One of the reasons for a vehicle to pull or skid to the side when braking is a malfunction of the brake pressure regulator (also called the “sorcerer”). The most common causes of pressure regulator malfunction are brake fluid leakage, air in the brake system, damage to the rubber seal, damage to the rubber hose. In some cases, pumping air from the brake system, replacing the seal or hose will help, however, in most cases the problem can only be solved by replacement.
You can replace the sorcerer in the car yourself; for this you need a household set of tools - a wrench and pliers. The brake system of the Zhiguli is one of the most primitive in the world, and even if the driver has never done this before, then if you follow the instructions, he will have a minimum of problems during replacement (if any).
How to replace the brake pressure regulator in a VAZ 2110?
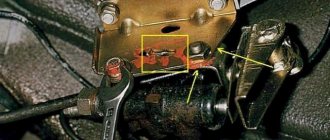
1. The first thing to do is to release the regulator drive lever; to do this, lift the bracket up. If necessary, use a screwdriver to loosen the earring bracket. All manipulations are performed with a key of 10.
2. After disconnecting the lever, carefully remove the earring bracket.
4. Unscrew the front bolt securing the bracket with the regulator.
5. We unscrew the rear bolt, which we hold the regulator on the side of the bracket, after which we remove the regulator (sorcerer), without unscrewing the drive.
6. If you need to replace drive parts, unscrew the bolt that holds the locking lever and disconnect the drive lever from the elastic lever.
7. When you connect the drive lever to the elastic lever, following the sequence, the clamp fork should fit into the groove on the elastic lever.
8. Next, install the brake pressure regulator in the same order as it was removed. Please note that the front mounting bolt is slightly longer than the rear one.
9. When replacing, it may be that the lever spring begins to protrude, thereby interfering with the installation of the regulator. To avoid problems, move the drive lever as far forward as possible beyond the protrusion.
10. Installation is complete, now crimp the earring brackets with pliers. To make sure that the system is working, pump and adjust the pressure.
Video about removing (removing) the sorcerer on a Renault Logan car:
Bleeding brakes on VAZ 2110, VAZ 2111, VAZ 2112
Welcome! Bleeding the brakes is a mandatory thing after replacing any unit in the hydraulic brake drive; by the way, this even applies to simply replacing the brake fluid (If it had to be completely drained), after which the brake system also needs to be bled, but few people know how to do this correctly, Therefore, especially for such people, we wrote a detailed article where we described everything down to the smallest detail, so, as they say, read and understand.
Note! In order to bleed the brakes, you will need to take with you: An assistant, since it will be much easier to bleed the brakes with him than alone, and you will also need to stock up on a small container (0.5 liter bottle, from some kind of lemonade) into which a little new brake fluid will be poured, but more on that a little later, and you will also need to take with you a hose of suitable length and diameter, but more on that later, in general, before immediately starting work and preparing the tools, first Read the article in full and only then prepare your things for work!
Summary:
When should you bleed your brakes? They require bleeding only if there is a depressurization somewhere in the brake system, and as we know from school, depressurization is a phenomenon when a tear occurs somewhere in the system, a breakdown that spoils the entire tightness of the system and in connection with this disrupts the operation of this system, for example, the tightness in the brake system may disappear if any brake hose is torn or after the fluid in the brake reservoir completely flows out of it and the reservoir remains open.
Note! By the way, it is not difficult to understand that the system has become depressurized, or in other words, air has gotten into it, firstly, the brakes in your car after air gets into the system will immediately begin to work worse, that is, the brake pedal travel will increase, but at the same time it will become easier to press than this happened earlier and the car will become much worse at braking, although this only depends on how depressurized your system is; if a lot of air gets into it, then the brakes can easily fail completely and, as they say, there will be no brakes at all!
Adjusting the brake pressure regulator (sorcerer)
1. Place the car on the inspection ditch and press the rear part of the car several times (with a force of about 40–50 kgf) to set the rear suspension to the middle position.
2. Loosen the front bolt securing the regulator to the bracket.
3. Using the wire as a feeler gauge, adjust the bracket so that the gap between the drive lever and the lever spring is 2.0–2.1 mm.
4. To do this, move the drive lever by the protrusion. In this position, tighten the bolt.
5. If the pressure regulator is correctly adjusted, when braking from a speed of about 40 km/h on a horizontal section of the road with a hard surface, the front wheels should lock slightly earlier than the rear (this can be determined by an observer outside the car). Otherwise, increase the gap (if the rear wheels lock earlier than the front ones) or decrease it (if the rear wheels lock much later than the front ones). After this, check the adjustment again by braking and repeat if necessary.
How to bleed the brakes, aka the braking system on a VAZ 2110-VAZ 2112?
Note! Before you get to work, remember one thing for yourself, in cars of the tenth family the brake system is built in such a way that the contours do not go along one horizontal line like on the classics, but diagonally, for some these words mean little because not everyone will understand them, let's explain all these points in detail. To begin with, let's move a little away from the cars of the tenth family and talk about the classics, as many already know, the classics are the very first family of cars that appeared at the plant, later there were nines, tens, etc. (Read the continuation in the “Important!” section at the very bottom of the article)
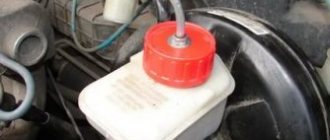
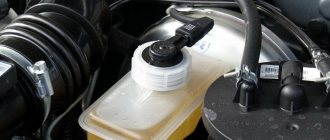
1) First, you will need to drive the car into the inspection hole and then open the hood and find the brake fluid reservoir there (shown with an arrow in the photo below), you open this reservoir by unscrewing the cap and then add it to the MAX mark new brake fluid.
Note! Do not under any circumstances add any other liquid, namely liquid from another manufacturer (Even if the composition is the same), and especially not underfill liquid of a different brand, because different additives are added to each liquid, and each manufacturer has their own, and therefore if you If you mix them, then the mixing will occur, thereby possibly ruining the brake system of your car, leading to corrosion, or the brakes will simply become ineffective! (If you don’t know what kind of fluid is in your reservoir, then replace the brake fluid; for information on how to replace it, see the article entitled: “Replacing brake fluid on a VAZ”)
Why do you need a brake force regulator?
The function of the regulator is to temporarily reduce the braking force during heavy braking. The fact is that force evenly distributed on the rear and front axles can lead to a skid of the car. If the rear brakes start working a little later and weaker than the front ones, this does not happen.
Based on the above, we can conclude that the sorcerer is an element of the car’s safety system, partly preserving its stability on the road when the brake pedal is pressed in an emergency. On modern models, this function is performed by ABS. That is why there is no need today to use a technically outdated device in production.
What is a sorcerer for? Is it worth cleaning it up!?
Since ancient times, a brake pressure regulator has been installed on Soviet cars; in colloquial language it is called a sorcerer. This small invention serves to distribute the braking force of the wheels, although it is not for nothing that it was nicknamed the sorcerer because of its unpredictability. If the sorcerer is not working properly, when braking, the car may skid to the side or the brakes may not be effective. Incorrect braking can also be caused by incorrect settings of the sorcerer. The front wheels always start braking, and then the rear ones, but the transition delay time depends on the sorcerer.
To properly configure the sorcerer, load the rear of the car halfway, that is, as much as you usually carry, including passengers, divide in half. We climb into the inspection hole and, using any object two millimeters thick, create a gap between the plate and the sorcerer.
The sorcerer may be faulty due to souring of the rod or internal blockage; it is better not to delay repairs, because faulty brakes are dangerous!!!
When replacing the sorcerer, only the rear brake cylinders need to be bled. To bleed the brakes, unscrew the nipple (not completely) from the inside of the wheel, ask an assistant to press the brake pedal, and bleed air from the system. We press the brake pedal with three long presses and on the fourth press we press the pedal, at this time we loosen the nipple and then tighten it again.
You can remove the sorcerer at your own risk, but at the same time you will have an even distribution of braking force on all four wheels, which will need to be taken into account when braking. The sorcerer can be replaced with a tee (2101-3506091), or bypassed using two brake hoses from a VAZ 2108.
Pinout of the sorcerer tubes:
1. Highway
2. Right wheel
3. Left wheel
4. Highway
When hooking up brake hoses from a VAZ 2108, you just need to connect 1 and 2, 3 and 4. Using a tee, we combine 4 and 1 and hook up 2.3 into the tee.
Personally, I do not recommend removing the sorcerer, and if it is not working properly, then it is better to simply replace it with a new one.
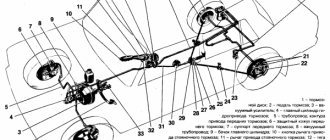
How does a sorcerer work?
The regulator itself consists of a cylinder, valve, spring and rod. The latter is connected to the rear beam, which ensures the operation of the VAZ-2109 sorcerer. Also, brake fluid circuits pass through the rear brake pressure regulator. For their mounting on the device there are 4 threaded entries. » alt=»»> How does the sorcerer regulator work on a VAZ? During emergency braking, the front of the car is pressed to the ground, and the rear is raised. This causes the regulator rod to move, which blocks the flow of fluid to the rear cylinders. A spring located under the valve prevents it from closing completely. Therefore, the rear mechanisms still work, but later and weaker than the front ones.
What is a sorcerer on a VAZ 2114
As just said, every machine has such an important element as a sorcerer. Its correct name sounds like a rear brake pressure regulator. The sorcerer of the VAZ 2114 is responsible for reducing the braking distance and for the absence of skidding during emergency braking, which is extremely important both for the safety of the car and for the safety of its passengers.
This element should be adjusted after any intervention in the car that entailed replacing springs or other suspension elements (which, in turn, could lead to a change in ground clearance). In some cases, it may be necessary not only to make adjustments, but also to completely replace the sorcerer with a VAZ 2114.
You can determine that this part has become unusable by three signs:
- The cuffs have worn out, resulting in a leak of brake fluid.
- In case of sudden braking, the car began to skid strongly.
- The piston of the device has soured.
Possible malfunctions of the regulator
In general, there are few malfunctions that can occur in the sorcerer. These include:
- Valve jamming;
- Misalignment of position;
- Brake fluid leaks.
A deregulated sorcerer can be adjusted. You can determine the need for adjustment by the behavior of the car when you press the brake. If the regulator is set incorrectly, the car starts to toss to the side.
If the valve jams or fluid leaks, the mechanism must be replaced. Theoretically, it can be repaired. However, the process of such repairs is complex and expensive, which makes it unprofitable.
Setting the brake force regulator
Adjustment of the sorcerer should be done on an overpass or inspection hole. At the same time, the car is unloaded and driven to the work site. To perform the manipulation you will need:
- Socket wrench 13 or corresponding socket;
- Drill diameter 2 mm.
To adjust the sorcerer, use a wrench to loosen the bolt securing it to the lever bracket. Next, use a screwdriver to move the bracket until the resulting gap allows you to insert a prepared two-millimeter drill into it. After this, the bolt is tightened.
Note: the brake pressure regulator of the VAZ-2110 and previous VAZ models turns sour during operation so that it is not possible to move its bracket. In such a situation, you should pour WD-40 liquid over the rusted area, wait 15-30 minutes, and then use a hammer to move the part to the side using a soft drift.
Examination
The operation of the VAZ-2109, 2110 and other AvtoVAZ models is checked on the move, in closed areas. To do this, accelerate the car to a speed of 40 km/h and sharply press the brake. The rear wheels should lock 1/2 second later than the front wheels.
The wheels are monitored by an assistant located outside the car. If wheel locking occurs noticeably later or does not occur at all, and also if the rear axle is locked simultaneously with the front, the sorcerer adjustment procedure is repeated.
To increase the response time of the rear brakes, the gap between the adjuster and the bracket is increased; to shorten it, it is reduced accordingly.
"LADA KALINA"
We set the regulator so that the rear is slightly late in locking the wheels. With this setting and partial load, the car needed only 27 m to stop. Fully loaded - 29.5 m. There are slight difficulties in preventing the front wheels from skidding. We reduce the gap in the regulator to zero - the half-empty Kalina stops after 31.8 m. The braking distance increases by 4.8 m, accompanied by a sharp blocking of the front wheels. The loaded one slows down after 35.2 m, the deterioration is even greater - 5.7 m! The pedal effort is increased and the brakes become noticeably hot.
Now we move the adjuster so that the rear brakes work as efficiently as possible. At partial load, the rear wheels suddenly lock and the car drifts off course—you have to release the pedal. On the verge of blocking it is very difficult to brake. The result is 30 m, which is 3 m worse than the “norm”. Full load gave a result of 26.9 m, which is 2.6 m better than the base (29.5 m). There are no comments regarding deceleration control. At the basic position of the regulator, the braking distance increases with increasing load. At partial load the spread of results is 4.8 m, so the base position is most effective. When you deviate from it in any direction, the braking distance increases.
On a fully loaded vehicle, depending on the position of the regulator, the spread of the braking distance is 8.3 m.
How does the brake force regulator - sorcerer - work?
What is the "Sorcerer" for? This is a rather mysterious detail and no one has found a clear answer to this question. Perhaps this is why he was colloquially called a “sorcerer”, because he works magically. At its core, this part performs a similar function to the anti-lock braking system, preventing the wheels of the rear axle from locking during emergency braking. Its operation directly depends on the position of the rear axle relative to the car body: when braking sharply, the car nose-dives, and the rear part of the body rises, after which the “witchcraft” begins - the brake force regulator partially blocks the flow of fluid, and the rear wheels do not lock.
Of course, in ideal conditions (dry asphalt, straight road, working brake system and chassis), the brake force regulator does its job perfectly. But such conditions do not always occur.
Sorcerer - brake regulator
The sorcerer is popularly called the brake force regulator. This is a mechanism that increases the efficiency of the car's braking system. It is screwed to the bottom of the body. Depending on the roll of the car, he decides how hard to brake the rear wheels.
Drivers have nicknamed the brake force regulator the sorcerer for the incomprehensible principle of its operation. It “comes to life” in one case, when, under sharp braking, the car nods and its rear part shoots up. When braking, the distance between the rear axle and the bottom increases, the lever from the axle releases the piston, it moves and blocks access to the brake fluid to the rear wheels and they continue to spin without being blocked. This means the car won't skid. In all other cases, the sorcerer rests.
The device of the sorcerer is quite simple: a cylinder with inlet and outlet fittings for brake fluid, a piston with a rod, sealing rings and a spring that prevents the piston from completely blocking access to the brake fluid; the wheels must slow down at least a little. With a working regulator at a speed of 70 km/h, the braking distance of a loaded car will be approximately 14 meters, and an empty one - 12 meters. The car brakes without skidding or skidding.
With a faulty sorcerer, an empty car slows down for about 10 meters, a loaded one - 12. But! Even on dry asphalt, locking the rear wheels causes skidding and skidding. The car may turn across the road. By the way, on an overloaded machine, the regulator may not work, even if it is working properly. The load will not allow the body to rise and the mechanism will not turn on. A malfunction is possible when the sorcerer does not allow brake fluid to flow through at all, i.e. There are basically no rear brakes. An empty car stops after 15 meters, a loaded car stops after 17. This is the longest braking distance. So it’s not far from the accident. The same thing will happen if you raise the body with spacers. The regulator perceives the resulting roll as an emergency and turns off the brakes.
The sorcerer sits under the bottom, and there is dirt there. Despite the boot, the most unprotected place is between the rod and the cylinder. Here the sorcerer turns sour, the piston jams and stops working. Yes, this is a small and capricious part, it is afraid of dirt and does not like suspension tuning, but a working regulator can protect you from an accident. And to extend its life, at least once a season, climb under the body and clean it of adhering dirt.
Add. information
More about the car:
- Car horns
- Wheel rims for cars
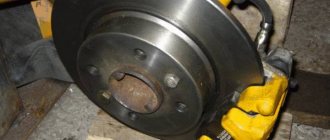
- Disc and drum brakes
- Engine cooling system and its operation
- DIY car underbody repair
- How to balance a wheel
- Car names and emblems
Signs of a malfunctioning brake force regulator
“Sorcerer”, as an element of the braking system, has a number of signs of malfunction that manifest themselves during emergency braking. Let's look at the first symptoms that call for checking the regulator:
- When braking hard, the car pulls to the side.
- Reduced braking efficiency (feels).
- “Bouncing” and jerking of the car when braking.
In such cases, it is necessary to check not only the “sorcerer”, but also other components of the brake system and chassis. But, since we are talking about the brake force regulator on the VAZ, we will consider this particular mechanism. After placing the car on a lift, pay attention to the regulator. The most common sign of its malfunction is the presence of brake fluid leaks. In case of any malfunction, the best solution is to replace the sorcerer. But, if you still decide to repair the brake force regulator, then below we have prepared brief instructions for this action.
How to check and disassemble the master brake cylinder of a VAZ
Replacing a VAZ 2110 heater radiator: should I install an old or a new model?
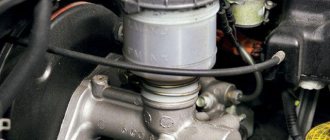
Before repairing the brake system, the brake master cylinder must be repaired first. This is done after the initial diagnosis.
If we talk about the design of the master brake cylinder, we can consider the example of one of the most popular brake systems - the hydraulic drive of the VAZ 2-circuit brake system. It is the knowledge of this device, which is really simple, that will help carry out repairs.
It should be noted right away that the primary and secondary piston assemblies cannot be repaired. These will need to be replaced with new units when the new cylinder is assembled.
Hydraulic drive includes the following parts:
- master brake cylinder;
- vacuum brake booster;
- brake pedal;
- hoses and pipelines for moving brake fluid;
- wheel (working) brake cylinders. If you repair the master brake cylinder, it is not necessary to repair the slave brake cylinder;
- expansion tank.
If the brake system is working properly, the pressure will be the same in both circuits. If brake fluid leaks from one circuit, the second is capable of providing braking.
Before repairing the master brake cylinder, you need to diagnose it. Before diagnosing, you need to know what methods are available for this. If you have to repair the brake system, for example, the rear or front brake cylinder. All procedures must begin with checking the GTZ.
The main malfunctions of the master cylinder are often due to the fact that the brake fluid is unevenly distributed throughout the circuits. For example, this may be due to brake fluid leaking or the brake system being air-filled. If we take everything into account, then each pair of wheels is responsible for its own circuit; the pressure may drop in one circuit, but this will not be a problem.
The second circuit will work in any case. The second pair of wheels will slow down the car. But this will reduce braking efficiency. This does not mean that in normal mode the car will not work with a faulty GTZ. It is better not to put off repairing the brake master cylinder for a long time.
First, you should pay attention to the indicators of control devices in the cabin - if the brake system is faulty, the warning lamp indicator will light up;
- You need to visually check the master cylinder body to see if there are any brake fluid leaks on it, especially in those places where the pipeline connects to the circuit outlets;
- the GTZ housing also needs to be checked for mechanical damage;
- you need to measure the pressure in the circuits: attach pressure gauges to the holes in the circuits and measure the pressure. The obtained figures must be compared with the control ones, which are indicated in the operating and repair instructions for the vehicle. You can see that the circuit is faulty.
After the external inspection has been carried out, it is necessary to disassemble the GTZ. You need to understand that it will not be possible to check the GTZ for leaks in a garage, since a special stand is needed.
After you begin disassembling the master cylinder, all parts must be washed with alcohol. All rubber products must be replaced with new ones. To do this, there are a variety of repair kits for all brands of cars. When repairing brakes, you don’t need to think that everything is fine and can still serve.
If, as a result of disassembly, it becomes clear that the gaskets (rubber-technical products) are swollen, then the fault will most likely be the brake fluid, which may be of poor quality or may not be suitable for the car. Also, the liquid may be unusable due to contamination.
Under no circumstances should you attempt to repair the GTZ pressure regulator. They change it as a set, as manufacturers set the parameters.
It is important that if you completely change the master brake cylinder or dismantle it, you must remember to pump out the brake fluid from the distribution tank and plug all the pipelines. It is also worth remembering that after replacing or repairing the brake system, the brake system must be bled
Completely replacing the gas turbine engine with a new one is far from one of the most economical repair options. In this case, it is better to calculate the costs of repairs, purchasing a repair kit and purchasing components.
Sorcerer repair
In order to repair the brake force regulator, you need to perform a number of actions:
Thanks for subscribing!
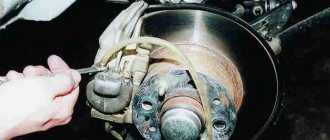
- Dismantling. We remove the entire assembly, using wrenches 10 and 13. The brake pipes are unscrewed, the brake fluid is drained and plugs are installed in the pipes. Next, the “sorcerer” body is removed, which is attached to the bottom with two nuts.
- Diagnostics and replacement of “sorcerer” parts. Carefully examine the surface of the “Sorcerer”. If necessary, replace faulty parts (sealing rubber bands) using a repair kit. A soured piston cannot be repaired and requires a complete replacement of the unit.
- Installation of the sorcerer. Reassemble and adjust the part in reverse order and bleed the brake system. Add brake fluid.
Repairing this unit is a rather dubious decision. Therefore, we strongly recommend that in case of any malfunction, you perform such an action as replacing the brake force regulator.
Adjusting the braking forces of Lada Vesta
The operating principle of the system that regulates and distributes brake fluid pressure on Lada Vesta cars is fundamentally different from previous models, and there is no “witchcraft” in it. The Lada Vesta brake pressure regulator is directly connected to the ABS system and is electronically regulated depending on the speed of each wheel.
The ABS control unit transmits signals from speed sensors and analyzes the situation. The system “understands” any skidding and allows you to distribute the braking force with maximum efficiency. The pressure is controlled by the valves in the ABS hydraulic block, and there is no need for any magic. In addition, the electronics itself detects all malfunctions and reports them to the driver using a special lamp on the dashboard.
Test results
The optimal adjustment of the “sorcerer” corresponds to the average factory settings, and a few percent can be gained only with individual correction for specific brake pads, tires, vehicle loading and road conditions. But it’s unlikely that anyone will start every trip with a test run.
It would seem that it is possible to reduce the braking distance by increasing the pressure in the rear brakes, but this threatens a loss of stability due to early blocking of the rear wheels. And today only ABS can provide maximum braking efficiency.
On a fully loaded car, depending on the position of the regulator, the spread of the braking distance is 8.3 m. The best results, as on the Niva, are with increasing pressure in the rear brakes. However, on a slippery road, even in smooth turns, early locking of the rear wheels is possible, leading to a skid. And at partial load, with the regulator position different from the base one, the braking distance only increases.
A brake force regulator, or sorcerer in common parlance, is a mechanical device designed to relieve excess pressure in the rear drum brakes.
On VAZ-2109, VAZ-2108, VAZ-2114 and other front-wheel drive models produced in Togliatti, it was installed in the rear left part of the body, under the bottom, in front of the rear suspension beam. The brake pressure regulator on the VAZ-2107 model and other “classics” is located on the right in the direction of travel of the car.
New vehicles equipped with ABS and EBD do not use the sorcerer.