Problems when paying with bank cards
Sometimes difficulties may arise when paying with Visa/MasterCard bank cards. The most common of them:
- There is a restriction on the card for paying for online purchases
- A plastic card is not intended for making payments online.
- The plastic card is not activated for making payments online.
- There are not enough funds on the plastic card.
In order to solve these problems, you need to call or write to the technical support of the bank where you are served. Bank specialists will help you resolve them and make payments.
That's basically it. The entire process of paying for a book in PDF format on car repair on our website takes 1-2 minutes.
If you still have any questions, you can ask them using the feedback form, or write us an email at
How to adjust the sorcerer on a VAZ 2114
To correctly distribute workloads between front and rear drives, it is necessary to manually adjust the operation of the device. The adjustment principle is as follows. The preliminary gap between the end of the piston and the plate is from two to three millimeters, but in your case this parameter must be determined “experimentally”. To make more precise adjustments, you need to move the regulator along the bracket.
The clearance parameters are selected depending on the behavior of the wheels in each specific case. For example: - There is no skidding of the rear wheels - we reduce the gap. — When triggered early (skidding), we increase the distance.
"CHEVROLE-NIVA"
By the way, before testing tires on cars without ABS, each time we slightly adjust the regulator taking into account the road condition (snow, ice, asphalt), ensuring that the rear wheels lock a little later than the front ones. Let's not break tradition. Our Shniva found the gap between the cheeks of the regulator to be 16 mm, which was adjusted using a stop screw.
Several brakings, and the braking distance from 80 km/h for a car with a partial load is determined: 34.4 m. With a full load... 33.6! Almost a meter shorter! At the same time, the driver noted a heavier pedal and rapid heating of the brakes, which required cooling before each measurement. Let’s remember these parameters and make adjustments to the “sorcerer” adjustment. First, let's reduce the gap to 8 mm. Now the regulator significantly limits the pressure in the rear brakes, transferring almost all the hard work to the front ones.
Braking has become more difficult, keeping the front wheels from skidding is not so easy - they lock very sharply and the car, naturally, loses control. However, the result, to our surprise, is the same as in the basic version: 34.4 m. At full load, you have to press the pedal much harder, the front brakes begin to overheat. The result is 37.8 m. This is 4.2 m more than with the basic adjustment (33.6 m).
Replacing the brake pressure regulator on VAZ 2108, VAZ 2109, VAZ 21099
Welcome! Today you will read detailed instructions on how to replace the sorcerer on cars of the Samara family. The first question you ask yourself will sound like this: “What kind of sorcerer, I was looking for instructions for replacing the pressure regulator?” We will explain everything to you in order. The so-called name “Sorcerer” came from the people, and “Brake Pressure Regulator” is its real name.
Note! To replace the pressure regulator, you will need the following tools: First, be sure to stock up on a screwdriver and a small set of basic wrenches. And also for the convenience of unscrewing some nuts, you can stock up on an extension cord with a union head!
- Replacing the brake pressure regulator
- To remove the regulator together with the bracket
- To remove the regulator without bracket
- Disassembling the brake pressure regulator
- Additional video clip
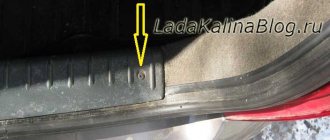
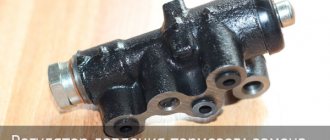
Where is the brake pressure regulator located? The pressure regulator is located on the left side of the body compartment, closer to the rear wheel. But to find it you will need to know what it looks like, if you still don’t understand what it looks like, then look at the very first photo at the top of the article. If you already know what it looks like, then look at the bottom photo where the red arrow indicates its location.
When should you change your brake pressure regulator? The regulator must be replaced if:
Its breakdowns can be very easily identified. Usually, with a faulty regulator, when braking sharply, the car skids, which can be very life-threatening if you are driving on the highway.
Note! With a working regulator, when braking sharply, the car does not go anywhere, that is, it brakes strictly in a straight line, but there is one “But!” The pressure regulator only works when, when braking, the nose of the car goes down and its rear part rises. Otherwise, the sorcerer will not work!
Replacing the brake pressure regulator:
Note! It is recommended to replace a faulty sorcerer with a new assembled one!
Removal: 1) First you will need to drive your car into the inspection hole.
2) Next, use a screwdriver to slightly lift up the bracket of the lever earring; for clarity, it is indicated by a red arrow.
3) Then remove the lever from the hole in the shackle and, as a result, remove the shackle bracket from the lever.
4) Then, using a wrench, unscrew the fittings of all pipes connected to the pressure regulator.
Note! Before unscrewing them, be sure to mark which tube goes where. If you have not done this, then when installing a new sorcerer, watch the video at the very bottom, which describes the correct connection of the tubes!
5) And after unscrewing the fittings, disconnect the brake hose tubes from the regulator.
Note! It is best to plug the holes in the brake pipes with something, because otherwise fluid will leak from the hydraulic drive of the system!
To remove the regulator together with the bracket: 1) Using an extension with a union head, unscrew the two nuts that secure the bracket to the body and then remove it together with the regulator.
To remove the regulator without a bracket: 1) Using a wrench, unscrew the two bolts that secure the sorcerer body to the bracket and then remove the regulator separately.
Installation: 1) Installation of a new brake pressure regulator is carried out in the reverse order of removal.
Note! To connect the tubes to the regulator, use the video located at the bottom of the article!
After final installation of the regulator, be sure to bleed the brake system! (How to bleed the brakes, see the article: “Bleeding the brakes on a VAZ”)
And finally, adjust the regulator drive! (For how to adjust the regulator, see the article “Adjusting the rear brake pressure regulator”)
Disassembling the brake pressure regulator:
Disassembly is carried out only to replace individual parts, but as mentioned above, it is best to replace the sorcerer as an assembly and not individually.
1) First, remove the drive arms and bracket from the regulator.
2) Next, taking the bracket in your hands, use a wrench to unscrew the bolt that secures the latch.
Note! After unscrewing the bolt, remove the clamp that holds the elastic lever!
3) Finally, disconnect both drive levers from each other.
Additional video: Don’t know where to screw the brake pipes onto the sorcerer? If not, then watch a video specially prepared for you, in which everything is indicated and explained in detail.
Vaz-Russia.ru
Adjusting the sorcerer Lada Kalina
Remove the bracket along with the earring from the lever.
11. Using a 8mm wrench, remove the bolt securing the lever lock.
12. Remove the lever retainer and disconnect the drive lever from the elastic lever.
13. When connecting the drive lever to the elastic lever, the clamp fork should fit into the groove on the elastic lever.
14. Install the regulator in the reverse order of removal. Please note that the front mounting bolt is longer than the rear.
15. After installing the regulator, crimp the earring bracket with pliers.
Then bleed the brake system and, if necessary, adjust the pressure regulator drive
Replacement
Replacing the sorcerer with a VAZ-2109 is performed as follows. You will need a 13 mm wrench, a powerful screwdriver, and a special wrench for unscrewing the brake pipes. Before work, you need to clean the part from rust, pour it with WD-40 or a similar liquid and wait.
You need to start by unscrewing the bolt that secures the bracket to the spring. Then unscrew the brake pipes. Having unscrewed the fittings, unscrew the bolts securing the part to the body and the sorcerer can be removed.
Where is the brake pressure regulator on a VAZ?
On many VAZ cars, the sorcerer is located mainly in the rear of the car, but so that you understand immediately and in the future you do not have questions about this, we note that on VAZ cars with the ABS system the sorcerer is not installed.
If we take cars of modern production, such as: “Priora”, “Kalina”, “Granta” as well as “VAZ 2108-VAZ 2115” and other modern cars, then on them the sorcerer is mainly located on the left side, the detailed location of the sorcerer is indicated in the photo below:
If you take cars of the classic family, people also call them “Classics”, then on them the sorcerer is located in the right rear part of the car body, see the photo below for more details:
Note! The location of the sorcerer is indicated by the number “1”!
How does a sorcerer work?
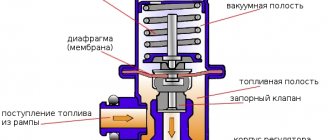
The regulator itself consists of a cylinder, valve, spring and rod. The latter is connected to the rear beam, which ensures the operation of the VAZ-2109 sorcerer. Also, brake fluid circuits pass through the rear brake pressure regulator. For their mounting on the device there are 4 threaded entries. » alt=»»> How does the sorcerer regulator work on a VAZ? During emergency braking, the front of the car is pressed to the ground, and the rear is raised. This causes the regulator rod to move, which blocks the flow of fluid to the rear cylinders. A spring located under the valve prevents it from closing completely. Therefore, the rear mechanisms still work, but later and weaker than the front ones.
The feasibility of installing a vacuum brake booster
The vacuum booster dramatically improves the driving comfort of the VAZ 2108. It reduces the pedal effort required to stop the car. All modern cars are equipped with a vacuum booster. Domestic and imported. Nowadays, it is impossible to imagine a car without a vacuum brake booster.
The amplifier is aggregated with the master brake cylinder and is mounted on a shield separating the engine compartment from the interior of the VAZ 2108. It is connected to the engine crankcase with a flexible hose to supply rarefied air necessary for the operation of the amplifier. A malfunction of the amplifier is clearly indicated by a noticeable increase in the force on the brake pedal. Braking acceleration decreases.
Continuing your trip with a broken amplifier is very risky.
You can drive to the nearest car service center with caution. A cracked hose can be wrapped with several layers of electrical tape. If replacing a cracked hose and check valve does not produce results, the unit must be replaced
If replacing the cracked hose and check valve does not produce results, the unit must be replaced.
Work on removing the amplifier is carried out in this order.
- Disconnect the negative battery terminal. De-energize the electrical system.
- Disconnect the wiring block from the hydraulic reservoir cap located on the brake master cylinder body.
- From the passenger compartment, remove the amplifier pusher pin using pliers. Disconnect the pusher.
- Disconnect the hose going to the engine crankcase.
- Unscrew the two nuts securing the brake master cylinder.
- Move the cylinder away from the amplifier housing. Leave it hanging from the metal hydraulic pipes.
- Unscrew the four nuts securing the amplifier bracket to the engine shield and carefully remove the amplifier.
- Unscrew the two nuts securing the amplifier to the bracket. Disconnect the bracket and amplifier.
Install the new VAZ 2108 vacuum booster in the reverse order.
Repair of brake pressure regulator Lada Kalina
It is recommended to replace a faulty pressure regulator as an assembly.
You will need: a flat-blade screwdriver, a 8- or 13-size wrench, a 13-size socket wrench (head), a special 10-size wrench for loosening the brake pipe nuts.
Using a screwdriver, remove the lock washer of the elastic arm of the regulator drive and the flat washer installed under it.
Disconnect the elastic arm with the shackle from the rear suspension beam.
To avoid having to adjust the pressure regulator drive during installation, mark the position of the drive lever relative to the bracket.
Place a container under the junction of the pipes with the regulator, since liquid will flow out from there, and use a special “10” wrench to unscrew the four nuts securing the brake pipes.
Disconnect the tubes from the regulator. Plug the pipe openings, for example, with protective caps for the wheel cylinder bleeder valves.
Label the tubes so as not to mix them up when installing the regulator later.
Using a 13mm wrench, remove the front bolt securing the regulator to the bracket
Using a 13mm wrench, remove the rear regulator mounting bolt.
Remove the regulator with drive from the vehicle.
This is what the pressure regulator and its drive look like when removed from the car
If it is necessary to replace drive parts, use a screwdriver to pry the earring bracket away from the elastic lever
Remove the bracket along with the earring from the lever.
Using a 8" wrench, unscrew the bolt securing the lever clamp.
Remove the lever retainer and disconnect the drive lever from the elastic lever.
When connecting the drive lever to the elastic lever, the clamp fork must fit into the groove on the elastic lever.
Install the regulator in the reverse order of removal. Please note that the front mounting bolt is longer than the rear.
After installing the regulator, crimp the earring bracket with pliers.
Then bleed the brake system and, if necessary, adjust the pressure regulator drive
Adjusting the pressure regulator drive
Incorrect adjustment of the pressure regulator drive can cause the vehicle to skid or pull to the side when braking, reducing braking efficiency.
You will need: a “13” key, wire with a diameter of 2.0–2.1 mm.
Place the car on the inspection ditch and press the rear of the car several times with a force of about 40–50 kgf to set the rear suspension to the middle position.
Loosen the front bolt securing the regulator to the bracket.
Using the wire as a feeler gauge, adjust the bracket so that the gap between the drive lever and the lever spring is 2.0–2.1 mm.
To do this, move the drive lever behind the protrusion.
In this position, tighten the bolt.
If the pressure regulator is adjusted correctly, when braking from a speed of about 40 km/h on a level section of paved road, the front wheels should lock slightly earlier than the rear wheels (this can be determined by an observer outside the vehicle).
Otherwise, increase the gap (if the rear wheels lock earlier than the front ones) or decrease it (if the rear wheels lock much later than the front ones).
After this, check the adjustment again by braking and repeat if necessary.
Sorcerer VAZ 2110 photo
The braking system of a car is an important safety element. Its good condition can save lives in case of road accidents. One of the most peculiar components is the rear brake pressure regulator, colloquially known as the sorcerer. This name appeared with the first Zhiguli cars because of its mystery and unknown operating principle. Witch
The VAZ
2110
has a catalog number starting with 2108, and is used, in addition to the tenth family, on other VAZ cars: Samara, Kalina and Priora.
Checking Symptoms of a sorcerer malfunction on a VAZ 2110
appear when braking:
Pulling the car to the side; Skidding; Insufficient brake performance. At VAZ 2110
The sorcerer is located on a bracket under the bottom, slightly to the left, in the area of the rear wheels. Work
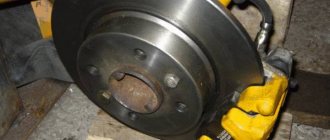
It’s better to use it on a lift, overpass or inspection pit. The main defects are easily detected during external inspection. Brake fluid leaks indicate wear or damage to the seals.
If the sorcerer's piston has turned sour and does not move, then this is also determined visually when the assistant smoothly presses the brake pedal several times. In both cases, repair is impractical and replacement is necessary.
Everything is in order if the regulator is clean, the gap between the drive lever and the plate is 2 mm, the rod moves when the pedal is pressed. A good sorcerer must provide:
Uniformity of braking forces on the rear wheels; Rear brakes engage later than front brakes; Adjustment of this delay, depending on the vehicle load. Removal and installation To replace the sorcerer with a VAZ 2110
you need wrenches for 13 and 10. Instead of 10, a special wrench for brake fittings is very desirable; it is more gentle than a regular open-end wrench when handling soft copper nuts due to the large contact area.
By moving the regulator, a gap of 2 mm is achieved between the elastic plate (the rod rests against it) and the lever. The spring resistance is high, you need to use a “mounter” or a special device. The bolts are tightened and the gap is checked with a feeler gauge. In the absence of a probe, you can use a drill with a diameter of 2 mm and even a two-ruble coin. Further checking is carried out on the go. When braking from a speed of 40 km/h, on your own or with the help of a partner outside the car, evaluate the moment when the rear mechanisms begin to operate compared to the front ones. If it needs to be done later, then the gap must be increased, and if it is smaller, then, accordingly, reduced.
Useful tips The effectiveness of rear axle braking, in addition to the sorcerer, is affected by:
Drum wear; Condition and quality of the pads; Adjusting the handbrake cable; Faulty brake hoses. Therefore, it is necessary to check all elements.
On the Internet there are tips for improving the brake system of VAZs: replacing the sorcerer with a simple tee, selecting the thickness of the sealing washers in the regulator, converting from a diagonal system to a dual-circuit front-rear axle. But according to the Road Traffic Regulations, it is prohibited to make any design changes to the car components that directly affect safety depends. The best option is qualified technical service, timely identification and elimination of faults.
One of the most mysterious, but no less important parts of the car is the brake force regulator (VAZ 2114 sorcerer).
The importance of this part is that it regulates the behavior of the car under different braking conditions. When the regulator operates correctly, the braking distance is reduced, skidding and skidding are prevented
READ Where is the horn relay for VAZ 2110
Malfunctions of the sorcerer on viburnum
The braking system of a car is an important safety element.
Its good condition can save lives in case of road accidents. One of the most peculiar components is the rear brake pressure regulator, colloquially known as the sorcerer. This name appeared with the first Zhiguli cars because of its mystery and unknown operating principle. The VAZ 2110 sorcerer has a catalog number starting with 2108, and is used, in addition to the tenth family, on other VAZ cars: Samara, Kalina and Priora.
Check
Symptoms of a malfunction of the sorcerer on the VAZ 2110 appear when braking:
The car pulls to the side; Skidding; Insufficient brake performance. The VAZ 2110 has a sorcerer on a bracket under the bottom, slightly to the left, in the area of the rear wheels. It is better to work with it on a lift, overpass or inspection hole. The main defects are easily detected during external inspection. Brake fluid leaks indicate wear or damage to the seals.
If the sorcerer's piston has turned sour and does not move, then this is also determined visually when the assistant smoothly presses the brake pedal several times. In both cases, repair is impractical and replacement is necessary.
Everything is in order if the regulator is clean, the gap between the drive lever and the plate is 2 mm, the rod moves when the pedal is pressed.
A working sorcerer must ensure:
Uniformity of braking forces on the rear wheels; Rear brakes engage later than front brakes; Adjustment of this delay, depending on the vehicle load.
Removal and installation
To replace the sorcerer on a VAZ 2110, you need wrenches 13 and 10. Instead of 10, a special wrench for brake fittings is very desirable; it is more gentle than a regular open-end wrench when handling soft copper nuts due to the large contact area.
This type of wrench is similar to a socket wrench, but has a slot for inserting a tube into it and high jaws.
You need about half a liter of brake fluid and 4 rubber plugs for the brake hoses. AvtoVAZ cast iron and Belarusian aluminum regulators are sold in VAZ spare parts stores. Russian VIS is usually more reliable, Belarusian Fenox is lighter and cheaper. The conditions under the bottom are unfavorable for the sorcerer, so you first need to clean the dirt with a stiff brush and moisten the threaded connections with a penetrating lubricant such as WD-40. The fixing bracket is removed from the rear beam; if necessary, you can use a powerful screwdriver to loosen it. The brake pipes are carefully unscrewed, marked for reassembly, and closed with rubber plugs. To dismantle the regulator, it is more convenient to unscrew the two nuts securing the bracket to the bottom and remove the sorcerer assembly. During installation, the regulator fastening bolts (attention, the front bolt is longer than the rear), through elongated holes, are not fully tightened to the bracket to ensure movement during adjustment. Assembly is carried out in the reverse order; for reliability, the clamp-clamp on the beam must be crimped with pliers. To remove air from the system, it is necessary to bleed the brakes after work.
It’s easier to do this together, the process has been described many times, including for the VAZ 2110-2112. When replacing the sorcerer, it is enough to bleed only the rear brakes. Adjustment
The work of the sorcerer on VAZ cars depends on the position of the body.
Therefore, adjustment must be performed not only during each maintenance, but also when replacing shock absorbers and springs, after repairing the rear beam and, of course, replacing the sorcerer itself. The car is placed on an overpass or inspection hole, to install the suspension in an equilibrium position, it swings a couple of times hands trunk. Use a 13mm wrench to loosen the fastening bolts to the bracket; the front bolt is not visible from below, you need to find it by touch. By moving the regulator, a gap of 2 mm is achieved between the elastic plate (the rod rests against it) and the lever.
The spring resistance is high, you need to use a “mounter” or a special device. The bolts are tightened and the gap is checked with a feeler gauge. In the absence of a probe, you can use a drill with a diameter of 2 mm and even a two-ruble coin. Further checking is carried out on the go. When braking from a speed of 40 km/h, on your own or with the help of a partner outside the car, evaluate the moment when the rear mechanisms begin to operate compared to the front ones. If it needs to be done later, then the gap must be increased, and if it is smaller, then, accordingly, reduced.
Useful tips
The effectiveness of rear axle braking, in addition to the sorcerer, is affected by:
FakeHeader
Comments 28
And what tubes should be connected to each other? Can I have a diagram?
Honestly, I can’t answer you exactly, since I already bought one, and just when I changed the hoses for iron, I connected them as they were, who knows how it is, because they have circuits arranged on the GTZ, where is the back where is the front, I got it right now, not cross to cross, as in stock, but the front, rear, and GTZ will be changed in the same way as it was, I’ll connect everything, I want from the new Niva, VUT and GTZ) in general it will be superb, I’m waiting for my system to run out)
This means that the tubes on the GTZ have been swapped as well.
maybe x.z. I can’t say anything, but I think it certainly won’t get worse)
The sorcerer threw it out. When pressed smoothly, the butt grips faster. I read on the drive that it is also necessary to swap the circuits on the GTZ.
I didn’t notice anything like that, I didn’t even know that I didn’t have a sorcerer))) until I decided to check just because I don’t care about making rear brake pipes)) when I press it smoothly, it slows down as usual, when I press it hard, the car, according to passengers, gets stuck, but I still want something better, here and the GT from the new modernized Niva, in my plans, I really want it, but I live in Tatarstan, in a small town, where the evil, despicable garbage ((( will get along with the car
I haven't seen a car yet. And your front discs are perforated and notched. If so, what kind of pads do you use?
Yes, these are the wheels, Alnas, ATE pads, starting from the rear)
And what tubes should be connected to each other? Can I have a diagram?
Nobody suggested a diagram? otherwise I want to throw out the sorcerer, but I can’t find which tube to connect to which anywhere
Nope. But I think so.
Nobody suggested a diagram? otherwise I want to throw out the sorcerer, but I can’t find which tube to connect to which anywhere
Connect the tubes to each other. UAZ would be harmful
Nobody suggested a diagram? otherwise I want to throw out the sorcerer, but I can’t find which tube to connect to which anywhere
The adapters are there. I think I'll throw out the sorcerer in the summer. Just take an adapter so that there are threads on both sides M10×1.25
I understand that you can unscrew all 4 tubes from the sorcerer, of which 2 come from the GTZ and 2 are connected to the left and right rear wheels through the same adapter: GTZ tube - left rear tube, GTZ tube - right rear
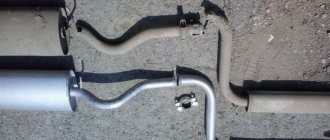
essentially the same as in the picture
Yes. There on the sorcerer itself there are arrows for entrances and exits
Damn, here you are))) I didn’t notice)))
How would I notice it? ))) the car brakes better than stock. Eee, but I thought it would come from 14th ventilated, perforated, brake discs and good pads, but it turns out I don’t even have this extra junk) it turns out that now I need to pump both rear brakes first, then both front ones, or vice versa, but not according to the book crisscross)
Haven’t you looked under the car even once in all this time? Have you looked at the condition of the bottom/sills and brake pipes?
Well, I wrote that I regularly climbed under the car, but didn’t look specifically at the place of the sorcerer)) there are some cuts from the factory crap, like anti-corrosion on the bottom, I regularly inspect, lubricate, bitumen mastic with anti-corrosion agent, tightened the handbrake a couple of times, changed the fuel filter, but that’s exactly what I didn’t look closely at this place)) I noticed what I already wrote only because I decided to look at the hoses that go to the beam)), because one of the front ones was completely sad)
"LADA KALINA"
We set the regulator so that the rear is slightly late in locking the wheels. With this setting and partial load, the car needed only 27 m to stop. Fully loaded - 29.5 m. There are slight difficulties in preventing the front wheels from skidding. We reduce the gap in the regulator to zero - the half-empty Kalina stops after 31.8 m. The braking distance increases by 4.8 m, accompanied by a sharp blocking of the front wheels. The loaded one slows down after 35.2 m, the deterioration is even greater - 5.7 m! The pedal effort is increased and the brakes become noticeably hot.
Now we move the adjuster so that the rear brakes work as efficiently as possible. At partial load, the rear wheels suddenly lock and the car drifts off course—you have to release the pedal. On the verge of blocking it is very difficult to brake. The result is 30 m, which is 3 m worse than the “norm”. Full load gave a result of 26.9 m, which is 2.6 m better than the base (29.5 m). There are no comments regarding deceleration control. At the basic position of the regulator, the braking distance increases with increasing load. At partial load the spread of results is 4.8 m, so the base position is most effective. When you deviate from it in any direction, the braking distance increases.
- On a fully loaded vehicle, depending on the position of the regulator, the spread of the braking distance is 8.3 m.
- The best results, as on the Niva, come with increasing pressure in the rear brakes.
- However, on a slippery road, even in smooth turns, early locking of the rear wheels is possible, leading to a skid.
- And at partial load, with the regulator position different from the base one, the braking distance only increases.
Setting up the brake force regulator: “The Sorcerer” carries the hero
Many people have heard that there is a “sorcerer” in the braking systems of VAZ cars, but not everyone knows about the importance of this device. We evaluate its impact on braking efficiency
“The sorcerer”, or, according to the catalogue, the pressure regulator in the brake drive, it was not for nothing that people received such an apt nickname: no one really knows how it works, but, they say, being faulty, it can present an unpleasant surprise - make the car dance in an emergency. braking.
This is where the insidiousness of the “sorcerer” lies: during normal operation, without braking to the floor, its work or inaction is practically not felt, but when its help is especially needed, it may not come.
The pistons have soured, the rod or drive lever has broken off, or you installed a new one instead of a faulty regulator, but for the time being you don’t know that the unit is defective or out of adjustment... How dangerous is this?
Let’s check in our experiment how “witchcraft” affects the effectiveness of the brakes at partial and full load of the Chevrolet Niva and Kalina and what the owner should be wary of if he does not monitor the condition of the regulator. We can simulate a malfunction, from excessive activity to complete inaction, with adjustments.
Let us remind you that the regulator’s task is to reduce the braking force on the rear axle, reducing the likelihood of skidding when braking to skid.
The regulator, mounted on the body and connected by an elastic lever to the axle beam, limits the pressure in the rear brake mechanisms depending on the position of the rear of the body relative to the road, that is, on the vehicle load.
“Sorcerer” is the predecessor of ABS, which helps to some extent prevent the rear wheels from locking when braking and thereby reduce the likelihood of skidding.
“Sorcerer” is the predecessor of ABS, which helps to some extent prevent the rear wheels from locking when braking and thereby reduce the likelihood of skidding.
By the way, before testing tires on cars without ABS, each time we slightly adjust the regulator taking into account the road condition (snow, ice, asphalt), ensuring that the rear wheels lock a little later than the front ones. Let's not break tradition. Our Shniva found the gap between the cheeks of the regulator to be 16 mm, which was adjusted using a stop screw.
Several brakings, and the braking distance from 80 km/h for a car with a partial load is determined: 34.4 m. With a full load... 33.6! Almost a meter shorter! At the same time, the driver noted a heavier pedal and rapid heating of the brakes, which required cooling before each measurement. Let’s remember these parameters and make adjustments to the “sorcerer” adjustment. First, let's reduce the gap to 8 mm. Now the regulator significantly limits the pressure in the rear brakes, transferring almost all the hard work to the front ones.
Adjusting the braking forces of Lada Vesta
The operating principle of the system that regulates and distributes brake fluid pressure on Lada Vesta cars is fundamentally different from previous models, and there is no “witchcraft” in it. The Lada Vesta brake pressure regulator is directly connected to the ABS system and is electronically regulated depending on the speed of each wheel.
The ABS control unit transmits signals from speed sensors and analyzes the situation. The system “understands” any skidding and allows you to distribute the braking force with maximum efficiency. The pressure is controlled by the valves in the ABS hydraulic block, and there is no need for any magic. In addition, the electronics itself detects all malfunctions and reports them to the driver using a special lamp on the dashboard.
Many people have heard that there is a “sorcerer” in the braking systems of VAZ cars, but not everyone knows about the importance of this device. We evaluate its impact on braking efficiency.
“The sorcerer”, or, according to the catalogue, the pressure regulator in the brake drive, it was not for nothing that people received such an apt nickname: no one really knows how it works, but, they say, being faulty, it can present an unpleasant surprise - make the car dance in an emergency. braking. This is where the insidiousness of the “sorcerer” lies: during normal operation, without braking to the floor, its work or inaction is practically not felt, but when its help is especially needed, it may not come. The pistons have soured, the rod or drive lever has broken off, or you installed a new one instead of a faulty regulator, but for the time being you do not know that the unit is defective or misadjusted. How dangerous is this?
Let’s check in our experiment how “witchcraft” affects the effectiveness of the brakes at partial and full load of the Chevrolet Niva and Kalina and what the owner should be wary of if he does not monitor the condition of the regulator. We can simulate a malfunction, from excessive activity to complete inaction, with adjustments. Let us remind you that the regulator’s task is to reduce the braking force on the rear axle, reducing the likelihood of skidding when braking to skid. The regulator, mounted on the body and connected by an elastic lever to the axle beam, limits the pressure in the rear brake mechanisms depending on the position of the rear of the body relative to the road, that is, on the vehicle load.
Design and principle of operation of the regulator
The VAZ brake pressure regulator is included in the drive circuit, which ensures the activation of the brake mechanisms of the rear wheel pair. Its main functional task is to correct the pressure in the drive circuit of the rear brake mechanisms, depending on the position of the car body relative to the rear axle, or on the vehicle load. The nature of its operation is similar to the operation of a limit valve, since it also interrupts the flow of brake fluid to the rear brake mechanisms, thereby minimizing the likelihood of “skidding” of the rear wheel pair.
The main structural elements of the pressure regulator are:
Torsion lever (item 1).
The regulator is mounted using a bracket and is connected to the rear axle beam using a torsion lever and rod. In addition, in the internal space of the regulator housing there are two cavities, one of which (pos. A) is connected to the main brake cylinder (hereinafter referred to as the GTZ), and the other (pos. B) is connected to the wheel brake cylinders.
The inoperative state of the regulator assumes the following positions of the main elements:
The torsion lever and spring (pos. 9) exert pressure on the piston (pos. 10), which rests against the plug (pos. 6).
In this case, gaps are formed between cavities “A” and “B”, which makes it possible to equalize the pressure in them and in the hydraulic brake drive.
During the braking process, under the influence of inertial forces, the rear of the vehicle moves upward, which helps to reduce the pressure from the torsion arm on the piston. Due to the larger area of the upper end of the piston, the pressure force acting on it will exceed the counter pressure force, which will lead to the lowering of the piston. At the moment the piston reaches the lower position and enters the seal, the communication between cavities “A” and “B” is interrupted, which initiates the occurrence of a pressure difference in them. The pressure in cavity “B” will decrease by an amount that determines the balance of the piston, that is, the amount of braking torque in the brake mechanisms of the rear wheel pair is adjusted.
Lada
“The sorcerer”, or, according to the catalogue, the pressure regulator in the brake drive, it was not for nothing that people received such an apt nickname: no one really knows how it works, but, they say, being faulty, it can present an unpleasant surprise - make the car dance in an emergency. braking. This is where the insidiousness of the “sorcerer” lies: during normal operation, without braking to the floor, its work or inaction is practically not felt, but when its help is especially needed, it may not come. The pistons have soured, the rod or drive lever has broken off, or you installed a new one instead of a faulty regulator, but for the time being you don’t know that the unit is defective or out of adjustment... How dangerous is this?
Let’s check in our experiment how “witchcraft” affects the effectiveness of the brakes at partial and full load of the Chevrolet Niva and Kalina and what the owner should be wary of if he does not monitor the condition of the regulator. We can simulate a malfunction, from excessive activity to complete inaction, with adjustments. Let us remind you that the regulator’s task is to reduce the braking force on the rear axle, reducing the likelihood of skidding when braking to skid. The regulator, mounted on the body and connected by an elastic lever to the axle beam, limits the pressure in the rear brake mechanisms depending on the position of the rear of the body relative to the road, that is, on the vehicle load.
Service
This part cannot be repaired. But in order for it to work properly, it needs to be maintained. This is usually done before making adjustments. The unit is installed in an unfavorable location - during operation it gets exposed to water, snow, dirt, and reagents from the road. All this makes the job worse. Gradually, water and snow become causes of corrosion.
General maintenance activities include cleaning the “sorcerer” from rust, removing the old rubber boot and installing a new one, replacing the lubricant, and cleaning all elements of the regulator from contamination. The old grease is first removed from under the boot.
Typical faults
There are very few malfunctions that occur in this part. These include stuck valves, misalignment, and leaks.
If the sorcerer is upset, he can be adjusted. And they determine whether adjustment is needed by the behavior of the car. If the setting is off, then when braking the car will throw from side to side. If the valves are stuck or the brake fluid is leaking, the part needs to be replaced. Theoretically, repairs are possible, but the complexity and cost make it unprofitable.
The regulator may fail to operate only in two cases - at the maximum possible load and at a speed limit above 80 kilometers per hour. In this situation, the speed does not drop quickly, so the rear axle is not unloaded.
Test results
The optimal adjustment of the “sorcerer” corresponds to the average factory settings, and a few percent can be gained only with individual correction for specific brake pads, tires, vehicle loading and road conditions. But it’s unlikely that anyone will start every trip with a test run.
It would seem that it is possible to reduce the braking distance by increasing the pressure in the rear brakes, but this threatens a loss of stability due to early blocking of the rear wheels. And today only ABS can provide maximum braking efficiency.
On a fully loaded car, depending on the position of the regulator, the spread of the braking distance is 8.3 m. The best results, as on the Niva, are with increasing pressure in the rear brakes. However, on a slippery road, even in smooth turns, early locking of the rear wheels is possible, leading to a skid. And at partial load, with the regulator position different from the base one, the braking distance only increases.
Setting up the brake force regulator: “The Sorcerer” carries the hero
Brake adjusters (sorcerer)
* All auto parts are in stock
, the product is updated on the website several times a day. Update of stock and prices: 11:15 2020-12-18 The data presented on spare parts on this page is for informational purposes only.
Special offers
* Check product availability by calling +7(978) 206-206-4 or +7(978) 206-206-5
How to find us
st. Communalnaya 43, Simferopol
We accept VISA, MasterCard, Mir cards for payment.
Autoall
- About Store
- Discounts
- Reviews
- Contacts
- Articles and news
Help Center:
Sale of spare parts for domestic cars
Help Center:
Ordering tires, wheels, spare parts for foreign cars
Social media:
Schedule:
- Mon. 9:00 – 17:00
- Tue. 9:00 – 17:00
- Wed 9:00 – 17:00
- Thurs. 9:00 – 17:00
- Fri. 9:00 – 17:00
- Sat. 9:00 – 16:00
- Sun. 9:00 – 15:00
Please note that the indication of TRADEMARKS (names of car brands) is aimed at informing buyers about the applicability of a spare part to a particular car brand, that is, the consumer properties of the product. This information does not mislead consumers regarding the spare parts for cars offered for sale and its manufacturer, and does not violate the rights of the copyright holders of these trademarks
The requirement to provide the buyer with the necessary and reliable information about the product offered for sale, ensuring the possibility of their correct choice, is imposed on the seller (manufacturer) by the Law “On the Protection of Consumer Rights”, Art. 495 of the Civil Code of the Russian Federation.
Is a sorcerer really necessary?
If you remove a part from a car, various unpleasant situations may arise. So, a car can brake with four wheels at once, the wheels can be blocked sequentially, and the car will go into a skid.
However, many VAZ owners, when servicing their car, sometimes notice that the sorcerer was removed by the previous owner. Some don't even notice his absence. Others remove it themselves, since it does not work and reduces the effectiveness of the braking system.
The thing is that AvtoVAZ engineers took someone else’s idea and used it to equip domestic cars, but these are completely different cars. Without a doubt, this product is very necessary, but in the case of VAZs it is disposable.
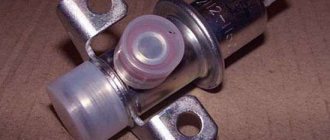
Brake pedal sensor
The brake pedal sensor on Lada cars is involved not only in sending a braking signal to the car's brake lights, but also in regulating the air-fuel mixture.
As you know, vehicle emission standards are becoming stricter every year and manufacturers are forced to adhere to these criteria in order to bring their products to market.
The brake pedal sensor (BPS) is involved in the formation of the fuel mixture only on Lada cars equipped with the E-GAZ system. If in a car the accelerator pedal is driven by a cable, then the sensor is responsible only for turning on the brake lights when you press the gas pedal.
If there is a malfunction or incorrect adjustment of this sensor, the car will operate in emergency mode, which will be indicated by the “check engine” lamp and error number “P0504” will appear.
This article will discuss malfunctions of the brake sensor on Lada Granta cars, as well as its replacement and adjustment.
About the sensor
The DPT is a conventional “frog with two contacts” for making and breaking. There are no complicated electrical circuits in its design.
One of the contacts, which works to close, when you press the brake pedal, lights up the brake lights, which in turn signal the cars behind to brake.
The second contact, which opens when the brake pedal is pressed, opens its contacts and thereby sends a signal to the ECU to remove the load from the engine. This is necessary to reduce the fuel supply during braking, that is, driving at high speeds (above idle) and when you press the brake pedal, the car begins to stop, and at this time the sensor sends a signal to the ECU to reduce the fuel supply through the injectors to reduce speed and exhaust emissions in atmosphere.
The sensor is located on the pedal assembly under the steering column of the car, mounted on a plate with two nuts, and they are also used for adjustment and control tightening.
The cost of the sensor in an auto parts store is up to 300 rubles.
Causes of malfunction and their consequences
If there is an external or internal breakdown of the sensor on the Granta dashboard, the “Check Engine” will light up with error “P0504”. This error indicates a malfunction of the DPT.
Symptoms of a problem
- The car starts poorly and immediately stalls;
- The idle speed fluctuates;
- The motor does not develop the required power;
- Jerks when moving;
Reasons for failure
The main cause of DPT failure is the spring, which returns the sensor contacts to their original position. If the spring breaks, the contacts do not return and remain in the final position, thereby the ECU continues to receive a signal that the car is braking and thus does not allow it to develop the necessary speed to complete the maneuver.
Broken spring
A less common breakdown is the failure of the sensor housing, since the sensor is made of plastic, when removing or replacing it it is easy to damage it, which can harm its design and operating mechanisms.
And the last reason is carbon deposits on the contacts. When the sensor is used for a long time, electrical deposits appear on its contacts, which soon leads to a poor connection between the moving contact and the fixed one.
Carbon deposits on contacts
Before purchasing a new sensor, it is necessary to diagnose the DPT. It happens that the sensor nuts are unscrewed due to vibration and thus its adjustment is disrupted, which can result in an error on the dashboard.
Check sequence:
Check the connector contacts, make sure the connector has not come off the sensor;
Press the brake pedal by hand and release, make sure that the sensor stop returns to its original position, thereby confirming that the return mechanism spring is working.
Check the adjustment and tightening of the locknuts; with the brake pedal free, there should be a distance of no more than 0.5-1 mm from the sensor stop to the housing.
If any of these points are not met, you must begin replacing and adjusting the brake pedal sensor on the Lada Granta.
Adjusting the sorcerer VAZ 2114: subtleties of the process
Many drivers have heard about such a detail as a sorcerer, but they do not know where he is and what tasks he is responsible for. In today's article we will look at what the sorcerer 2114 is and how to properly adjust it.
What is a sorcerer on a VAZ 2114
As just said, every machine has such an important element as a sorcerer. Its correct name sounds like a rear brake pressure regulator. The sorcerer of the VAZ 2114 is responsible for reducing the braking distance and for the absence of skidding during emergency braking, which is extremely important both for the safety of the car and for the safety of its passengers.
This element should be adjusted after any intervention in the car that entailed replacing springs or other suspension elements (which, in turn, could lead to a change in ground clearance). In some cases, it may be necessary not only to make adjustments, but also to completely replace the sorcerer with a VAZ 2114.
You can determine that this part has become unusable by three signs:
- The cuffs have worn out, resulting in a leak of brake fluid.
- In case of sudden braking, the car began to skid strongly.
- The piston of the device has soured.
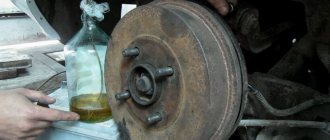
The first two signs are quite easy to identify, but to identify the last one, you should invite an assistant and conduct a small experiment. One of its participants must press the brake pedal, and the second must monitor the sorcerer's rod.
If it is working properly, the rod should periodically extend (at the moment of pressing) and press on the spring plate, pressing it against the drive lever. If this does not happen, it means the piston is rusty and the sorcerer will have to be replaced.
You should absolutely not ignore the malfunction of the sorcerer, as well as completely dismantle it (as other motorists sometimes advise), since without it the car will lose control when braking and will often skid.
How to change the sorcerer
In order to replace a damaged sorcerer, you will first need to purchase a new one. One of the best of this kind is considered to be the brake regulator from. In addition to this, you will also need to purchase a canister of brake fluid, since during the repair process a significant leakage from the system may occur.
To perform the replacement you will need an appropriate set of tools, which includes:
- wrenches “10” (it is highly recommended to use special ones designed for unscrewing brake pipe fittings);
- wrenches “13” (socket and socket);
- a screwdriver with a large blade or a steel spatula;
- feeler gauge (a drill or a 2 mm thick steel plate will also work).
The replacement and adjustment of the VAZ 2114 sorcerer itself should be carried out in the following order:
- Place the vehicle on an overpass or inspection hole.
- Clean the pipe fittings and other threaded connections with a wire brush, then fill them with kerosene or WD-40 and leave it like that for a while.
- Using a screwdriver or a spatula, use a screwdriver or a spatula to pry the clamp-retainer of the regulator drive lever and remove it.
- Disconnect and dismantle the sorcerer lever.
- Unscrew the fittings using a special “10” wrench and immediately plug them with rubber plugs (if you are unable to move the fittings out of place, you should once again flush the threads with “Vedeshka” or kerosene and wait some more time, then try again).
- Unscrew the two sorcerer fastening nuts from the body using a “13” wrench.
- Remove the sorcerer along with its bracket.
- Disconnect the brake pressure regulator from the bracket.
- Attach the new sorcerer to the bracket (there is no need to tighten the bolts all the way).
- Place the bracket with the regulator in its original place, connect the tubes to it and tighten the fittings.
- Connect the lever from the rear beam to the sorcerer and secure it with a clamping bracket (it is important to ensure that the bracket securely grips the lever).
At this point, the installation of the sorcerer can be considered complete, all that remains is to bleed the brake system.
When dismantling the brake pipes when replacing the sorcerer, it is recommended to immediately mark them so as not to confuse them during reassembly.
How to replace the brake pressure regulator in a VAZ 2110?
1. The first thing to do is to release the regulator drive lever; to do this, lift the bracket up. If necessary, use a screwdriver to loosen the earring bracket. All manipulations are performed with a key of 10.
2. After disconnecting the lever, carefully remove the earring bracket.
3. Prepare a container; it needs to be placed under the junction of the regulator with the pipes; brake fluid will flow out of it. We disconnect the four tubes by unscrewing the fastening nuts. We wait until the liquid drains. We plug the holes in the tubes; this can be done, for example, with caps on the cylinder bleeder valves. It is recommended to mark the tubes so that during further installation you will not confuse them.
4. Unscrew the front bolt securing the bracket with the regulator.
5. We unscrew the rear bolt, which we hold the regulator on the side of the bracket, after which we remove the regulator (sorcerer), without unscrewing the drive.
6. If you need to replace drive parts, unscrew the bolt that holds the locking lever and disconnect the drive lever from the elastic lever.
7. When you connect the drive lever to the elastic lever, following the sequence, the clamp fork should fit into the groove on the elastic lever.
8. Next, install the brake pressure regulator in the same order as we removed it
Please note that the front mounting bolt is slightly longer than the rear
9. When replacing, it may be that the lever spring begins to protrude, thereby interfering with the installation of the regulator. To avoid problems, move the drive lever as far forward as possible beyond the protrusion.
10. Installation is complete, now crimp the earring brackets with pliers. To make sure that the system is working, pump and adjust the pressure.
Video about removing (removing) the sorcerer on a Renault Logan car:
Setting the brake force regulator
Adjustment of the sorcerer should be done on an overpass or inspection hole. At the same time, the car is unloaded and driven to the work site. To perform the manipulation you will need:
- Socket wrench 13 or corresponding socket;
- Drill diameter 2 mm.
To adjust the sorcerer, use a wrench to loosen the bolt securing it to the lever bracket. Next, use a screwdriver to move the bracket until the resulting gap allows you to insert a prepared two-millimeter drill into it. After this, the bolt is tightened.
Note: the brake pressure regulator of the VAZ-2110 and previous VAZ models turns sour during operation so that it is not possible to move its bracket. In such a situation, you should pour WD-40 liquid over the rusted area, wait 15-30 minutes, and then use a hammer to move the part to the side using a soft drift.
Brake pressure regulator: replacement and adjustment
One of the reasons for a vehicle to pull or skid to the side when braking is a malfunction of the brake pressure regulator (also called the “sorcerer”). The most common causes of pressure regulator malfunction are brake fluid leakage, air in the brake system, damage to the rubber seal, damage to the rubber hose. In some cases, pumping air from the brake system, replacing the seal or hose will help, however, in most cases the problem can only be solved by replacement.
You can replace the sorcerer in the car yourself; for this you need a household set of tools - a wrench and pliers. The brake system of the Zhiguli is one of the most primitive in the world, and even if the driver has never done this before, then if you follow the instructions, he will have a minimum of problems during replacement (if any).
Replacing the brake pressure regulator
The replacement of the sorcerer on VAZ-2110 cars and other vehicles equipped with an RTD is carried out on an overpass. You need a 13 mm spanner, a powerful screwdriver and a special 10 mm wrench designed for unscrewing brake pipes. Before starting work, the assembly must be cleaned of dirt and rust, doused with WD-40 or another penetrating compound, and then wait half an hour.
Work begins by unscrewing the bolt securing the bracket to the spring. Afterwards, the brake pipes are dismantled, the position of which is recommended to be pre-marked.
You can also unscrew the tube fittings with a regular wrench. However, using a special tool makes the job easier and reduces the likelihood of “licking” the edges. After the fittings, unscrew the two bolts securing the sorcerer to the body and remove the part. It is necessary to install the new VAZ-2110 sorcerer in strict reverse order. After installing it and before adjusting the RTD, you should bleed the rear brake circuits. Next, the above-described procedure for setting up the sorcerer is performed.