Sooner or later, most car owners are faced with the fact that the interior lighting stops working. Let's consider the causes of this malfunction and find out what to do in this or that case.
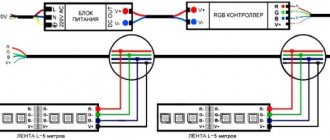
To understand where to look for the cause of the malfunction, you need to understand how the interior lighting system works in general. This is a typical simplified diagram. You can include many more different devices in it, but the machines are different and it is impossible to draw a diagram for each specific instance. In most cases, interior lighting is connected like this:
Now let's look at the reasons why interior lighting may fail.
How to make interior light with your own hands, detailed instructions.
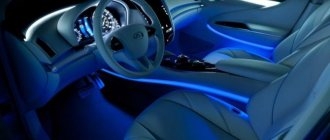
Many owners of a modern Lada are not satisfied with the lighting in the car's interior. In this regard, there is a need to modernize the lighting yourself. We'll tell you how to independently improve visibility in the vehicle interior.
Independent tuning of the Lada interior is quite common. Most vehicle owners strive to increase interior comfort and improve the appearance of the interior with their own hands. First of all, most car enthusiasts improve interior lighting. The desired result can be achieved by installing LED lighting for the Lada Granta interior. LED tuning is quite easy to do with your own hands, while significantly increasing the visibility of the interior and making the Granta’s interior more attractive.
Causes of breakdowns and methods for eliminating them
Despite the simplicity of the interior lighting circuit, sometimes malfunctions occur, leading to malfunctions or complete failure of the lighting devices. The most common problem is that the light in the Kalina’s cabin does not turn on. The reason may be burnt out light bulbs and fuses, replacing which is not difficult.
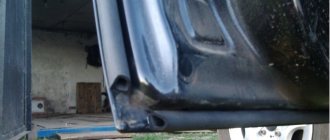
The lights do not light up when the doors are opened due to wear on the cam washers. Some car enthusiasts try to reduce the stroke of the locking mechanism by moving the pusher mounted on the car body in the door opening. Sometimes this helps eliminate the problem, but when the pusher moves, the tightness of the door to the seal worsens. This breaks the seal and allows dirt and water to get into the seal.
Features of interior lighting fixtures
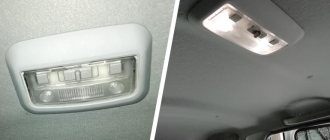
In the minimum configuration, Kalina's interior lighting is represented by one lamp located on the ceiling in the front of the car. It gives a soft yellow light, but according to car enthusiasts, it is not enough.
More equipped versions have two built-in lamps: one in front, the second above the rear seat. Lighting in luxury versions has been improved: some halogen lamps have been replaced with LED lamps.
The front courtesy light in the Kalina's cabin, located above the rearview mirror, has a control unit. It consists of a right lamp for individual lighting, activated by a key, a left lamp, activated by a key, a lamp and a three-position switch that determines the interior lighting mode. When the switch is set to the far left position, the lamp lights up continuously until it is turned off. In the middle position of the three-way switch, the lamp is de-energized, and when switched to the extreme right position, the light automatically turns on when any of the car doors is opened and turns off when all doors are closed with the ignition on.
Installation
- We choose a place to mount the lampshade in the rear of the car. We find the stiffener by pressing on the ceiling trim. For convenience, you can make a fastening template from masking tape, which we paste onto the ceiling trim in the place where the lampshade will be placed.
- We make a hole in the ceiling trim according to the template using a utility knife.
- We make holes in the stiffener with a drill and secure the lamp frame with screws.
- Snap the lampshade into the frame.
Installation of floor (leg) lighting in Kalina
Installing driver and passenger footwell lighting
You will need: LED strip (total length 3 meters). The price is 600 rubles for the wire (several meters). tricks (2 pieces).
Driver's floor lighting. We fix the LED strip with double-sided tape, or use a plastic cable channel that is secured with self-tapping screws. The mounting location is the steering column casing and the bottom of the dashboard.
Front passenger floor lighting. By analogy, we attach the LED strip under the glove compartment.
By the way, for illumination you can also use the glove box lighting, which is most conveniently installed on the side trim of the dashboard. To make the lighting brighter, install an LED light bulb instead of a regular one.
Rear passenger footwell lighting. Here it is most convenient to glue the light source to the corners, which in turn are fixed to the air ducts. Note that it is not at all necessary to remove the seats for this; it is enough to simply move them forward as much as possible.
Connecting floor lighting in Kalina
Ground connection (select the one you need):
- From any nearby point on the body, if you want the backlight to turn on manually, via a toggle switch.
- To the door switches, if you want the backlight to turn on when the door opens. In order not to pull the wire out of the door (as we did when installing heated mirrors), you can hook it to the blue and white wire under the threshold of the left door. And under the threshold of the right door - red-brown.
Connection +12V (select the one you need):
- Plus from the dimensions (+12V appears after turning on the interior lighting). You can take it from the radio block, connector A6. Or from the cigarette lighter (white wire), but for this you will have to remove the central tunnel of the Kalina.
- Constant plus (+12V) from the red wire of the ignition switch or ceiling lamp.
- Plus, after turning on the ignition from the ignition switch, there is a thick blue wire with a black stripe (it says '15' next to the wire).
It is better to run the wires under the carpet. If you lay them on top, then make sure that they do not get in the way of your feet and are not torn when the seats move.
We recommend connecting Kalina's floor lighting to the interior lamp. We stretch the wires along the windshield pillar and solder the wires directly to the contacts on which the light bulb itself sits, otherwise operation in three modes will not work.
- ground to the green wire.
- +12V to red.
Thus, it will be possible to control the additional lighting of the car through the lampshade (turn it on if desired, or make sure that the lighting turns on itself when the door is opened). As a result, such additional lighting for Kalina’s interior will make the interior not only more comfortable, but also more practical. Carefully choose the color of the backlight so that it is in harmony with the overall color scheme. Do not forget that the polarity of LEDs is important; do not confuse the minus with the plus, otherwise nothing will light up.
Approach the issue of tuning the Kalina's interior in a comprehensive manner, install additional lighting for the interior handles.
| Getting into Kalina's cabin will be much more convenient if additional lighting is implemented. Let's dwell on interior tuning, and in particular, how to install lighting for the feet of front and rear passengers in the Lada Kalina. |
Connection
All the necessary contacts for connecting an additional lamp are in the front lamp. To install the wires, it is not at all necessary to remove the roof trim; just bend it slightly from the edge or move it slightly out of the door seal.
Article on the topic: How to check a generator with a tester on a car
Lada Priora front lamp diagram:
- far left (red) – “mass”
- central (white) – +12V
- far right (black) – ground (door switches)
Diagram of the front lamp of Lada Granta (pre-style) and Lada Kalina:
- far left (black) – “mass”
- central (green) – “ground” (door switches)
- far right (red) – +12V
Diagram of the front lamp with ERA-GLONASS for Lada Granta FL:
- 11 and 14 – +12V appears after turning on the main relay (turning on the ignition, opening the doors). The power goes out 2-5 minutes after removing the ignition key.
- 15 – “mass”.
- 17 – “ground” (door limit switches), which appears for a while when the doors are opened.
The result of such a connection in the video:
Attention!
Wire colors may vary depending on vehicle equipment. Focus on the contact numbers and check the wiring with a multimeter.
Interior lighting - lamp replacement, removal and installation
Replacing the lamp
1. We prepare the car for work (see “Preparing the car for maintenance and repair”). 2. Using a slotted screwdriver with a thin blade, release the two fixing protrusions and remove the diffuser.
3. To replace the interior lighting lamp, press the spring contacts and remove it. We install a new lamp in the lampshade.
4. To replace the individual lighting lamp, press it and turn it counterclockwise. Install the lamp in reverse order. 5. Place the two protrusions on the lower part of the diffuser into the grooves of the interior lamp housing and press the upper part of the diffuser until the latches snap into place.
Removal
1. Remove the diffuser for the interior lamp. 2. We remove the lower part of the ceiling lining from engagement with the body.
3. Remove the lining. 4. Using a Phillips screwdriver, unscrew the two self-tapping screws securing the lampshade to the interior ceiling.
5. Remove the lampshade from the hole in the ceiling trim.
6. Squeezing the spring clamps on both sides, disconnect the wiring harness blocks.
Installation
Install the lampshade in the reverse order.
The dashboard of the Lada Kalina car is made of softer plastic than the dashboards of other models of the Volga Automobile Concern. Despite this, the build quality of the torpedo of this vehicle leaves much to be desired. This is primarily due to the fact that the process of assembling the dashboard of a Lada Kalina car is not automated.
Removing the instrument panel on a Lada Kalina, which is not equipped with a front passenger airbag, is a relatively simple procedure, and it can be done even without special skills.
We replace standard lighting with LED lamps.
To complete the work we will need the following materials and tools:
- LED Strip Light. Double-sided tape. Stationery knife.
In order to tune the interior lighting grants, you need to stock up on high-quality LED strip. The choice of LEDs is one of the most important stages in interior modernization. Therefore, it is recommended to purchase quality products from trusted manufacturers. When choosing lamps, make sure that they are suitable for connection to the vehicle's standard 12-volt power supply.
Stages of work execution.
First of all, it is necessary to dismantle the standard interior lamp. After we have dismantled the diffuser, we can gain free access to the conductors.
Next, you need to prepare the LED strip by cutting it into several parts. Using double-sided tape, install the light bulbs on the Lada lampshade.
The final step is to connect the conductors of the LED strip according to the polarity and install the lampshade in its original position. We check the functionality of the light bulbs.
The purpose of each of the fuses on the car
If you turn over the removed cover, then on its inside you will see a diagram of the location of the relays and fuses in the mounting block (fuse block). On it, all these elements are numbered and designated from F1 to F20. Naturally, everyone is responsible for the performance of various consumers in the vehicle’s electrical network:
Diagram with the location of fuses VAZ 2114
- F1 – rear fog light and indicator lamp for turning on the latter (10 A);
- F2 – turn signal breaker relay, VAZ 2114 emergency alarm, turn signals (10 A);
- F3 – front and central interior lighting, trunk, trip computer and brake light bulbs (7.5 A);
- F4 – heated rear window (20 A);
- F5 – sound signal, cooling system fan (20 A);
- F6 – power windows (30 A);
- F7 – electric motor for heater, front window, washer, glove compartment lamp, cigarette lighter (30 A);
- F8, F9 – fog lights, right and left, respectively (7.5 A);
- F10, F11 – left clearance, as well as right, indicator for turning on dimensions, license plate lighting, as well as instrument lighting lamp, ashtrays (7.5 A);
- F12, F13 – right and left low beam, respectively (7.5 A);
- F14, F15 – high beam left and right, respectively (7.5 A);
- F16 – turn signals, dashboard indicators – parking brake, low battery, etc., as well as a trip computer (15 A);
- F17-20 – reserve respectively for 7.5, 10, 30 and 20 A.
The VAZ 2114 fuse diagram also contains backup fuses for 7.5, 10, 20, and 30 A, located in the lower part of the VAZ 2114 fuse block. Having pulled out the supposedly blown one, you should inspect it visually. If it is clear that the integrity of the thread is broken, then it can be unequivocally stated that the reason for the inoperability of the vehicle equipment lies precisely in the malfunction of the fuses. You can replace the inoperative one with a backup one of the same power according to the data that is presented to you by the diagram on the back of the plastic cover of the mounting block.
Reason #2: Blown fuse
The second reason your interior lights may not work is a blown fuse. Almost always, interior lighting “shares” a fuse with other devices. Therefore, if, for example, the clock or radio stops working along with the light, the likelihood of a fuse blowing is extremely high.
Find the correct fuse in the correct block and make sure it is not damaged. If the fuse does blow, it is likely due to a short circuit. Therefore, it is not a fact that after installing a new fuse everything will work. It is quite possible that it will immediately catch fire. If this happens, then there is definitely a short circuit. You need to know how to find a short circuit in a car.
However, the fuse does not always blow due to a “short circuit”. His sweater can only be old (shabby) or made from poor quality material.
↑ Questions unclear to whom
On this occasion, a friend had two questions for experts from the program “What? Where? When?":
- Which AvtoVAZ specialist came up with such a system for turning on the lighting in the Lada Grant's interior?
- Which motorist was smart and was able to guess that it was necessary to turn on the lights using the wiper switch?
Whatever you say, our people are very talented and love different jokes. The country must know its heroes. It has certainly been said that Russia cannot be understood with the mind.
And I also feel a little sorry for the owners of foreign cars, since everything in their cars is simple and clear, there is absolutely no imagination.
How to make interior light with your own hands, detailed instructions.
Many owners of a modern Lada are not satisfied with the lighting in the car's interior. In this regard, there is a need to modernize the lighting yourself. We'll tell you how to independently improve visibility in the vehicle interior.
Independent tuning of the Lada interior is quite common. Most vehicle owners strive to increase interior comfort and improve the appearance of the interior with their own hands. First of all, most car enthusiasts improve interior lighting. The desired result can be achieved by installing LED lighting for the Lada Granta interior. LED tuning is quite easy to do with your own hands, while significantly increasing the visibility of the interior and making the Granta’s interior more attractive.
Installation of LEDs in the interior lamp of Kalina
You can’t just replace lamps with LEDs, because the polarity is wrong. In order for everything to work out, you only need a relay for closing and a block for it.
We connect two more to the white-red wire (we connect one to the relay winding, the other to one of the terminals). Take a brown and green wire and cut off a piece of wire with a terminal. We connect this piece to the second contact of the relay, and the wire itself to the free contact of the winding. The relay can be placed between the roof and the interior trim.
We connect it all to the lampshade like this:
- White with red - to black in the lampshade.
- Brown with green - to green.
- Black to red.
Reason #3: Oxidized contact
There are many contacts in the internal lighting circuits. But above all, the contacts inside the ceiling and the door limit switches are susceptible to oxidation. Limit switches on many Russian cars very often oxidize, since they do not have a rubber casing.
Identifying an oxidized contact is very simple: just look at it. Remove the cover, disassemble it and make sure the contacts are clean. If oxides are present, clean them with a small flathead screwdriver or fine sandpaper. Do the same with the limit switches - each of these switches must be removed and checked. Before removing the limit switches, it is better to disconnect the battery, because very often when removing the positive wire of the switch, it shorts to the housing.
Do-it-yourself tuning of the Lada Granta interior: instrument panel
As practice shows, the vast majority of Lada Granta owners are not satisfied with such an element of the car interior as the instrument panel. Namely, the color and intensity of its illumination. Many car owners turn to specialized auto repair shops for help, but it is quite possible to improve this part yourself. The main thing that is required for this is experience in working with a soldering iron and desoldering pump. Let's look at this tuning in more detail.
Based on this, tuning the Granta instrument panel will differ from the improvement of previous VAZ models.
Before tuning this part in a Lada with your own hands, you need to disassemble it. To do this, you need to bend the plastic clips located around the entire perimeter of the instrument panel. Next, remove the back cover. The latter is easy to reach by pulling up the special arrows. After removing the cover we will see the Granta instrument panel board. We take it out and proceed to the display. It may be soldered to the panel and you will need to use a desoldering pump to remove it. After soldering, the display antennae should move freely in the landing areas. After dismantling the display, we get access to all the LEDs on the Lada panel.
Next, you need to insert your own LEDs instead of the factory ones, and then immediately check the serviceability of the entire instrument panel. If all lights work, then you can begin reassembly.
When assembling the instrument panel, special attention should be paid to the location of the display antennae. They must fit into their seats as accurately as possible
Otherwise the system will stop working. Upon completion of assembly, it is worth treating the cover of the Granta shield with Anti-creak cream.
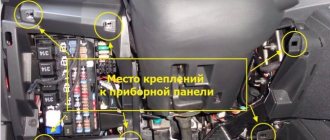
Removing the car dashboard
To dismantle the torpedo you will need the following tools:
In addition, you will need a bit of patience and accuracy when performing the work.
- First you need to bend the rubber seals of the front doors from the A-pillars.
- After this, you need to remove the plastic covers of the front pillars. Each of them is held on by 3 clips. Use a slotted screwdriver as leverage.
- Next, you need to unscrew the screws securing the upper front (in the direction of travel) panel trim. There are 2 of them: one on the right, the other on the left, both are located near the racks.
- After this, you need to remove the upper front trim by carefully pulling it towards you. It is secured not only with self-tapping screws, but also with clips at the front. When removing the panel, try not to lose them.
- Then you need to unscrew all the screws and remove the trim on the side air ducts.
- First you need to remove the ashtray. To do this, just pull it all the way back (in the direction of travel of the car) and unscrew the 4 screws that secure it to the console.
- Then you need to pry with a screwdriver and pull out the plugs located to the right and left of the alarm button.
- After this, you need to unscrew the 2 screws located under the plugs and securing the center console from below.
- Now you should carefully pull the console towards you and disconnect all the wiring from it, having previously marked with a marker what is attached where. If you don't have a marker, you can take a picture with your phone of which wires go where.
- After dismantling the center console, you need to unscrew 2 bolts and 5 screws and remove the steering column cover.
- Then you need to unscrew 2 screws and remove the outer trim of the instrument cluster.
- Next, you need to unscrew all the instrument panel mounting nuts from above using a 10 mm wrench.
- After this, you need to tear off the lock washers on which the heater air duct is seated, unscrew the remaining screws securing the dashboard, and remove it by pulling it towards you.
How to make interior light with your own hands, detailed instructions.
Many owners of a modern Lada are not satisfied with the lighting in the car's interior. In this regard, there is a need to modernize the lighting yourself. We'll tell you how to independently improve visibility in the vehicle interior.
Independent tuning of the Lada interior is quite common. Most vehicle owners strive to increase interior comfort and improve the appearance of the interior with their own hands. First of all, most car enthusiasts improve interior lighting. The desired result can be achieved by installing LED lighting for the Lada Granta interior. LED tuning is quite easy to do with your own hands, while significantly increasing the visibility of the interior and making the Granta’s interior more attractive.
Interior lighting of Lada Granta with LED matrix
As always, there is little light in the car interior. This is especially true for the Russian automobile industry. Let's consider one of the ways to improve the light in the Lada Granta interior. For this we need a minimum of materials. And most importantly, for those who save money, everything can be purchased on Aliexpress. It costs a penny, but is quite enough for interior lighting. And for a long time.
For this we need:
-2 COB LEDs, -2 adapters, - double-sided thermally conductive tape, - aluminum plate.
Let's get started. Firstly, you should immediately foresee what size and type of matrix you will purchase. It is possible, as in our case, with COB, or with SMD diodes. Fortunately there are a huge number of them. The seller stated 12 W matrices, but this is not true. After measuring, each output was 9 watts. But this is quite enough for our goal - to illuminate the interior of the Lada Grant using matrix COB LEDs.
Types of LED matrices for car interior lighting
1 of 2
SMD matrix
COB matrix
The Chinese have a fairly large number of COB matrices. As you can see in the photo, it does not have a resistor. It is not good. You can, of course, use it this way, but it’s better to solder a resistor. And this is laziness))). Therefore, we immediately buy it with a resistor. He looks like this.
Next to the matrix you can see various adapters; read on for what they are for. For some it is clear how to use them, but others (like me))) initially had no idea what to do with them before purchasing...
During operation, the LEDs get quite hot; for better thermal conductivity, use an aluminum plate and double-sided tape to glue it to the back of the matrix. Can. Of course, leave everything as it is, because... the matrix will not work constantly and rapid degradation is not terrible. But I still advise you not to worry too much and install the plates. The photo shows a simple fastening without plates and thermal tape. This is also possible.
Glue it all inside the lampshade on both sides
Next we take the notorious adapters. Before purchasing, you should look at your lampshade and decide on the original mounting socket. We have a regular pin from 31 to 42 mm. The most common adapters are shown in the photo. Because Since we have two matrices in the base, we carefully remove the metal caps and attach an additional output there to quickly and easily connect two matrices.
As a result, you should get something like this.
We check the connections and insert the adapter into the lamp base.
Let's put everything in its place. Our two LED matrices are visible inside the lampshade.
We install everything in place and check the operation of the “new” lamp in the Lada Granta interior using COB LED matrices.
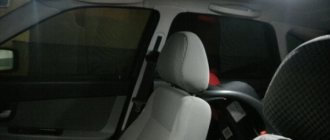
Of course, after the native lighting - heaven and earth. Bright, fresh. One lamp is enough for the entire salon. For lighting, choose a cool color. Not very yellow. If you need a link to the seller, I will add it to the article at the request of readers.
How to determine the malfunction?
Diagnostics of voltage in electrical wiring is carried out as follows:
- First, you will need a test lamp with wires connected to it. One of them is connected to the negative of the battery or the mass of the vehicle, that is, the body. And the second probe should be connected to the section of the electrical circuit being diagnosed. In this case, it is desirable that the connection point be as close as possible to the battery or safety device.
- If after connection the light starts to light up, this indicates that there is voltage in the circuit. In particular, we are talking about the area between the connection and the battery.
- The remaining components of the electrical circuit are diagnosed in a similar manner. When it happens that the light bulb does not light up and there is no voltage, this indicates that the faulty source is located between this point and the last one where the voltage was. As practice shows, wiring problems are often associated with poor connections, so when problems are detected, the first thing you need to do is check the contacts. Also remember that in some sections of the wiring there is voltage in the circuit only when the ignition key is turned.
An equally important point is to find a short circuit; this problem is relevant for many vehicles, including Grant. One way to find the short circuit point is to dismantle the safety element and then connect a test lamp or tester to its socket.
All other components in this circuit must be turned off, that is, there should be no voltage in it. Try moving the wires in different directions, while watching the control - if it starts to burn, then somewhere in the area one of the contacts is closing. Most likely, the reason lies in the rubbing of the insulation (the author of the video is the Kroom&coTV channel).
As for diagnosing grounding reliability, it is carried out as follows:
- First you need to disconnect the battery terminals, then connect one of the probes of the diagnostic tester (multimeter) or a warning lamp to the body of the Lada Granta.
- The second probe should then be connected to the connection or ground point you want to test.
- If, as a result of the connection, the lamp lights up, this indicates that everything is normal with the grounding, you can begin diagnosing other circuits.
And one more point that should be discussed in more detail is diagnosing the integrity of the wiring. This procedure is carried out in order to determine whether there is a break in the wiring or not.
Integrity check is done like this:
- First you need to turn off the voltage from the wiring and diagnose the integrity using a test light and a connected power source.
- Next, you need to connect the wiring from the light source to the ends of the electrical circuit being diagnosed, or one probe to the positive, and the second to the car body. If the control lights up after connection, this will indicate that there are no breaks in the circuit. If the lamp does not light up, then most likely there is a break in the circuit.
- In a similar way, you can check the functionality of the switch by connecting a test lamp to its terminals.
- After the switch is activated, the control should light up.
Installation of LED strip
Before installing footwell lights in a car with your own hands, you should decide where you will attach the tape itself.
To illuminate the footwell area, it can be installed below the seats, along the perimeter of the lower part of the front seats, under the instrument panel and under the glove compartment. It all depends on your imagination. Remember, when choosing a place for installation, you should take into account that the installed lighting should be directed towards the floor.
After choosing a location, measure and cut a piece of tape of the required size. Do not forget that it may not be cut in all places. Cut only in areas where solder contacts are located. Therefore, having measured what length you need, it is better to take a little less than vice versa, so that later there is no sagging during fastening.
After cutting, solder a wire to the edges of the tape and try to connect it to a power source. If it works, isolate the solder joints. To do this, put a heat-shrinkable tube over the joint, heat it with a soldering iron or even with a lighter. After insulation, attach the tape to the selected location using an adhesive layer, glue, or even regular silicone ties.
Replacing the interior light bulb of Lada Priora (VAZ Priora)
Interior lighting plays an important role in the dark: it creates comfortable conditions for the driver, makes it possible to better see the instruments, gear shift knob, etc. The interior lighting of the Priora does not always satisfy car enthusiasts. The article discusses types of lighting and provides instructions on how to install lampshades.
Features of interior lighting on VAZ cars
In the simplest configuration of the Lada Priora, there is only one interior lighting fixture. It is located on the ceiling at the front. They are equipped with C10W bulbs, which emit a soft but faint yellow light. Priora owners are not satisfied with such light, so they install an improved unit from the “Lux” version model.
Two lighting fixtures are fully equipped in Priora and Kalina. One is located near the driver. The second is located in the ceiling above the rear seats. Although an LED lamp is used, it shines no worse than light sources installed near the driver.
Instructions for installing new lampshades
To replace lighting fixtures in both the Priora and Kalina interiors, no special knowledge is required, since the procedure is simple.
Photo gallery “Step-by-step installation of lighting shades”
To replace the light bulb, follow these steps:
- First you need to remove the protective cover. This can be done by prying it with a screwdriver from the mounting side and lightly pressing the clip. Now the cover can be easily removed from the ceiling.
- Next you need to disconnect the power wires.
- Having disconnected the old lamp, a new element is installed in its place.
- Assembly is carried out in reverse order.
Installing an additional “Lux” lighting fixture will require care and time. First of all, you need to purchase a new block, which will be placed above the rear sofa.
The installation procedure consists of the following steps:
- First, you need to apply markings to the ceiling, deciding on the place where the rear lamp will be located.
- Then, according to the markings, a hole is cut in the ceiling covering.
- Next, you need to stretch the power wire from the front light between the roof and the ceiling covering.
- At the next stage, the unit to be installed is connected.
- To ensure that the lid fits tightly to the ceiling, you can cut a frame from some kind of rubber seal.
In the Priora “Norma” configuration, it is recommended to change the front unit installed from the factory. Replacing it is easy, since the characteristics of the devices are the same.
The replacement scheme is similar to replacing a light bulb: a new element will be installed instead of the old light source. When installing LEDs, keep in mind that they differ in brightness color. For the rear light, it is better to make the LED backlight brighter, and put medium-brightness LEDs in front (the author of the video is Repair and Tuning).
After replacing the lighting unit of the Priora Norma configuration with a higher-quality luxury one, the driver becomes more comfortable in the cabin.
Simplicity of installation and low time costs make it possible to replace the standard lighting unit with a more powerful one, or equip the cabin with an additional light source. At the same time, you do not need to have in-depth knowledge of electrical engineering; even a novice driver can perform the replacement.
Price issue
The block (diode) costs 460 rubles. The front Lux package costs 535 rubles.
There are two options to improve lighting by replacing it with LED:
- Replacing a conventional lamp with an LED one. Price 50 rub.
- Replacing a lighting lamp with an LED module - 350 rubles.
- To replace the unit you do not need to remove it, just remove the glass.
- This video demonstrates how to install a rear light in the interior of a Lada Kalina with your own hands (the author of the video is NBI12345).
- The reasons why you sometimes have to remove the interior lamp on a Lada Priora car may be the following:
- Failure of its backlight lamp
- Failure of the interior air temperature sensor
- Mechanical damage to the lamp housing (for further replacement)
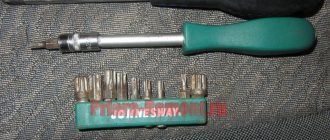
In order to remove the lampshade with your own hands, you will need a minimum of tools, namely:
- Torx bit t 20
- Holder
- Flat blade screwdriver
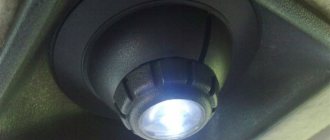
LED navigation light
The first in line to improve the interior lighting is the standard lampshade. To improve lighting, we need to replace the incandescent lamp with an LED one, or use LED panels.
Before starting work, to avoid a short circuit, be sure to disconnect the negative terminal of the battery!
Tools required: slotted screwdriver, soldering iron or solder paste, LED lamp or panel.
1.
Using a flat-blade screwdriver, pry up the housing of the interior lamp on the right side and remove it, disconnecting the power connector.
2.
Next, we take out the incandescent lamp and change it to an LED lamp, with a distance between the contacts from 39 to 42 mm.
Or we use LED boards, they are more efficient and durable than ready-made lamps. Power for the panels can be taken from the copper legs that are used to mount the lamp. You can place the boards as shown in the photo.
Due to the larger number of LEDs, the brightness of LED panels significantly exceeds the brightness of a conventional LED lamp, so this method of improving lighting is the most preferable. Additional light from the courtesy lamp allows you to illuminate a significant area of the vehicle exit area.
3.
After finishing the work, return the power plug to its place and snap the lighting lamp into the frame body.
Required
Lamp lighting, for example:
- from Lada Priora Luxe (catalog number: 21700-3714010-01) together with mounting frame (21700-3714014-01);
- from Sable or GAZelle (CA 453.0031);
- lamp from a foreign car (for example, with this number: 3b0947291);
- any other of your choice.
You will also need several meters of wires.
Where can I buy
: in our online store (category Interior lighting).