The device of the front brake cylinder of the VAZ 2107
Let's first take a look at what brake systems are available in this car model.
There are only two of them: A working vehicle is used to allow the vehicle to reduce speed and stop. The parking lock fixes the vehicle in a stationary state when the driver needs it. They do not depend on each other, but setting off on a journey knowing that one of them is faulty is strictly prohibited. Naturally, the front and rear brakes should also always be replaced in a timely manner.
General structure of the braking system
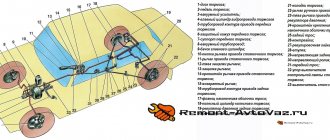
The schematic diagram of the vehicle includes the following elements:
- brake mechanism;
- brake drive.
The brake mechanism implements the function of braking - achieving the torque that is necessary to reduce the speed of movement or stop.
The VAZ-2107 is equipped with a classic version of friction mechanisms based on friction force.
Their design can be represented by the following two options:
- disc (compression mechanism) front brakes;
- drum (unclosing mechanism) rear brakes.
A brake actuator is needed to control the braking mechanisms. There are mechanical, pneumatic, hydraulic, electric and combined operating principles of drives. The VAZ-2107 uses the most common hydraulic principle, based on the action of brake fluid (a special oily substance).
The hydraulic drive circuit includes:
- brake pedal (to control the hydraulic drive);
- vacuum booster (to create additional force when pressing the pedal);
- master brake cylinder with an expansion tank (to ensure an increase or decrease in fluid pressure in the dual-circuit system, as well as to replenish fluid);
- wheel (or working) cylinders (to bring the control functions of the pedal to the brake mechanism);
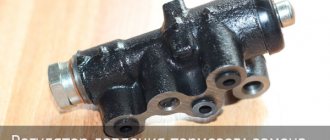
- rear brake pressure regulator (to adjust the braking force as the vehicle weight increases);
- pipelines and hoses (for placing and moving brake fluid throughout the system).
The implementation of braking functions in the VAZ-2107 (as well as in related models - sedans 2101, 2103, 2105, 2106 and station wagons 2102, 2104) involves the use of two parallel independent hydraulic drive circuits. In the event of a malfunction of one circuit, the braking functions are redistributed to the second.
How does it all work
The principle of operation of the VAZ 2107 brake system can be briefly described as follows:
- The driver, while driving along the highway, decides to slow down or stop.
- To do this, he presses the brake pedal with his foot.
- This force immediately falls on the valve mechanism of the amplifier.
- The valve slightly opens the supply of atmospheric pressure to the membrane.
- The membrane acts on the rod through vibration.
- Next, the rod itself exerts pressure on the piston element of the master cylinder.
- The brake fluid, in turn, begins to move the pistons of the working cylinders under pressure.
- Due to pressure, the cylinders are expanded or pressed (depending on whether disc or drum brakes are on a given vehicle axle). The mechanisms begin to rub the pads and discs (or drums), due to which the movement speed is reset.
The system includes more than 30 elements and assemblies, each of which performs its own function during braking
When to change cylinders
The driver needs to regularly (once every 3 months) check the condition of the pads and discs, replacing worn parts of the brake system as necessary. The GTZ can fail after 20-30 thousand kilometers due to wear of parts.
The most common breakdown is jamming of one or more cylinders. If the car “slows down” or pulls to the side while driving, you need to take immediate action.
Other signs indicating possible problems with the brakes:
- There are visible streaks on the body or spar under the turbocharger.
- Constantly shows low fluid level.
- Noticeable overheating of one wheel.
- The driver has to press the pedal hard to slow down.
Basic faults
The brake system itself is quite simple, but some of its elements require special attention. Main types of faults:
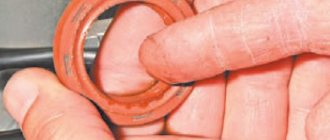
- The brake fluid leaks, resulting in a drop in pressure in the system. If a preliminary inspection does not find a leak, it is necessary to check the brake master cylinder. We bend the noise-insulating mat located under the brake pedal and inspect for streaks in the area of the rubber seal of the master cylinder. The presence of drips will indicate that the cause has been found and requires disassembling the cylinder and then replacing the cuff. If there is a vacuum booster, the brake master cylinder must be removed and inspected.
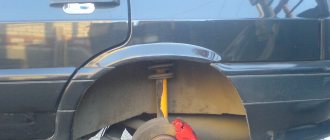
- When you release the brake pedal, the car drives sluggishly. Reason: the rear or front pads are jammed. Seized pads are identified by checking the heat of the corresponding wheel. We touch each disk - the hottest one will be jammed. In the case when these are the front wheels, you can, after removing the wheel, move the brake cylinder. If this fails, you will have to replace it with a new one. In the case of rear pads, the brake wheel cylinder will need to be replaced.
- When you press the pedal, braking does not occur, but it does when you press it several times in a row. This may indicate the presence of air in the system. The solution to the problem is to bleed the brakes to remove air.
- Problem with the handbrake. Most often this problem occurs in winter. It manifests itself in the fact that after a long period of parking, when the handbrake is released, the wheels remain locked. The reason is that the parking brake cable is frozen. During its operation, moisture gets there and freezes in winter. If the casing is severely damaged, it will have to be replaced.
Replacing front brake hoses
Replacing the front brake hoses on a VAZ 2107 is not a difficult procedure, and before performing it, you need to pump out the fluid from the expansion tank. To pump it out, it is better to use a rubber bulb or syringe. Before you start doing the work, you will need to grab a tool and get started.
- First, let's start removing the front wheel from the desired side. We remove the front wheel in order to free access to the hose.
- When access to the eyeliner opens, you must first clean the joints with a wire brush, and then treat them with WD-40 or similar lubricant.
- 5-10 minutes after treating the connections with lubricant, you can begin to unscrew the fittings. To do this, use a special 10 mm key with a slot.
- The key has a special stopper in the form of a bolt, which is screwed in after it is put on the metal tube.
- We proceed to loosen the bracket nut, for which you need to hold the fitting with a key “17”.
- As soon as the connecting coupling on the metal tube is loosened, you can remove the special key and continue unscrewing by hand.
- After disconnecting the hose, a rubber boot must be placed on the end of the tube to prevent dust or water from entering the system.
- To release the second end of the fitting from the bracket, you will need to remove the bracket with pliers.
- Using a flathead screwdriver, unscrew the screw that holds the trim bracket to the caliper. After this, you can dismantle the part.
New hose in place - Using a “14” wrench, you need to unscrew the bolt securing the second fitting.
- The copper washers must be replaced, and then proceed to install the new hose on the caliper. It is important to take into account one nuance - the tip of the fitting should be directed downward, not upward.
After screwing the second fitting, you can begin to perform similar actions, but on the other front wheel. This completes the installation of the front hoses, but do not rush to install the wheels in place, as you will need to perform the procedure of removing air from the system (bleeding the brakes).
Install and screw the locking bracket
How to unscrew an old brake hose
1. Carefully clean with a metal brush all the bolted connections that we will unscrew: the fastening of the brake hose clamp to the working cylinder, the bolt connecting it to the cylinder, the joint between the hose and the brake pipe and their fixing plate. These places are located in the wheel area and serve as an excellent storage area for road dirt and rust. This must be done so that there are no problems when dismantling all these parts.
2. Unscrew the cap from the brake fluid reservoir and instead put on a plastic bag and screw the cap onto the clutch reservoir. This is necessary to seal the brake system. Having done this “trick”, you will not lose much “brake fluid” when replacing the front brake hoses on a classic.
3. Using pliers or round nose pliers, remove the fixing bracket from the junction of the tube and hose. It is needed to prevent spontaneous unscrewing of the fitting.
↑ Disassembly and assembly of wheel cylinders
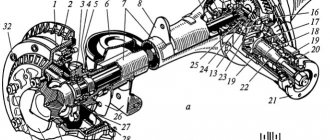
↑ Wheel cylinder design
1 — block stop; 2 — protective cap; 3 - cylinder body; 4 - piston; 5 - seal; 6 — support cup; 7 - spring; 8 - crackers; 9 — thrust ring; 10 - thrust screw; 11 - fitting; A - slot on the thrust ring
- Remove the protective caps 2, then press the pistons 4 assembled with the parts of the device for automatically adjusting the gap between the brake pads and the drum out of the cylinder body.
- Install the piston assembly with the automatic device on a special device so that the projections of the device cover the head of the thrust screw 3.
- Using a special screwdriver, turning piston 9, unscrew the stop screw 3 from the piston.
- Remove seal 8 with support cup 7 and crackers 5 from the screw.
- Disconnect the thrust ring 4 and the thrust screw 3.
Assemble the automatic device for adjusting the gap between the shoes and the drum and the wheel cylinder itself in the reverse order, taking into account the following:
- tighten the piston thrust screws with a torque of 3.9–6.9 N·m (0.4–0.7 kgf·m);
- Slot A on the rings should be directed vertically upward; deviation from the vertical is allowed no more than 30°. This arrangement of the slot ensures more complete removal of air from the wheel brake drive when bleeding the brake;
- To pre-compress the thrust rings, press the pistons into the cylinder body using a special device shaped like a cylinder with a conical internal hole;
- the force of pressing the piston into the cylinder must be at least 343 N (35 kgf); if the force is less than 343 N (35 kgf), replace the thrust ring;
- when pressing the piston into the cylinder, it is necessary to maintain dimensions of 4.5–4.8 mm and 67 mm (maximum) (see figure) for a free fit of the brake drum;
- Before installing parts into the cylinder body, lubricate them generously with brake fluid.
After assembly, check the movement of each piston in the cylinder body. They should move easily within 1.25–1.65 mm. Replace the protective caps 2 last.
Design and purpose of the brake caliper on the VAZ 2107
To understand why the “seven” needs a brake caliper, you should clearly understand how the brake system of this car is designed. First of all, it should be said that the VAZ 2107 has two brake systems: parking and working. The parking system allows you to lock the rear wheels after stopping the car. The working system allows you to smoothly block the rotation of the front wheels while the machine is moving, changing its speed until it comes to a complete stop. A hydraulic braking system consisting of four cylinders, two brake discs, four pads and two brake calipers allows you to achieve smooth blocking of the front wheels.
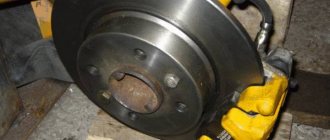
The brake caliper is a housing with a pair of holes, made of light alloy. Hydraulic cylinders with pistons are installed in the holes. When the driver presses the pedal, brake fluid is pumped into the cylinders. The pistons from the cylinders extend and press on the brake pads, which in turn compress the brake disc, preventing it from rotating. This changes the speed of the car. Thus, the caliper body is the basis of the VAZ 2107 working brake system, without which the installation of brake cylinders and discs would be impossible. It should also be noted here that brake calipers are installed only on the front axle of the VAZ 2107.
As for the parking system of the VAZ 2107, it is designed differently. Its basis is large brake drums with internal pads installed on the rear axle of the car. When the driver, after stopping the car, pulls the handbrake lever, the brake pads move apart and rest against the inner walls of the drum, completely blocking the rotation of the rear wheels.
Signs of a faulty brake caliper
There are not many signs of malfunction in the VAZ 2107 brake caliper. Here they are:
- The car does not brake fast enough. This usually occurs due to a brake fluid leak. It can escape either through worn hoses or through hydraulic cylinders that have lost their tightness due to wear. The first version of the problem is solved by replacing the brake hoses, the second - by replacing the damaged cylinder;
- constant braking. It looks like this: the driver, pressing the brakes, stopped the car, and when he released the brake pedal, he discovered that the front wheels remained blocked. This happens because the cylinder pistons are stuck in the open position and the brake pads are still pressing on the brake disc, holding it in place. In such a situation, they usually change the entire caliper, since finding new hydraulic cylinders for the “seven” on sale becomes more and more difficult every year;
- squeaking noise when braking. The driver, pressing the brake pedal, hears a quiet squeak, which can intensify with increasing pressure. If you have to brake sharply and at high speed, the creaking turns into a piercing howl. All this suggests that the brake pads in the caliper have completely worn out, or rather, the coating of these pads. The material that covers the front part of the block has increased wear resistance, however, it eventually becomes unusable, being worn down to the ground. As a result, the brake disc is compressed by two steel plates without a protective coating, which leads not only to a loud squeaking sound, but also to increased heating of the caliper.
↑ Checking wheel cylinder parts
↑ Wheel cylinders
Check the cleanliness of the working surfaces of the cylinder, pistons and thrust rings. The surfaces must be completely smooth, without roughness, to prevent fluid leakage and premature wear of seals and pistons. Eliminate defects on the cylinder surface by lapping or grinding. However, increasing the internal diameter of the cylinder is not allowed.
↑ Wheel cylinder parts
1 — piston assembly; 2 — cylinder body; 3 - thrust screw; 4 - thrust ring; 5 - crackers; 6 - spring; 7 — support cup; 8 - seal; 9 - piston; 10 - protective cap
Check the condition of the thrust screw 3, spring 6, support cup 7 and cotters 5. If necessary, replace damaged parts with new ones.
Replace the seals 8 with new ones. Check the condition of the protective caps 10 and replace them if necessary.
↑ Pads
Carefully check the pads for damage or deformation.
Check the elasticity of the tension springs, both upper and lower; if necessary, replace them with new ones.
The springs must not have residual deformations when stretched with a force of 343 N (35 kgf) for the lower springs and 411 N (42 kgf) for the upper ones.
Check the cleanliness of the linings, if dirt or traces of grease are found, thoroughly clean the linings with a wire brush and rinse with white spirit, in addition, check for any leakage of grease or oil inside the drum; eliminate the faults. Replace the pads with new ones if the thickness of the linings is less than 1.5–2 mm.
↑ Brake drums
Inspect the brake drums. If there are deep grooves or excessive ovality on the working surface, rebore the drums on the machine.
Then use a lathe to sand the drums with fine-grained abrasive stones. This increases the durability of the linings and improves uniformity and braking performance.
The largest permissible increase in the nominal diameter of the drum (250 mm) after boring and grinding is 1 mm. The limits of this tolerance must be strictly observed, otherwise the strength of the drum as well as the braking efficiency will be compromised.
Replacing a brake caliper on a VAZ 2107
To replace the brake caliper on a VAZ 2107, we will need a number of tools. Let's list them:
- open-end wrenches, set;
- new brake caliper for VAZ 2107;
- flat screwdriver;
- a piece of rubber hose with a diameter of 8 mm and a length of 5 cm;
- jack;
- goatee
Sequencing
Before removing the caliper, the wheel behind which it is located will have to be jacked up and removed. Without this preparatory operation, further work will be impossible. After removing the wheel, access to the caliper opens, and you can proceed to the main work.
- The brake hose is connected to the caliper. It is mounted on a bracket that is attached to the caliper with a bolt. The bolt is unscrewed with a 10mm open-end wrench, the bracket is slightly raised and removed.
Video: changing the caliper on a VAZ 2107
Here it is impossible not to tell one case related to the prevention of brake fluid leakage from the “seven” hose. One driver I know, who did not have the above-mentioned rubber plug on hand, found a simple way out of the situation: he pushed an ordinary 19mm bolt that was lying nearby into the eye of the brake hose. As it turned out, the bolt fits the hole in the eye perfectly, and the brake fluid does not leak. There is only one problem: you can only get such a bolt out of the eye using pliers. The same person assured me that another ideal brake hose plug was a stub from an old Constructor pencil. This is a thick Soviet pencil with a round section, and the driver has been carrying it in the glove compartment ever since.
Removing the brake caliper
To remove the caliper you must do the following:
- lift the car on a lift or jack up the wheel on which the brake caliper needs to be removed;
- Using a wrench, remove the bolt securing the brake hose bracket;
- remove the bracket so that it does not interfere with further actions;
Important: under the bracket fastening bolt there is a spring washer, which must not be lost when dismantling the bolt and bracket.
- unscrew the bolt securing the brake hose;
- remove the bolt after first removing the two o-rings;
- insert a rubber tube or bolt of a suitable diameter into the hole in the brake hose tip to prevent brake fluid from leaking out;
- Use pliers to remove the cotter pins securing the brake pad pins;
- pull out the pins securing the brake pads and remove them using a bit or a thin, but not sharp, screwdriver;
- remove the retaining springs from the brake pads;
- remove the brake pads;
Advice: if you plan to use the brake pads in the future, they should be marked with a marker so that during reassembly they can be installed in the same place where they were. If this is not done, they will wear out faster and brake worse.
- bend the locking plates of the washers on the caliper mounting bolts;
- unscrew and remove the bolts securing the caliper to the steering knuckle;
- Remove the brake mechanism (caliper) of the VAZ 2107 from the brake disc.
Important: the upper and lower caliper mounting bolts differ in the shape of the head. When installing the unit in place, it is necessary not to mix them up.
Important points
When repairing the brake system of a VAZ 2107, you should remember several very important nuances. Without mentioning them, this article would be incomplete. So:
- On later VAZ 2107 models, spring washers began to be installed under the fastening bolts of the brake brackets. They are thin and very easy to lose when removing the bracket. To prevent this from happening, it is advisable to spread some newspaper or rag under the caliper. If the puck does pop out, it will be much easier to find it;
- If the driver does not plan to change the brake pads when replacing the caliper, then before removing them they should be marked with a marker or chalk so that they can be installed in the same place during reassembly. If you change the original location of the pads, they will become unusable much faster;
- If the driver decides to leave the caliper in place and plans to change only the brake pads, then he will have to buy not one, but two sets of pads, since these parts are always changed on two wheels, and not on one. If you leave old pads on one of the wheels, this will inevitably lead to rapid wear and new problems in the operation of the brake system;
So, replacing a brake caliper is not at all as difficult a task as it might seem at first glance. The main thing that the driver should remember when changing this part is its extreme importance. If a mistake is made when installing the caliper or pads, this does not bode well for either the driver or the car. It is for this reason that the article described in as much detail as possible all the nuances of installing a brake caliper. And it is strongly recommended to pay close attention to these nuances.
Source