Bleeding ABS brakes is essential for safe vehicle operation. After replacing the brake fluid, remove any remaining air from the system. The procedure for bleeding brakes with ABS confuses many drivers, since the process differs from that on cars where this system is not provided.
Have you ever needed the help of a car lawyer?
Not really
It is no more difficult to bleed a brake system with ABS than a conventional one. The main difference lies in the accumulator and valves, from which it is not so easy to remove air. However, if you have certain knowledge and skills, it is quite possible to bleed ABS brakes yourself, without the help of specialists from a service station.
Several ways to bleed the brake system
Let us remind you that bleeding the brakes is very important for accident-free situations on the roads; keep an eye on the ABS brake bleeding system. Bleeding ABS brakes is possible in several ways, and their implementation depends on the design of the entire complex. There are two ways to remove air from the brake system, but in any case, you will need an assistant. The process of bleeding a brake system with ABS cannot be considered labor-intensive or complicated.
Method No. 1
After completely disabling the ABS system, you need to do the following:
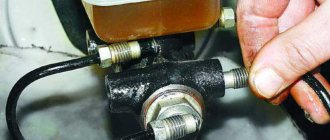
- First, you need to bleed the unit farthest from the master cylinder - the rear wheel on the right side. You need to put one end of the hose on the fitting, and lower the other end into a bottle of brake fluid. You need to have an assistant behind the wheel who will press the brake with your foot. And press until the air is completely removed.
- While the assistant holds down the gas pedal, you need to unscrew the fitting. After the liquid or air stops flowing, you must immediately tighten the fitting. This operation must be repeated several times if bubbles still come out of the working cylinder.
- Then you can move to the rear left wheel and do the same actions.
- After this, we move to the right front caliper, and finish pumping the brakes on the left front caliper.
- When each slave cylinder has been bled, it's time to look at how much fluid is in the expansion tank. The main thing is not to allow the brake fluid to completely drain from the reservoir, because then air will enter the system.
Method number 2. Using a special pump, bleed the brakes
If it is possible to connect a pump, then you can use this method to pump the brakes, but you will also need a partner for this. It is imperative that after the brake bleeding process is completed, before leaving, you need to check the tightness of the system and the absence of leaks. Check the brake fluid level.
- To bleed the right rear cylinder, you need to put a hose on the fitting on one side, and on the other side, also put the hose in a bottle with brake fluid. Then you need to unscrew the fitting about 1.5 turns.
- The assistant will also press the brake pedal and turn on the engine. The attached pump will create pressure in the brake line and expel all the air. After the bubbles stop flowing into the bottle, you just need to turn off the engine.
- The rear left wheel is pumped a little differently. The hose is attached to the fitting and lowered into the liquid, and the drain must be unscrewed 1 turn.
- Turn on the engine and when the bubbles enter the bottle of liquid, you will need to press the brake pedal about halfway, after which you need to quickly tighten the fitting.
- Then you can release the pedal and turn off the engine.
- The main thing is to add brake fluid to the reservoir on time.
- When bleeding of the brakes has come to an end, you need to tighten all the fittings, screw on the cap on the reservoir and reconnect all previously disconnected connectors. Look under the bottom and check how tight the pipelines, fittings and cylinders are. And if nothing leaks anywhere, then everything is fine with the car and you can drive safely. Good luck in completing the solution to the problem of bleeding brakes with ABS.
When bleeding ABS brakes, during work, care must be taken to ensure that the pump does not run without fluid. Remember that the braking system is an extremely important component, and timely bleeding of the brakes ensures the safety of the car and may not only save your life.
Video tip - Quickly pumping brakes with ABS on BMW 75o:
2304-3-20-03
The fastest filling, as a rule, occurs in the case of a bottle in which the hose coming from the brake cylinder of the front left wheel is lowered. As soon as there is about 200 ml of liquid in the bottle of the front left wheel, wrap and tighten the fitting of the local cylinder. We repeat the same with the front right wheel. We complete the process on the rear axle - here 200-250 ml of liquid should pass through each fitting.
That's it, the brake fluid replacement is complete. All that remains is to make sure that all fittings are tightened tightly. We put on the protective caps, check the fluid level in the master cylinder reservoir - and off we go.
Anti-lock braking system ABS: types, types
Depending on the type and type, ABS is classified into:
- One scheme of operation of the ABS system is when all the devices that make up the ABS are located in one unit. That is, the hydraulic valve block, hydraulic accumulator and pump are located in one unit.
- The second ABS scheme is when the component devices (hydraulic valve block, hydraulic accumulator and pump) are located in different places. In this type of braking system, in addition to the ABS module, there is also an ESP module and an SBC module.
If the car has a system of the first type, then it is easy to properly pump the ABS.
If the car has a system of the second type, then one cannot cope without a scanner; it needs to be pumped to a service center for maintenance.
The ABS system consists of:
- Sensors (installed on the hubs). When replacing rear wheel hubs, as well as some front ones, you may notice special recesses for sensors. They are engaged in transmitting data about the speed of movement.
- Control valves (installed in the brake system). Serve to change the pressure in the system.
- The electronic unit. Receives speed information from sensors and adjusts control valves.
Replacing brake fluid on a Priora with ABS do-it-yourself video
Good day, dear car enthusiasts! There is most likely no driver among us who has not at least once experienced a feeling of helplessness at the moment of braking. When the car continues to move, and not at all in the direction the driver wants. Skid.
Fortunately, engineering does not stand still. The modern driver is armed with a system such as ABS. Let's take a closer look at the ABS system and see if it is possible to bleed ABS brakes yourself.
What is car ABS
ABS (Anti-lock Braking System) is an anti-lock braking system that prevents the wheels from locking during emergency braking.
The main task of ABS is to regulate the speed of rotation of all wheels. This is done by changing the pressure in the car's brake system. The process occurs using signals (pulses) from each wheel sensor that enter the ABS control unit.
How the anti-lock braking system works
The contact patch of the car's wheels is relatively stationary to the road surface. According to physics, the wheels are affected by the so-called. static friction force.
Taking into account the fact that the static friction force is greater than the sliding friction force, ABS effectively slows down the rotation of the wheels at a speed that corresponds to the speed of the car at the moment of braking.
At the moment the braking begins, the anti-lock braking system begins to constantly and quite accurately determine the rotation speed of each wheel and synchronizes it.
Anti-lock braking system device
Here are the main components of ABS:
- sensors installed on the wheel hubs of a car: speed, acceleration or deceleration;
- control valves installed in the line of the main brake system. They are also components of the pressure modulator;
- ABS electronic control unit. Its task is to receive signals from sensors and control the operation of valves.
Bleeding brakes with ABS, taking into account the characteristics of the system
Bleeding an ABS brake system will require you to have certain technical skills. In addition, it will not be superfluous to first study the manual on the design and maintenance of the brake system of your car.
Features of bleeding brakes with ABS:
- in cars that have a hydraulic valve block, a hydraulic accumulator and a pump in one unit, replacing the brake fluid and bleeding the brake system with ABS is done in the same way (you need to turn off the system by removing (disabling) the fuse). Bleeding of the circuits is carried out with the brake pedal pressed, the RTC bleeder fitting must be unscrewed. The ignition is turned on and the pump expels air from the circuit. The bleeder screw is tightened and the brake pedal is released. An extinguished ABS fault light is evidence that your actions were correct.
- Bleeding the brake system with ABS, in which the hydraulic module with valves and the hydraulic accumulator are separated into separate units, is carried out using a diagnostic scanner to retrieve information from the ABS ECU. It's unlikely you have one. Therefore, bleeding of brakes with ABS of this type should most likely be done by you at a service station.
- Bleeding the brake system with ABS and electronic activation systems (ESP or SBC) is carried out only under service conditions.
How to bleed ABS brakes?
Technology for bleeding the brake system with ABS
Bleeding brakes with ABS, like bleeding a conventional brake system, is done with an assistant. Turn off the ignition (position “0”). Disconnect the connectors on the brake fluid reservoir.
Front wheel brakes:
- put the hose on the bleeder fitting;
- open the fitting back;
- the brake pedal is pressed all the way and held in the depressed position;
- we observe the release of an “aired” mixture;
- tighten the fitting and release the pedal.
Rear right wheel brake:
- put the hose on the bleeder fitting, unscrew it one turn;
- press the brake pedal all the way, turn the ignition key to position “2”. In this case, the brake pedal is held in the pressed position;
- a running pump will expel air from the system. That is, as soon as the brake fluid begins to come out without air bubbles, close the fitting and release the brake.
Rear left wheel brake
- The hose is put on the fitting and unscrewed 1 turn;
- DO NOT press the brake pedal;
- a working pump pushes out the “aired” mixture;
- press the brake pedal halfway and tighten the fitting;
- release the pedal and wait until the pump stops completely.
In reverse order: ignition key to “0”, connect the connectors to the brake fluid reservoir, check the brake system for leaks (see ABS fault indicator).
Good luck with bleeding your ABS brakes.
We recommend reading:
Useful tips
How to bleed ABS brakes on Priora, Kalina and Honda Civic correctly? To prevent the work from causing harm to your car, and you don’t have to take it to a car service center, you should remember a few rules. Self-replacement of brake fluid for Lada Priora. Step-by-step writing of the work with illustrations.
Firstly, you do not need to turn on the ignition for more than 15-20 seconds. Otherwise, this will lead to failure of the electric pump. Secondly, it is necessary to take breaks between pumping the wheels. After all the air (aired mixture) has come out of one wheel, you should not immediately move to the second. You need to wait about 5-10 minutes until the air in the system completely disappears.
- Why does the electric power steering turn off on a Kalina? Replacing the electric power steering control unit
- Fuse block Kalina 2, its diagram, assignment of all fuses and relays (21925, 21927 Lux)
- Vaz Kalina tire sizes - Size tables
- How to tighten the handbrake on Kalina or replace its cable
FAQ
- Literally, ABS (Anti-lock Brake System) stands for an anti-lock braking system, which is used during emergency braking, when you have to suddenly and suddenly press hard on the brake pedal in order to avoid a collision with an obstacle. Presumably we can say that this is an additional device in the car that helps to hold the road by alternately releasing the wheels from braking at a frequency of several times per second.
- One of those who first came up with such a system was Heinz Lieber in 1964, but the first working example of ABS was made by Hans Scherenberg. And already 8 years later, Bosch used this anti-lock braking system on luxury Daimler-Benz cars. However, at that time she was very huge compared to what she is now, weighing almost 7 kilograms.
How does ABS work?
The principle of operation of the anti-lock system is to alternately create pressure in the brake circuits and the pressing force of the brake pads to the disc. This is done with a special pump, supplying brake fluid from the hydraulic unit to the working brake cylinders or blocking its flow with electric valves.
Triggering occurs cyclically in 3 phases. Based on data from the sensors, the ABS control unit issues commands to: hold, release or increase the brake fluid pressure in the circuit of the brake cylinder of a certain wheel.
When the control unit has created braking force to the point where there is a danger of blocking, the inlet valve of the valve body closes. Then, provided that the exhaust is also blocked, the force is applied to the working brake cylinder of the caliper. Then, in order for the pads to press out, the exhaust valve opens so that the fluid flows into the pressure accumulator and the wheel can spin. And in order for the pressure to be released faster, the liquid is pumped into the damping chamber in the opposite direction (at this moment vibration appears on the pedal). After which the cycle is repeated, the electronics of the ABS unit close the magnetic exhaust valve and open the intake valve to again create pressure in the circuit. The system turns on when the vehicle speed exceeds 10-15 km/h; if it is lower, it should not work.
The point of the work is to keep the wheels on the verge of blocking, allowing them to spin and slow down at the same time, regulating and distributing the braking force across the wheels on which the sensors are installed.
How does ABS affect automatic transmission?
On many modern cars, the ABS unit is connected to the automatic transmission, and if there are problems with it, the car may behave differently depending on the type of problem (the speedometer will stop working, the car will be blocked for diagnostics, the emergency mode of the automatic transmission will turn on, etc.).
How do ABS sensors affect? Indirectly. They transmit speed data directly to the wheels to provide the necessary performance indicators for the gearbox. Making it possible to use various additional motion functions with a certain differential difference between the speeds of rotation of the wheels on different axles or sides of the car and the shafts of the box itself. If the connection from the sensors to the ABS unit or to the transmission control unit is broken, or incorrect data is received, the automatic transmission goes into emergency mode. This protection is triggered at speeds over 40 km/h.
Related terms
- Caliper
- Speed sensor
- Vacuum brake booster
Types of brake fluid
As you may notice, there are two classes often mentioned in brake fluid descriptions: DOT3 and DOT4. They are similar in many ways. Polyethylene glycol is used as the basis for their production.
DOT is an acronym derived from the English phrase Department of Transport (US Department of Transportation). This department sets boiling point requirements.
To receive the DOT3 or DOT4 label, brake fluids must meet specifications.
There are also brake fluids of class DOT 5. The fact is that this class has a fundamental difference from the other two, since DOT5 is made on the basis of silicone.
Thanks to this, it can be used under high load conditions and at very low temperatures. This type of brake fluid is used in various military vehicles deployed around the world.
So, if you do not plan to travel on military equipment, then choose the DOT3 or DOT4 marking.
How many TJs are contained in VAZ models?
Most often, quite practical and inexpensive Dot 4 liquid is poured into the cars of the Volzhsky Automobile Plant. The systems of classic models (from VAZ-2101 to VAZ-2107) do not contain so much of it - 0.55 liters, but more modern Ladas (VAZ-2114, “Kalina”, “tenth” family) already require a whole liter of brake fluid. However, if you plan to flush the system, it is better to purchase a little more liquid than required. One and a half liters will be enough, but since packaging is done only in liter containers, it is better to take two such packages.
It is also useful to know that most of the liquids used (in particular Dot 3 and Dot 4) cannot be stored open for too long: a maximum of two years!
The brake system is one of the important systems in a car, because without brakes it is impossible to imagine a single trip, even the shortest one. The brake system is made up of many parts, but the blood in its veins is brake fluid. We choose high-quality brake fluid for the VAZ 2110. Why do you need to change the brake fluid? Brake fluid is used under difficult conditions, as a result of which, even during quiet driving, it can heat up to +150-180`C.
New high-quality brake fluid copes with its duties without difficulty. But during operation it inevitably absorbs moisture, which causes the boiling point to decrease. As soon as the brake fluid collects a large amount of water, it can already boil at 145-160`C. What causes “vapor blocking of the brakes” is when, due to a sharp expansion of the formed bubbles, part of the liquid is squeezed out into the reserve tank, and when the pedal is pressed, the liquid remaining below cannot create the required pressure, i.e.
K. Saturated with bubbles, and the pedal falls through. How to check the condition and level of brake fluid? The brake fluid level is checked by the level on the barrel. The condition of the brake fluid is determined by its color.
If it is darkened or has a rusty color, then it should be replaced. How long does it take to change the brake fluid in a VAZ 2110? According to the regulations, after 45,000 km or 3 years, whichever comes sooner. Which brake fluid to choose for VAZ 2110? Brake fluid, like fuel and lubricants, should be purchased from a trusted brand and in trusted places, this way you will protect yourself from purchasing a low-quality product.
When choosing, you can rely on survey results or comments. What type of brake fluid should I choose for the VAZ 2110? Brake fluid is classified as DOT 3, 4, 5 and 5.1. DOT 5.1 (glycol base) on road sports cars where the thermal stress on the brakes is significantly higher. DOT 5 (silicone) is practically not used on conventional vehicles.
Glycol-based brake fluid absorbs water and attacks paint. Silicone brake fluid does not absorb water or corrode paint, but does require good brake bleeding. Otherwise, all the moisture in the hydraulic system will accumulate in one place and can cause localized corrosion in the hydraulics. Brake fluid compatibility All brake fluids are interchangeable in nature. That is, DOT 3, 4, 5 are interchangeable.
1, and DOT 5 only with itself. How to replace brake fluid in a VAZ 2110? You can change the brake fluid according to the instructions. So, let’s vote and leave reviews about the brake fluid for the VAZ 2110-12. Which brand of brake fluid did you choose? What type of brake fluid do you use? What brake fluid was used before? After how long do you change the brakes?
>
Advice from experienced car owners
VAZ 2107 bleeding the brakes
We found out how often the brake fluid is changed. Below are some warnings for experienced drivers:
- replace based on the manufacturer's recommendations;
- mix TFs within the same class (it’s better to always use the same one);
- – follow the instructions;
- there should be no H2O;
- if contaminated, prompt replacement is required;
- in a car without ABS, do not allow the fuel fluid level to reach a critically low level when pumping;
- do not create excess pressure in the expansion tank;
- Wipe the tank only with a cloth (water is prohibited).
When deciding to change the solution, take into account the mileage and condition of the car’s brakes. Don't forget the car manufacturer's recommendations. The shelf life of the brake fluid is limited, and it must be renewed.
If you prefer to contact a specialized service station, use Uremont. Here you will quickly find a car service suitable for your location, read reviews from aggregator visitors and receive a response to your application in an average of ten minutes.
It is convenient to clarify questions about cost in a special chat with representatives of partner car services. We work for Russia, Kazakhstan and Belarus. We provide technical support around the clock.
Is it possible to mix brake fluids?
Important! Is it possible to mix brake fluids? Due to the fact that DOT 5 uses different chemicals that are found in DOT 4 and DOT 3. Therefore, DOT 5 should not be mixed with DOT 4 or DOT 3
Also, if the operating instructions for a particular car say that brake fluid other than DOT 5 cannot be used, then DOT 3 and 4 cannot be poured into the brake system of such a car.
How often should you change the brake fluid in your car?
The frequency of TJ replacement depends on the following factors:
- type of brake system;
- operating conditions of the vehicle;
- brake fluid class;
- composition (the basis on which the fuel fluid is produced).
For most cars, the service interval for replacing brake fluid is 40 thousand km, if the temperature in the system does not consistently rise above 150 degrees. For sports cars and premium cars, it is recommended to completely change the brake fluid every 20 thousand km. More information about the terms of use and the procedure for replacing brake fluid can be found in the car’s operating instructions.
Experts believe that it is undesirable to simply add brake fluid from time to time. Even if most of the fluid is renewed, its properties will differ from those of a completely replaced fluid. The same applies to mixing formulations of different brands and classes.
Sometimes the color of the fluid may indicate the need for replacement. Optimally, if the glycol liquid is light yellow or light brown, the silicone-based composition is dark red. It is worth replacing the fluid completely or contacting a service technician if the color has changed significantly, the liquid has become cloudy, or sediment has appeared in it. Delay threatens breakdown.
How to change the TJ?
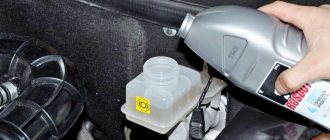
- Open the tank.
- With a slight movement, unscrew the fittings involved in bleeding on the brake cylinders of a certain circuit and pull the rubber hose onto them.
- Place the ends of the hose in a container of water and completely pump out the fluid from the system using the brake pedal.
- Pour new fluid into the reservoir until clean fluid comes out of the hose.
- Tighten the fittings and pump the fluid by pressing the pedal to remove air from the system. As soon as liquid without air begins to emerge from the hoses of all four tubes, the hoses are removed and the reservoir cap is returned to its original place. The calipers and cylinders are replaced in the same way.
If you are not sure about the correctness of your own actions to replace the brake fluid, contact specialists at the official service centers of FAVORIT MOTORS Group of Companies. Experienced technicians will quickly and efficiently diagnose the system and perform all necessary work in accordance with the manufacturers’ recommendations. Don't risk your safety, turn to professionals!
Sources
- https://oooyuma.ru/uhod-za-avtomobilem/skolko-nuzhno-tormoznoj-zhidkosti-dlya-zameny.html
- https://etlib.ru/blog/610-skolko-tormoznoj-zhidkosti-nuzhno-dlya-zameny
- https://favorit-motors.ru/articles/obsluzhivanie-i-remont/zamena-tormoznoj-zhidkosti/
- https://autostuk.ru/skolko-tormoznoj-zhidkosti-nuzhno-dlya-zameny.html
- https://nahybride.ru/hodovaya-chast/zamena-tormoznoj-zhidkosti-svoimi-rukami
- https://zen.yandex.ru/media/uremont/kak-chasto-nujno-meniat-tormoznuiu-jidkost-v-avtomobile-5c98956b3bbd5d00b3568ec3
What is car ABS
ABS (Anti-lock Braking System) is an anti-lock braking system that prevents the wheels from locking during emergency braking.
The main task of ABS is to regulate the speed of rotation of all wheels. This is done by changing the pressure in the car's brake system. The process occurs using signals (pulses) from each wheel sensor that enter the ABS control unit.
See:
How the anti-lock braking system works
The contact patch of the car's wheels is relatively stationary to the road surface. To remove air from the system, it is necessary to bleed the brakes. From the brake pedal. Threshold covers are installed for the purpose of protection. As we can see, remove the threshold and replace it. According to physics, the wheels are affected by the so-called. static friction force.
Taking into account the fact that the static friction force is greater than the sliding friction force, ABS effectively slows down the rotation of the wheels at a speed that corresponds to the speed of the car at the moment of braking.
At the moment the braking begins, the anti-lock braking system begins to constantly and quite accurately determine the rotation speed of each wheel and synchronizes it.
Anti-lock braking system device
Here are the main components of ABS:
- sensors installed on the wheel hubs of a car: speed, acceleration or deceleration;
- control valves installed in the line of the main brake system. They are also components of the pressure modulator;
- ABS electronic control unit. To ensure effective and safe braking in the grant with external brakes on. Its task is to receive signals from sensors and control the operation of valves.
Conclusion
After carrying out repair and maintenance work on critical components of the car, before driving, you must first check the tightness of the system and the operability of the vehicle components.
ABS - Anti-lock Braking System is a system against wheel locking during heavy braking. Thanks to the fact that ABS prevents the car from skidding along the road, safety increases in emergency situations. The anti-lock braking system will operate correctly if the system is not air-filled.
Watch this helpful video. Tests show that even a working ABS system turns off at the end of the braking distance, so you still need to modify it with your foot.
The Lada brake system is responsible for the safety of the driver and passengers of the vehicle, so it needs to be checked regularly. The serviceability of the brake pads should be checked at least once a month.
How to properly and quickly bleed ABS brakes with your own hands
The procedure for bleeding the brakes is influenced by the design of the system, the location of components and the presence of additional electronic modules. The correct sequence is important. You need to start by relieving the pressure in the hydraulic accumulator. To do this, you need to turn off the ignition (it is not necessary to start the engine) and pump the pedal.
A simple secret to quickly pumping brakes. Video:
Read how to bleed ABS brakes and stock up on the following materials, parts, accessories and tools:
- spanner;
- a rubber (possibly plastic) hose with a diameter corresponding to the thickness of the fitting tip;
- brake fluid;
- container (necessarily transparent). This is where you will drain the old brake fluid.
Bleeding ABS brakes, where the components are located in one unit, differs little from the standard procedure. The only thing you need to do is turn off the system by pulling the fuse. This method works on domestic Ladas.
You can take advantage of the built-in pump. Then you will have to pump with the ignition on or even with the engine running. The sequence and order of bleeding the brakes starts with the right front cylinder and looks like this:
- disconnect the terminal of the level control sensor fixed on the expansion tank cover;
- remove the cover;
- open the brake reservoir;
- fill the reservoir to the brim with brake fluid;
- put the hose on the tip of the fitting;
- lower the end of the hose into a container to collect liquid;
- open the fitting by turning it a quarter or half a turn;
- to activate electronic systems, turn on the ignition;
- release the brake;
- wait until the pump expels the airy mixture;
- release the brake pedal;
- Tighten the fitting with a wrench.
The brake bleeding scheme is no different on any car, be it Patriot, Lacetti, Ford, Passat, Gazelle. First, air is removed from the “far” circuit (for “left-hand drive” cars it is on the right), then from the “near” circuit.
To bleed a system with components located in different places, a diagnostic tester is needed. It connects to the car and allows you to control electronic components using a smartphone or computer. In this case, you will also have to unscrew the fittings and drain the airy liquid. However, no manipulation of the pedal is required. Instead, the valves and electric pump must be activated using the appropriate menu items. This way you can bleed the systems on the VW Passat B6 and other modern cars.
Bleeding the brakes using the Priora as an example
Before you bleed the ABS brakes, you will have to drive the car into a pit. This will help you gain convenient access to the fittings on the rear cylinders and will allow you to avoid removing the discs during operation. On the Priora, the procedure for pumping brakes with ABS does not differ from that adopted on simpler models. The only difference is that the work must be performed by first turning on the ignition. In this case, the solenoid valves will be in the open position.
How to properly bleed the brakes on a Priora with abs with your own hands, video:
Step by Step Actions
The nuances of pumping depend directly on the ABS model. The location of individual components and the presence or absence of additional modules affect the order of the procedure.
The preparatory stage is the same regardless of the car brand. Turn off the ignition and press the brake pedal intensely several times.
Pumping using the example of Lada Granta
The car is placed on an overpass or driven into a pit. This is necessary so that you do not have to remove the disks for free access to the working surface. Next, turn on the ignition to open the solenoid valves. Start the procedure with the right rear wheel.
To bleed the brakes you need:
- Disconnect the wires from the tank cap;
- remove the cover;
- pour brake fluid into the reservoir (as much as will fit);
- remove the cap;
- use a spanner wrench to loosen the tension on the fitting;
- the prepared hose is connected to the tip of the fitting;
- place the second end of the hose in a container for waste liquid;
- press the brake pedal several times;
- fix the pedal in the lowest position and hold it;
- use a key to open the fitting;
- wait until the liquid has completely drained (at this moment the brake pedal will “fall” to the floor);
- close the fitting;
- pump the pedal again and repeat the procedure until the liquid flowing from the hose no longer contains air bubbles;
- tighten the fitting;
- remove the hose;
- reinstall all parts.
The process is repeated on each wheel in order of priority.
Bleeding the brakes of Lada Priora
The process of bleeding the ABS brake system for the Lada Priora is similar to the previous one. When bleeding the front wheels, the discs are removed, providing better access to the working surface.
After completing the process, you should not immediately drive out onto the road. First, they check the functionality of the system in a safe area, eliminating leaks and failures of the pedal.
Preparing to replace the brake fluid of a car with ABS: conditions and necessary tools
When servicing a vehicle's deceleration system, free access to the working cylinders of each wheel is necessary. Therefore, the most suitable place for work is an inspection ditch or overpass.
When performing the procedure, you will need an assistant and a set of equipment:
- set of open-end wrenches;
- a large-volume medical syringe and a hose corresponding to the diameter of the tip, about 10-15 cm long (an alternative is a pear);
- container for extracted brake fluid;
- tube 20-30 cm long; the diameter is slightly smaller than the diameter of the fitting on the brake cylinders (to ensure tension).
Alternative solution to the issue
The operating manual for a car with ABS may stipulate the presence of a drain fitting in the design of the anti-lock module. To service such a system, you may need a compressor or a homemade installation in the form of a pear and a modified brake fluid reservoir cap. The replacement technology in this case looks much simpler:
- remove the used liquid from the container and fill it with new one;
- bleed all four brake cylinders using the classical method according to the scheme specified by the manufacturer;
- install a special adapter for the compressor or a home-made installation instead of the brake reservoir cap;
- connect a hose to the drain fitting of the anti-blocking module and unscrew it 1 turn;
- create a pressure of about 1 BAR;
- identify the end of the release of old liquid and bubbles;
- relieve pressure.
When replacing used brake fluid with new brake fluid in an ABS system, the following notes should be taken into account:
- constant monitoring of the liquid level in the tank is necessary: a decrease below the minimum mark (MIN, Low) is not allowed;
- The permissible operating time of the hydraulic pump is 2 minutes; if it exceeds, turn off the ignition and allow the unit to cool for 5-10 minutes.
- before draining the fluid, it is necessary to discharge the system by pressing the brake pedal at least 20 times;
- It is strictly prohibited to pour used liquid or a composition that has stood for a long time in an open container;
- When you turn on the ignition and the drain plug is open, you should be prepared for a sudden release of liquid.
Possible mistakes
In order for the procedure to be effective and not lead to new problems, you should know common mistakes. The most common ones include:
- mixing two different brake fluids;
- reducing the fluid level in the system to critical;
- pressure too high.
If you mix two brake fluids with different parameters, the rubber seals are damaged. The system becomes clogged with clots and stops working.
When the fluid level in the reservoir is too low, air gets into the brake system and it fails. Also, do not use excessive force when pumping. The recommended pressure in the tank is 0.8 atmospheres. If excessive pressure is created, the tank will leak.
Features of brakes with ABS (anti-lock braking system)
After the creation of the first hydraulic brakes, it soon became clear: completely jamming the wheels with pads does not improve braking performance at all. Moreover, it creates dangerous drifts. At first, drivers were taught jerk braking, that is, not keeping the pedal pressed constantly, but “pumping” by releasing and pressing the pedal with high frequency. The method is not very effective, because in critical situations, most drivers press the brake pedal firmly to the floor. And the same ABS was developed that is found on many Priora models.
Operating principle of ABS
The basis of ABS, as in all systems of modern cars, is a computer. It is he who controls all the actions of the anti-blocker. ABS is practically built into the Priora braking system. The fluid from the main cylinder enters the “hydraulic unit”, in which the ECU (electronic control unit), pressure control valves and ERP (electric return pump) are mounted. In accordance with the signals from the wheel speed sensors, the ECU opens and closes the valves and, releasing pressure, creates the very necessary jerky “pumping” effect. Even if the driver presses the pedal without releasing it.
Downloading a book
After successfully completing the payment (by any method) and returning to the KrutilVertel store from the payment system website, you will be taken to the successful payment page:
The book you purchased will be in your personal account, from where you can always download it.
Please note that after making the payment, you need to return back from the payment system website to the KrutilVertel website. If for some reason you did not return back to the site and closed the payment system tab with a message about the successful completion of the payment, please let us know - we will send you a letter indicating access to download the book. If for some reason you did not return back to the site and closed the payment system tab with a message about the successful completion of the payment, please let us know - we will send you a letter indicating access to download the book
If for some reason you did not return back to the site and closed the payment system tab with a message about the successful completion of the payment, please let us know - we will send you a letter indicating access to download the book.
Bleeding brakes on Lada Priora
After servicing or repairing the brake system of a Lada Priora, it is necessary to bleed the hydraulic brakes to remove excess air. I don’t think it’s worth talking about what the consequences may be if you ignore this procedure.
– when you press the pedal once – increased pedal travel, its “softness”;
– with repeated pressing of the pedal - a gradual decrease in the pedal stroke with a simultaneous increase in its “hardness”.
Before bleeding the hydraulic drive, it is necessary to identify and eliminate the cause of depressurization.
Helpful advice.
If pumping a hydraulic drive is associated with the repair of one circuit and the serviceability of another circuit is known, then pumping only the circuit being repaired is permissible.
Sequence of bleeding the brakes:
You will need:
"8" wrench, rubber hose, container for collecting brake fluid.
Self-bleeding brakes on Lada Priora
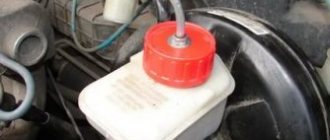
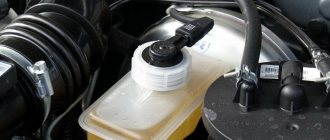
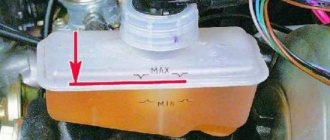
1. Check the level and, if necessary, add brake fluid to the master cylinder reservoir to the “MAX” mark.
Attention. Only add brake fluid of the same grade as that used in the system. Please note that on our website there is already a publication about bleeding the brake system of a VAZ 21099 with your own hands
2
Please note that on our website there is already a publication about bleeding the brake system of a VAZ 21099 with your own hands. 2. Place the vehicle on an inspection pit or lift
Place the vehicle on an inspection pit or lift
2. Place the vehicle on an inspection pit or lift.
3. If the rear wheels are suspended, first unlock the rear brake pressure regulator by inserting a screwdriver between the plate and the piston. Don't forget to remove it when finished.
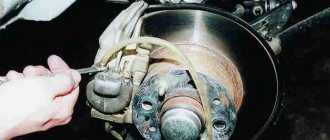
4. Clean the air release valve on the brake mechanism from which air is supposed to be removed from dirt and dust.
5. Remove the protective cap from the air release valve.
6. Place the rubber hose over the valve head and immerse the end in a clean, transparent container partially filled with brake fluid (the end of the hose should be immersed in the fluid).
7. An assistant must sharply press the brake pedal 4–5 times (with an interval of 1–2 s between presses). After the last swing, you need to keep the pedal pressed.
8. Unscrew the air release valve 1/2 to 3/4 turn. Air bubbles will be visible in the liquid flowing from the hose. When the fluid stops flowing from the hose, close the air release valve completely, after which the assistant should release the brake pedal.
9. Repeat steps 7 and 8 until there are no air bubbles in the flowing liquid. At the same time, monitor the brake fluid level in the reservoir and, if necessary, add fluid, not allowing the level to drop below the “MIN” mark.
10. Remove the hose, wipe the air release valve fitting dry and put the protective cap on it. Bleed the brakes of the remaining wheels if necessary.
Notes.
Do not reuse brake fluid that was drained when bleeding. If the brake system hydraulic drive is not pumped thoroughly enough, then when you press the pedal at the end of its stroke, you will feel an increased “softness” of the pedal.
Recommendation.
There are two ways to bleed the hydraulic brake system without an assistant. The first is the most reliable: order a turner an aluminum or bronze cover for the main brake cylinder, screw the valve from the camera into it and connect it to the spare wheel with an additional hose; air pressure should not exceed 0.05–0.07 MPa (0.5–0.7 kgf/cm2). The second is not very reliable, but acceptable: connect the rubber bulb to the wheel cylinder fitting - the connection should be very tight. Squeeze the bulb, unscrew the fitting; When the bulb is half full, tighten the fitting. Repeat the procedure three to four times. During test braking, check the operation of the brakes.
Do-it-yourself brake bleeding on the Lada Priora has been successfully completed. Let us remember that the previous article was about replacing the wheel bearing on a Lada Priora.
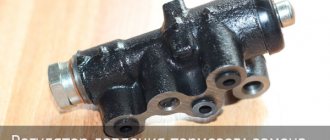
Main signs of GTZ breakdowns
Lada LadaThe main task of this unit is to uniformly distribute the working fluid of the hydraulic system along the contours. Therefore, the slightest imbalance leads to a decrease in braking efficiency.
To determine the condition of the master cylinder or the need to replace it, experts advise paying attention to factors such as:
- readings of the warning lamp on the dashboard;
- brake oil leaks;
- cracks on the body
If at least one of these signs is detected, repairs should be started immediately. It is possible, of course, to partially restore defective parts, but practice shows that it would be more rational to install a new assembly.
Replacing brake fluid on Kalina
Welcome! Brake fluid - although it is called brake fluid, in some cars, namely in classics and Nivas, it is also used in the clutch mechanism, and all this is because on these cars the clutch mechanism and the brake mechanism work according to the same principle, but on front-wheel drive, the clutch is no longer engaged due to the fluid, but due to the cable that comes from the pedal and is connected to the box, but we are now talking about the brakes and not the clutch, we will try to explain to you why this particular fluid is present in the brake system, that’s all the fact is that this liquid is not compressed and therefore when you press the pedal, the rod, which is located in the main brake cylinder, moves forward and in connection with this the liquid moves and all the pistons on four wheels push the brake pads and thus braking occurs if If you are interested, you can learn more about this from the article entitled: “The principle of operation of the brake caliper and why is it needed?”
Note! To carry out the procedure for changing the fluid on your car, you will need: Firstly, the new brake fluid itself, secondly, a set of wrenches, and also a thin hose will need a suitable diameter, namely one that will fit onto the fitting when bleeding (If you don’t know nothing about this fitting, then don’t change the fluid yet, but at the beginning just read the article in detail and you will understand what we are talking about, then using this fitting you will select a thin hose for bleeding), and the container itself is 1-2 empty liters will be needed in order to drain all the old fluid from the system into it!
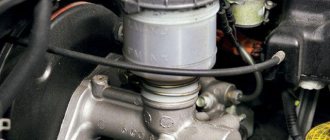
Where is the brake fluid located? This fluid is located in the brake hoses, as well as in the brake master cylinder, the main part of it is located, and the most important part is located in the brake reservoir, which is indicated below in the diagram as number 8, by the way, in the diagram below, arrow number 4 indicates the brake master cylinder, arrows 3 , 7, 18, 11 the brake hoses are indicated, and in general the entire diagram shows the brake system of the car, you can understand a lot from it and most importantly, if you think a little, you can understand the principle of its operation, remember we said at the beginning that you don’t compress the liquid, so let’s explain in a nutshell, when you press the brake pedal (indicated by number 10), the rod that is located in the main brake cylinder moves forward, due to the fact that the liquid is not compressible, it presses on the working brake cylinders, which are in the brake the calipers are located (the calipers are indicated by numbers 1 and 5, in the rear there are no calipers, purely working brake cylinders are located there, one of them is clearly visible and is indicated under the number 16) and they, in turn, push out the brake pads, and this is how the car is braked, the fluid By the way, it is constantly in the brake pipes, due to the fact that it is filled into the brake reservoir.
When should you change your brake fluid? From time to time and only from time to time, but although if you are repairing the brake mechanism and this repair will affect the brake fluid, then in this case you will need to buy one new bottle, because as a rule, when work is carried out on the brake system, it itself is affected brake fluid (For example, you disconnect the brake hose from the caliper and then close the hose with a plug so that the fluid does not spill out of it, but in this case it will still be affected) air particles get into it, due to which the fluid begins to shrink (And this is unacceptable, otherwise the car will brake poorly or will not do this at all) and therefore, in order to expel this air from the system, you will have to drain some fluid and fill it with new one, in addition, the fluid must be completely replaced in the case when its expiration date will expire (Each liquid has its own expiration date and it is indicated on the box, so when you buy a new liquid, look at the manufacturing date it has and also pay attention to the expiration date, it is usually about 3, 5 years) and after 2-3 years after filling, because when the fluid is poured into the brake system it begins to slowly absorb moisture, in 2 years it will begin to consist of 3-4 percent moisture, which is very bad and due to with this, the effectiveness of the brakes will disappear and, most importantly, it will boil faster, for example, new brake fluid (let’s take DOT-4, it’s just that everyone boils differently and therefore we will be determined by a specific fluid) boils at a temperature of 230-240 degrees, the old one is 2 years old -3 which and which has absorbed moisture will boil already at a temperature of 160-170 degrees and you can forget about the effectiveness of the braking system while it is boiling for a while (Until it cools down)