Bleeding the brakes means removing air from the brake system lines. Bleeding the brakes of a VAZ 2109 is mandatory when replacing the brake fluid with new one, as well as after a leak in the system. Let's consider the principle of operation of the brake mechanisms and the consequences of air entering the system. The system on the “nine” must be pumped in a strictly established order. It is better to do the work with a partner, but you can do it alone. Let's study the technology.
Preparing for work
Pumping will not be effective unless you first carry out a number of preparatory measures to prepare the system for intervention:
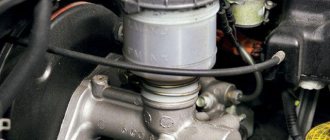
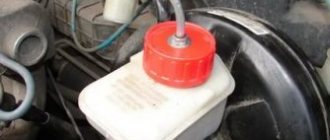
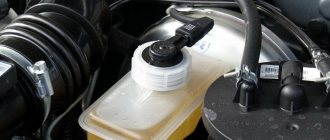
- Check the amount of brake fluid in the conservator tank. It should be at the maximum level. If necessary, add more until the level reaches maximum.
- Prepare a clean plastic container in which to place some brake fluid.
- Take a hose whose diameter is equal to the size of the brake fittings. It must be of sufficient length.
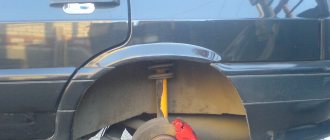
- If you have placed the car on jacks or a special lift, then you need to insert a flat-head screwdriver between the piston and the plate. This technique will help you block the pressure regulator.
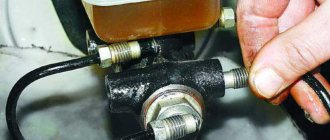
- Loosen the fittings slightly.
One of the most important recommendations is to have an assistant to carry out the work. This could be any person, even those who do not understand car repair issues. He has a simple job to do.
Bleeding brakes on a VAZ 2022, preparation and sequence of actions
Bleeding the VAZ 2109 brakes is carried out in a sequence strictly determined by the design features, namely:
- Rear right wheel (farthest wheel in the system);
- Front left (connected by the system to the already pumped rear right wheel);
- Rear left;
- Front right.
The sequence is this way because of the diagonal placement of the contours. All steps must be completed when pumping along the full circuit. You can only upgrade one at a time.
To work you will need:
Note. Brake fluid is quite aggressive; it should not come into contact with the skin and should be washed off immediately. It is also undesirable for it to come into contact with plastic parts, wires, or in the eyes; TJ vapors are poisonous.
Preparing to bleed the brakes
To properly bleed the brakes on a VAZ 2109, as necessary, you will need competent preparation according to the following scheme:
Be sure to check the system for leaks and inspect all pipelines and parts. The machine is installed on a pit or raised with a jack. Tubes, connections, hoses must be carefully cleaned with a rag, then press the brake several times and secure. When inspecting, connections and hoses must not be wet. Detected leaks are eliminated by tightening the fasteners or replacing problematic parts.- Make sure that the fluid level in the tank is maximum; if not, top up. The level will have to be checked after bleeding each mechanism, otherwise air will enter the system again.
- Pour a little liquid into the draining container so that the bubbles escaping from the system are visible.
- The fittings must be loosened before starting work.
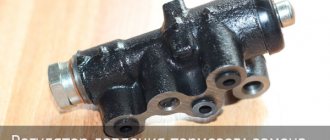
- You also need to remember that the VAZ 2109 has a rear wheel drive pressure regulator. When pumping, it is necessary to create high pressure in the system. To prevent the regulator from blocking the flow of fluid to the rear wheels, when working without a pit, on a jack, you need to open its valve and keep it in this form until the end of work. To do this, it is enough to install, for example, a flat screwdriver between the plate and the regulator rod, pushing the rod all the way. The screwdriver is removed upon completion of work.
How to carry out repairs with an assistant
Getting the job done right is not difficult if you find someone to help you. Bleeding is performed according to the instructions:
- To create pressure in the system, the assistant must press the brake pedal about 9 times at short intervals. After the last press, it must be pushed into the floor and not released.
- At the same time, place the hose on the loosened cylinder fitting. This will allow air to escape from the system.
- The end of the hose is placed in a prepared container with brake fluid. If you do everything correctly, its level will begin to rise, as it will begin to leave the circuit along with the air.
- Bubbles will tell you that air is escaping. As soon as they stop appearing, the air lock has left the system.
- Tighten the fitting and again ask an assistant to pump the system using the pedal about 9 times at short intervals. After completing the work, return the fitting caps to their place.
Air in the brake system is dangerous
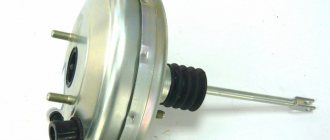
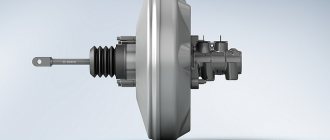
A piston is placed inside the brake master cylinder. The brake hoses supply the fluid to the local cylinders on each wheel. Thus, the main braking system consists of:
- master brake cylinder;
- brake hoses;
- wheel brake cylinders.
When the driver presses the pedal, the rod pushes the piston. Brake fluid is sent under pressure to each of the 4 wheel cylinders. At this time, the pistons move apart in them. As a result, the pads are moved apart and pressed against the disc or drum. This creates a friction force, causing the wheel speed to instantly decrease.
If air gets into the system, the VAZ brakes instantly lose effectiveness. This happens because the pressure drops. The pads begin to press against the disc (drum) worse. This can be understood if, when you press the pedal, it fails, and the braking distance increases significantly (the distance from the point at which the pedal was pressed to the point of complete stop). In this case, further operation is not recommended until the brakes are bled.
A more dangerous malfunction is when more air enters the area near one wheel. In this case, the pressure in the wheel cylinders of the left and right wheels will be different. This leads to uneven pressing of the pads to the disc (drum). When you press the pedal, according to the laws of physics, a side skid of the car may occur.
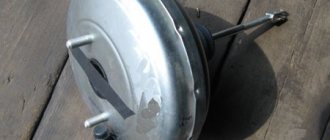
Air enters the brake ducts after brake repair, after replacing the old brake fluid, replacing cylinders, pads, and a vacuum booster.
What to do if there is no one to help
It is not always possible to pump the brakes with 4 hands, so manufacturers came up with an aerator. It is sold in all auto stores and markets. The cost of this special device does not exceed 200 rubles, but it will help you bleed the brake system at any convenient time.
If you don’t have time to look for the right device, you can create pressure in the system using a regular wheel. Connect the chamber valve to the expansion tank for the brake fluid. Raise the side of the car to be repaired and open the bleeder fitting. Install the aerator and unscrew the wheel chamber nipple, wait until liquid begins to come out of the system.
If you have a compressor, you can use it instead of a wheel. In this case, pumping will be more effective. When doing the work yourself, you need to monitor the system and remove pressure from it in a timely manner.
Diagnosis of problems with old VAZ brake fluid
The big problem with the brake fluid for the VAZ 2110, as for almost any other car, is its hygroscopicity. It simply absorbs moisture like a charm. If the water content in the brake fluid is higher than 3-5%, it may boil and the brake pedal, accordingly, will fail.
Visually, the liquid should be clean and transparent and free of foreign impurities. Also, to diagnose it, a special tester is often used to determine the percentage of moisture in the total volume of liquid in the tank. This pleasure costs about one and a half thousand rubles. Of course, it’s not that cheap, but believe me, it’s really convenient to always have this kind of device with you in your car.
How to check the result of your work
Find a clear, dry section of paved road to check the brake bleeding. You need to accelerate to 40 kilometers per hour, and then press the brake pedal and do not release it until it comes to a complete stop. Take a tape measure and measure the resulting braking distance - its beginning will be clearly visible on the asphalt. If the brakes work as they should, the length should be 12.2 meters.
labavto.com
Brakes are one of the most important systems of a vehicle. They must always be in good condition, as safety on the road depends on them. One of the procedures that is carried out during brake repair is bleeding the brake system (TS). On a VAZ 2109 it is not difficult to carry out it, acting step by step according to the instructions.
Why do you need to bleed your brake system?
This procedure is carried out to restore its functionality and effectiveness. Air is removed from the vehicle lines by pumping. This procedure is carried out after carrying out any measures with the brake system:
During repair work and brake replacement, air may enter the system. Its presence in vehicle lines is very dangerous - the brake pedal simply does not respond to pressure and it is impossible to stop the car. Therefore, its removal is necessary.
When working with brake fluid, you must be careful, as it and its vapors are very toxic. It is advisable to work with gloves. If brake fluid gets on your skin, it should be washed off immediately with warm soapy water. Do not allow the fluid to come into contact with wires or plastic parts and trim while pouring fluid into the reservoir.
Basic pumping rules and preparatory activities
The brake system of the VAZ 2109 consists of two independent circuits. If one of them fails, the other operates, this increases traffic safety. If work was carried out on only one of the cylinders or other elements of the brake system, then pump the corresponding circuit on which the repair was carried out. If brake hoses, brake fluid were changed, or the master cylinder was removed, it is necessary to bleed both circuits.
Bleeding is carried out in a strictly defined order; if it is not followed, the procedure will be useless and problems with the pedal will remain. You can pump only one circuit. If both are pumped, then start the process from the rear right wheel. Next they move to the left wheel in front. Next, they return to the rear wheel pair and bleed the rear left wheel, and finish on the front right one. The procedure for pumping the vehicle is described in the “nine” manual.
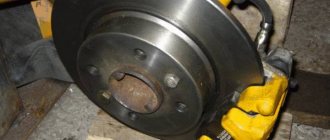
Pads
When braking, a grinding noise is heard from the front wheels. Most often this happens due to worn pads. This consumable consists of a metal base and a friction lining. It is this pad that stops the car by friction against the disc. During operation, the friction material gradually wears off. When it is completely erased, the base begins to rub against the disc. This is what causes the grinding noise. Sometimes, when the pads are worn too much, the caliper working cylinders can be squeezed out and jam. This leads to increased wear of the brake discs, even to the point of cutting them off. Therefore, you should not delay replacing the pads. Be sure to change consumables on both sides
Also pay attention to other components of the brake mechanism
This is especially important if the pads wear unevenly. When choosing components, it is advisable to use “original” pads
If you purchase non-original spare parts, make sure that they can be installed correctly. Incorrect installation may cause grinding noise in the future. Sometimes a pad can break due to various reasons. Most often, the reason is their low quality. The linings crumble very often. The sharp edges resulting from this scratch the disc. Therefore, the disc must be polished when such a problem is identified. Buy spare parts only from reliable places, be sure to ask for certificates. If you had to brake suddenly and then a grinding noise started, the pads may be burnt. Remove carbon deposits from the pads with fine sandpaper. Article on the topic “Replacing brake discs and pads with your own hands”
When choosing components, it is advisable to use “original” pads. If you purchase non-original spare parts, make sure that they can be installed correctly. Incorrect installation may cause grinding noise in the future. Sometimes a pad can break due to various reasons. Most often, the reason is their low quality. The linings crumble very often. The sharp edges resulting from this scratch the disc. Therefore, the disc must be polished when such a problem is identified. Buy spare parts only from reliable places, be sure to ask for certificates. If you had to brake suddenly and then a grinding noise started, the pads may be burnt. Remove carbon deposits from the pads with fine sandpaper. Article on the topic “Replacing brake discs and pads with your own hands.”