Car brake system: what does a motorist need to know?
Before you get behind the wheel or get a driver's license, in addition to the rules of the road, you need to study all the internal systems of the car.
First of all, the safety of the driver and passengers depends on this. Serviceable brakes are a guarantee of a calm and confident ride on the road. To understand all possible situations or problems with the braking system, you need to understand how it works. On most cars, the braking process involves:
- brake discs (in some cases drums);
- pads
- brake fluid.
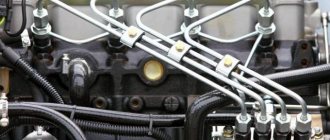
Each component plays a separate role in the process of mechanical deceleration of the car. When you press the pedal, a piston moves in the main brake cylinder, which releases the brake fluid. The latter, in turn, passes through the highways and actuates the brake cylinders on the wheels, and the pads are pressed against the drums or discs.
In modern cars, an anti-lock braking system (ABS) may be involved in the braking process. It allows you to avoid complete blocking of the vehicle's wheels during braking, thereby preventing the car from going into an uncontrolled skid.
Additionally, an expansion tank for brake fluid and a vacuum booster are involved in the process. The latter serves to reduce pressure on the brake pedal.
Why does the brake system need to be bled?
The main reason for the need to bleed the brakes is the presence of air in the system. The entry of even small bubbles disrupts the operation of the brakes. Due to the uneven distribution of fluid, the compression process of the brake pads works asynchronously. If the intensity of the brakes on each wheel is different, the braking process becomes unpredictable (to varying degrees) and the driver may lose control at an unexpected moment.
It is worth noting that bleeding the system is, for the most part, a mandatory procedure after replacing the brake fluid.
Knowing when it's time to bleed the brakes is easy:
- An experienced driver who knows his car will immediately feel problems with the brake pedal. This may be an increase in the working stroke or excessive softness when pressed.
- Scheduled brake fluid replacement. Replacements must be made after reading the vehicle's operating manual.
- During a sudden stop, the car goes into a skid or a slight roll is felt in one direction or another.
On average, brake fluid is replaced every 2 years or every 50–60 thousand kilometers. However, during scheduled maintenance it is better to check the condition of the fluid using a special tester.
After any manipulations with the system, it is necessary to check the serviceability of the brakes and, in case of deficiencies in operation, carry out preventive maintenance to avoid problems while driving. The cause may be repair work on the master cylinder or vacuum booster.
How often should you change and check the brake fluid level?
Manufacturers recommend changing brake fluid no more than once every 2 to 3 years. This roughly corresponds to 30-50 thousand km. More precise replacement dates are indicated in the technical documentation that comes with the specific brand of car.
In addition, the fluid should also be replaced when it changes color from golden to dirty brown.
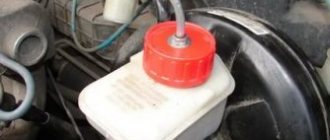
Its level should be checked regularly, since the quality of braking and safety on the road depend on it.
When to change the brake fluid in a car
Brake fluid (FL), like any other, is characterized by a number of key operating parameters. One of them is its boiling point. It is about 2500 C. Over time, after prolonged use, this figure can decrease significantly. This phenomenon is due to the fact that the brake fluid is quite hygroscopic, and moisture, one way or another penetrating into the brake system, gradually reduces its performance characteristics.
In this regard, the threshold for its boiling sharply decreases, which can lead to serious consequences, including brake failure. The fact is that the operating temperature range of the fuel fluid is 170 - 1900 C, and if the percentage of moisture in it is high, under certain conditions it will simply begin to boil. This will inevitably lead to the appearance of air pockets, due to which the pressure in the system will be insufficient for effective braking.
Referring to the requirements established by the regulations, replacement of the TJ should be carried out at least once every two years. If you take into account the mileage of the car, the approved regulations indicate that its value should not exceed 55 thousand km.
It is worth noting that all presented standards are advisory in nature. To know for sure whether the fuel tank can be replaced or not, you need to use special diagnostic equipment.
A so-called tester can be used as a diagnostic device. It helps determine the percentage of moisture content in the fluid and allows you to judge whether it is advisable to continue using it or whether it should be replaced.
It is worth remembering that among the presented devices there are both universal testers and those that are designed to work exclusively with specific types of fuel fluids.
Air in the system: how does it manifest itself and how to get rid of it?
It should be noted that, due to its structure, brake fluid is always in contact with air, thanks to the hole for the float rod - through the reservoir cap of the master cylinder. However, if the system depressurizes, you should not immediately blame the gas turbine cover, since the mechanism is designed in such a way that air cannot enter the working circuits.
However, to eliminate this source of the problem, it is worth pressing the brake pedal successively and leaving it pressed for several minutes. If the pedal slowly lowers, we can talk about a violation of the tightness of the system.
An additional cause of depressurization may be worn hoses or incorrect brake bleeding procedures. Already at the first action of air, while driving, the brake will work too softly and periodically fall into the floor, and the process of braking the vehicle will work unevenly and slowly.
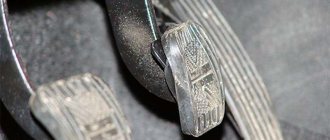
Adjusting the brake pedal travel
The brake pedal travel can be adjusted. The brake pedal travel should be 3-5 mm
Free play of the brake pedal is the pedal travel from its top position until the brake mechanisms begin to operate. It should be 3-5 mm.
- Remove the wire blocks from the brake signal switch terminals.
- Using a 19 mm open-end wrench, loosen the locknut of the switch. The brake signal switch also serves as a stop for the brake pedal in its upper position. To reduce the free play, screw the locknut onto the switch and screw the switch into the bracket plate. To increase the free play, unscrew the switch from the plate a few turns and tighten the locknut.
- By pressing the brake pedal several times, we check the operation of the brake signals. If necessary, repeat the adjustment.
The necessary set of tools for work
When you notice the first symptoms of a problem with the brakes, you need to decide whether it is possible to contact a service center. Our specialists have the necessary experience and skills to carry out work quickly and safely. Equipment plays a special role in solving the problem.
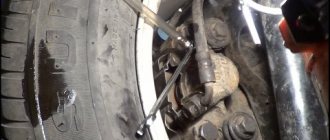
If in specialized places they use unique devices with universal adapters for any car, then when bleeding the brakes with your own hands, improvised means are sufficient. To carry out this, you need to acquire a set of appropriate keys, a container for brake fluid and several hoses. The diameter of the holes must completely match the bleeder fittings.
General rules for bleeding brakes
Before proceeding with actual bleeding, it is worth preparing clean brake fluid. Be sure to use only the liquid that was previously poured into the car.
If it is not possible to find out the exact brand of the substance, it is better to use the liquid that is provided in the car’s operating instructions.
It is better to pump the brakes with a partner. The main task of the assistant will be to consistently press the brake pedal at a signal, but the work of the chief mechanic will fall on your shoulders.
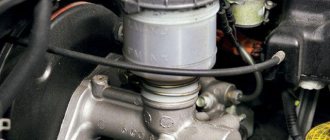
- The first step to successful and high-quality work will be a preliminary check of each circuit and drive unit for leaks.
- Most often, problems arise with the master brake cylinder - the most inaccessible portion of air is localized in it. It may need to be pumped several times by loosening the threaded valve.
- Each car has its own unique brake bleeding sequence. You must read it in the vehicle's operating manual before starting the procedure. For most vehicles, the sequence starts with the rear wheels and is represented as "right rear wheel - left rear wheel - right front wheel - left front wheel".
Important points
Before you start pumping, you should remember a number of important rules that will help you avoid additional problems.
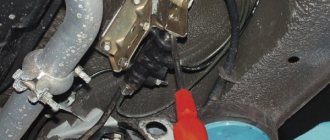
- Before work, inspect the main components for leaks. If the seal is broken somewhere, bleeding the brakes will be a waste of time and effort.
- Always monitor the brake fluid level in the expansion tank. If it becomes empty during operation, the system will become even more airy.
- Never use an open-end wrench to unscrew fittings - the edges are easily torn off.
- Be sure to clean the fittings from dirt; before pumping, it’s a good idea to spray them with WD-40 and wait 10-15 minutes. Often the fitting becomes tightly “stuck” to the brake cylinder and breaks off when you try to unscrew it. If the fitting does not budge, try gently heating and cooling it several times.
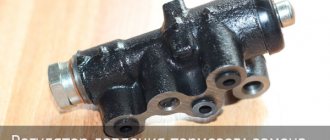
- On vehicles equipped with a brake force regulator (sorcerer), the rear of the vehicle must be loaded before bleeding. You can simulate loading by slipping a screwdriver between the regulator rod and the pressure plate.
- If there are no special instructions from the manufacturer regarding the bleeding order, the following scheme is recommended: rear right wheel, rear left, front right and front left.
Procedure
Success and high-quality pumping of the brake system lies in following the entire technology of action:
- The first step is to replace the fluid in the GTZ tank or check its quantity and, if necessary, top it up to the maximum level.
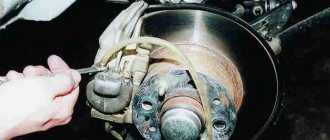
- For more comfortable work, it is necessary to clean all air release valves on each wheel from dirt, dust and deposits.
- According to the correct sequence provided in the instructions, it is necessary to unscrew the fitting plug on the desired wheel and attach the prepared hose over the valve.
- The second end of the tube is placed in a previously prepared container with brake fluid.
- The partner progressively presses the brake pedal from 3 to 5 times and at the last movement fixes the pedal in the pressed position.
- At this time, you need to unscrew the air valve halfway. After opening the valve, liquid along with air bubbles will begin to flow through the tube into the container. When the pressure of the liquid escaping into the container disappears, the valve can be screwed back firmly, and your partner can release the brake pedal.
- The process may have to be repeated several times on each node. The main thing is to maintain the wheel sequence and control the amount of fluid in the master cylinder reservoir.
After pumping is completed, you need to make sure that the fitting plugs are tight and that the brakes are operating. After the test, if successful, the brake operation will return to normal. If the driver still feels problems in operation, then perhaps attempts to bleed the brakes with their own hands were unsuccessful, or there is a problem with the wear of the pads or discs.
How to bleed brakes with one hand?
The essence of the procedure does not change - whether you are alone or a whole company of soldiers. Conditions for achieving the goal: maintain the liquid level in the tank with fuel fluid, depress the brake pedal (to bleed the system), adjust the opening of the fitting and control the pumping process.
Method No. 1
In order to simplify our work and prevent air from entering the system through the same fitting through which we pump out, we need to isolate the system. This is very easy to do - you will need a drip system (or any hose of any size) and a container (for example a bottle).
Cut a small piece of tube from the dropper. We put one end on the fitting, and lower the other into the bottle. You need to pour enough brake fluid into it so that the tube is immersed in it by about 1 cm. Open the tank with the brake fluid, unscrew the fitting and depress the brake pedal.
We pump until air bubbles stop coming out of the system. Also, this method is suitable for partial replacement of the TJ (a good alternative to a complete replacement). Do not forget to monitor the level of fuel fluid in the tank and add it after each pumping. It is necessary to bleed according to the following scheme: rear right, front left, rear left, front right
Method number 2
The essence is the same, but we reduce the number of movements. Find any gas stop (for example, from the trunk lid), depress the pedal 10-15 times to create pressure in the system, depress it again and secure it with the stop. Now you can simply unscrew the required fitting and top up the fuel fluid in a timely manner.
Method number 3
We also reduce movements and disable the option of squeezing the pedal. Buy a syringe (the largest one) and a hose (again, a drip system will do). Place the hose on the fitting, squeeze out the syringe, insert it into the other end of the hose and open the fitting. When the syringe is full, close the fitting and pour out what you pumped out. Don't forget to add TJ.
Features of pumping
Start pumping from
the farthest point from the GTZ
.
Depending on the brake circuit, the sequence will be different. On old Zhiguli cars the diagram looks like the letter “Z”. Start with the right rear, then move to the rear left, then the front right and the last will be the front left.
On modern cars the sequence is different:
Rear right -> front left -> rear left -> front right (on right-hand drive cars, where the GTZ from the right begins to pump from the rear left).
When repairing the brake line, you should start pumping from the wheel closest to the point of depressurization.
If you do not follow the sequence, the result
of the work done will be zero. Since the pedal will be tight, but at the same time the brakes will be a little weak, and no matter how much you pump it, it won’t get better! We'll have to do everything again.
Differences and specifics of bleeding brakes with ABS
The anti-lock braking system allows you to control the vehicle's handling when braking. After pressing the pedal, the central control panel receives a response signal from sensors installed on the front and rear wheels. Thanks to the control system, the wheels slow down at the same speed as the car itself. In other words, thanks to ABS, the car cannot skid.
Regardless of the manufacturer, most devices have common characteristics:
- Electronic speed sensors on the hubs;
- Pressure controllers for main brake fluid lines;
- Electronic unit for signal processing.
Unlike most cars with simple braking systems, bleeding anti-lock brakes is difficult. For the procedure to be successful, it is necessary to familiarize yourself in detail with the theory of ABS operation. However, if the hydraulic accumulator, valves and pump are located nearby due to the design solution, the pumping technology will be very similar to the standard one.
Before starting work, in addition to standard tools, you must acquire a scanner to read information from the electronic unit. However, if the car has additional sensors, it is better to take the vehicle to a specialized salon. Any improper intervention calls into question the safety of road users.
Usually, for successful bleeding with the ABS system, it is enough to monitor the pressure in the hydraulic system. The standard value is 180 atm, but to work with the brakes it must be reduced - turn off the ignition and apply the brake 20 times. Only after this, some of the liquid will splash out and the pressure will drop significantly. After reducing the pressure, you can begin to turn off the ignition and disconnect the connectors and controllers on the GTZ tank for further manipulations.
Checking the result
The easiest way to evaluate the result of the work is to accelerate to a speed of 20-30 km/h, followed by braking. Based on the length of the braking distance of each wheel, it is not difficult to determine which ones set faster and which ones need to be pumped more.
Sources
- https://AutoVogdenie.ru/kak-prokachat-tormoza-s-abs-odnomu-cheloveku.html
- https://zen.yandex.ru/media/id/5beafefd84edee00aa843c51/kak-samostoiatelno-v-odni-ruki-prokachat-tormoza-instrukciia-dlia-avtomobilei-si-bez-abs-3-sposoba-5c855ad90b2a7200b4ef9f6a
- https://avto-idea.ru/remont/kak-prokachat-tormoza-s-abs-posledovatelnost-prokachki/
- https://ZnanieAvto.ru/stop/prokachka-tormozov.html
- https://autoiwc.ru/other/bleeding-brake-system.html
- https://zen.yandex.ru/media/etlib/chto-budet-esli-ne-sobliudat-posledovatelnost-prokachki-tormozov-5ca71128a8248400b375f01c
- https://zen.yandex.ru/media/id/5c5ee6fa67f92b00ae9f2213/prokachka-tormoznoi-sistemy-avtomobilia-svoimi-rukami-5cd98e455631d800b31369df
- https://pricurivatel.ru/prokachka-tormoznoj-sistemy.html
- https://avtoivan.ru/2018/09/20/prokachivaem-tormoza-s-abs-shemy-i-varianty-prokachki/