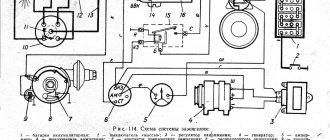
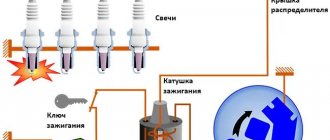
1 – ignition coils 2 – injectors 3 – controller 4 – main relay 5 – fuse connected to the main relay 6 – cooling system electric fan relay 7 – fuse connected to the cooling system electric fan relay 8 – electric fuel pump relay 9 – fuse connected to electric fuel pump relay 10 – mass flow and air temperature sensor 11 – throttle position sensor 12 – coolant temperature sensor 13 – canister purge solenoid valve 14 – oxygen sensor 15 – knock sensor 16 – crankshaft position sensor 17 – idle speed control 18 – immobilizer control unit 19 – immobilizer status indicator 20 – phase sensor 21 – vehicle speed sensor 22 – electric fuel pump module with fuel level sensor 23 – oil pressure warning lamp sensor 24 – coolant temperature indicator sensor
A – block connected to the wiring harness of the ABS cabin group B – diagnostic block C – block connected to the air conditioner wiring harness D – to the “+” terminal of the battery D – to the side door wiring harness block E – block connected to the panel wiring harness devices
Electrical system diagram of VAZ 21124 in the engine compartment
- electric fan (No. 3);
- electric fan switch relay (No. 22);
- coolant temperature sensor (No. 7);
- electric fuel pump with fuel level sensor (No. 30);
- fuel pump activation relay (No. 21);
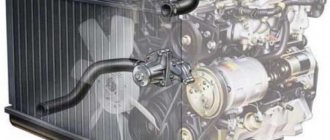
- electric heater of the fuel system inlet pipe (No. 4);
- power relay and heater protection fuse (No. 23 and 24);
- air temperature sensor and absolute pressure sensor (No. 5 and 6);
- engine control controller (No. 13);
- SUD fuse box (No. 20);
- fuse box (No. 27);
- ignition relay 21124 (No. 26);
- spark plugs (No. 28);
- car starter relay (No. 25);
- battery (No. 18).
How to preserve a VAZ-2111 in winter
In order for the VAZ-2111 to serve for a long time, it is necessary not only to promptly eliminate faults related to the operation of the electrical circuit, but also to properly maintain the car. Experts give the following recommendations:
- Washing is good, but after cleaning the car it won’t be superfluous to treat the body parts with liquid wax. Why is this necessary? Wax fills even the smallest pores that appear in the paint, and dirt does not penetrate there, which means you can save money on another wash.
- If you are not satisfied with the roughness that a rag leaves after wiping off dirt, use polishing and rub the liquid glass. The latter will keep the VAZ-2111 in the best condition for at least 1.5 years.
- Many owners of domestic cars want to turn a boring vehicle into a real modern car. To do this, owners stick stickers on the surface, but no one takes into account that they are a real dust collector for small debris and dirt.
- Drive your car with care - service station workers assure that any scratch can be retouched by painting the part, but they do not specify that it is almost impossible to select an identical shade of paint previously used by the manufacturer. Therefore, the entire car has to be repainted.
- The headlights of the VAZ-2111 are made of plastic - this is how the designers take care of the recycling of raw materials. But plastic wears out over time and becomes cloudy. To extend the life of your headlights, initially protect the surface with armored film.
- There is an opinion that seat covers prevent abrasion of the seats themselves, but this is not the case. Moreover, it is easy to wash the seats; special products are used for this.
Replace your wipers promptly; they will protect the glass from scratches.
This free collection contains all the necessary documentation for the electrical equipment of the VAZ-2111 car - the circuit itself, the heating system, headlight cleaner, electronic engine control module and fuse box. The VAZ 2111 is the first station wagon in the line of front-wheel drive cars, which is a modernized concept of the rear-wheel drive VAZ 2104. In it, the wiring diagram for the injector and a number of other components have undergone changes as part of the concept change. Diagrams for other models can be viewed here.
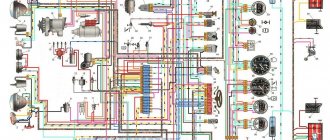
Electrical diagram of the VAZ-21104 ECM with controller 21124-1411020-30/31/32
1 — block of the ignition coil wiring harness to the ignition system harness; 2 — block of the ignition system harness to the ignition coil wiring harness; 3 — ignition coils; 4 — immobilizer warning sensor; 5 — immobilizer control unit; 6 — spark plugs; 7 — nozzles; 8 — diagnostic block; 9 — block of the ignition system harness to the ABS cabin group harness; 10 - controller; 11 — electric fuel pump; 12 — block of the ignition system harness to the fuel level sensor harness; 13 — block of the fuel level sensor harness to the ignition system harness; 14 — block of the ignition system harness to the injector harness; 15 — injector harness block to the ignition system harness; 16 — block of the ignition system harness to the side door harness; 17 — speed sensor; 18 — idle speed regulator; 19 — throttle position sensor; 20 — coolant temperature sensor; 21 — mass air flow sensor; 22 — oil pressure warning lamp sensor; 23 - phase sensor; 24 — oxygen sensor; 25 — crankshaft position sensor; 26 — knock sensor; 27 — solenoid valve for purge of the adsorber; 28 — oil level sensor; 29 — coolant temperature indicator sensor; 30 — block of the ignition system harness to the instrument panel harness; 31 — block of the instrument panel harness to the ignition system harness; 32 — ignition relay; 33 - ignition relay fuse; 34 — fuse for the electric fuel pump power supply circuit; 35 — electric fuel pump relay; 36 — electric fan relay; 37 — controller power supply fuse; 38 — ignition system harness block to the air conditioner connector; 39 — instrument cluster; 40 — ignition switch; 41 — electric fan of the cooling system; 42 — on-board control system unit; 43 — starter relay; 44 — contacts of the 8-terminal blocks of the instrument panel harness and the front harness; 45 — contacts of the 21-terminal blocks of the instrument panel harness and the rear harness; 46 — trip computer; 47 - diagnostic connector.
Common faults
As you can see, in general, a 16-valve engine is a rather complex system. Accordingly, there are also enough breakdowns in its operation; all of them can be divided into several groups. For example, if you have suspicions about the functionality of the spark plugs, and they turned out to be working, then you need to check the operation of the ignition coil and high-voltage cables. As practice shows, breakdowns in the wires can also lead to incorrect operation of the ignition system. Failure of one or another element of the electrical network can be a consequence of either a breakdown of the device itself or a failure of the generator unit or battery.
Most often, car owners are faced with the problem of battery failure, so let’s look at the main malfunctions characteristic of this device:
- a short circuit has occurred between the electrodes of the device;
- damage to the plates located inside;
- the appearance of cracks and other mechanical damage on the battery case, as well as shedding of the plates, which can lead to leakage of electrolyte;
- oxidation of the battery terminals, this problem can be solved by stripping.
All these faults ultimately lead to battery discharge. If we talk about the reasons that caused these problems, then most likely they all lie in incorrect operation, of course, if the battery life is high and has not yet expired. Much less often, the malfunction lies in a manufacturing defect, but this happens infrequently.
To prevent malfunctions in the operation of the battery, the following rules should be taken into account during operation:
- Firstly, the device must be securely fixed at the landing site. If the battery is not secured securely, this can lead to constant vibration, which can subsequently cause cracks in the case.
- Operation of the car and, accordingly, the use of the electrical network is allowed only when using a working generator. If the alternator is faulty or its belt tension is weak, it will ultimately lead to battery discharge.
- If the contact at the device terminal is poor, this can lead to its oxidation and destruction.
- Cranking the starter for a long time when trying to start the engine also contributes to battery discharge. This problem especially often manifests itself in cold weather, when the battery electrolytes are less mobile, and the driver has to turn the starter longer to start it (the author of the video is Vyacheslav Kravchenko).
Repairing a VAZ 2111. The would-be electricians almost burned the car.
Depending on the type and manufacturer, the battery life can range from three to five years. However, the service life may be shorter if the battery is used intensively and in harsh conditions. One way or another, the consequence of battery discharge is always the same - the device will not be able to crank the starter to start the engine, as well as power the devices and equipment of the car as a whole. If the diagnostics show that the battery is working normally, the cause of the malfunction may lie in the performance of the generator.
Its design as a whole is more complex; accordingly, this unit has a lot of faults:
- erasing of brushes due to their wear;
- voltage regulator relay failure;
- failure of the diode bridge;
- bearing wear, which is accompanied by a hum when the generator operates;
- wear of slip rings;
- damage or wear of pulley teeth;
- short circuit in the stator winding;
- damage to the charging circuit wiring;
- broken or worn alternator belt.
Malfunctions in the operation of the unit can be determined by diagnostics using a multimeter. As for repairs, you can do it yourself. We have previously described the procedure for repairing a generator using the VAZ 2114 model as an example in this article; in the case of the VAZ 2111 it looks similar.
As for other malfunctions in the operation of the electrical circuit, there may be several reasons:
- failure of the device itself;
- fuse blown caused by a short circuit (before replacing the fuse, it is necessary to determine the cause of the short circuit);
- electrical circuit breakage, the problem is solved by replacing the wire;
- oxidation of contacts on device terminals (video author - Ramanych channel).
We treat wiring VAZ 2110 16V
Car fuses - number, current and description
F1 5 Lighting lamps: numbers, instruments, dimensions on the dashboard, left dimensions, trunk lighting F2 7.5 Low beam in the left headlight F3 10 High beam in the left headlight F4 10 Right front fog lamp F5 30 Door windows F6 15 Portable lamp, cigarette lighter F7 20 Radiator fan, horn F8 20 Heated rear window F9 20 Windshield washer and cleaner F10 20 Reserve F11 5 Clearance on the right side F12 7.5 Low beam in the right headlight F13 10 High beam in the right headlight F14 10 Fog lamp, left F15 20 Heated seats 21124 F16 10 Hazard signal, turn signals F17 7.5 Brake light, ignition switch illumination, interior lighting F18 25 Cigarette lighter, glove compartment light, interior heater F19 10 Reversing lamp, brake light monitoring F20 7.5 Rear fog lights headlights
CAR ELECTRONICS REPAIR
Electrical equipment
Depending on the installed power unit, the electrical wiring of the VAZ 2111 also changes.
This is due to the fact that the car uses:
- Fuel injection systems;
- Contactless ignition;
- The transverse location of the power unit in the engine compartment also affects the wiring.
After all, the changed location of the motor alone forced the designers to develop:
- Another layout of wiring attachment points in the engine compartment;
- Form wiring harnesses differently for close groups of devices and sensors.
Applicable controllers
The engine is controlled using an electronic controller. And for each modification, the manufacturer installed a specific model, which may not coincide with the factory documentation.
The automaker installed the following controllers on all cars:
- GM model (2111-1411020-20);
- model “January 4.1” (2111-1411020-22);
- model M 1.5.4 (111-1411020-00);
- model “January 5.1” (2111-1411020-61);
- model “January 5.1.1” (2111-1411020-71);
- model MP 7.0 (2111-1411020-40).
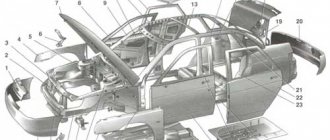
Being a body shortened to 4170 mm in comparison with the VAZ 2110, the new model retains all the qualities of a hatchback. Reducing the base had a positive effect on the car's handling, which made it a favorite among car enthusiasts in the domestic auto industry.
The car does not start - there is no charge in the battery
This problem occurs because the battery power is lost somewhere. It doesn't disappear randomly, but always for some reason.
Here are some of them:
- leave the car outside at ambient temperatures of -20 degrees and below;
- the battery is running low;
- For some time, the radio was working in your cabin, which led to the loss of charge.
In all these cases, two types of treatment are usually used: firstly, urgently recharge, and secondly, buy a new battery. If you drag and drive with a dead battery, soon you won’t even be able to disarm the car. You will have to manually remove the terminals in an attempt to plug it. The situation will improve as soon as the battery is charged.
Installation of fog lights
Car owners can independently equip their car with fog lights. For ease of installation, you can watch videos from forums where masters share their experience of such work.
VAZ 2112 Wiring of fog lights (Luxury degree)
Conclusions: in fact, replacing old wiring in the rear of the car is much easier than in the engine compartment or inside the cabin. And the diagrams proposed in the article will help you figure it out faster and prevent mistakes.
How does a wiring diagram benefit you?
Although domestic cars will be simpler than foreign cars, they all consist of a huge number of different components, power and fuel units and, of course, complex electrical equipment. The familiar VAZ-2112 could not do without a modern electrical part. The right turn has stopped working, there is no low beam, the horn is quiet and does not buzz, the light in the trunk has burned out or the radiator fan has stopped turning on. What to do, where to run and who to ask?
Every car owner should at least become familiar with the electrical part of his car. When to start? Rummage through the glove compartment and, if your wife has not yet put things in order, you can find the “Operating Manual for the VAZ-2112” there. Among other things, this essential book contains a lot of important electrical information. Having delved a little deeper, in the future you will not only save on repairs at the gas station, but also avoid ordering a tow truck when suddenly your “loved one” ends up at a point in the middle of a field.
General information
The car and electricity are fused together from the very beginning. You may recall that the very first such vehicle used an electric motor, until the internal combustion engine was invented. Wiring a VAZ 2112 makes it possible to perform actions that simply cannot be carried out without electricity. Among them are:
- ignition of the fuel mixture in the cylinders of a carburetor and injection engine;
- starting the engine;
- operation of head lighting devices at night to illuminate the road surface;
- fog lights when driving in conditions of limited visibility;
- light indication of the instrument scale;
- side lights for vehicle detection at night;
- turn indicators;
- signaling devices.
Schematic diagram of the electrical wiring of a VAZ 2112 car (16 valve)
In addition, the wiring diagram of the VAZ 2112 will help you figure out how and what the auxiliary equipment is connected to:
- “wipers”, which allow the driver to feel normal in rainy or snowy weather;
- sound signals in case of an emergency;
- searching for a spark in case of engine failure;
- CD player and radio;
- window lifters;
- windshield and rear window heaters;
- interior lighting lamps.
The electrical wiring of the VAZ 2112 connects electrical appliances and devices with current sources located in the car. An electrical equipment system is a collection of current consumers and its producers .
Serviced battery
Let's look at it in more detail, starting with the most important elements: The battery is a chemical source of energy, which is a lead-acid DC battery module. The photo shows a battery being serviced. Usually there are six of them. It is used for:
- starting the engine with an electric starter;
- supplying power to electrical equipment when the engine is not running or when it is running at low crankshaft speeds.
Generator . Used as the main source of current for all electronic and electrical devices and instruments in the car. But, it can provide this only at medium or high crankshaft speeds. The price of this equipment depends on the manufacturer. Ignition system . Designed to ignite fuel in engine cylinders. Can be contact or non-contact. Modern VAZ 2112 cars are equipped with the latter version, which has a number of advantages over the contact system, which is already considered obsolete. The main advantages should be noted:
- increased voltage potential supplied to the secondary winding of the ignition coil;
- increased power and longer spark discharge duration;
- increased service life of the spark plug;
- the breaker contacts practically do not fail;
- fuel burns better in the cylinders, which saves money as a result;
- makes engine starting easier;
- the engine becomes more responsive and more economical.
Starter relay installation diagram
If the battery is not charging
When the battery is no longer charged, it does not allow the car to be used for a long time. Maximum until it is completely discharged. In this case, a red light comes on on the instrument panel, which signals that the wiring on the VAZ 2112 requires checking. The instructions below will help with this:
- Check the generator drive belt, it should be intact and have the required tension.
Advice: it is not recommended to apply too much tension; it will significantly shorten the life of the belt.
- If everything is fine, check the fuse. The VAZ 2112 wiring diagram for 8 or 16 valves, as well as the reverse side of the mounting block cover, will help you find out where it is located. After replacing it and starting the engine, the lamp should go out, allowing you to continue your journey.
Checking and replacing the fuse
- When the charging lamp does not go out, check the wire from the generator to the “+” terminal of the battery. There are usually two of them:
- thick – from the battery to the starter,
- thin - to the generator.
It should not be broken or have oxidized contacts . It happens that there is no way to fix the breakdown, which means that the generator itself needs to be repaired. Repairs must not be delayed as a short circuit may occur. But it’s better to do this at a service station or at home in the garage with your own hands.
Advice: when driving only on battery power, to reduce on-board electricity consumption, turn off as many devices as possible - radio, heater fan, etc.
How does the controller monitor the operation of the injector?
When determining the specific position and opening time of the injector design, the specific volume of fuel entering the valves of the VAZ-2110 cylinder is determined. At the same time, thanks to special sensors installed on the motor, the on-board computer records specific values and transmits them to the controller.
Subsequently, the controller, based on the information coming from the on-board computer, makes a decision on the position and duration of opening of the injector damper. If the controller malfunctions, the injectors will not be adjusted correctly, and the engine may stall while driving.
Tip: when starting the engine, the injector controller operates in asynchronous mode until the engine reaches a certain number of revolutions. That is why, after replacing the silent blocks of the front control arms on a VAZ-2110, you should warm up the car for 10-15 minutes.