The famous “loaf” - the multi-purpose UAZ 452 appeared in the line of the Ulyanovsk Automobile Plant back in 1965 and remains on the assembly line to this day. Of course, over the years of production, the manufacturer has modernized the car in every possible way - the suspension, engine, and wiring diagram of the UAZ 452 have changed, but in general, the entire design has remained the same.
Electrical wiring of UAZ 452: reliable single-wire circuit
What is included in the electrical circuit?
What features do automotive electrics have on old cars produced by the Ulyanovsk Automobile Plant?
Electronic components
The electrical circuit of the UAZ 452 itself is quite simple - single-wire.
By its design, the wiring diagram of a UAZ390995 or other model is characterized by the following solutions:
- The vehicle body is used as the mass.
- Any electrical equipment of the old-style circuit on a UAZ 409 or other model, as well as actuators, are equipped with a negative terminal, which is connected to the car body. According to experts, in general this scheme is imperfect.
According to the operating instructions for electrical equipment, the driver must periodically diagnose the condition of the integrity of the contacts. We are also talking about their oxidation. If the driver notices the presence of oxidation on the terminals, he should treat them using fine-grained sandpaper.
Engine compartment
In this case, the engine compartment is located directly in the passenger compartment in accordance with the design of the car.
Access to the electrical circuit and other mechanisms and assemblies is made from the interior, as a result of dismantling the cover, which:
- Designed to protect the motorist and passenger from exhaust gases entering the cabin.
- Allows you to protect the car interior from the penetration of dirt and dust.
- Performs the function of an additional heating device, in particular passively, as a result of heating.
Engine compartment of an AUZ car
Previously, the UAZ 396255 and other models with a carburetor used an engine from the legendary Pobeda, which was later replaced with a more improved and modern unit. In particular, it means a Volga engine. This decision at one time, back in 1964, was facilitated by the serial launch of a production line at the ZMZ enterprise. Despite the fact that many domestic car enthusiasts claim that the UAZ 390994 injector circuit in the engine compartment is located in an inconvenient place due to the lack of a hood, this is not so. Decades of operation have proven that the absence of a hood in no way affects the diagnosis and maintenance of the car.
Passive safety
The very design of the domestic Loaf with the absence of a hood at first raised many questions in terms of the safety of the driver and passengers. As a result of several dozen crash tests that were carried out back in the early 70s of the last century, it was revealed that the car is no less safe when compared with other domestic cars. As the results showed, in the event of an accident, both the driver and passengers of the car have a good chance of avoiding injury in an accident.
Wiring diagram for a loaf with an injection engine.
When repairing electrical wiring in such a car, it is difficult to find a ready-made connection diagram - the manufacturer did not include it in the operating instructions.
It is believed that the wiring diagram for electrical appliances in UAZ loaf cars with an injection engine almost completely corresponds to the diagram that is used in a car with a carburetor, but in reality they are different.
To solve car control problems related to wiring, 2 connection schemes are used - standard for a loaf with a carburetor engine and injection for GAZ - 69 “Kozel”.
Combining the information from these two diagrams allows you to repair or reinstall the wiring in the injection loaf.
Instead of a circuit diagram for an injection GAZ-69, a circuit diagram for an electronic engine control system can be used, so drivers are advised to carry it with them along with a wiring diagram for a loaf carburetor engine.
Features of electrical equipment
So, what features does the UAZ 452 electrical wiring diagram have? At the time of the start of production, the most difficult moment for the engineers and designers of the enterprise was the search for the highest quality elements and components.
In particular, we are talking about parts for the vehicle lighting system, as well as ignition, which is especially clearly seen in how the car’s cabin is filled:
- control elements for various transport systems;
- control devices for monitoring the condition of components and mechanisms.
External optics
At that time, designers had to resort to many freelance solutions in order to establish mass production of cars.
- The UAZ electrical circuit includes an optics switch, which was borrowed from the GAZ 69. By the way, the latter is the predecessor of the Bukhanka.
- In addition, almost all the optics were borrowed from the GAZ 64 - these are lights, etc.
Ignition system
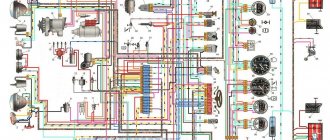
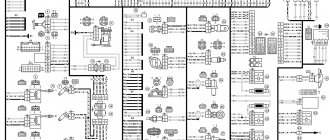
Scheme UAZ-3741, -3909, -3962, -2206 Loaf.
Scheme UAZ-3741, -3909, -3962, -2206 Loaf.
Electrical diagram (without steering column switches).
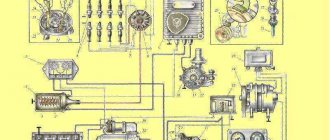
1 – front lamp; 2 – headlight; 3 – special sign lamp (only for UAZ-3962); 4 – heater fan electric motor (only for UAZ-3962, UAZ-2206); 5 – signal lamp sensor for emergency condition of the hydraulic brake drive; 6 – sound signal; 7 – side turn signal repeater; 8 – turning headlight (only for UAZ-3962); 9 – turning headlight switch; 10 – cabin lighting; 11 – signal lamp for turning on the parking brake system; 12 – switch for the parking brake system warning lamp; 13 – windshield wiper motor; 14 – switch for the electric motor of the windshield wiper and washer; 15 – speedometer; 16 – signal lamp for turning on the high beam headlights; 17 – voltmeter; 18 – oil pressure indicator; 19 – warning lamp for emergency oil pressure; 20 – coolant temperature indicator in the engine cylinder block; 21 – warning lamp for emergency overheating of the coolant in the radiator; 22 – fuel level indicator; 23 – washer motor; 24 – alarm switch; 25 – signal lamp for direction indicators; 26 – emergency signal lamp for the hydraulic brake system; 27 – ignition switch; 28 – central light switch; 29 – thermal fuse; 30 – heater resistance; 31 – heater fan motor switch; 32 – headlight switch; 33 – rear fog lamp switch; 34 – fuse block; 35 – plug socket; 36 – unbalance solenoid valve; 37 – direction indicator switch; 38 – sound signal button; 39 – sensor for emergency oil pressure warning lamp; 40 – warning lamp sensor for emergency overheating of the coolant in the radiator; 41 – oil pressure indicator sensor; 42 – coolant temperature indicator sensor in the cylinder block; 43 – turn signal switch; 44 – heater fuse (only for UAZ-3962, UAZ-2206); 45 – heater fan electric motor switch (only for UAZ-3962, UAZ-2206); 46 – resistance of the heater fan electric motor switch (only for UAZ-3962, UAZ-2206); 47 – heater fan electric motor (only for UAZ-3962, UAZ-2206); 48 – generator; 49 – spark plug; 50 – sensor-distributor; 51 – ignition coil; 52 – ground switch; 53 – rechargeable battery; 54 – lamp switch; 55 – plug socket (only for UAZ-3962, UAZ-2206); 56 – lampshade; 56* – lampshade (only for UAZ-3962, UAZ-2206); 57 – transistor switch; 58 – emergency vibrator; 59 – electronic carburetor control unit; 60 – microswitch; 61 – additional resistance; 62 – additional starter relay; 63 – solenoid valve; 64 – starter; 65 – fuel level indicator sensor in the tank; 66 – brake signal switch; 67 – reverse light switch; 68 – rear lamp; 69 – rear fog lamp; 70 – license plate light; 71 – reversing lamp; 72 – trailer socket.
Source
troubleshooting
On any domestic car, problems periodically arise in the operation of electrical equipment. If you notice that the UAZ wiring is not working correctly, you need to diagnose it and check all the elements. If there are any malfunctions in the operation of electronic devices, first of all you need to check whether the fuses in the mounting block have burned out. If everything is fine with these elements, but the equipment still does not function, for example, if we talk about optics, then you need to check whether the light bulbs are working. If the lamps themselves are working, it is necessary to test the electrical part using a tester (the author of the video about testing car wiring is Ramil Abdullin).
If the Loaf refuses to start at all, you need to do the following:
- First of all, check the functionality of the battery.
- With the battery charged, use a tester to test the circuit from the coil to the generator; often the reason for the inability to start the engine is breaks in the wiring. If there are breaks, the wires should be changed. If there is oxidation on the contacts, they should be cleaned.
- Starting the power unit will be impossible if there is no spark. To diagnose the presence of a spark, remove the high-voltage cable from the spark plug and bring it to the body. When you try to start the engine, a spark should jump between the cable and the body.
- If there is no spark, the problem may be carbon deposits and deposits on it. By the way, carbon deposits are often the cause of unstable engine operation and tripping. To get rid of such a malfunction, it is advisable to clean the spark plugs; step-by-step instructions for this process are presented here.
Technical characteristics and design features of the ZMZ 409 engine
The ZMZ 409 gasoline engine, equipped with a microprocessor-controlled direct injection system, is based on the cast-iron cylinder block of the ZMZ 406 model unit. The power plant was created specifically to equip UAZ vehicles, as well as Volga (experimental and small-scale versions). It differs from the base engine by an increased piston stroke and modernized pistons, which made it possible to retain the same connecting rods. Depending on the software version, the motors meet Euro 2/3 or 4 requirements. The latest modifications of the motor comply with Euro 5 standards and have modified power and torque curves.
The powertrain serial number, which is the vehicle's VIN number, is located on the left side of the engine block above the front mount mount.
Technical characteristics of the power unit:
- block design - 4-cylinder in-line;
- number of valves per cylinder - 4 (2 for intake, 2 for exhaust);
- cylinder diameter - 95.5 mm;
- piston stroke - 94 mm;
- working volume - 2693 cubic meters. cm;
- compression ratio - 9;
- The order of flashes in the cylinders is 1:3:4:2;
- maximum power (version for UAZ “Bukhanka”) - 112 hp. With. at 4250-4400 rpm;
- torque - no less than 198 N/m at 2500 rpm;
- fuel type - unleaded gasoline with an octane rating of 92 or more;
- direction of rotation of the crankshaft (from the pulley side) is right;
- type of cooling system - liquid, forced type;
- crankcase ventilation system - forced, closed type, operates from a vacuum inside the intake manifold;
- engine weight (with attachments) - 190 kg.
Main features of the engine design:
- the working mirrors of the cylinders are made directly in the material of the cast iron block, without the use of liners;
- main bearing caps are not interchangeable, since the parts are processed together with the block;
- the front cover of the camshaft supports is the same for the intake and exhaust;
- the timing gear bearing caps are machined together with the head, so they cannot be swapped;
- Hydraulic play compensators are installed in the valve drive;
- some engines have intake and exhaust camshafts with identical cam profiles;
- the pistons have recesses on the bottom that prevent contact with the valves in the event of a violation of the valve timing;
- the valves and mounting springs are identical to those used on the engines of the VAZ-2108 car.
To complete the UAZ “Bukhanka” vehicles, several engine modifications were supplied, differing in attachments.
Video “Designation of electrical circuit elements in UAZ”
A detailed designation of all the sensors and regulators of the electrical circuit in the Bukhanka’s interior is presented in the video below (the author of the video is Xodor).
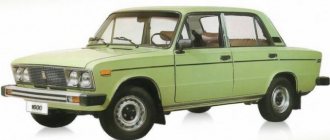
The UAZ-452 has received a variety of affectionate nicknames over the years of operation: “Loaf” and “Loaf” - for its external resemblance to a bread brick, “Tablet” - for reliable service in medical organizations. It is noteworthy that its design and individual systems - transmission, body or wiring diagram of the UAZ 452 turned out to be quite durable. Perhaps this was the only car in those years capable of reaching the most remote places for humanitarian purposes.
The famous Bukhanka has become a multi-purpose vehicle for rural areas
Video
Overhaul of UAZ wiring from the author Ivan Saichenko.
UAZ 2206 Bukhanka is the popular name for a family of all-wheel drive cargo and passenger off-road vehicles produced in various modifications since 1965 (UAZ 452, 3741, 3909, 39094, 3962, 3303, 3741) mainly with gasoline engines (injector and carburetor). In this article we will show an electrical diagram, a description of the fuses and relays of the UAZ Bukhanka 2206 and their locations.
Meet UAZ 452
The car was a cargo-passenger version of an off-road vehicle with a 4x4 wheel arrangement. The Ulyanovsk Automobile Plant mastered production of the model back in 1965.
You can evaluate its capabilities by watching the following video:
The UAZ 452 is capable of transporting cargo weighing up to 700 kg in the back. In addition, it can tow a trailer weighing 850 kg. The vehicle became very popular not only in Russian off-road conditions, but was also successfully used in large cities in various capacities (pictured in the article).
In particular:
- Like a traffic police car;
- As a fire engine;
- Ambulance car;
- Grocery store;
- Utility vehicle, etc.
The famous Barefoot on the basis of UAZ 452 - a road train in the Izmailovo Central Park of Culture and Culture
Electronic components
The electrical wiring of the UAZ 452 was a simple single-wire circuit.
Structurally, it had the following solutions:
- The role of the second wire was played by the metal body and the components and assemblies attached to it;
- All electronic components and actuators had a “-” displayed on the housing. The cost of such a solution justified the imperfection of the scheme.
For reference: The instructions provided for regular checking of contacts. When oxidized, they should have been cleaned with sandpaper.
Power unit
The engine compartment is located directly inside the car, as this is due to its design.
Access to components and assemblies is also provided from the passenger compartment by removing the cover, which:
- Provided protection for the driver and passengers from the penetration of exhaust gases;
- Protected from dust and dirt;
- Served as an additional heating element (passive - from heating).
The high engine layout contributes to the vehicle's cross-country ability in off-road conditions
The previously used engine from Pobeda was replaced with a more modern engine from the 21st Volga. This was facilitated by the launch of a production line at the Zavolzhsky Motor Plant in 1964.
Note! Despite some skepticism regarding the inconvenience of servicing a cabover car with your own hands, years of operation have proven that there are no difficulties.
Passive vehicle safety
The design of the "Baton" with a cabover layout also initially raised a number of questions regarding safety. However, a series of crash tests conducted back in 1971 at the Dmitrov test site proved that in most emergency situations the driver and passengers of the UAZ 452 have a chance to avoid injury.
A striking example of comprehensive testing of “Tablets”
New modifications
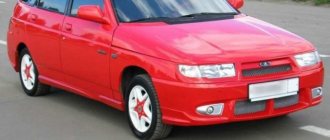
Since 1985 the car has undergone changes. They can even be called quite significant. It is also worth considering that in recent years the electrical circuit of the UAZ 452 has been quite seriously modernized. And the basic equipment itself has become noticeably richer. Now the injector has become a modification for the UAZ Bukhanka. The manufacturer abandoned carburetor systems and released a more economical and modern injector for the UAZ Bukhanka. The electrical equipment of the UAZ has become more progressive.
The dashboard has also been transformed. The most noticeable changes were: an additional starter relay, additional resistance in the battery ignition circuit. However, most Bukhanka owners upgrade their vehicle themselves. And the dashboard is the first step to modernizing the interior.
In the basic configuration, the dashboard does not look impressive, so most drivers decide to upgrade its appearance. A solid overlay is installed on the panel, which makes it more visually interesting. This overlay is freely available, and buying it is not particularly difficult. The dashboard in the UAZ 452 is all-metal and does not decorate the interior. Modern panel trim is mostly made of plastic and serves as a good decoration for this car.
Another drawback in the old Loaf is the lack of electric windows. However, power windows can be easily installed yourself. They will fit perfectly into the electrical circuit of the UAZ 452. But neither the installation of window regulators nor their initial absence in the electrical wiring is the main problem of the poor configuration.
Features of electrical equipment
For designers, a more difficult process in those years was to find high-quality components to equip the ignition and lighting systems.
This can be clearly seen from the filling of the cabin:
- vehicle system controls;
- control devices.
Due to a shortage of controls, the UAZ received rather “variegated” elements
External lighting
Everything that could be obtained was used to ensure uninterrupted supplies to the factory conveyor.
In particular:
- from the predecessor of the Bukhanka, the GAZ-69, the factory workers borrowed a foot-operated light switch;
- From GAZ-24 headlights, etc.
The design of the GAZ-69 switch was successfully used on the 452
Ignition system
Since the Volgov engine was installed on Loaves and Bukhanki, the UAZ 452 wiring for the ignition system was almost completely copied from it.
The simplicity of the design made it easy to maintain the car away from garage conditions
Release 1965 - 1984
If we talk about the beginning of production, then that UAZ 452 electrical equipment circuit lasted on the assembly line until 1984. During this period, many details in the circuit were borrowed from other models. Also, quite a large number of details could be called experimental. However, as the future has shown, such simplicity resulted in extreme reliability during operation.
In those years, it was quite a difficult task to find the necessary elements and parts. This problem was especially pressing in ignition and lighting systems. Therefore, the solution was to borrow parts from predecessors. So, a foot light switch was taken from GAZ 69.
She got the Bukhanka's headlights from the GAZ 24. The ignition system was copied with minor changes from the Volga. Therefore, it is not surprising that the GAZ 452 manufacturers also borrowed the engine from the Volga. As for the electrical circuit, everything was very primitive and simple, but at the same time practical and reliable. In addition, the price of the issue clearly justified such simplicity.
The electrical circuit of old UAZs was not ideal. The instructions of those years even provided for cleaning the contacts with sandpaper in case of oxidation. This approach raised some doubts about the safety of the electrical wiring design. And the UAZ electrical wiring itself in those years was a simple single-wire circuit.
Electrical wiring diagram
The top picture shows a non-contact version of the car's electrical wiring in color; the bottom picture shows an older model.
Old style UAZ 3303 wiring diagram
The electrical circuit of the UAZ 3303 generator shown separately is shown above.
The circuit having an ignition system with contacts is taken from 469. There is a radio receiver on the circuit, this is interesting.
Electrical circuit of UAZ 469 similar to 3303 with contact ignition system
In conclusion, I present another one from an onboard UAZ 33036 that is newer, but not yet fuel-injected.
Additional elements of the “Loaf” electrical system
The following elements can be installed in the Loaf cabin:
- Fuse block.
- Turn signal control relay.
- ABS indicator lamp controller.
- Turning on the high beams.
- Low beam control relay.
- Ensuring intermittent wiper movement.
- Rear fog lamp controller.
- Starter circuit control.
Arrangement of elements in the cabin
If ABS is used, an additional fuse box is installed on the machine, which includes:
- protective element of power circuits, designed for a current of 40A (position I);
- 25A wiring protection device (position II).
Location of fusible links of the ABS system
Symbols on the diagram:
- Block.
- Direct fuses.
When installing an anti-lock braking system, the following components are included in the electrical circuit:
- hydraulic unit with controller A1;
- sensors for determining the speed of rotation of the front and rear wheels - B1/B2 and B3/B4, respectively;
- acceleration sensor B5;
- ABS control LED on the instrument panel, indicating a system malfunction;
- EBD indicator of hydraulic module failure;
- Brake pedal position sensor BLS.
Schematic diagram of ABS on the “Loaf”
The main fuse box used on cars is:
| Number on the diagram | Denomination, A | Purpose |
| F1 | 10 |
|
| F2 | 10 |
|
| F3 | 10 |
|
Diagram of the main mounting block
Medical versions of the Loaf are equipped with an extended fuse block to protect additional equipment. There are also cars equipped with heated front seats at the factory. These machines have additional wiring harnesses.
Self-installation of electronic ignition on a UAZ was demonstrated by the author of the video, Alexander Grushevsky.