All parts and components of a car have their own service life. It can be long, short, but never endless, so every element of the car sooner or later needs to be replaced. The lambda probe is no exception. Moreover, unfortunately, it fails quite often, and it is not cheap, so it is not surprising that experienced motorists, bypassing the manufacturers’ recommendations, have found a way (and even more than one) to clean the lambda probe at home, that is, to significantly reduce their costs for repairs. But first things first.
What is a lambda probe, what is it for and why is it so important that it is in good working order?
A lambda umbrella (also often called an oxygen sensor) is a special sensor-controller that measures (estimates) the volume of oxygen remaining in the unburned fuel mixture (exhaust gases) of the car, compares it with the nominal values and sends the data obtained as a result of this comparison to the fuel system control unit (CU). The control unit, in turn, in order to optimize the composition of the combustible mixture, increases or decreases the volume of fuel supplied to the combustion chamber, thereby affecting the content of harmful substances in the exhaust gases, the dynamics of the car, the stability of the power plant and other characteristics.
From here it is obvious that if the oxygen sensor is faulty, that is, it sends incorrect information to the control unit, then the fuel/oxygen supply will be carried out with errors. As a result, the car will begin to “eat” a lot, accelerate poorly, operate unstably and heavily pollute the environment (more than accepted environmental standards allow). This situation can only be prevented by timely replacement of a failed sensor or by cleaning it in cases where it is permissible - the sensor itself and its base are not damaged, and improper operation is caused by contaminants accumulated on it (lead deposits and soot).
The role of the sensor in engine operation
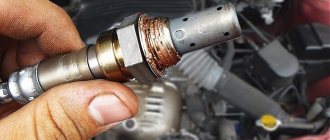
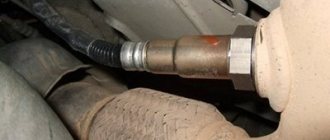
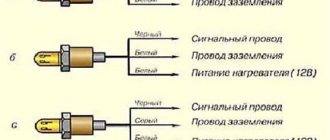
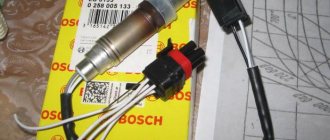
The element is a metal rod with a threaded or flanged tip for mounting inside the exhaust tract. A platinum-coated ceramic working part protrudes from the end of the lambda probe, protected from the outside by a steel cap with holes for the passage of exhaust gases. Wires (from 2 to 6 pieces) come out from the other end, transmitting a signal to the electronic control unit (controller).
To understand the question of how to clean the lambda probe and whether it needs to be done, it is advisable to understand how it works:
- The sensor's task is to determine the amount of oxygen remaining in the gases after fuel combustion. To do this, the device is placed in the section of the exhaust pipe between the catalyst tank and the exhaust manifold. In new cars, 2 elements are installed - before the neutralizer and after it.
- When the probe detects a large amount of oxygen, the controller “sees” this by a change in voltage and determines that the mixture supplied to the cylinders is lean, after which it adjusts the air-to-fuel ratio.
- If there is little oxygen, then the mixture is too rich and the control unit reduces the supply of gasoline.
If the sensor fails, wires break or contacts oxidize, the controller switches the fuel supply to the average mode . That is, the car can move further, but fuel consumption increases, and the car’s behavior changes for the worse (acceleration dynamics are lost). In general, this is a fairly reliable device, serving 100-150 thousand km on imported cars and 50-100 thousand km on domestic ones.
How to clean a lambda probe at home: instructions.
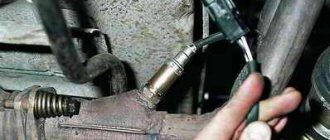
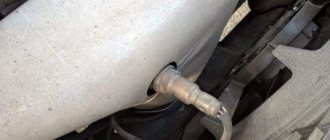
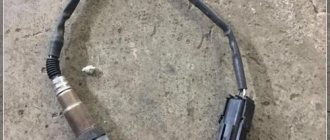
The first thing you need to do is find this lambda probe. This can be done under the hood of your car in front of the catalyst. And in modern cars there are two such sensors - before and after the catalyst, so the easiest way to view them is from the pit.
Once you find the lambda sensor(s) in your car, remove it(es) using the appropriate size wrench.
Then move on to cleaning.
Method No. 1 – cleaning with phosphoric acid.
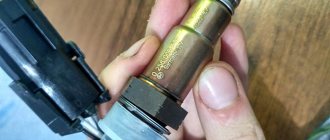
This method could be called one of the simplest and fastest, if not for the need for full/partial access to the ceramic-platinum base of the device, hidden behind a protective metal cap, which is not so easy to remove, given the impossibility of working with a hacksaw , as it may damage the working base. What to do? – Use a lathe for this purpose: use it to cut off the protective cap near the thread at the very base of the lambda probe.
If you don't have such a machine, you can try using a file. Of course, you won’t be able to remove the protective cap with it, but making windows (5 mm holes) in it is easy.
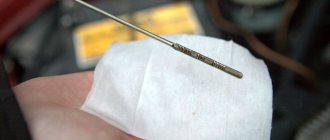
So, when access to the working rod of the lambda probe is secured, you can proceed directly to the procedure for cleaning it.
To do this, take at least 100 ml of orthophosphoric acid (its analogue: rust converter, flux/soldering acid, etc.), pour it into a small glass container (shot glass, jar, glass, etc.), and then lower the core there clogged part.
IMPORTANT: the entire device must not be immersed in phosphoric acid!
Wait 15-20 minutes, rinse the base of the part with clean water, and leave until completely dry. If necessary, repeat the procedure until the black-brown core again acquires a metallic tint.
If you were unable to clean the lambda probe in this way on either the second or third attempt, try increasing the effect of the aggressive liquid with a brush: by constantly wetting and smearing the base, you will very soon notice how the dirt will begin to come off, returning the parts to their original shine.
By the way, if work will be done on a lambda probe with the protective cap removed, then instead of a brush you can use something larger, for example, an old toothbrush.
At the end of the cleaning work, it is again recommended to rinse the oxygen sensor thoroughly with clean water and dry thoroughly.
If the cap was removed, then before installing the part, it is returned to its place using argon welding.
When using this method you need to remember:
- orthophosphoric acid (and its analogues as well) is a dangerous chemical, so it is necessary to work with them, observing all safety rules and excluding its contact with the eyes and inside the body;
- if the lambda probe is heavily clogged, then the mentioned 15-20 minutes may not be enough to completely clean it, so in particularly advanced cases, the time of exposure of the core to acid should be increased to 1-3 hours, and sometimes the whole night (at least 8 hours) ;
- To check the effectiveness of such repairs, as a rule, it takes some time, only it will give the driver the opportunity to evaluate the “behavior” of the car and measure fuel consumption, with the exception of the Check Engine error that lights up on the instrument panel, it is an indisputable sign that it is up to you to resuscitate the clogged lambda probe failed;
- If in your car the protective cap of the oxygen sensor has a double shell (two layers), most likely you will not be able to cut it with a file, so the only option for cleaning the core of such a lambda probe is to soak it in acid along with the protective element.
Method No. 2 – accelerated.
To implement it, you will need the same phosphoric acid and a gas burner or stove. If the choice falls on the latter, it is better to use the smallest burner (it will be more convenient): remove the lid from it, turn it over and place it, slightly moving it to the side, so that it protects (covers) the gas pipe from possible acid entering there.
Then everything is simple: light a fire, dip the oxygen sensor core in acid and heat it thoroughly over this fire. When the acid begins to boil and splash, green-blue salt will begin to appear on the surface of the sensor.
Wait until the aggressive liquid has completely boiled away, rinse the part with clean water, dip it in phosphoric acid again and put it on fire... - repeat these steps until the lambda probe sparkles clean (in our case it took about 15 minutes). Before installation, the threads of the oxygen sensor should be lubricated with graphite grease (so that it does not burn).
Only after this can the part be returned to its place.
What is the price?
The cost of the device will vary depending on the manufacturer and brand of the machine.
| Name | Price, rub |
| Lambda probe for Volkswagen Golf | From 2900 to 8000 rubles depending on the brand |
| Oxygen sensor for VAZ cars | From 1900 to 4200 rubles depending on the car brand |
| Lambda probe for Daewoo cars | From 800 to 6 thousand rubles on average |
| Oxygen controller for Renault cars | From 1800 to 8 thousand rubles depending on the brand |
| Prices are relevant for three regions: Moscow, Chelyabinsk, Krasnodar. | |
Stories from our readers
“Fucking basin. "
Hi all! My name is Mikhail, now I’ll tell you a story about how I managed to exchange my two-wheeler for a 2010 Camry. It all started with the fact that I began to be wildly irritated by the breakdowns of the two-wheeler, it seemed like nothing serious was broken, but damn it, there were so many little things that really started to irritate me. This is where the idea arose that it was time to change the car to a foreign car. The choice fell on the melting Camry of the tenth years.
Yes, I had matured morally, but financially I just couldn’t handle it. I’ll say right away that I am against loans and taking a car, especially not a new one, on credit is unreasonable. My salary is 24k a month, so collecting 600-700 thousand is almost impossible for me. I started looking for different ways to make money on the Internet. You can’t imagine how many scams there are, what I haven’t tried: sports betting, network marketing, and even the volcano casino, where I successfully lost about 10 thousand ((The only direction in which it seemed to me that I could make money was currency trading on the stock exchange, they call it Forex. But when I started delving into it, I realized that it was very difficult for me. I continued to dig further and came across binary options. The essence is the same as in Forex, but it’s much easier to understand. I started reading forums, studying trading strategies. I tried it on a demo account, then opened a real account. To be honest, I didn’t manage to start earning money right away, until I understood all the mechanics of options, I lost about 3,000 rubles, but as it turned out, it was a precious experience. Now I earn 5-7 thousand rubles a day. I managed to get the car buy after half a year, but in my opinion this is a good result, and it’s not about the car, my life has changed, I naturally quit my job, I have more free time for myself and my family. You’ll laugh, but I work directly on the phone)) If If you want to change your life like me, then here’s what I advise you to do right now: 1. Register on the site 2. Practice on a Demo account (it’s free). 3. As soon as you get something on the Demo account, top up your REAL ACCOUNT and go to REAL MONEY! I also advise you to download the application to your phone, it’s much more convenient to work from your phone. Download here.
During the first 5-7 minutes after starting the engine, the ECU adjusts the mixture composition based on the readings of other sensors and averaged parameters. After this time, when the oxygen sensor has warmed up to operating temperature, then the ECU connects its parameters to the general calculation formula.
An oxygen sensor error may be caused by a faulty heating circuit. As a result, the sensor will not have time to warm up in the allotted time, which means that incorrect signals from the oxygen sensor . The fuel mixture will not be suitable, which will negatively affect engine performance (high fuel consumption, idle speed fluctuates, the car does not drive). As soon as the oxygen sensor warms up to operating temperature, all symptoms disappear.
The service life of a VAZ oxygen sensor can reach 100-150 thousand km, but the service replacement of an oxygen sensor on a ten should take place in the interval of 60-80 thousand km.
How to check the oxygen sensor ? To make an accurate conclusion about the performance of the sensor, you need to use an oscilloscope. In other cases, the condition of the lambda probe can only be determined indirectly.
Lambda probe restoration
A common cause of malfunctions is carbon deposits, which prevent the capture of oxygen and, accordingly, distort the output signal.
Therefore, in order to
restore the oxygen sensor, you need to clean the platinum electrodes on the ceramic rod from carbon deposits.
It is impossible to clean carbon deposits by mechanical means, since this method will damage the metal coating. All that remains is to resort to the help of chemistry. We open the sensor, to do this we saw off first the first and then the second protective cap. Goal: get to a white ceramic rod with carbon deposits of the same color.
To clean the sensor rod from carbon deposits, you will need phosphoric acid, which may be part of the rust converter. Before using cleaning products, make sure that they do not leave a protective layer behind. We immerse our sensor in the cleaning solution for 20 minutes. During this time, the liquid will begin to become cloudy and the deposits will disappear (using a soft brush is allowed).
Heating also allows you to get rid of carbon deposits, especially if you cool the rod sharply after heating. Temperature changes cause carbon deposits to crack and fall off like a shell.
Heat the ceramic rod over an open fire a couple of times.
After cleaning, we attach the caps to several points of semi-automatic camp welding.
The VAZ 2110 oxygen sensor , like the sensors of foreign cars, has a similar structure, so this cleaning of the lambda probe is suitable for every car enthusiast.
Were you able to repair your car's oxygen sensor?
DIY lambda probe repair
How to check the oxygen sensor (lambda probe) with your own hands
Welcome, friends, to the DIY car repair website. The lambda probe can be considered one of the most important parts in the operation of the engine and in the exhaust system of a vehicle.
And this is of great interest to most drivers, how can you check the oxygen sensor? How to check the oxygen sensor (lambda probe) Checking the sensor is not at all difficult, which we will try to consider in detail in this article. A lambda probe is a special device, also called an oxygen sensor, it is located in the exhaust system on the exhaust manifold. The information transmitted from this oxygen device allows the control unit to always maintain the required composition of the fuel mixture. For example, if a very lean mixture enters the combustion chamber or a very rich mixture, the lambda probe signals the electronic system of your vehicle and the computer begins to adjust the necessary parameters.
Lambda probe design and what the oxygen sensor consists of:
- Metal case. Seal ring with wiring and special cuffs. Protective housing, which has a hole to provide ventilation. Current-conducting circuit contact. Filament coil. Protective shield, which has a hole through which gases escape.
The uniqueness of these devices is that they are made from heat-resistant materials and are designed to operate at high temperatures. Types of devices: Before you start checking the sensor, you need to familiarize yourself with the main reasons that can cause it to fail.
Some causes and malfunctions of the sensor.
- Antifreeze and coolant get inside the housing. Incorrect cleaning of the housing with various chemicals that are completely unsuitable for this. Too much lead in gasoline. Overheating of the sensor housing, which occurs due to the ingress of low-quality gasoline.
What happens if the oxygen sensor becomes unusable:
- The car begins to twitch. Uneven engine speed. High accumulation of toxins in gas exhaust.
It is recommended to monitor the operation of the sensor, which must be checked at least once, after each run of 10,000 kilometers. Also, don’t forget to read the article about the idle speed sensor.
Checking the lambda probe yourself
There is a visual inspection, which is the easiest and most straightforward method to start with. First you need to inspect all the connectors to which the wires are connected and they all must be securely and tightly fixed in place.
Visual inspection of the device: The presence of soot usually appears due to a defective sensor heater; it can also be formed due to the combustion of a highly enriched mixture, which ultimately clogs the sensor and it begins to malfunction. Shiny deposits appear due to a high concentration of lead in gasoline. Usually in these cases it is advisable to replace the device, since the lead has already damaged the probe and the catalytic converter. Whitish and grayish deposits also lead to replacing the sensor, because they are due to various additives used in the fuel, which also leads to malfunction of the device.
Conclusions and recommendations
According to many motorists, a layer of soot on the ceramic tip interferes with the normal operation of the device, since it interferes with accurately assessing the amount of oxygen. By giving the controller inadequate signals, the sensor behaves as if it has failed, which is why the control unit begins to supply fuel in emergency mode, and the Check Engine display flashes on the dashboard.
In fact, cleaning the lambda probe with your own hands helps in 2-3 cases out of a hundred, as evidenced by numerous reviews from car enthusiasts on the forums.
The above signs usually indicate a real breakdown of the part; as a result, it will still have to be replaced. Here are some recommendations:
- do diagnostics at the nearest service station and make sure that the lambda probe is faulty, because the Check Engine light also lights up for other reasons;
- You should not remove and wash a working sensor with acid in order to simply clean it, in this way you can ruin a completely working element;
- if the probe is declared unusable by a car service specialist, clean it boldly, since there is nothing to lose;
- do not use nitric or sulfuric acid for cleaning, they are too aggressive;
- perform the work wearing rubber gloves and safety glasses, and pour the acid carefully, without splashing;
- ensure the room is ventilated.
After drying and installing the part in place, observe the behavior of the car for 2-3 days . If fuel consumption does not decrease and the Check Engine warning light does not go off, go to your local store for a new device. In the vast majority of cases, it is not possible to restore the lambda probe and there are two ways out of the situation: replace the element with a new one or install a decoy - an electronic simulator of the sensor’s operation.
How to clean the lambda probe on a VAZ 2110? DIY oxygen sensor cleaning
04/15/2015 | 1966 | Repair of VAZ 2110 | no comments
The lambda probe or oxygen sensor (oxygen sensor) plays an important role in the “life” of the car. A lot actually depends on this sensor, the existence of which many people have no idea about, for example: correct and uninterrupted operation of the engine, fuel consumption, power of the power unit, etc. Severe operating conditions of this sensor affect its condition over time, Therefore, it is not surprising that after several tens of thousands of kilometers, the lambda probe begins to “compost its brains.”
A thick layer of carbon deposits accumulates outside and in the inside of the lambda probe, which actually causes interruptions in its operation. Some motorists, at the first sign of a malfunction, immediately change the oxygen sensor, although, as practice shows, it is enough to simply wash the sensor using a special product.
Read how to check the lambda probe here. In this article you will learn how to clean the lambda probe of a VAZ 2110 with your own hands at home. Step-by-step instructions for cleaning an oxygen sensor will allow you to clean this sensor as quickly and efficiently as possible.
Cleaning the VAZ 2110 oxygen sensor - step-by-step instructions
In order to remove the resulting deposit consisting of soot, soot and other contaminants, we need a special liquid - phosphoric acid. Under no circumstances try to use sandpaper, a metal brush, a file or other sharp objects to clean the lambda probe; this will lead to the sensor being permanently damaged and all that remains for you is to replace the oxygen sensor.1.
First you need to find orthophosphoric acid. If you are unable to obtain acid, use a rust converter.2. Next, you should remove the lambda probe.3.
Carefully lower the working part (metal tip) into the prepared liquid for 15-20 minutes.4. If the dirt is serious, you can use a toothbrush; with its help, soot and deposits are removed more effectively.5.
There are articles on the Internet about how to clean the lambda probe, in which it is recommended to cut off the tip on the lambda probe for more thorough cleaning, but I recommend doing this only if the usual cleaning of the VAZ 2110 oxygen sensor did not produce any results. After cleaning, the previously cut tip must be welded back.6.
When the surface of the sensor is cleaned and has acquired a characteristic metallic color, rinse the lambda probe in water and let it dry.7. Reinstall the lambda and check the operation. If after cleaning the oxygen sensor nothing has changed and the engine still runs intermittently, replace the oxygen sensor with a new one. That’s all for today, see you again at https://vaz-remont.ru/ .
Therefore, it is customary among VAZ owners to repair the lambda probe with their own hands or turn it off completely (in this case, the car’s brains are simply flashed). The question is reasonable: is it possible to disconnect it from the network (remove the sensor and connect the connector).
In theory, this does not promise anything terrible, but in practice, the electronic engine control unit will set the average parameters for the fuel mixture - the characteristic will jump from rich to lean - the experienced dynamism of the car will disappear and gasoline consumption will increase. So, if you have a need to spend money on the right things, read the manuals on how to repair an oxygen sensor.
Symptoms of a faulty sensor
- Gasoline consumption exceeds 12 liters per hundred square meters. At idle, it feels like the engine is adjusting. When accelerating, failures are possible, the dynamics, in principle, are not stable, the engine power becomes lower
Naturally, all these signs are just guesses, they may indicate a breakdown of other parts of the suspension or engine. To find out for sure whether your oxygen sensor is damaged or not, you need to check the lambda probe, especially since the methods are simple and can be done in a garage .
Lambda probe errors
Another important point is the correct reading of the errors, which will be given to you by the board in the event of a lambda malfunction (if it is not there, take the car to a service center, they will definitely help you). Usually, any problem in the car is indicated by a check engine signal, although in a situation with a lambda - the probe may not light up. List of the most common error codes:
- Error P0130 - the signal from the sensor does not receive the infidels or does not acquire P0131 - the signal from the sensor is received by the low -haired P0133 - the response of the lambda itself is very slow p0134 - response is simply inaccuishes P0135 - the heating element of the oxygen sensor P0136 - the landing of the second lambda Taoshka P0137 - second signal level sensor is low. Error P0138 - on the contrary, the signal level on the second device is high. Error P0140 - the sensor itself has broken. Error P0141 - the heating element on the second device has overheated. Error P1102 - the resistance of the information reading device has disappeared or is very low. Error P1115 - a problem in the heating circuit of the sensor itself.
The last error is the most common: if the heating circuit is closed, the lambda probe immediately produces an incorrect signal from the electronic control unit, and all of the above symptoms of a malfunction can be correlated with the lambda.
Factors influencing failure
Reasons influencing the occurrence of malfunctions of the oxygen sensor:
- Low-quality gasoline emits a lot of lead and iron in the exhaust, which clog the contacts of the lambda probe in just a couple of fill-ups. The condition of the oil scraper rings and caps leaves much to be desired; the oil simply gets into the fuel mixture and into the car's exhaust system. If the valves are clamped, then the exhaust system is subject to constant popping noises that destroy the sensor surface. Maybe the fuel mixture is of the wrong quality, the ignition timing is not aligned, there are many internal reasons.
All these reasons can be the impetus for the right thought: how to repair a lambda probe?
How to repair a lambda probe
- If there is a break in the contacts of the heating element circuit.
External signs and causes
If the lambda probe heating system or the device itself in the car does not work, the symptoms of the malfunctioning condition will be as follows:
- The power unit began to operate less stably. The revolutions can spontaneously increase and fall. The engine often stalls, especially at traffic lights.
- The quality of the combustible mixture, which is pumped with air into the cylinder system, has decreased. If the sensor is not functioning properly, this will cause excessive fuel consumption.
- The fuel supply has become ineffective, fuel enters the combustion chambers uncontrollably. This can lead to malfunctions in the operation of the unit, as well as the electronic system of the car.
- Over time, the engine may experience intermittency when operating at idle speed. At maximum, the efficiency of the internal combustion engine will also be less low.
- There were problems with the functioning of electronic systems. Due to the need to repair the sensor, individual compartments of the power unit will operate unstably. This is due to the fact that pulsed fault signals are sent with a delay.
- While driving, the vehicle began to jerk. Especially when the car is going uphill.
- When the engine operates at any speed, popping noises may appear.
- The engine began to respond slowly to pressing the gas pedal. Acceleration occurs, but not immediately.
One of the important symptoms is the lightning of the Check Engine indicator or the oxygen controller failure light on the car’s dashboard.
The reasons why the performance of the oxygen sensor will be impaired may not arise immediately, so failure of the part occurs in several stages:
- At first, the oxygen sensor begins to function unstably. Periodically, the signal from the device disappears, information is provided over a wide range. This leads to deterioration in the quality of the combustible mixture, as well as unstable speed operation. At the initial stage, the car jerks when moving, popping noises uncharacteristic of the operation of the internal combustion engine appear, and a malfunction indicator may light up on the dashboard.
- At the next stage, the lambda probe stops functioning on a cold engine until the unit warms up. The symptoms of the problem will be similar, only they will appear with greater force. The engine power of the car may decrease, and a response will appear when you press the gas pedal. As a result, this can lead to overheating of the internal combustion engine.
- At the third stage, the oxygen sensor usually fails completely. The power of the power unit drops even more, this is clearly evident when driving at high speed. An unpleasant and pungent odor appears from the muffler.
Reasons that may cause a breakdown of the oxygen sensor:
- The device casing has depressurized. Because of this, exhaust gases and air began to get inside.
- Controller overheating. The reason may be due to malfunctions in the ignition system or incorrectly performed tuning of the power unit.
- Long-term exposure to external factors. This reason can be attributed to natural wear and tear, since any oxygen sensor fails over time.
- The working surface of the oxygen sensor is covered with combustion products, which block its operation. This is usually due to the regular use of low-quality fuel.
- There is a power failure or the wiring leading to the central control unit is damaged.
- Mechanical damage to the device. A strong blow to the case may destroy the internal components of the controller. This often occurs during regular off-road driving.
The “Online auto parts store” channel talked about the causes of malfunctions in the operation of oxygen controllers.