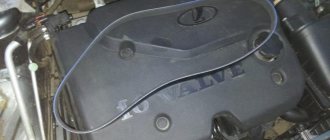
Certain cars are characterized by the fact that over time they develop problems with the alternator belts. To a greater extent, this applies to domestically produced cars - LADA Priora and LADA Kalina. However, foreign-made cars also sometimes experience problems with the alternator belt. Be that as it may, knowledge of how to tighten the alternator belt is needed to eliminate any malfunction. It is worth noting that every driver must monitor the generator system and diagnose belt tension. To do this, first of all, you should learn how to identify belt problems.
How to tighten the alternator belt
Certain cars are characterized by the fact that over time they develop problems with the alternator belts. To a greater extent, this applies to domestically produced cars - LADA Priora and LADA Kalina. However, foreign-made cars also sometimes experience problems with the alternator belt. Be that as it may, knowledge of how to tighten the alternator belt is needed to eliminate any malfunction. It is worth noting that every driver must monitor the generator system and diagnose belt tension. To do this, first of all, you should learn how to identify belt problems.
Checking the tension of the generator belt
If there is a suspicion of a malfunction of the alternator belt, it is necessary to carry out appropriate diagnostics. To carry out diagnostics, you need to acquire a caliper or an ordinary metal ruler.
Diagnostics of the alternator belt is carried out as follows:
- You should press the belt with a certain force (about 3-4 kg);
- Next, use a ruler to measure the degree of bending.
If you have extensive experience, it is not necessary to use measuring devices - it is enough to determine the condition of the alternator belt by eye.
In the case of normal tension, the maximum bend is 1cm. Otherwise, we can confidently say that it is too weakened. If you do not have enough experience to identify the problem by eye, follow the diagram and use measuring devices to get the most accurate result. There is also a way to diagnose the alternator belt using a dynamometer. It consists of using a dynamometer to move the belt to the side, which should not bend more than 10-15 mm with a force of approximately 10 kgf.
Preparing to repair or replace the alternator belt
First of all, it is necessary to service the generator itself, for example, clean the contacts of the voltage regulator. To do such things, you need to use a soft rag soaked in gasoline. It is advisable to clean some parts of the generator with compressor or pump compressed air. In addition, it is necessary to inspect the condition of the wires and connections of the generator to the motor.
A weakening belt manifests itself in the unstable functioning of the generator and the entire motor. By the way, you should also not allow excessive tension, since this accelerates wear on the alternator belt, which can cause it to break while driving. For this reason, you should not delay troubleshooting.
A loose belt leads to a decrease in efficiency, resulting in overloads in the electrical network, which cause the car to slip on the pulleys.
Before you begin repair work, you need to prepare the following tools:
- Metal strip;
- Socket wrench 17;
- Ruler;
- Mounting and the like.
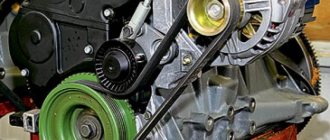
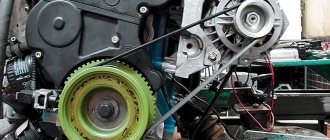
To achieve greater comfort during repairs, the machine must be placed on an inspection hole. Next, using a socket wrench, you should loosen the nut on the tension bar, since it secures the alternator belt. After this, while in the inspection hole, you need to loosen the fastening of the generator to the bracket. Before doing this, remove the engine mudguard.
Having completed the required actions, it is worth ensuring the necessary tension. To do this, use a pry bar to press the generator away from the engine. While the generator is in this position, the nut must be tightened again with sufficient force.
Tensioning the alternator belt is done in approximately the same way. It is worth noting that this is the best method available. However, individual drivers may well do as they please.
How to properly tighten the alternator belt?
Replacing the alternator belt proceeds as follows:
- The bolt is loosened by 2-3 turns;
- When you unscrew the adjustment bolt, the belt tension is loosened, after which the belt itself is removed;
- Inspect the belt, and if there are tears, cracks, delamination of rubber and similar defects, it should be replaced;
- Inspect the pulleys, and if they are clogged or damaged, either replace them or clean them;
- If necessary, the tensioning device can be removed. To do this, you need to unscrew three bolts. For greater convenience, you should move the roller up.
It is worth noting that before you start replacing the alternator belt, it would be a good idea to study the manufacturer’s recommendations, in which you can often find useful information. One way or another, information about the individual properties of your car never hurts.
If there is a need to tighten the belt on the crankshaft pulleys, you can use a narrow metal strip. Be that as it may, in order to avoid various troubles, everything should be followed with maximum precision.
Video on replacing the alternator belt
Upon completion of the belt tensioning work, it is necessary to check the operation of the generator set. First of all, it is worth checking the circuit with the engine turned off. In order for the control lamp to flash on the panel, you need to turn the key. Only after completing these steps can you start the engine. After some time, at average crankshaft speeds, the warning light should go out.
It is worth noting that when tightening the belt, certain difficulties may arise. In this case, it is worth looking for information about the alternator and how to tension the belt for a specific car, since certain technical properties may vary.
The procedure for replacing the alternator belt is not particularly difficult. Almost every driver is able to independently check the belt and, if necessary, tighten it.
Source
We exhale, we are not in danger of bending the valves
If you have an 8-valve engine, then bending the valves and replacing them, as a rule, does not threaten you, but if the “head” is 16-valve, you are definitely guaranteed to replace these elements. However, in this article we will look at how to change the timing belt on a younger brother, when a breakdown does not entail any unpleasant consequences, and all work can be carried out almost in the field and with minimal knowledge.
Major breakdowns
There are three main types of timing belt failure:
- The integrity of the belt structure is compromised - in this case, the belt delaminates, and the internal threads on its surface become visible to the naked eye. These problems occur due to mechanical damage or due to incorrect adjustment. This belt must be replaced immediately.
- Over-tension or under-tension of the belt - the tension roller is responsible for the degree of belt tension, which allows the belt to rotate around its own axis and allows it to be adjusted correctly. If the belt is too tight or too loose, it will fall into an indecent state very quickly.
- A break is the most unpleasant situation that can happen on the road with a timing belt. In this case, the engine will completely stall and it will be possible to start it again only by installing a new element.
To avoid such troubles, the manufacturer recommends checking it every 15,000 kilometers and replacing it every 75,000 kilometers. In fact, it should be changed as soon as visible cracks are detected on the surface.
How to properly tension the Kalina generator belt
To perform the work, you can remove the right front wheel or install the car on an inspection ditch or overpass.
1. We prepare the car for work.
2. Remove the right side of the engine mudguard.
3. Visually check the condition of the generator drive belt - Apply a force of 98 N (10 kgf) to the belt exactly in the middle between the generator pulley and the engine crankshaft pulley.
If cracks, signs of wear and other damage are found on the belt, the belt should be replaced. A correctly adjusted belt should bend by about 8 mm. If the belt deflection is not normal, adjust the belt tension. If it is difficult to estimate the force created by the hand, you can use a household steelyard with a maximum permissible load of 10 kg.
4. To adjust, remove the windshield washer reservoir.
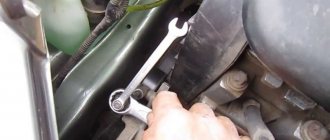
5. Using a 19 mm open-end wrench, unscrew the locknut of the tension mechanism. By rotating the adjusting pin with an 8 mm socket wrench, we change the tension of the generator drive belt (clockwise we increase the belt tension, and counterclockwise we decrease it).
Excessive belt tension can lead to failure of the front alternator bearing.
6. We check the tension of the generator belt (see above) and, if necessary, repeat the adjustment.
7. After making sure that the belt is tensioned correctly, hold the adjusting pin and tighten the locknut.
Tension adjustment
After replacing the alternator belt on Kalina, making a rough adjustment and then starting the engine, it is necessary to more accurately adjust the drive tension
. To do this, we perform the following operations:
- loosen the tensioner rod locknut;
- turn the adjusting pin with a wrench to “8” until the result is achieved;
- tighten the locknut.
When gradually tightening the belt, you can use a simple canter scale, which you need to attach to the key at “8” and tighten the pin counterclockwise to a reading of 2 kg. A normal setting is considered when, with a force of 10 kgf, in the area between the generator and crankshaft pulleys, the deflection value will be within 8-10 mm.
More “advanced” owners have devices such as TsNT-Belt, the operation of which is based on the recognition of the known acoustic characteristics of drive devices.
Specifics of the drive circuit on different modifications of Lada Kalina
The factory design provides for different lengths of standard gears, which depend on the configuration of the machine:
- without air conditioning – 882 mm;
- with air conditioning – 1018 mm.
The first VAZ 1118 models without air conditioning and a tension roller are equipped with a poly-V drive with a length of 823 mm
. Thus, with one belt from the crankshaft pulley, not only the alternator, but also the air conditioning compressor can be activated. The roller circuit allows you to adjust the tension.
Signs of breakdown and vulnerable spots
In any tension roller design, the weakest point is the bearing. The part is subject to loads of a constant nature, in addition to which temperature differences contribute. Under such conditions, element failure can occur quite often.
What kind of oil to pour into Granta 8 valves
Lada Granta engine oil change
Gearbox Lada Granta
Let's take a closer look at the list of main signs, due to the presence of which the roller can be considered faulty:
- The battery no longer receives a full charge;
- the car's energy-intensive current collectors began to show disturbances in their functioning;
- a characteristic hum coming from the area where the generator unit is located;
- presence of play during roller operation;
- The working surface of the generator set drive belt shows signs of uneven wear.
Recommendations for choosing a belt drive
Gates
drive as standard .
As a replacement on the first models, you can use Dayco 825
.
Here you need to take into account that elastic specimens are marked with the “ Poly-V
” symbol; if it is absent, the product has a rigid structure.
Alternative drives for VAZ 1118 with air conditioning
:
- Roulunds Rubber 6PK1015;
- Dayco 6PK1005;
- Bosch 6PK1015;
- Gates 6PK1019.
Alternative drives for VAZ 1118 without air conditioning
:
- Bautler 6PK883;
- Dayko 6PK888;
- Finwhale BP6 883;
- Luzar LB 0118 1118-3701720 6РК 884;
- Roulunds Rubber 6PK884;
- BRT 882 mm (Balakovo plant).
Drive system repair
Regulations for periodic inspection and replacement of the alternator belt on Kalina
Many new owners of vehicles, either from prolonged joy or out of ignorance, remember the presence of a flexible connection under the hood only after the lamp on the dashboard lights up. The technical documentation of the vehicle indicates operational standards, after which the torque transmission elements must be removed and new ones installed:
- tensioner roller after 60,000 km;
- belt after 30,000 km.
Experts strongly recommend monthly scheduled maintenance of the rubber drive, consisting of simple external inspection steps. The part needs to be replaced if the following defects are detected
:
A high-frequency whistle that appears when electrical consumers are turned on also indicates the need to replace the generator belt on Kalina or, at a minimum, to adjust its tension.
Symptoms of a problem
Damage to the tensioner is usually easy to diagnose. It is often noticeable visually. Running the car for a short time without an alternator belt helps to identify the problem. This often allows the damage to be localized. You should think about replacing the Kalina generator belt tensioner in the following cases:
- Presence of traces of rust and corrosion on the roller axis.
- A characteristic whistle when the engine is running.
- Short service life of the alternator belt.
- Curvature of the roller relative to the belt.
Repair technology for the auxiliary drive system
Sequencing
is similar for both models with and without air conditioning and consists of the following items:
- Remove the engine protection.
- Remove the right wheel and fender liner.
- Remove the expansion tank.
- Jack up the right side of the engine and unscrew the mount.
- By tightening the tensioner mechanism pin, loosen the belt tension.
- Remove the drive from the roller and then from all pulleys.
- Install the new part and reassemble in reverse order.
- Adjust the tension.
It is advisable to carry out work in an inspection pit in compliance with all safety measures. When changing the flexible connection, it is recommended to simultaneously install a new tensioner roller, but this depends on the desire of the owner and the condition of the unit.
Forced tuning
Unfortunately, since 2011, designers have abolished the tensioner on Kalina. They were guided primarily by considerations of economy, but they did this without any modification to the generator. In practice, cases of its premature failure immediately became more frequent. Therefore, owners began to install the tensioner on their cars themselves.
It's not very difficult to do this. True, you will have to purchase not only the tensioner itself, but also the generator bracket. The only problem is removing the standard belt. It is very difficult to remove because it is very tight at the factory. You can simply cut it, as you will have to buy a new one. The fact is that the Kalina generator belt without a tensioner has a size of 820 mm, but 880 will be needed.
A whistle appeared near the generator. Checking the belt tension is normal. Suspicion of the pressure roller. A more thorough inspection showed that the belt had jumped 1 groove to the right on the pulley. We loosen, rearrange, tighten - the whistle disappeared.
5000 thousand) At 38000 thousand. It started to whistle very loudly, the whistle did not disappear even after warming up. Upon inspection, it turned out that the belt had jumped one groove towards the engine on the camshaft pulley. We rearranged it, adjusted the tension, after 2000-3000 thousand. history repeats itself. The roller is also skewed. The whole dog is buried in the tension mechanism, or rather in its distortion. I'll try to level it with washers.
__________________ If in a dark alley you suddenly received a kick in the groin, a punch in the stomach and a baseball bat on the head, then the most important thing is not to get confused
When replacing the alternator belt or when repairing the engine, it is imperative to check the condition of the alternator tensioner roller.
The roller should rotate easily and silently, there should be no traces of grease from the roller
To replace the roller, you need to loosen the tension on the generator drive belt.
Use a screwdriver to pry off the roller cover (shown on the removed tensioner)
Using a spanner wrench or a 17mm socket, unscrew the bolt securing the roller to the lower bracket of the tensioner (the bolt thread is left-handed, so unscrew the bolt clockwise)
For clarity, we show it on a removed tension device.
We take out the tension roller with the bolt, support sleeve and washer
Install the tension roller in reverse order
To remove the tensioner completely, release the belt tension.
Using a 13mm head, unscrew the bolt securing the upper bracket of the tensioner to the generator bracket.
Remove the washer from the bolt (located on the inside of the tensioner bracket), remove the bolt and bushing.
Using a 13" socket, unscrew the bolt securing the lower bracket of the tensioner to the generator bracket (shown on a dismantled engine for clarity).
We take out the tensioning device assembly.
We remove the bolt securing the lower bracket of the tensioner by removing the spacer and two cup washers from it.
If necessary, disassemble the generator drive belt tensioner.
We assemble and install the tensioner in the reverse order
| 16.02.2008, 14:36 | #22 |
Useful video tutorials on the topic
A video with a step-by-step operation will help you analyze in detail all the nuances of replacing and adjusting the tension
How to replace the alternator belt on Lada Kalina
How to tighten a belt
The design of the generator mount for Lada Granta and Kalina 2nd generation differs from the usual one that we saw on Lada Priora or Lada Kalina 1st generation. On new Lada cars with 8 valve engines, AvtoVAZ did not provide for belt tension, so replacing the alternator belt is done differently.
According to the maintenance regulations, the alternator belt must be checked every 15 thousand km, and it must be replaced every 30 thousand km, regardless of its condition. Because The alternator belt tensioner is not used, so the belt is designed to be stretched once during installation (reuse is not recommended).
Replacement cost
The cost of changing a belt on a Lada Kalina car depends on the type of engine, range of units and is:
- for a motor without a tensioner - from 300 rubles;
- engines with a tensioner without air conditioning - from 150 to 350 rubles;
- motors with tensioner and air conditioning - from 220 to 400 rubles;
- for unit 21127 - about 600 rubles.
We recommend: The quietest and softest summer tires
Replacing the roller will require an additional 250 rubles. The total amount required by the car owner to purchase spare parts, in the maximum version, will not exceed 850 rubles.
Replacing the belt and generator roller on an 8-valve Lada Kalina is very easy and simple. A wide range of product choices will not suit every consumer's taste. Moreover, even analogues of original parts are of fairly high quality. Diagnosing faults is easy and can be done by any motorist.