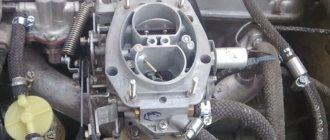
The VAZ 2110 was equipped not only with an injection engine, but also with a carburetor. Great popularity and the rest of the years of production, the tenth Lada model was produced with an injection engine. The injector helped the “ten” improve its technical characteristics, increased the reliability and stability of the internal combustion engine. As you know, injection engines are equipped with a large number of different electronics and sensors aimed at maintaining the operation of the entire car. With the advent of the injector, the VAZ 2110 began to work much better, softer, and the dynamics began to please. Fuel was injected into the combustion chamber under pressure using fuel injectors; the fuel was atomized under pressure, which was pumped by a fuel pump.
Quite often, fuel injectors become dirty due to poor fuel quality, which makes their flow rate slightly lower and leads to a lack of fuel and loss of vehicle power.
In this article we will talk about fuel injectors on the Lada 110, namely their purpose, design, location, signs of malfunction, methods of washing and replacement.
Purpose
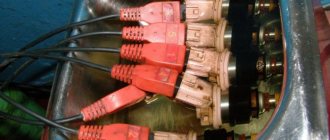
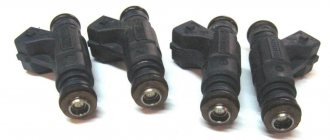
Fuel injectors are designed to spray fuel, which is mixed with air to form a fuel mixture and then enters the combustion chamber. The injectors replaced the old carburetor injection, which produced mono injection on all 4-cylinders, and the injectors allowed individual injection for each cylinder. Based on this, we can define the purpose of fuel injectors - this is the supply of fuel under pressure into the combustion chamber of a certain cylinder. There are a total of four fuel injectors on the VAZ 2110, which are connected into one system, to the fuel rail.
Removing the fuel pressure regulator
The fuel pressure regulator is attached to the rail with two Allen-head bolts. They are not visible from above, but the key can be found by touch. It is better to use a torx wrench, as the heads are often clogged with dirt. In this case, the torx bit is easier to insert. The return pipe is screwed to the RDT using a fitting with a 24 mm edge. If you can’t unscrew it in place, you can remove the regulator along with the fuel pipe, and then unscrew it in a vice.
The photo shows a new fuel pressure regulator code 2112-1160010-01 and a removed tube.
Now we put the new fuel pressure regulator in place and screw the fuel pipe. Before the first start, you need to pump up the pressure in the fuel rail and fill it with gasoline, otherwise the engine may not start for a long time.
To do this, turn on the ignition three times, and each time wait until the pump stops humming. Of course, don’t forget to replace the fuel pump fuse before doing this. Then we start the engine.
Device
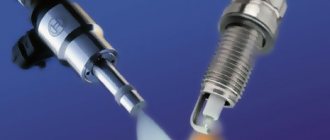
A fuel injector is an electromechanical part that, under the influence of an electric current, opens a channel and passes the compressed fuel through the nozzle into the combustion chamber. The injector is an electromagnetic valve, the armature of which has a locking bar; when voltage appears on the injector winding, the armature is retracted, thereby opening the channel for the passage of fuel.
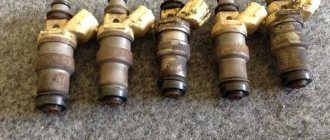
The injector consists of many parts, but most often the mesh filter is at risk of contamination, which becomes clogged due to fuel combustion products and low-quality fuel.
The nozzle consists of:
- O-ring;
- Strainer;
- Electrical connector;
- Windings;
- Return spring;
- Anchors;
- Housings;
- Needles;
- Pin;
Replacement or cleaning?
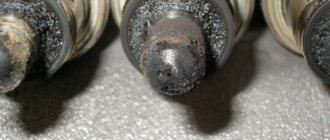
In order to understand what needs to be done with the nozzle, change it or simply clean it, it is better to diagnose them on a special stand. Under such conditions, you can test it in operation under different pressures, and also visually see how tightly it closes, and whether it is “snotty.”
If any of the injectors needs to be replaced, then you should buy a new one with exactly the same part number as the old one. Also, during installation of cleaned injectors, all O-rings should be replaced (2 pieces on each injector - approx.).
Installation is carried out strictly in the reverse order, similar to the removal procedure.
Location
The injectors are located opposite each cylinder and are inserted into special milled holes in the cylinder head on one side, and on the other hand they are assembled into a single system through the fuel rail. All 4 injectors are connected in parallel and spray the same amount of fuel into the cylinders.
The location of the injectors depends on the engine type. For example, in an 8-valve engine, the fuel rail with injectors is located at the rear of the cylinder head, above the exhaust manifold.
In a 16-valve engine, the fuel rail is located on the front of the cylinder head, under the intake receiver.
Cleaning the injector, step-by-step operation of removed injectors
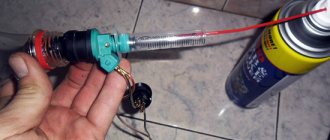
It is advisable to cover the openings in the ramp so as not to accidentally drop any foreign object there. Now let's move on to cleaning the injectors. Since at 12 V and 3 W the nozzle does not open, it is necessary to use 12 V and 10 W, which will require a lamp to act as a damper. We connect the connector for the nozzle to a 12 V lamp and a microswitch.
Since the nozzles will be cleaned under pressure, all fasteners must be strong enough. You can assemble a device through which liquid for cleaning injectors will be supplied using different methods. For example, you can glue a rubber pipe in the sprayer head using hot glue/clamp or use a syringe, which is most convenient.
Injector cleaning technology:
- Remove the rubber sealing ring from the nozzle.
- We put a rubber tube on the nozzle shank.
- We connect the wires to the car battery - the polarity of the connection can be any.
- Holding the structure in your hands, you need to press the head of the cylinder until the hissing stops and the pressure is balanced.
- We direct the nozzle to the side and press the button.
The cleaning procedure must be repeated two to three times for each nozzle. If the nozzles of the nozzles are really dirty, then after the first portion of liquid the appearance of the stream coming out of the nozzles will change.
Symptoms of a problem
Quite often, injectors fail due to winding burnout or contamination, which seriously affects engine performance. If in the first case the injector fails completely and it is difficult not to notice, then in the second case, if it is dirty, it is quite difficult to determine whether the injector is faulty, but still it will show signs by which you can find out whether the injector is working or not.
Signs of a broken injector:
- The engine is tripping;
- Loss of power;
- The car's dynamics disappeared;
- The internal combustion engine starts poorly;
All these symptoms are indirect and can be observed with other problems in the car; in order to more accurately determine faults in the injectors, it is necessary to diagnose them.
Troubleshooting
Before removing the injectors on the VAZ 2107, you need to make sure that they are really clogged. There are several ways:
- Hearing test: the old-fashioned method of diagnosis. Applicable only when the holes are significantly dirty. “Experienced” people recommend listening to the audio coming from the cylinder block. If muffled ringing sounds are clearly audible in the sound of the engine, then the fuel nozzles need to be cleaned;
- Assessing the condition of injectors using a multimeter: a much more objective method of analysis compared to the previous one. First you need to know what type of sprayers is installed on the car. As a rule, the “seven” was equipped with high-resistance injectors. For correct diagnostics, it is necessary to disconnect the “high voltage” going to the injector. Now you need to connect the diagnostic wires of the device to the injector terminals. If the voltmeter readings give values in the range of 12-17 Ohms, then everything is in order with the injectors;
- Diagnostics of the mechanical parameters of the sprayer. This diagnostic operation is only available with professional equipment; it is performed only at specialized service stations. The point is that the injectors are dismantled and attached to a stand. Large quantities of fuel are continuously passed through the part. The technician evaluates the parameters of the torch that is formed when fuel passes through the nozzle. If the fuel flows unevenly, then the device is clogged.
Examination
The injectors can be checked by measuring the fuel pressure, but the injectors can be checked in more detail only after they have been removed.
Checking fuel pressure
This test is quite primitive and will not determine the failure of the injector with 100% effect, but this test consists of determining whether the injector is leaking. Fuel injectors must maintain gasoline pressure and not leak it; it often happens that they begin to leak fuel, which then flows into the cylinders.
By measuring the fuel pressure, you can determine whether there is a leak or not, but it should be noted that this procedure without removal will not give an accurate result, since the pressure may drop for other reasons.
Check after removal
It is necessary to apply pressure directly to the injector and see if it allows fuel to pass through when the valve is closed.
The second step is to check the clarity of the fuel atomization, that is, for contamination of the injector. To do this, you need to connect the injector to the stand, or assemble your own circuit for washing the injectors.
Nozzle, how to clean nozzles with ultrasound, pros and cons of this method
The benefits of this method are quite controversial. Some believe that ultrasound kills injectors because it destroys the mesh, others argue the opposite - that this is a necessary measure when cleaning injectors and that it must be combined with washing them during dismantling. According to some experts, ultrasound affects the ceramic components of the nozzle, so the period of influence must be reduced to a minimum. Another disadvantage of the ultrasonic cleaning method is its high cost.
Cleaning VAZ 2110 injectors
You can wash the injectors in three ways: using a special wash, at a service station (service station) and with your own hands. The first method does not give the desired effect and often even worsens the situation, and washing at a service station costs a pretty penny, which not every car enthusiast wants to spend on such an easy procedure. Therefore, it would be best to do the washing yourself.
For self-washing, it is necessary to make a power supply circuit for the nozzle; for this we need:
- Carburetor cleaner;
- Wires 2 m;
- ON/OFF button;
- 12V lamp;
- Injector connector;
- Syringe;
Electrical circuit assembly
To flush the nozzle, it is necessary to supply power to it; for this you will need to assemble an electrical circuit according to the diagram presented below. It is not difficult to assemble such an assembly; you just need to look carefully at the drawing and everything will become clear.
Washing video
Injector repair kit
If the injectors cannot be washed and they are already in a deplorable condition, you can use a repair kit for fuel injectors for the VAZ 2110, it is sold in regular auto parts stores for domestic cars. The cost of this kit is small and amounts to approximately 200-300 rubles.
The repair kit includes:
- O-rings;
- Nets;
- Fasteners;
- Filters, etc.
Replacing injector consumables will help correct contamination.
Cleaning on removed injectors
In order to clean the injectors, the first step is to remove them. How to quickly replace them is written in this article.
When the injectors are removed, you can proceed to cleaning them.
Connection diagram!
Since the nozzle opens at a power of 12V and 10W, it is necessary to make wire connections, the circuit of which will include a light bulb. It will thus act as a damper. You can make such a circuit using this diagram:
Detailed connection diagram.
- Next, when everything is connected according to the diagram, we connect power to the injector, but leave the other end unpowered.
- Since cleaning will be done under pressure, take care to ensure that all connections are properly secured. It is best to use hot melt glue.
The pipe to the sprayer is fixed with hot-melt adhesive.
Injector cleaning technology
- First of all, remove the O-ring from the injector.
- We put a pre-prepared rubber tube on its shank.
The entire structure is assembled.
- Since the injectors do not have polarity, we connect the end switches of the wires to the battery.
- Next, press the button in the cylinder and hold it until the pressure stabilizes and the hissing stops.
- When it has stabilized, point the nozzle to the side and press the power button.
The nozzle is cleaned and the lamp lights up.
- We carry out steps 4 and 5 for each nozzle 2-3 times in a row.
- If the nozzles were heavily contaminated, then after the first blowing the type and quality of the jet escaping from the nozzle will change.
- After 2-3 cleaning attempts, inspect the spray state and if you are unable to achieve the desired result, continue spraying.
- After cleaning is complete, install new O-rings and lubricate them with a small amount of gasoline. This will protect them from cracking and wear.
We recommend: Why do car headlights sweat from the inside and what to do about it?
In total, you will need about 3 hours to complete such work.
The difference before and after cleaning.
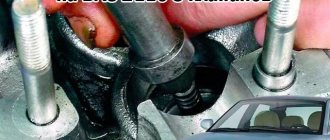
Removing the injectors
In order to remove the injectors, you will need a special tool necessary for this work. It should be noted that the process of removing injectors on a VAZ 2110 depends on the type of engine; in an 8-valve engine, dismantling them is quite simple, but in a 16-valve internal combustion engine you will have to tinker. Let's look at each of the engines in detailed instructions.
Tool you will need:
- Flat and Phillips screwdrivers;
- Set of open-end wrenches;
- Set of hexagons;
After preparing the instrument, you can begin removal.
Dismantling the injectors of an 8-valve internal combustion engine
- We relieve the fuel pressure by disconnecting the fuel pump connector, which is located under the rear seat of the car.
- We start the engine and let it run until it stalls, after which we proceed to remove the injectors.
- We unscrew the fuel supply and return pipes (if there is one) with two 17 mm wrenches.
- Unscrew the tubes from the fuel rail.
- We unscrew the ramp from the cylinder head using a hexagon (2 bolts).
- Pull the ramp away from the cylinder head and remove it.
- Then remove the injector clamps and pull it out of the ramp.
Dismantling the injectors of a 16-valve internal combustion engine
- We relieve the fuel pressure by disconnecting the fuel pump connector, which is located under the rear seat of the car.
- We start the engine and let it run until it stalls, after which we proceed to remove the injectors.
- We unscrew the fuel supply and return pipes (if there is one) with two 17 mm wrenches.
- Unscrew the tubes from the fuel rail.
- Unscrew the two nuts securing the receiver.
- We unscrew the clamps from the cuffs connecting the receiver and the intake manifold.
- Disconnect the receiver from the intake manifold.
- We unscrew the ramp from the cylinder head using a hexagon (2 bolts).
- Pull the ramp away from the cylinder head and remove it.
- Then remove the injector clamps and pull it out of the ramp.
Video
Dismantling
Before replacing or cleaning the injectors, they will need to be removed from the fuel rail. To achieve this, the following activities are carried out:
- Make sure the engine has cooled down properly. It is not safe to work on a hot engine;
- Disconnect the power wires from the fuel pump to de-energize the device;
- Try to reduce the pressure in the engine power system as much as possible. To do this, the engine starts, and then you need to wait until it stalls at idle speed;
- Repeat this procedure several times until the car simply stops responding to turns of the ignition key;
- That's it, now our goal is the fuel rail. To remove it, you must first remove the terminals from the battery, turn off the power to the ramp itself, disconnect the fuel supply hoses, and also disconnect all electrical appliances going to it. These are pressure, idle, throttle position sensors;
- If you have an 8-valve engine, then you do not need to remove the receiver. This step is relevant for engines with 16 valves;
- Experts do not recommend removing the intake manifold without dismantling the throttle valve and the hose going to it. It is better to unscrew and disconnect everything at once, which will allow you to continue working more conveniently;
- Cover the exhaust manifold openings with something to protect them from foreign objects;
- Using a hex wrench, you can unscrew a couple of bolts and remove the fuel rail along with the injectors;
- Make sure that there are no distortions when removing the ramp, otherwise problems may arise with the dismantling processes;
- We remove the injectors. To do this, remove the mounting brackets that hold the electrical connector. You also need to remove the bracket that holds the injector in its seat.
After dismantling the elements, be sure to close the seats to prevent debris and other objects from getting in, and place the nozzles themselves on a table or floor, after laying down a dry rag.
Here you can decide whether to change or clean the elements of the fuel system. If replacement is required, install new injectors in place of the old ones and follow the assembly procedure.
Cleaning
Here proceed as follows.
- Remove the rubber rings from the injectors, and when cleaning is finished, replace them with new seals.
- The cleaning process should begin with the nozzles, on which various deposits form as the car is used.
- Be sure to thoroughly clean the funnel-shaped surfaces where tar deposits accumulate.
- The next step is the fuel mixture supply channels.
- To open the solenoid valve to supply fuel, you will have to trick the device with a 5-7 V power supply.
- Some use stabilized voltage sources, phone chargers, or even a car battery. If using a battery, the voltage should be supplied through the light bulb. It will play the role of a current damper. Otherwise you risk burning the winding.
- Electricity is supplied through two wires, in the gap of one of which a button is installed. It will close and open the network. This creates an imitation of the operation of an injector in an engine due to the influence of a pulsed electric charge.
- You can supply the cleaning liquid to clean the injectors through a can of carburetor cleaner. Inexpensive and effective, even better than specialized chemicals.
- Be sure to tightly connect the cylinder and nozzle with a rubber tube, clamps and any other means.
- All is ready? You can then apply electricity to open the injector. At the same time, press the button on the cleaning agent canister.
- Soon the torch of the liquid jet, which will exit through the fuel atomizer of the injector, will change its “clumsy” direction and will begin to uniformly exit the nozzle. This indicates that you have removed all carbon deposits.
Homemade cleaning device
Before replacing the cleaned injector, check its actual condition.
Basic methods for cleaning an injector
Today, there are several options for cleaning the injector with and without removing the injectors, they differ in their operating principle and efficiency:
- Application of automotive chemicals (special products). This method is good because it is accessible, because car stores are stocked with many types of fluids for restoring injectors. How to clean the injector this way? It is enough to select the appropriate option, add the product to the fuel tank (taking into account the manufacturer’s instructions), refuel and continue to operate the car. What are the features, pros and cons of the method, we will consider below.
- Using the capabilities of ultrasound. This option is more advanced and high-tech, and therefore gives better results. The difficulty is that the work is carried out using expensive equipment that is available only in specialized workshops. The operating principle is based on the use of ultrasound. When compared with other methods of cleaning the injector, this technique is the safest and most effective.
- Chemical method (washing). This cleaning option is good because it covers the injectors and the fuel system as a whole. Here a special washing stand is used, which is connected to the fuel system of the machine. Before performing work, the fuel tank is turned off. As a result, the flushing fluid cleans the pressure regulator, intake valves, injectors and even the fuel rail. PHOTO 6 But there are many ways to clean the injector (nozzles) using a chemical method at home.
Some options for self-washing the injector offered by drivers.
Why do injector nozzles become clogged?
The main element of the injector is the nozzles, which supply fuel to the engine cylinders.
Thanks to these devices, fuel is dispensed and atomized. If the nozzles are clogged, the injector efficiency will be reduced. What is the reason?
Today, there is an increasingly common opinion that the injector becomes dirty due to the use of low-quality gasoline, which contains foreign elements or even sand. In practice this is not entirely true.
The car's fuel system is well thought out. It provides several degrees of fuel purification, which prevents dirt from getting to the injectors, so the risk of injector contamination for this reason is minimal.
The system filters foreign elements, ranging from large fragments to small contaminants.
What causes the pollution? The main culprits are heavy fuel fractions that remain on the walls of the nozzles (nozzles).
Most often this happens after the ignition is turned off, when the body of the product heats up from the engine, and the cooling system no longer performs its functions.
At high temperatures, light fractions evaporate, but heavy fractions remain in the nozzle channels, gradually contaminating them.
Over time, the thickness of the deposits increases, which leads to a decrease in the cross-section of the nozzle and a deterioration in its performance. As a result, engine performance decreases.
The presence of heavy fractions in the fuel composition is a situation that is typical for low-quality fuel.
Such gasoline is obtained through direct distillation and performance improvement using high-octane additives.
Errors in fuel storage also lead to an increase in the volume of heavy fractions. The result is contamination of the injectors, and the car owner inevitably faces the question of how to clean them.
We clean the injector on a 16 valve VAZ-2112 with our own hands
Many car enthusiasts have encountered problems with injection in the 16-valve VAZ-2112. So, this is usually due to contamination of the injector, or rather the fuel spray nozzles. Depending on the driving mode and engine operation, they can spray gasoline or “stream” it into the cylinders. But not many motorists know how to clean this element.