Almost all car owners, including non-smokers, use this device. The cigarette lighter socket is used as a 12-volt socket for connecting various electrical devices:
- fan;
- compressor;
- navigator;
- DVR;
- charger for phone or laptop.
VAZ 2110 models are equipped with long, old-style cigarette lighters. Their disadvantage is that they do not provide reliable fixation of connected devices that are designed to meet European standards. As a result, the devices sometimes short out and refuse to work correctly, causing the fuse to trip. Some owners decide to replace the cigarette lighter with Euro standards in the VAZ 2110. The following are instructions on how to change the device to a short one with your own hands without the help of a specialist, and install a new fuse.
Required Tools
Before dismantling the cigarette lighter on a VAZ 2110, repairing it or installing a new device, or replacing a fuse, you will need to stock up on suitable devices. To work you will need:
- Phillips and standard screwdriver;
- protective gloves.
To fix a broken cigarette lighter or fuse, the following will be useful:
- multitester;
- blowtorch with solder;
- heat shrink tubes, electrical tape;
- wire cutters;
- needle file
Nuances
There are several ways to extend the life of a new cigarette lighter. If you do not follow these tips, you will be changing this device regularly. Here are the most important points:
- The most important thing is not to allow the current consumption to exceed. In the case when you connect tees to the cigarette lighter, most likely you will simply ruin it. The cigarette lighter is not designed for such loads. Never connect several devices to it at the same time;
- It is also worth choosing fuses carefully. They only look completely identical. In fact, they may differ slightly from one manufacturer to another. But even a difference of half an ampere can be critical. Therefore, purchase fuses only from proven brands;
- If
a fuse is blown, it is worth checking all the wiring that touches it. Often it is also damaged, and subsequently it can affect the operation of the cigarette lighter, or cause the fuse to re-blow.
Why did the cigarette lighter break?
Over time, the device may stop working. The most common reasons why a VAZ cigarette lighter breaks.
- Blown fuse. The element protects the circuit from wire melting or fire. If the maximum permissible current parameters are exceeded, the fuse fails. It is necessary to remove it from the mounting block. Fuse F18 should be replaced with a serviceable element with the same rating (25 amperes).
- Cigarette lighter wiring broken or short circuited. If a car fuse burns frequently, it means there is a short in the circuit. This failure should be diagnosed using a multitester. The wires coming to the cigarette lighter are tested for resistance. The fuse blows.
- Poor contact. Over time, the connector on the VAZ 2110 may become loose and the contacts may oxidize, not guaranteeing a good connection. The repair is simple - you need to remove the cigarette lighter from the socket, process the contact points with a file and bend them for better fixation of the device.
- Burnt out spiral. The metal thread located inside the device on the VAZ 2110 can burn out due to frequent thermal exposure, and the fuse trips. It is worth replacing the cigarette lighter.
- A burnt-out backlight bulb in a VAZ 2110. There is additional lighting around the device itself to help you find the device in the dark. Over time, the light bulb may also stop lighting and the fuse will trip. You will need to remove the burnt element and then replace it with a working one.
How does a cigarette lighter work?
The device system is quite simple. The principle of operation is as follows.
A spring-loaded lid with a filament extends into the interior. When it is pressed, the working element heats up. After sufficient heating, the key snaps out of the groove and the cigarette lighter cover rises. Then it can be removed and used for its intended purpose.
Checking the condition of the wiring and contacts
If the device does not work correctly or fails altogether, you should check the entire circuit, including protective elements. Typically, diagnostics are performed in the following sequence:
- remove the dashboard;
- find two wires connected to the cigarette lighter;
- inspect the joints for damage, oxides, melting;
- Next, you should follow the line to the fuse box and find the required fuse link and check its condition.
Let's summarize
Obviously, the procedure for replacing the cigarette lighter is quite simple, even a beginner can do it. But you need to understand that the cigarette lighter will have to be changed often if the current consumption increases above 25 amperes. Once this value is reached, the entire procedure described above will have to be performed again, since the node will inevitably fail. The most common reason for this is connecting multiple devices at the same time. You should not use tees, and you should always know exactly how much the device you want to connect to the cigarette lighter consumes. This will extend the life of both the unit itself and the fuses.
Source
Maybe the fuse has blown?
Before removing and replacing the VAZ 2110 cigarette lighter, you should check the serviceability of the protective element. This is a fairly common failure. The car circuit in this area is protected by a 25 ampere fuse. This means that devices with a total power of more than 300 W (12 volts * 25 amperes = 300 watts) cannot be connected to the socket.
Otherwise, the fuse on the VAZ 2110 will blow out. A hint that it was he who “gave up” is the failure of the heater fan. If the device does not work, the fuse should be replaced. The location of the mounting block is to the left of the steering column, behind the decorative panel trim.
To make it easier to pull out the fuse, you should use tweezers. It is necessary to change the part with index F-18. The fuse rating is 25 amperes. It is prohibited to install parts designed to carry high current. An unsuitable fuse may result in a short circuit, damage to wiring cables, or fire.
Location of fuses on the diagram for VAZ 2110
The main unit is located behind a protective cover that protects it from moisture, dust and dirt. Location: near the left foot at the bottom of the dashboard. The main fuses and fusible links of the car are concentrated here. The console controls most of the car's electrical equipment.
There are also auxiliary blocks - one is located in the niche of the gearbox housing and contains mainly protective relays. It can be found behind the plastic cover on the left side of the front passenger footwell.
Which fuse is responsible for the cigarette lighter?
The car circuit has a number of fusible links responsible for protecting the on-board circuits. Insert F18 is responsible for the cigarette lighter device. The fuse has a rated limit of 25 Amps. It is quite easy to find the part in the main fuse box. She is located in the bottom row, third from the right.
Fuse blown
When such a breakdown occurs, the entire system stops working. Any manipulations of the car enthusiast remain without reaction or response. If the insert burns out, check the lines and contacts for short circuits. Only after eliminating the breakdown can you change the VAZ 2110 fuse.
Replacing the fuse
To change a burnt-out element, follow a simple procedure:
- find the required insert;
- carefully remove the damaged part from the socket;
- inspect the nest for damage or burns;
- insert the new fuse into the seat.
Important! It is strictly not recommended to pull out the fuse by swinging it - this can damage the socket or tear off the thin leg, which will cause even greater damage. For replacement, special forceps or tweezers are used.
What will you need?
It is worth paying attention to the need for proper selection of fuses. This requires 25A fuses
.
If you take a lower value, they will light up immediately after turning on the cigarette lighter. If you take a fuse with a higher rating, it simply will not work. There is a known case where the driver installed a 30A
. As a result, when he noticed the smell of burnt insulation, some of the wires going to the cigarette lighter were burned, and the fuse itself melted. More precisely, the plastic shell melted, but the conductor was intact and working.
Replacement with tunnel dismantling
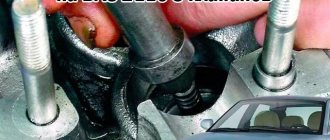
According to the user manual, the device must be removed by removing the decorative cover of the central tunnel. The instructions will tell you how to correctly remove the cigarette lighter of the VAZ 2110.
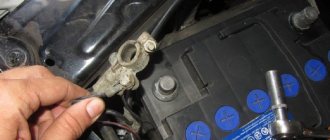
- Turn off the ignition, open the hood, remove the negative terminal.
- We unscrew two bolts securing the cover of the instrument tunnel (see photo).
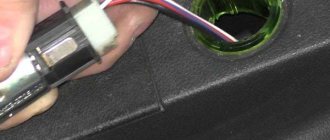
- Carefully remove the wire block.
- Now you need to remove the decorative plastic trim under the parking brake.
- Unsnap the latches of the gearshift lever cover and remove it.
- Unscrew the screw using a Phillips screwdriver.
- Move the seats aside, and then remove the screw from the tunnel near the gearshift lever.
- The tunnel protective cover should now be easy to remove.
- We dismantle the cartridge along with the filter and fuse.
- We remove the device in order to repair or replace it.
- Installation of the device is carried out in the reverse order.
Connection diagram
There is the filament element itself, contact connectors and a fuse.
The most accurate pinout of the part can be found in the vehicle owner's manual.
How to remove the cigarette lighter
To completely remove the element from the car, you will need to disassemble the device and perform a certain sequence of actions.
- Disconnect the battery from the car.
- Remove the device casing and remove the device socket.
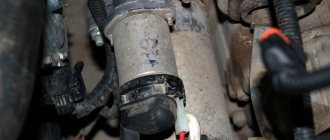
- There is a terminal block under the facing plate. The connection is disassembled.
- Squeeze the indicator light screen until the clips come out of their sockets.
- Next, use a screwdriver to unclip the light guide fasteners and remove the part.
- Next, you need to remove the device from the facing element.
- Next, the mounting socket itself is removed.
Disassembling the center console
To completely remove all the cigarette lighter wiring, you will need to dismantle the instrument console.
- Use a Phillips screwdriver to unscrew the screws from the side grooves.
- Next you need to disconnect the clips in the central part.
- If everything is done correctly, the panel will be removed from its fastenings and can be dismantled.
After unscrewing the part, access to the cigarette lighter contact group opens.
Spiral
If everything is working normally, the coil heats up in about 20 seconds. Then the cartridge is fired. In case of strong changes in heating time, the contacts of the spiral should be straightened or bent.
Connecting a new cigarette lighter
To install a fresh element on a VAZ 2110 you will need to follow the procedure:
- disconnect the battery;
- disassemble the center console of the tidy;
- disconnect the terminals of the contact group;
- follow the dismantling procedure described above;
- install the new part in reverse order.
Pinout
The Euro cigarette lighter 2110 has only three contacts.
- The negative terminal is connected to the car body.
- The plus filament is located in the center and is connected to the cigarette lighter power line coming out of the fuse box.
- The third contact is intended to supply power from the vehicle's side lighting.
Important! The standard block 2110 is not suitable for working with the Euro module. To do this, just find a contact connector in any auto store.
How to correctly connect the cigarette lighter directly to the battery via a fuse
It is enough to perform a simple sequence of actions.
- Route the power line to the battery under the hood.
- Connect the line securely to the battery terminal.
- Next you need to insert a fuse into the system. It is usually placed directly in front of the device.
- It is also useful to install a switch or relay here. To be able to accurately control the activation and deactivation of equipment. Typically, users connect the relay to the ignition switch. Thus, only after turning the key in the cylinder, the device will be powered.
- The final step is connecting the wiring to the device.
Diagram of the VAZ engine management system with BOSCH controller - ECM 21104 1.6 16V
1 – block of the ignition coil wiring harness to the ignition system harness; 2 – block of the ignition system harness to the ignition coil wiring harness; 3 – ignition coils; 4 – immobilizer warning sensor; 5 – immobilizer control unit; 6 – spark plugs; 7 – nozzles; 8 – diagnostic block; 9 – block of the ignition system harness to the ABS cabin group harness; 10 – controller; 11 – electric fuel pump; 12 – block of the ignition system harness to the fuel level sensor harness; 13 – fuel level sensor harness connector to the ignition system harness; 14 – block of the ignition system harness to the injector harness; 15 – injector harness block to the ignition system harness; 16 – block of the ignition system harness to the side door harness; 17 – speed sensor; 18 – idle speed regulator; 19 – throttle position sensor; 20 – coolant temperature sensor; 21 – mass air flow sensor; 22 – oil pressure warning lamp sensor; 23 – phase sensor; 24 – oxygen sensor; 25 – crankshaft position sensor; 26 – knock sensor; 27 – solenoid valve for purge of the adsorber; 28 – oil level sensor; 29 – coolant temperature indicator sensor; 30 – block of the ignition system harness to the instrument panel harness; 31 – instrument panel harness connector to the ignition system harness; 32 – ignition relay; 33 – ignition relay fuse; 34 – fuse for the electric fuel pump power supply circuit; 35 – electric fuel pump relay; 36 – electric fan relay; 37 – controller power supply fuse; 38 – ignition system harness block to the air conditioner connector; 39 – instrument cluster; 40 – ignition switch; 41 – electric fan of the cooling system; 42 – on-board control system unit; 43 – starter relay; 44 – contacts of the 8-terminal blocks of the instrument panel harness and the front harness; 45 – contacts of the 21-terminal blocks of the instrument panel harness and the rear harness; 46 – trip computer; 47 – diagnostic connector.
How to quickly remove the cigarette lighter of a VAZ 2110
There is an easier way that allows you to remove the device without dismantling the tunnel. You can quickly remove the device on a VAZ 2110 as follows:
- We de-energize the circuit.
- We dismantle the metal cartridge.
- Using scissors or a minus screwdriver, we tighten the fixing antennae inside the cartridge and pull it out.
- Unclip the wire block.
- We dismantle the plastic filter, carefully prying up its edges.
The video will help you understand how to remove the cigarette lighter and replace the fuse on a VAZ 2110 car.
conclusions
As you can see, problems with the cigarette lighter, although not common, do occur. Therefore, you need to know how to properly diagnose, as well as how best to avoid problems. Knowing how to remove the cigarette lighter on a VAZ 2110 and 2112 will make your task easier when you need to replace a faulty device. Despite the fact that this repair is one of the simplest, it also has its own characteristics that are worth considering. Otherwise, you will lose a lot of time and may break other structural elements. When performing work, be extremely careful and careful.
Changing the cigarette lighter light bulb
Sometimes the backlight of the device burns out and the fuse trips. This will require dismantling the filter and replacing the light bulb. It’s easy to do work on a VAZ 2110.
- Remove the terminal from the car battery.
- We take out the metal cylinder.
- We bend the fixing antennae and remove the device from the hole.
- Disconnect the wire block.
- Remove the filter ring.
- We squeeze the lamp screen so that the legs come out of the slots.
- Remove the light bulb by turning it 90 degrees.
- We install a new element, and then assemble the device, following the reverse procedure.
Instructions
If you determine that to fix the problem it is necessary to remove the cigarette lighter, then you should begin this work. This is done in the following order:
- First, remove the negative terminal from the battery. You will be working with electricians, so you need to avoid short circuits as much as possible;
- From the central tunnel, unscrew the 2 screws that are located near the dashboard;
- Unscrew the side panels of the central tunnel. They are secured with self-tapping screws; this must be done on both sides;
- The pads that power it and the backlight are turned off;
- Find the decorative trim under the handbrake lever. Pry it off with a slotted screwdriver;
- Next, remove the cover from the gear shift lever;
- Find a screw near the speed lever and unscrew it with a Phillips screwdriver;
- Remove the entire central tunnel, it is attached to 2 self-tapping screws;
- Remove the cigarette lighter socket. Along with it comes the light bulb screen;
- Locate and release the cigarette lighter latch. As a result, it should move forward a little and disengage with the body;
- Pull out the cigarette lighter itself;
- Squeeze the latches on the light guide. They are easily compressed, and as a result, the cigarette lighter is disconnected from the light guide panel.
This completes the work. All that remains is to install the new device in place. This is done in reverse order.
Connecting an additional cigarette lighter
Some car owners install another socket. You will need:
- drill or screwdriver with a set of metal drills;
- a crown for cutting out a hole, the diameter must match the diameter of the car cigarette lighter;
- file;
- soldering iron with solder;
- wire cutters;
- screwdrivers;
- multitester;
- heat-shrink tubing;
- wire of suitable cross-section;
- fuse that can withstand the current recommended by the manufacturer - 25 amperes.
Procedure.
- We turn off the power to the car and choose a place to connect an additional cigarette lighter. It is desirable that it be a flat surface.
- We drill a hole of a suitable diameter and clean the edges with a file.
- We connect to the wiring, observing the polarity and passing them through the fuse.
- We check the functionality of the model and carry out assembly.
Video instruction
The connection is carried out in the same way for all models of the VAZ family: 2110, 2111, 2112 or 21124. If the cigarette lighter does not work, then before removing it and proceeding with dismantling, you need to buy a new part. There are many options on the market.
The main factor when choosing a cigarette lighter is the cost of the element. A price that is too low indicates that low-quality materials were used in production. When heated, they may be damaged, and the cigarette lighter itself may not work correctly. Short elements are sold according to European standards. This part will not be suitable for older models - you will have to change the socket itself, additionally purchasing a Europanel.
The video will tell you how to choose a device for a VAZ 2112.
How to connect the device to a cigarette lighter without a plug
Some owners decide to abandon the device itself and prefer to install other devices directly. To connect the device directly without a plug you will need:
- blowtorch, solder;
- screwdriver.
Procedure.
- We dismantle the car cigarette lighter, gaining access to the cables.
- We connect the wires of the installed device, observing the polarity.
- We carry out the assembly.
Connection diagram.
- A constant minus. Comes to the car body.
- A constant plus. Connects through a fuse to the battery.
- Plus, coming up to the backlight bulb.
Frequent problems and ways to solve them
Before changing the cigarette lighter, you should inspect other common breakdown areas. It may be possible to repair the part without replacing or dismantling it.
Frequent problems include:
- Blown fuse. To check this element, you need to connect a standard 12-volt lamp to the socket, and then turn the ignition key. If the lamp does not light, the fuse has blown. It needs to be removed and replaced. You need to get to the block under the front panel and remove the non-working element.
- Loose or oxidized contacts. It is necessary to check the connectors of the VAZ car cigarette lighter for the presence of rust, tighten them for tight contact.
- Fallen wires. There is an age issue that should also be taken into account. To eliminate this, you should solder them to their seats.
- Burnt out spiral. Treated by dismantling and installing a new nest. To extend the lifespan, it is advisable not to connect devices with high current strength, such as a compressor for inflating tires.
Cigarette lighter not from ignition
There is a way to connect directly to the car battery. This scheme has advantages: if you connect the cigarette lighter directly to the battery, you can avoid interfering with the wiring itself and the fuse. The work will take less time; the positive cables should be led directly to the battery, and the negative cables should be attached to the car body.
It is also important to remember that you need to select the right spare parts. Initially, this concerns the wires. Each square millimeter of cross-section is designed for 5-10 amperes of current. Should be taken with reserve. A cross-section of 3–5 mm is quite sufficient to transmit the required voltage. Otherwise, the wires may burn and the fuse will trip. This will result in a risk of short circuit. The circuit should be routed through an additional fuse with a rating specified by the manufacturer.
Basic faults
The most common problem is trying to connect several devices to the cigarette lighter at the same time. In this case, increased power consumption occurs, which the cigarette lighter is not designed for. As a result, several malfunctions may appear at once, which will lead to the failure of this device.
If you notice that the cigarette lighter is not working, you should first check the fuses. In many cases, when a large load is applied, they are the ones that cannot withstand. Therefore, diagnostics should begin with checking the mounting fuse block. The following fuses are responsible for the operation of the device:
- F18
; - F6
.
Order of Operations
Before removing the cigarette lighter of a VAZ 2110, 2111 or 2112, you need to de-energize the circuit; to do this, remove the negative terminal from the battery. Now you can start working directly:
- It is necessary to remove the plates on each side of the instrument tunnel; to do this, unscrew two bolts from each. On the right side, disconnect the backlight and cigarette lighter connector.
The housing of the unit is fixed to the casing of the instrument tunnel; it must be removed. The trim is located under the handbrake lever. It can be easily removed with a flat screwdriver.
- Also, using a flat-head screwdriver, you now need to pry and remove the housing from the gearbox shift lever.
- There is a screw under the cover; you need to unscrew it with a Phillips screwdriver.
- Now the driver and front passenger seats need to be moved back and the gearbox screws unscrewed. There are five of them.
- You need to remove the top cover of the instrument tunnel. Now the cigarette lighter is accessible. You can remove its cartridge. Then the screen is removed so that the tabs come out of the grooves on the light guide.
- Use a flat-head screwdriver to press the latch next to the cigarette lighter socket, so it is released from the light guide.
- Now you can remove the assembly along with all the elements.
- Then you need to tighten the latches on the light guide, so it is immediately disconnected from the assembly.
- If you need to change the LED itself, it can be easily removed by pressing the tabs on the housing. When installing a new device, make sure that the slot in the casing aligns with the protrusion on the housing.
- Now you can begin installing the new cigarette lighter. First, it is connected to the light guide, the following operations are performed in the reverse order.
How much does a new device cost?
You can buy different devices on the market. The price of a Euro sample car lighter ranges from 500 to 1200 rubles. It is advisable to buy original production parts - this guarantees long-term operation of the device. The device must be well packaged, have quality certificates and certificates of conformity.
The design of the device on the VAZ 2110 is simple. Inside the metal cartridge is a nichrome spiral that can heat up, and a backlight lamp. The cartridge is inserted into the cigarette lighter socket, located in different places in the cabin. When you press the handle, the contacts close, as a result of which the spiral begins to heat up. After the heating has reached its maximum point, the thermal relay is activated and the device snaps back to its original position.
Important points
- Replacing the cigarette lighter is good, but the new device is unlikely to last long if the car owner does not follow a simple rule: do not allow the current consumption to exceed 25 amperes. As soon as the current exceeds this limit, the entire above procedure will have to be carried out again, because the cigarette lighter (or fuse) will inevitably be damaged. Most often this happens when the driver uses various tees, that is, connects several devices to the cigarette lighter socket at once. This should be avoided at all costs.
- If the cigarette lighter remains intact, but only the fuse had to be replaced, it must be replaced with a device of the same brand. Auto parts stores today have a lot of fuses from various companies. Despite the fact that their passport characteristics are the same, in practice this is often not the case. And in the case of a cigarette lighter, an error of even half an ampere can be critical, and it will very quickly fail.
As can be seen from the above article, to replace the cigarette lighter you do not need to take the car to a car service center and even a novice car enthusiast can perform this operation. But it is important to remember that even the highest quality cigarette lighter is unlikely to last long if the owner has the habit of connecting everything to it at once. The best option here is to know exactly how much current a particular device connected to the cigarette lighter consumes. This knowledge will significantly extend the life of both the fuses and the device itself.
- Author: Alexey Stepanov
Copywriter with five years of experience.
(14 votes, average: 3.5 out of 5)