Every modern person knows the proverb given to us by our ancestors that it is useful to prepare a sleigh in the summer. However, it is not always possible to carry out some types of repair work on time if you own a car. Often the vehicle itself “manages” this process. As soon as something knocks or creaks, you immediately begin to look for the problem. In the same way, the first news of help from the heater fan on your VAZ-2108 begins to arrive. It is not difficult to guess why it is precisely at the moment of the first frost that car owners most often have to face such a problem. It’s just that the days before were hot and warm, so no one even tried to turn on the stove.
So, if the heater motor on your VAZ-2108 howled pitifully and sadly, don’t hesitate, but start carrying out repair work. Of course, many G8 owners don’t even know what actions are important to take to restore the device to excellent performance. In order not to torment you with unnecessary doubts, and not to force you to spend time searching for the necessary information, we are ready to present you with a step-by-step algorithm of actions. If you follow it, you will be no worse than a real master in carrying out repairs, after which the heater fan on your VAZ 2108 will work flawlessly and successfully compete with new devices.
Fan replacement process
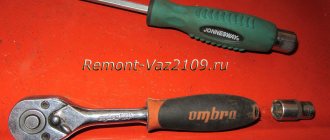
Of course, you should prepare for any task; only in these cases can you count on an optimal result. It is imprudent to purchase any spare parts or the new motor itself in advance, since no one knows what the problem is, why the heater motor on your VAZ-2108 howled so much. However, to carry out diagnostics it must first be removed. For these specific actions, you will need to have a Phillips screwdriver, a 10mm socket and a ratchet handle on hand. We will work both from the engine compartment and from the interior.
Algorithm of actions
First, open the hood and unscrew the five bolts that securely secure the plastic trim. We remove it and put it aside so that it does not interfere with us during all subsequent actions. Now remove the rubber seal on the hood as it prevents the fan guard from being removed. As soon as you remove this casing, you will immediately be able to find the motor itself. It is easy to see that it is fastened with two bolts. Arm yourself with a pre-prepared screwdriver and unscrew these bolts.
After this, we suggest that you move into the car interior and prepare to continue working in an uncomfortable position. It is very important to disconnect the power leads. Under the instrument panel you will find a positive wire plug, unplug it. The next step should be to disconnect the negative wire. However, it is additionally secured with a nut located in an inaccessible place. For this reason, try to initially feel it, and then, after getting used to it, unscrew it using a socket and ratchet. Once you disconnect the wires, push them towards the motor itself. Leave the interior and go to the engine compartment again. Grasp the engine with both hands and carefully turn it from side to side to find the optimal location to remove it.
After you manage to remove the heater motor, inspect it to make sure it is intact and free of mechanical damage. If your diagnostics show that the stove motor can no longer be restored, go to the store and buy a new one. You really don’t want to part with some money, but you still have no other choice. It is impossible to travel without a heater in winter, not only because there is no comfort, but also because such trips are unsafe.
Some craftsmen are making efforts to remake a failed motor. If the bushings on the VAZ or UAZ heater motor “fly”, many decide to insert bearings instead. Indeed, it is possible to revive the fan’s operation, but especially not to get rid of the noise. Only you can decide for yourself whether to purchase a new one or restore the old one; we are not your guide in this matter. In any case, you will also have to perform steps aimed at installing a new or restored motor back into the engine compartment. Don't worry about this because you will have to do the same thing, just in reverse order.
So, as you can see, removing and then installing a new motor on the stove of your “eight” is not an difficult task. It is quite enough to carefully familiarize yourself with the algorithm we have proposed and carry out all the steps flawlessly.
Heater fan repair. VAZ 2108, 2109, 21099, 2113, 2114, 2115
If the heater fan does not work on your car, then this is a problem, regardless of the time of year!
Car windows fog up even from the breath of the driver, but especially from passengers who are celebrating something. Opaque glass is an immediate safety hazard. In short, fan problems need to be fixed immediately. Today we have a VAZ-2109 in our workshop. The owner is bothered by the crackling noise that accompanies the stove fan every time he turns on. To find the cause, the node will have to be removed. We will work “on the ground”. No special tool required.
Attention! First, as usual, disconnect the battery.
| Using a Phillips screwdriver, unscrew the four screws and remove the protective casing, spreading its side walls apart. | Using the same screwdriver, unscrew the two fan mounting screws.
|
| Inside the cabin, remove the positive wire from the connector and release the negative wire, secured to the heater stud with a “10” nut. | |
| Don't be tempted to use wire cutters. The twists that appear during assembly will not add reliability. |
| Using a screwdriver, pry up the rubber bushing and remove both wires out. | Remove the fan from the air supply duct. |
The operation is akin to a puzzle, because the fan can only be removed in a certain position. In a hopeless situation, the “corridor” can be slightly expanded by pulling the front wall of the box with your hands.
| And here is the defect! The cracking noise was made by last year's leaves stuck in the impeller (except for those that had already dried out and crumbled to dust). |
And yet, you shouldn’t “cut off the oxygen” by covering the air intake with tights - the fan can barely cope with its duties anyway.
| Taking this opportunity, we will lubricate the electric motor bearings. For this: |
| using a screwdriver to pry up the plastic fasteners. | . “halve” the body. |
| Use a puller (or other available tool) to remove the steel retaining ring. | Remove the impeller from the motor shaft. |
| If it does not give way, try to carefully knock out the shaft with light blows of a hammer through a drift. An assistant (not shown in the picture) must hold the impeller suspended while simultaneously insuring the electric motor from falling. | Use a screwdriver to pry up two spring clips. |
| . remove the motor cover and remove it from the housing. | |
Both bearings are now accessible for lubrication.
We carry out assembly in reverse order.
Evgeny BORISENKOV. Technical Center ZR “Krestovsky”
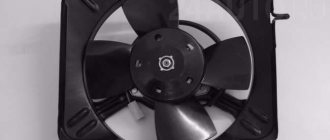
What is a stove fan
A car heater, which is popularly called a stove, is designed to perform a simple and at the same time important function - heating the interior. In addition, the device helps eliminate fogging of windows in cold and damp weather. During normal operation of the heating system, the temperature in the interior of the “nine” should be maintained at +20 ˚С with the same indicators outside, but only with a minus sign. In the legs, with maximum heating mode, the value should be maintained at +25 ˚С. One of the important components of the stove, in addition to the radiator, is the fan. The purpose of this device, its malfunctions and repairs should be considered in more detail.
Purpose of the device
The purpose of the motor is to increase the efficiency of the heating system and air circulation in the car. Its operation is based on air intake from outside and its subsequent supply into the cabin through the radiator. As a result of the air flow passing through the heat exchanger, the air enters the cabin already warmed up.
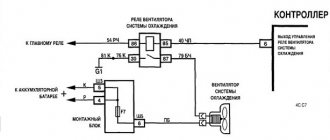
Heater operation diagram: a - VAZ 2108; b - VAZ -2108–01: 1- fan impeller; 2 — air duct for heating the windshield; 3 — windshield heating flap; 4 — damper for heating the driver’s feet; 5 — central nozzle flap; 6 - central nozzle; 7- radiator; 8 — heater control damper; 9 — driver’s foot heating window; 10 - internal ventilation duct
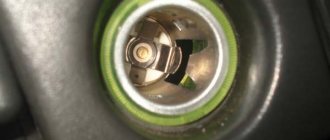
Where is the motor located on the VAZ 2108/09
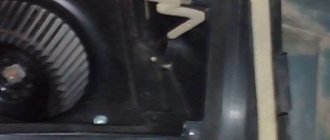
The heater motor on the VAZ 2108/09 is installed in a niche in the engine compartment in front of the windshield, which is radically different from the design of the heater of classic Zhiguli cars, which have a fan installed in the cabin. The unit is an electric motor with an impeller mounted on it, through which air is pumped into the cabin.
The heater motor on the VAZ 2108/09 is installed in a niche in the engine compartment in front of the windshield
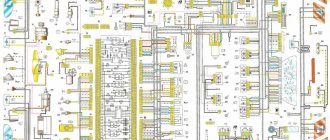
Connection diagram
To make it easier to find possible faults with the fan, an installation diagram may sometimes be required, the main components of which are:
- fuse mounting block;
- egnition lock;
- additional resistor;
- fan motor;
- operating mode switch.
The heater motor connection diagram consists of a fuse mounting block, an ignition switch, an additional resistor, a fan motor, and an operating mode switch
Car heating system design
The 2108 heating system consists of the following components:
- draft, which affects the heater valve of the VAZ 2108;
- damper control lever;
- additional resistor;
- a motor that affects the rotation of the fan;
- system operating mode switch.
Heater valve VAZ 2108
Bottom line
After all the parts are in place, it is necessary to check. Start the engine and let it warm up to operating temperature. In order to heat the coolant faster, simply drive the car, giving the VAZ 2108 engine high speeds.
Warm up the engine to operating temperature
When the temperature sensor shows a sufficient level, turn on the stove. If you feel warmth, it means the job was done correctly. All that remains is to check the operating modes (fast and slow). If everything is functioning, then you can praise yourself because you did everything without errors, and you can enjoy a comfortable trip, regardless of weather conditions.
Operating principle of the stove
- The liquid is heated to a certain temperature and enters the radiator of the VAZ 2108 stove.
- To ensure constant circulation, rubber tubes are installed between it and the liquid cooling system, fixed for better fastening with clamps.
- Warm air enters the car interior through several openings. The heater motor with its own fan is designed to distribute air evenly.
- The air flows directly to the feet of the driver and passengers, and also exits to the panel. The heat flow is then delayed by the dampers, and therefore the air is cooled. Thus, cool air is supplied to the windshield.
If the operation of the furnace is not satisfactory, it can be modernized. This is done by installing fiberglass.
The action goes like this:
- It is necessary to disassemble the stove, wash all parts and begin assembly. This action can also be used to visually inspect parts for damage. For example, the casing ear often breaks.
- After this, you need to glue all the flaps and fill the seams with sealant. Glue the casing and wait a while until the sealant is stable.
- Assemble the “insides” of the heating system and cover it with fiberglass. Thanks to this, the temperature will increase to 10 degrees.
Typical faults
As with any mechanism, problems can occur in the heating system (video author - Andrey Kuzemsky).
If the VAZ 2108 heater motor is broken, you can understand this by comparing some symptoms:
- If the motor does not work when switching operating modes, the cause of the breakdown may be hidden in the resistor. When repairing, you need to replace the resistor with a new one, because it cannot be repaired.
- If the fuse is blown, you need to check the insulation of the armature located on ground. There may be a short circuit.
- If, when switching modes, the VAZ 2108 heater fan rotates at the same speed, this may be a consequence of contamination or oxidation of the collector. In case of repair, it is worth cleaning the collector and, if nothing has changed and the fan continues to act up, you can replace the bearings.
If the VAZ 2108 stove motor does not even show signs of life, then the reason is not in its design, but in a broken circuit. To find out if this is true, you can use a voltmeter.
Why did the VAZ-2109 heater fan stop working and how to solve this problem
With the weather getting colder, driving an unheated car is no fun. There may be several reasons for a heater malfunction. From this article you will learn what to do if the fan of the VAZ-2109 stove does not work and how to get to it to replace it.
Troubleshooting or why the heater fan stopped working
If faults appear in the electrical circuits, the fan simply will not turn on. This can be determined by the value of the coolant temperature; the index arrow will move to the red zone of the scale. To troubleshoot in this case, reduce the load on the engine to idle speed and turn on the interior heater. Then open the tap to supply coolant to the heater radiator. Start coasting until you come to a complete stop.
DIY repair
To carry out repairs yourself, you need to use the following tools:
- a Phillips head screwdriver;
- 10mm wrench.
When dismantling, you need to remove the plastic trim, which is located on the outside of the windshield. To remove it, you need to open the hood and remove the 5 bolts that secure the trim to the body. Remove the rubber seal from the engine compartment and pry the casing with a screwdriver to get to the motor and oven fan. Now you can remove the motor. It is attached to the body of the VAZ 2108 with two bolts.
When the clamps are disconnected, you can turn off the power and disconnect the positive wire of the furnace under the dashboard. The negative one is attached over a special thread and pressed down with a special nut. You need to unscrew the nut by touch and fold back the negative wire. By disconnecting the wires, you can remove the motor and install a new fan. The entire structure is assembled in reverse order.
It is important to note that breakdowns associated with the stove also depend on which panel is installed on the VAZ - low or high. Both have their downsides. For example, on a high one the central flap does not open completely. It is she who is responsible for supplying cold and hot air to the car interior. To solve this, you need to adjust the damper. And to get to it you need to disassemble the dashboard.
If we talk about the low panel, this is where the thermostat often breaks. Of course, if it wears out, the oven will not work. It is recommended to change it every two or three years. And if replacement does not solve the problems, it is worth replacing the hoses that connect the stove and radiator.
Formula 1 style side mirrors
These non-standard side mirrors first appeared on Formula 1 racing cars and immediately attracted the attention of car enthusiasts. f1 models are intended for those who:
- energetic and prefers a sporty style,
- strives for individuality in everything;
- ready to improve the aerodynamic properties and change the appearance of the standard nine with the help of tuning (from English - adjustment, tuning).
| Advantages | Embodiment |
| The f1 side reflectors differ from the standard ones in their lightness. | This is expressed not only in their properties, but also in their minimalist design. |
| F1 are produced on a thin but durable metal leg. | They are made of shockproof glass that can withstand significant loads. |
| Mirror devices f1 are universal in the sense that they can be installed with equal success both on a foreign car and on the oldest car of the Soviet automobile industry that still runs on our roads. They are also easy to install on the “nine”. | No adapters are required for installation. The f1 base is mounted either to the body or to the door pillar. Where there are mounting platforms for mirrors - to the platform itself. |
In order for the trip to be safe, the driver must have sufficient visibility and not only see what is happening in front and behind, but need to have an idea of what is happening on the sides of the car. This is necessary when performing various maneuvers, such as changing lanes, overtaking, entering the road, reversing, etc.
The standard mirrors of the VAZ 2109 cannot provide sufficient visibility, they have a rather narrow range of adjustments, they are easily splashed with dirt, and in cold weather they are immediately covered with an ice crust. The stores have side mirrors that are equipped with electric heating and turn signal indicators. Installation does not require large expenses and, if desired, you can install the mirrors yourself. During installation, we will have to dismantle the front door trim of the car and remove the control handle for the standard VAZ 2109 mirror, if it is still intact. Use a thin flat screwdriver to pry it off and remove the inner lining of the mirror. Next, take a Phillips screwdriver and remove the three screws securing the base mirror. Now nothing prevents us from removing it. To install new mirrors, we cut out a special marking template, which is included with the new mirrors. We apply this same template to the door and use an awl to transfer the markings to the door. Now take a round file or cutter and increase the diameter of the hole. We lay a wiring harness through the corrugated casing from the door into the passenger compartment and make the connection parallel to the rear window heater.
All these actions are indicated in the attached manual, so it will not be superfluous if the instructions are before your eyes. We hold the side mirror with one hand, and with the other we fasten the mirror adjustment mechanism; fastening is carried out with a screw, under which a large washer is inserted. Next, we install the internal lining in its regular place and tighten the three self-tapping screws that secure the mirror. Keep in mind that the top screw goes through the hole in the mirror adjustment mechanism. The next step is installing the mirror control knob. If the previous one was broken, as most often happens, we replace the part with a new one, which is available in any specialized store. Use the handle to adjust the position of the mirror. The second mirror is installed in the same way. We turn on the heated rear window, thereby checking the operation of the heated side mirrors, this should take several minutes. If the kit includes turn signal mirrors, you need to attach a special plate to the outside of the door (the plate is included in the kit), take an awl and make a marking, in this place you will need to drill a hole for attaching the mirror. The wiring runs from the door to the salon, we connect them in parallel to the turn signal of the VAZ 2109 car. We put the mirror in its regular place and tighten the screws for its fastening. If you overtighten the screws, the plastic bosses may crack. To prevent this from happening, we put pieces of a thin-walled metal tube of the appropriate diameter on them.