Many motorists prefer to contact the same technician to fix any problem in their car. The only drawback of such solutions is high prices and the need to often wait in a long line. In some cases, it is possible to do the work yourself. A simple set of tools and minimal knowledge is enough. Attention is also important, otherwise the result will not be as desired.
Injection cars and their main features
VAZ 2114 cars in any version are equipped only with an injection-type engine. Therefore, there is no doubt about the reliability of the devices. But it cannot be without problems, especially when they use insufficiently high-quality fuel or do not change the filtration elements in a timely manner. The appearance of the Check Engine sign indicates the need to check the engine for performance.
The mechanical part of the injector includes the following parts:
- Injectors.
- Air type pipe.
- Air filters with housings.
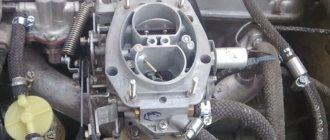
- Throttle units.
- Fuel ramp.
- Intake manifold.
Most often, these are the parts that people are faced with purchasing in the event of repairs and replacements. When repairing a VAZ 2114, the injector must remain intact.
What injectors are installed on VAZ 2114/2115 cars
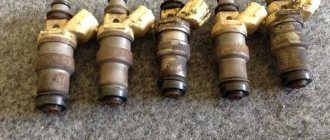
Almost all types of injectors that the VAZ 2114/2115 are equipped with at the factory can be considered interchangeable. Depending on the year of manufacture, injectors manufactured by Bosch and Siemens of different markings were installed on the car.
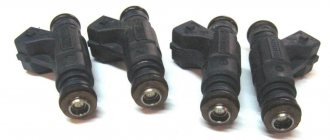
Bosch injectors:
- Model 0280 158 022. The product is compatible only with a 16-valve 1.6-liter engine. The nozzle is black and is designed to operate at an optimal pressure of 3.8 atmospheres.
- Model 0280 158 017. An injector with this marking is installed on 8-valve engines with a volume of 1.6 liters. The body is also black.
- Modification 0280 158 996 is considered obsolete, since injectors with this marking were installed on cars until 2006. The model was intended for 8-valve power units.
Standard equipment of VAZ 2114/2115 injection engines
Siemens injectors:
- VAZ20734 is made in an orange case. The model can be installed on a VAZ 2114/2115 of any year of manufacture, but the modification is paired with an 8-valve engine.
- Model VAZ20735 is intended for a 16-valve engine. In terms of its characteristics, it is practically no different from the previous model. The nozzle has a blue marking.
Depending on the marking, it can be used on different types of engines
More information about injectors
The injectors themselves belong to the electromagnetic variety of devices. The electrical part with a pulse causes the valve to open. Then the fuel is atomized and injected into the cylinder under high pressure. The magnitude of the pulses indicates what the degree of opening of the valves should be. Dosage is organized according to existing conditions.
Compatibility with injectors of different brands and models is a distinctive feature of VAZ 2114 engines. Here is an example of the names of trusted manufacturers:
- SIEMENS.
- BOSCH.
- G.M.
Engine characteristics determine the performance of injectors to choose. If the conditions are not met, there is a high probability of a decrease in power and an increase in fuel consumption. Marking the part helps you understand which variety will be relevant. Products are now produced with approximately the same quality.
Injector system design
This system includes:
- Computer. Serves to select the optimal operating mode and the quality of the supplied mixture based on the performance of all sensors of the machine. In addition, the computer detects possible problems in the injector elements themselves.
- Sensors They provide the computer with all the information about the state of the engine at a particular moment. We are talking about a fuel flow sensor, an air flow sensor, a lambda probe, a knock sensor, and so on.
- Injection system. Modern engines are distinguished by two types of injection. First of all, mono-injection is when one nozzle works on all cylinders, and the prepared fuel mixture has the same characteristics. This type of injection is becoming less and less popular today, as it is ineffective. In a distributed fuel injection system, unlike the first, a separate injector is installed on each cylinder, and it is responsible for regulating the amount of fuel supplied.
- Injectors. They can be called the “workhorses” of the injection system, because they are responsible for the main work of mixing air and fuel, and supplying it to the combustion chamber.
The injectors, in addition, turn off the supply of the fuel mixture, say, during a descent from a mountain with the gear engaged.
This part of the injector system is specifically subject to the greatest wear, primarily due to microparticles of dirt that can wear out the injector channels and the locking mechanism.
Due to wear, the injector will begin to supply more fuel to the chamber than required. This affects the stability of the engine and power is lost.
Important information
First you need to find out exactly what kind of fuel the car is fueled with. Turning to unfamiliar gas stations is likely to interfere with stable operation. Negative consequences are associated with carbon deposits inside the combustion chambers. The service life of the injectors does not even reach 120 thousand kilometers if you regularly choose low-quality materials for refueling.
It is recommended to replace it at least every 90 thousand kilometers.
Troubleshooting
To quickly check the injectors without removing them, you will need an indicator screwdriver. It consists of a metal rod and handle on which a switch and a contact are located to create a conductive circuit, clamped by one of the fingers. When moving the switch forward towards the rod, the device becomes less sensitive; when moving to the upper position, its sensitivity increases. In the first case, the red indicator lamp will light up or flicker, in the second case, the green lamp will light up.
Before carrying out the test, the screwdriver switch must be moved forward, towards the working part (rod) until it stops, and your finger must be pressed against the open contact located on the handle of the indicator screwdriver. The hand must remain in this position during the entire test, closing the electrical circuit, otherwise there will be no indication.
The working rod of the screwdriver must be positioned so that it touches the metal bracket on the block holding the nozzle. There is an opinion that it is enough to simply bring the rod to the block for an indication to occur, but this is not so. The metal clamp catches the electromagnetic pulse generated during the operation of the injectors; a potential difference and alternating currents arise in it, which the device records.
This test checks the injector while the engine is running, so it must be started and left at idle. When the rod of the indicator screwdriver comes into contact with the metal bracket on the screwdriver, the red indicator should light up. This checks performance on all cylinders. If the injector of one of the cylinders is not working, the indicator will not light or blink.
Using the indicator does not necessarily indicate that the injector is faulty, it signals that it is not working. The problem may be there, or in the voltage supply system, poor contact, failure in the electronic control unit, etc.
Some models do not have metal pad clamps in which currents are generated; in this case, is it possible to determine the faulty injector without removing it from the engine? Yes, this can be done using the same indicator screwdriver. To do this, you need to set the switch in the uppermost position (this is the highest level of sensitivity of the device) and perform additional manipulations.
After starting the engine, the screwdriver rod is brought to the injector block, and no indication will appear, even if it is working. Therefore, you need to attach a metal bracket to the screwdriver shaft, which will serve as an antenna where electromagnetic oscillations will occur. A paper clip carefully pressed around the rod with pliers is suitable for this.
During the fuel injector test, the switch remains in the highest sensitivity up position. With the engine running at idle speed, you need to bring the bracket as close to the block as possible, it should cover it. A blinking indication should appear on the device due to currents excited by the electromagnetic field that occurs during operation of the nozzle. If there is a non-working injector under the column, there will be no indication. This technique is also suitable for pads equipped with a metal bracket.
Conclusion
Testing with an indicator screwdriver will help you quickly find a problem when the engine is misfiring due to an injector, or other problems from the list above arise. If you have this tool, you can carry out diagnostics in your garage, and having identified a malfunction, fix it, if possible. The proposed test only reveals the fact that the injector is not working, and this can be done without disassembling the engine.
To identify the reasons why the fuel does not ignite in the cylinder, more detailed diagnostics and subsequent repairs will be required. However, it is not always necessary to replace the nozzle; there are other reasons why it does not function or is unstable. Sometimes you just need to seal the pad contact and the problem of stable engine operation is immediately solved; in more complex cases, for example, to clean the injectors, you will need to contact specialists.
Source
Is it possible to extend the life of injectors?
Extension of service life is acceptable. To do this, use one of the available options.
The first involves the use of additive materials that improve the quality composition of the fuel. Additives are poured directly into the fuel tank.
Or you can wash the injectors themselves. This is done when contacting a car dealership, or on your own. But in most situations, completely replacing the part itself is a more economical solution.
Replacement or flushing?
Some problems can be eliminated by cleaning and flushing. Others are “treated” only by replacement.
Table: problems with injectors
| Malfunction | Remedy |
| reduced performance | flushing, replacement if flushing fails |
| leakage | flushing, replacement if flushing fails |
| increased productivity | replacement |
| valve sticking | replacement |
| unstable valve sticking | flushing, replacement if flushing fails |
| overestimated or underestimated winding resistance | replacement |
In these cases, flushing is not a panacea. This method should be used taking into account the mileage and quality of service during operation.
During operation, the injector nozzles inevitably become coked and clogged with resinous deposits. The picture is aggravated by low-quality fuel, which can introduce additional pollutants.
For some time, fuel atomizers continue to operate without any visible changes, but sooner or later contaminants accumulate, changing the shape of the spray and reducing performance.
Injector life expectancy is limited even when using the cleanest fuel. Manufacturers recommend changing them every 100–120 thousand kilometers. Due to the fact that motorists use imperfect gasoline, and the one that can be bought at gas stations, the part has to be changed after 80-100 thousand km.
There is an opinion among motorists that “there is no need to interfere if everything works fine.” This opinion is justified, but only if the owner is ready to replace the nozzles with new ones approximately every 50 thousand kilometers.
The fact is that by getting rid of minor deposits as they accumulate, the owner extends the life of the consumable, since pollutants do not have time to cause irreparable damage.
Clogged injectors begin to interfere with normal operation after 30–50 thousand km.
Initially, negative processes manifest themselves only in increased fuel consumption. Owners do not always associate the increased “appetite” of the engine with injectors, since there are many reasons for this phenomenon.
In the range of 50–80 thousand km, pollution, having accumulated, can cause interruptions in engine operation, which is no longer undetectable. It becomes clear that “you have to get into the injectors,” but cleaning them at this stage may be useless. When a clogged part is used for a long time, the diameter of the nozzle often increases. Flushing will remove contaminants, but the original parameters will not be restored.
To extend the life of trouble-free operation and postpone replacement, you should regularly check the
pour injector cleaning fluid into the tank or use it in another way recommended by the manufacturer.
Motorists' opinions about the effectiveness and safety of injection chemicals are contradictory. Many people fear that flushing without removing it from the engine will clog the cylinders.
Indeed, if the car owner has not touched the injectors for a long time, it is impossible to do without removing the rack. The chemicals in the tank can cause harm instead of benefit. If you use cleaners regularly, without waiting for characteristic malfunctions to appear, there will be no harm to the engine from the chemicals.
Although injection chemistry has a beneficial effect on slightly dirty injectors, its use does not guarantee that the atomizers will comfortably “live” the entire period “allotted” to them by the manufacturer. You can unsuccessfully fill the tank with “left” gasoline at almost any gas station.
To minimize the accumulation of deposits, manufacturers recommend additional preventive flushing with special products every 30 thousand kilometers.
| Mileage (thousand km) | Flushing | Replacement |
| up to 30 | preventive flushing with fuel additives every 3–5 thousand km | individual replacement of faulty parts |
| 30–80 | preventive flushing with a special agent every 30 thousand km | individual replacement |
| 80–120 | preventive flushing with a special agent every 30 thousand km | complete replacement of all injectors if at least one faulty one is detected |
Carrying out diagnostics
Before replacement, be sure to perform an inspection and performance check.
Troubleshooting methods are described as follows:
- When the engine is not warmed up, although the latter continues to work.
It is enough to touch the nozzle with your hand to check if it works. If vibration or pulsation is felt, then everything is correct. But this method cannot be called completely reliable.
- Inspection at idle speed.
The number of revolutions is increased slightly. And then they look at how the engine works in this state. Then the nuts on the caps to hold the injectors are slightly loosened. Afterwards the number of revolutions should decrease. If this does not happen, one of the parts is definitely broken.
Work begins when the faults are accurately verified.
Do-it-yourself cleaning and washing of injectors (injectors) on a VAZ 2114
It is not easy for a passenger car to survive in our country - bad roads and poor fuel quality leave their mark. Recently, there have been trends towards improving the technical characteristics of gasoline at Russian gas stations, but, nevertheless, we are still noticeably behind world standards in this matter.
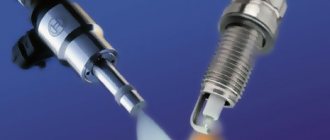
Injector and spark plug
Procedure for removing injectors
The rack and nozzles must be completely dismantled before work can begin. The following manipulations are expected:
- The car is completely cleaned. It is assumed that the negative terminal is disconnected from the battery.
- All work is carried out if the engine has completely cooled down. Otherwise, the risk of injury increases.
- The upper part gets rid of the casing that covers it.
- Removing air filters.
- The pipeline is unscrewed from the injectors and pumps. Maintaining high pressure in the system assumes that the remaining mixtures are released before this. The pipelines are supported by brackets.
- The injector is unscrewed with a spanner.
- The puck is also removed, the main thing is not to lose it.
- The plug and clamp near the ramp are completely disconnected. Most of the parts are left behind.
The same principles apply when removing the remaining injectors. Next comes flushing the VAZ 2114 injector.
How to clean the injector yourself: the best ways
Now let's look at methods for cleaning injectors that can be used in a garage and will give the expected result.
The first method of cleaning injectors (using the example of a VAZ-2110)
The work is performed according to the following algorithm:
- Start the engine, then remove the fuel pump power fuse. This is necessary to reduce the pressure in the fuel supply line. The engine will stall on its own;
- Discard the terminals from the sprayers, as well as the two hoses (cordless and reversible);
- Unscrew the tablet with nozzles and remove the sealing rings.
Now you can clean the injector. To complete the work, you will need carburetor flushing fluid and a device that allows you to blow the composition through a nozzle under pressure.
As an option, it is possible to use a plastic bottle combined with the hole at the nozzle inlet, as well as a container filled with cleaning liquid. Now connect a pair of wires from the battery to the terminals of the injector nozzle.
Next, open and close the circuit to achieve the closing and opening of the injector, respectively. At this moment, flushing liquid passes through the nozzle under high pressure. According to car owners, after 3-6 passes it is possible to achieve optimal spray. If it was not possible to clean the injector, it must be replaced.
Second method (using the example of Mazda 5)
The appearance of soot on the spark plugs, soot on the valves and piston crowns, as well as a decrease in engine power indicates the need to flush the system.
To do this you will need:
- WYNNS fluid, which allows you to clean the fuel system and not change the spark plugs after that;
- Hoses and clamps;
- Crocodiles for fixation.
The following is the algorithm:
- Assemble the cleaning unit. In this case, the tube from the pump to the ramp should be 28 cm shorter than the return. This is a necessary condition, because the tubes used are two-layer, so they are difficult to bend.
- After preparing the system, it is necessary to remove the fuel pump relay (located in the safety box in the engine compartment).
- To find an approach to the return pipe, you will need to dismantle the fastening of the electro-pneumatic valve strip. Move the part back a little and remove the original Mazda hose. Next, put on the clamp.
- To remove the supply tube, remove the rubber corrugation that connects the throttle valve unit and the air filter.
- Remove the electro-pneumatic valve of the exhaust gas recirculation system.
- Press the lock on the left and right and remove the supply hose. Next, put on the supply tube from the prepared device.
- Return it to its place and tighten the corrugation. Next, pour 0.5 liters of liquid into the jar, turn on the electric pump, start the engine and let it work out all the available composition at idle. This takes 10-15 minutes. To speed up the process, remove power from the ignition coils and crank the starter, forcing fluid into the cylinders.
- All that remains is to clean the knots after soaking. To do this, you need to fill in 0.5 liters of clean liquid and let the engine run under different loads.
- Collect everything using the reverse algorithm. Pay careful attention to the quality of the hose connections (there should be no leaks).
How to clean injectors by removing them (method No. 3)
To complete the work, you will need carburetor cleaning fluid, a non-latching button, a 5 cc syringe, wires with four terminals and a charging power supply.
To clean the injector, proceed as follows:
- Insert a thin tube into the outlet of the syringe (make a seal so that it holds tightly);
- Place the nozzle on the other side of the syringe;
- Assemble the diagram. Embed the button that was prepared before starting work into one of the power supply wires;
- Connect the terminals to the injector and turn on the charger power to the outlet. Press the button several times and make sure that the nozzle opens when power is applied;
- Connect the bottle cap to the other side of the thin tube coming out of the “nozzle” of the syringe. The place of twisting can be sealed with something;
- Press the spray button several times, then press the button 2-3 times. First place a transparent container under the nozzle outlet to be able to analyze the spray quality.
- Repeat the procedure as many times as necessary.
Cleaning inside
This is one of the most important points when working with devices. Among the main devices are tubes and syringes, and delivery cartridges. Cleaning agents get inside through tubes. First, they test the composition on a small area, because it is very aggressive. Work begins if nothing happens.
After cleaning, new rings are installed. It is not recommended to put the old ones back, even if they are cleaned. The filters and fuel pump mesh are also removed and replaced with new ones. Their location is easy to find out if you study the VAZ 2114 diagram; the injector rarely changes its position.
Replacing O-rings
To prevent fuel leakage, do not reuse the O-rings of the injector and injector body. They are replaced with new ones every time they are removed for any reason.
To remove the old ring, just pry it up with a screwdriver. When installing new ones, do not use hard tools; install the seals by hand. Before installing the injector, lubricate the rubber bands with engine oil.
An injection engine is not at all complicated, as owners of carburetor cars sometimes believe. Injectors are reliable parts that require only a little attention. Show it, and the engine will thank you.