Almost all modern cars are built on injection engines, the VAZ 2114 is no exception. This type of engine made it possible to increase power and reduce fuel consumption of the vehicle as a whole. As you know, for the injector to work, you need many different parts and sensors involved in the operation of the engine. The fuel in such an engine is supplied under pressure, and then atomized and mixed with air, then enters the combustion chamber in the form of an air-fuel mixture. To spray fuel, fuel injectors are used, which operate under a certain pressure.
This article talks about VAZ 2114 fuel injectors, namely their purpose, design, signs of malfunction, methods of cleaning and self-replacement, as well as cost and much more.
Purpose
VAZ 2114 injectors are designed to spray fuel under pressure and mix it with air to form a fuel mixture. When fuel arrives at the injector, it is closed, as soon as the control unit sends a signal to open a certain injector, it opens, thereby fuel under pressure is sprayed and mixed with air, after which it enters the combustion chamber of the cylinder through the intake valve and is ignited by the spark plug.
How to clean injectors on a VAZ 2115 at home?
Fuel injectors play an important role in the fuel system; stable engine operation, fuel consumption and much more depend on their serviceability and performance. Today I won’t talk for a long time about the reasons why the injectors become clogged, it seems to me that everyone already knows about this, instead I propose to go directly to the work of cleaning the fuel injectors of the VAZ 2115.
Design
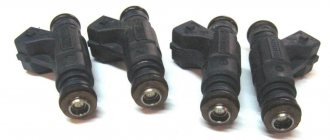
The fuel injector of the 14th Lada model is an electromechanical part that acts as a valve and atomizer. In the closed position, the injector is a valve that holds fuel and does not allow it to leak, thereby reducing the pressure in the system, and in the open position it is a sprayer, spraying this fuel into the engine system.
The nozzle has:
- Mesh filter;
- O-rings;
- Electromagnet winding;
- Core (acting as a valve);
- Return spring;
- Power connector;
CAR INJECTOR SYSTEM VAZ 2114
The VAZ 2114 is equipped with an engine with a distributed fuel injection system (injector), and the stable operation of the engine of this car depends on the quality of gasoline. A low octane number of fuel leads to a drop in power and unstable operation of the power unit. As a result, any parts of the internal combustion engine (ICE) may fail. Mechanical impurities in the fuel lead to clogging of fuel filters, damage the fuel pump, and clog the injectors. You have to disassemble the fuel system (TS) and clean the injector. How the VAZ 2114 injector works, how to clean it and in what cases, how to remove and install the fuel rail, we will look at in this short article.
The VAZ 2115 injector is no different from the VAZ 2114, so when considering the device of the “fourteenth” model, we will also keep in mind the “15th”. The mechanical part of the injector includes:
Intake manifold; Fuel rail (or rail, which is the same thing); Throttle assembly; Air filter with housing; Air pipe (injector corrugation); Injectors.
Gasoline injector device
Car enthusiasts who replace the carburetor with a distributed injection system in their “eights” and “nines” are puzzled by purchasing exactly these listed parts, not counting the electrical components.
The injectors on the VAZ 2114 are an electromagnetic device in which, when there is a pulse in the electrical component, the valve opens and atomized fuel is injected under pressure into the internal combustion engine cylinder. Depending on the magnitude of the pulse, the valve opens to a greater or lesser extent, thereby dosing the flow.
Model 2114 can be equipped with fuel injectors from different manufacturers, and accordingly, the cost of the injectors may also differ. Manufacturers and cost (price range in the Russian Federation):
- GM (1300 – 1400 rub.),
- BOSCH (1000 – 1200 rub.),
- SIEMENS (800 – 1400 rubles).
The VAZ 2114 (2115) is equipped with engines of 1.5 and 1.6 liters (8 and 16 valves), therefore the performance of the injectors must be selected depending on the type of engine. If you make the wrong choice, fuel consumption may increase or the internal combustion engine may lose power. Which injectors are better to install on a VAZ 2114? Here you should focus on the part markings. For example, BOSCH 0 280 158 502 is only suitable for a 1.5 l 8-valve engine. It’s hard to say anything about the manufacturer; the quality of all products is approximately the same.
SIGNS OF PROBLEM
There are certain signs of clogged injector nozzles:
- Difficulties in engine operation, jerking;
- High gas consumption;
- Unstable engine operation at idle speed.
And, if the injectors are leaking, the internal combustion engine may not start at all. To improve engine operation, you should clean the injectors on the VAZ 2114.
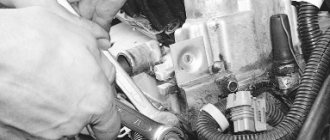
Let's look at how to remove injectors on a VAZ 2114 (of course, everything is done with the engine not running, and it won’t hurt to disconnect the battery terminals). To do this we need a set of combination wrenches, a hexagon, screwdrivers and pliers:
- Relieve the pressure in the system. On the rear of the ramp there is a valve under the cap. We unscrew the cap and press the valve with a thin screwdriver or rod.
- Remove the air filter pipe;
- Disconnect the fuel lines (supply and return);
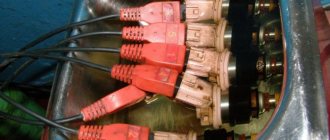
- Disconnect the electrical connectors from the injectors. The connectors are snap-on and easy to remove;
- We unscrew the two ramp mounting bolts (or a 10mm wrench or a hexagon):
- We dismantle the fuel rail.
Symptoms of a problem
Although injectors are a fairly reliable mechanism capable of operating for tens of thousands of kilometers, they can still fail and cause a lot of trouble for the car enthusiast.
Faulty injectors are accompanied by the following symptoms:
- Any of the cylinders is turned off;
- The engine knocks heavily;
- Engine power is lost;
- The engine does not start well;
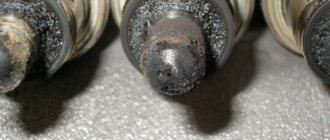
- Black or white spark plugs;
If such malfunctions appear on your car, most likely the fuel injectors are faulty; they require cleaning or replacement with new ones. In most cases, the problem is solved by cleaning the injectors or replacing the repair kit.
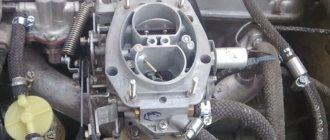
Carburetor. Advantages and disadvantages
Let's start with the negative points. These include:
- Such engines have not been installed on production cars for a long time. In Europe, due to environmental requirements, carburetors are blacklisted. That is, they are prohibited because they heavily pollute the atmosphere;
- At high speeds, the engine's capabilities drop significantly. Torque does not reach the desired levels. But at low speeds it is effective and allows you to accelerate well from zero to hundreds;
- When overtaking, the carburetor is a pain. It is problematic to overtake cars normally and confidently. Especially considering the power of the carburetor nines;
- High fuel consumption when compared with injection engines. On average, a nine with a carburetor in normal mode consumes about 8.5-9 liters of fuel per 100 kilometers;
- The air damper is controlled manually. The exception is some versions of the latest samples, where automatic devices have been installed. Some motorists claim that manually controlling the throttle in winter has its advantages, as it allows you to feel the engine. But only experienced drivers can understand this.
What breaks in injectors
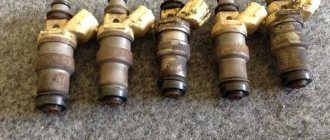
Failures in injectors do occur, but extremely rarely; in most cases, injector malfunctions are not accompanied by their breakdown, most often they simply become clogged, which leads to a decrease in efficiency and, consequently, a decrease in the amount of fuel.
Clogged injectors
When an injector becomes clogged, the fuel to pass through it becomes more difficult and it loses in quantity, and this leads to a lean fuel mixture, which is fraught with a decrease in engine power, overheating of the spark plugs and melting of the insulators, as well as burnout of the valves.
Injector leakage
When the injectors are leaking, it may be because the shut-off valve is not keeping the fuel pressure closed. Leaking injectors are dangerous because they can wash away the oil film from the cylinder walls, thereby reducing engine compression, and fuel can also get into the internal combustion engine oil and reduce its functions to zero.
If there is any problem with the injectors, they must be repaired as soon as possible.
How to understand when it is necessary to clean fuel injectors
- Loss of dynamics during car acceleration.
- When you press the gas there are jerks and dips while driving.
- The engine is running rough and unstable.
- Fuel consumption has increased.
- It takes a long time to start the engine with the fuel pump running.
- Black smoke from the exhaust pipe.
There are many instructions and methods for cleaning fuel injectors on the Internet, but we recommend using the most reliable and proven one - cleaning in an ultrasonic stand.
Cleaning injectors
To clean the injectors yourself, you do not need to have great skills in car repairs; it is enough to have the desire to repair the car yourself and purchase the necessary parts to carry out this work.
For cleaning you will need:
- Carburetor cleaner;
- Syringe;
- Wire 2 m;
- Lamp 12V;
- Non-latching button (wires can be used);
- Lamp (serves as a current-limiting resistor);
- Injector connector;
- O-rings;
After all the parts are prepared, we assemble the washing device. We fill the syringe with up to half of the carburetor cleaner, and insert it into the nozzle with a diameter that fits perfectly.
We assemble a power circuit for opening and closing the nozzle. We connect everything as shown in the diagram.
Flushing
We connect the circuit to the battery and create pressure on the injector by pressing the syringe piston, as soon as pressure appears, press the button and close the circuit for 1-2 seconds, the injector will open, we repeat this procedure several times until the injector sprays fuel evenly.
Ultrasound or chemicals for cleaning the injector?
Today, simple single-circuit installations are used for washing and cleaning. These are containers in which the solvent is located. The unit is placed next to the machine. A hose is connected to the inlet of the fuel rail to inject the product into the system. The cleaner, which acts as both a cleaning agent and a fuel, is supplied to the system by a compressor.
The disadvantage is that you only need to clean the injector nozzle. And modern sprayers cannot be cleaned using ultrasound. And this process is quite labor-intensive.
It is preferable to use imported solvents as a cleaner for injectors and injectors. They are of high quality. These are, for example, injector cleaning products such as the German Liqui Moly, the Belgian Winns or the American Hi-Gear. Domestic products were also tested, but neither “Toilet duckling” nor “Moidodyr” were suitable for these purposes.
Replacing injectors
Replacement is quite simple; for this you will need to meet two conditions: perform work on a cold engine and relieve the fuel pressure in the system.
To relieve fuel pressure, you need to remove the connector from the fuel pump under the rear seat and start the engine and let it run until it stalls. Then let the engine cool and you can start working.
- We turn off the fuel supply to the fuel frame; if the system has a return line, then turn it off;
- Turn off the power to the injectors by disconnecting the connector;
- We unscrew the two hex bolts that secure the ramp to the intake receiver;
- We take out the ramp;
- We take out the injectors by removing the stopper;
- We assemble in the reverse order;
Be sure to replace the O-rings with new ones before assembly and lubricate them with a small amount of engine oil before installation, this will make it much easier to insert them into the seats.
Functionality check
Checking functionality yourself:
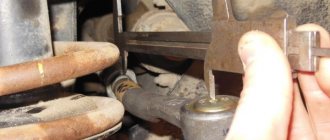
- Check the performance of the injectors on a cold engine, but with the engine running. We touch each nozzle with an ordinary hand. The working nozzle should pulsate and “tremble”. But this method is not entirely informative.
- There is another way to effectively diagnose. Add idle speed and let the car run. Then we loosen the cap nuts holding the injectors one by one, and the engine speed should decrease. When this does not happen, it is concluded that this injector is not working. If a malfunction is detected, you can clean the injectors yourself.
How can you clean the injectors on a VAZ 2114 yourself in order to reduce the cost of replacing spare parts, repairing and servicing the car? Cleaning injectors on a VAZ 2114 is quite simple. First you need to remove them.
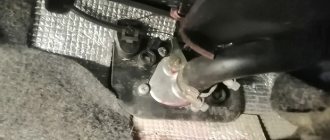
For safety reasons, turn off the engine and let it cool. Disconnect the negative cable on the battery, remove the protective casing and air filter. We unscrew the high-pressure pipeline from the nozzle and pump, remove it from the bracket supporting it.
Using a spanner, unscrew the nozzle along with the old washer and remove it. In this case, it is necessary to disconnect the electrical connector and slide the lock along the ramp to remove it. And so all 4 pieces.
Now let’s get to the main question: “How to clean the injectors on a VAZ 2114”? The injectors need to be examined first. If there are signs of leakage, it is better to immediately replace the spare parts with new ones.
For the rest, it is necessary to remove the o-rings from the atomizer and body. Prepared injectors should be soaked in acetone or gasoline for a while, this will allow them to be better cleaned.
We recommend: Reasons for increased fuel consumption on the VAZ 2114 While they are soaking, you can simultaneously clean the ramp and valve cover. It is even better to blow out the ramp with a vacuum cleaner. The time has passed to begin the cleaning procedure itself. A lot of coke, resembling tar, always forms around the nozzle of the spare part itself. It definitely needs to be removed. Next, using a blunt pin or needle, carefully clean the funnel-shaped surface around the nozzle. The outside of the nozzle is clean. But the most difficult thing is internal cleaning. How to clean VAZ 2114 injectors from the inside? To do this you will need: electrical tape, a can of carburetor cleaner, a syringe, a tube.
The product is supplied under pressure through a tube, simulating injection. It will take several such movements for each nozzle so that they break through and begin to spray the liquid evenly.
Then you need to let the injectors dry, put new o-rings on them and reassemble everything in the reverse order, while changing the fuel filter and the fuel pump mesh. .
Most modern cars are equipped with injection engines; the days of carburetor engines are gone forever. Injection power plants are more economical, environmentally friendly and productive, but at the same time they have a more complex design and injection system, consisting of a pressure regulator, injectors equipped with an electromagnetic valve, a fuel line, a fuel rail, intake valves and a number of other parts.
During operation, various fine particles and heavy fractions (sulfur, olefin, benzene and a number of others) are deposited on the designated parts, which come along with the fuel and can accumulate in the form of varnish and resinous deposits. In turn, this leads to contamination of the injectors, a change in the direction and shape of the spray pattern, and in some cases a complete cessation of fuel supply, even when using fuel filters that are capable of filtering out particles larger than 10-20 microns.
As a result, the formation of the air-fuel mixture is significantly deteriorated, the tightness of the pressure regulator valve is also compromised, and engine performance is reduced.
The deposition of these substances can interfere with the normal functioning of the working elements inside the nozzle, namely, it can disrupt the tightness of the valve, which is opened by an electromagnet controlled by the BC. In this case, when closed, they will allow gasoline to pass through due to constant pressure in the fuel system.
How to clean the injectors on a VAZ 2113-VAZ 2115?
Note! You probably already know that there are two ways to clean injectors, the first method is to ultrasonic clean them, a very effective method, but there have also been cases when people’s injectors simply failed, this may be due to the inexperience of car service workers in the first place (Just like that cleaning is carried out only in a car service using a special device and you can’t do it at home) and secondly, the device itself with which they perform cleaning does not work correctly (If everything is fine and the cleaning technology is followed, then nothing will happen to your injectors happens), the second method is already performed at home and also if you approach it with normal carburetor fluid (Not too caustic), then in this case nothing will happen to the injectors, we will describe this method in this article.
1) Let’s get down to the work itself, first you will need to remove the fuel rail and then you will need to remove the injectors from it, how to do all this, read the article entitled: “Replacing fuel injectors on a VAZ” (In this article to which a link is given It is also described how you can check the performance of the injectors, you will also carry out this check and perhaps you will not even need to clean them if they splash the same level of fuel into all containers), after removal, prepare a work area that should not be too dirty (It is best to use some or put a cloth and then place the injectors on it) and also prepare all the tools that will be needed, but you also take into account the fact that the battery should be nearby, so do all the work next to the car.
Note! By the way, you can also replace the battery with a charger, it will be even more convenient, in general, take any charger (it’s better to use old phones) and connect two wires to it (both contacts need to be tied to its tip with electrical tape so that they stick ) and these same two wires will go to the injector when cleaning it (more on this a little later)!
2) Now take the cleaner itself and remove the top cap from it, then place the back part of the nozzle on the protruding nipple from under the cleaner (it must be seated tightly so that the nozzle does not fly off during the work) as shown in the photo below and proceed to work , if you do all the work using a battery, then we would like to immediately note that it provides a current of 12 Volts, so be careful not to burn the injector (Just do not hold the contacts for a long time so that the injector works and everything will be fine for you, for 10-20 seconds will be enough), but if you used the charger, then we have already told you everything about how to connect it, namely in point 1 in “ Note! “We described everything, so let’s say a few words about the battery, you also need to connect these two wires to it and put one of the wires on the minus terminal, and the other on the plus, and after that you can connect these wires to the injector, read more about this in paragraph below.
How to determine a breakdown
If the injector on a car does not function, an experienced car enthusiast will notice the problem almost immediately. Firstly, the engine will begin to operate unstably and fuel consumption will increase significantly. Secondly, you may notice misfire at idle and deterioration in vehicle dynamics. It will take much longer to accelerate with full throttle.
Please note that poor injection system performance does not guarantee that the injector is not working. It is quite possible that it is simply time to clean the injectors; there is no point in changing working devices. But how can you determine if everything is fine with the elements of the fuel system? There are two main ways:
- Touch the nozzles. If you feel a pulsation, it means they are fully functional and you can get by with regular cleaning.
- Start the engine and increase idle speed. After this, you need to slightly twist the caps on the injector, which will cause the engine speed to drop. If the number of revolutions does not change, then there is a problem that needs to be solved.
So, you have identified the problem and are convinced that the car really needs to replace the injectors. Next, we’ll talk about how to remove them and install new ones.
Recommendations and tips
An indicator of normal operation of the nozzle is a high-quality spray of liquid. Also, after washing the injectors, it is recommended to replace the fuel filters; if necessary, the fuel pump mesh filter is additionally cleaned. This is necessary to prevent dirt from the fuel system from re-clogging the injectors.
We also recommend reading the article on how to clean injectors with ultrasound. From this article you will learn about the advantages and disadvantages of this method, as well as the features of such cleaning.
Please note that the cleaning method by washing only removes surface deposits. If the injectors on a 2114 or VAZ 2115 have persistent and heavy contamination, it is necessary to perform deep cleaning of the injectors with ultrasound or washing on a bench. In difficult cases, ultrasonic cleaning of injectors is combined with washing to obtain better results.