The latest releases of VAZ “tens” engines had rubber valve seals. The kit consisted of an expander spring and a steel bushing.
The manufacturer recommends replacing the oil removal part after the car has run 150 thousand kilometers. Many car owners do this within the walls of a car service center.
At the same time, they are completely unaware that in a VAZ 2110, replacing the oil seals of 8 valves can be completely done independently.
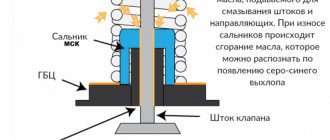
The main purpose of the valve stem seal is to seal the joint between the rods. This circumstance ensures that engine oil will not flow into the gap.
The engine will operate efficiently only when the components in the gas distribution mechanism are continuously operating. Engine parts are constantly subject to friction. To minimize their wear, they should be lubricated with oil. But it should not enter the combustion chamber. For this purpose, seals are installed.
When they wear out, the oil will end up in the engine cylinders. This will cause a circumstance to arise in which the oil will begin to burn and form carbon deposits on the walls of various elements. The result will be a drop in compression and the valve will not close tightly.
Replacing valve stem seals with your own hands
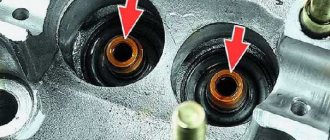
Valve seals (VSC) are made of special rubber, which ages over time, begins to deteriorate and peel off from the base. All this leads to the fact that the cap begins to leak more oil, and therefore there is a high consumption of engine oil. Other symptoms of replacing valve stem seals may be the presence of blue smoke during over-gassing and low compression in the cylinders.
Tool for replacing valve stem seals :
Additional Notes
Repairing your car yourself is largely a hobby. Over time, motorists gain skills in the repair process - starting from the simplest and moving to the most complex. In this case, you can count on gaining your own skills to quickly replace certain functional components of your machine.
We invite you to start repairing your car yourself. This will help significantly reduce the costs that motorists typically pay. Do-it-yourself work has always been advantageous, and it can also be carried out taking into account other requirements. The proposed instructions will help you understand in practice the replacement process quickly enough and from now on do this work yourself.
Stories from our readers
“Fucking basin. "
Hi all! My name is Mikhail, now I’ll tell you a story about how I managed to exchange my two-wheeler for a 2010 Camry. It all started with the fact that I began to be wildly irritated by the breakdowns of the two-wheeler, it seemed like nothing serious was broken, but damn it, there were so many little things that really started to irritate me. This is where the idea arose that it was time to change the car to a foreign car. The choice fell on the melting Camry of the tenth years.
Yes, I had matured morally, but financially I just couldn’t handle it. I’ll say right away that I am against loans and taking a car, especially not a new one, on credit is unreasonable. My salary is 24k a month, so collecting 600-700 thousand is almost impossible for me. I started looking for different ways to make money on the Internet. You can’t imagine how many scams there are, what I haven’t tried: sports betting, network marketing, and even the volcano casino, where I successfully lost about 10 thousand ((The only direction in which it seemed to me that I could make money was currency trading on the stock exchange, they call it Forex. But when I started delving into it, I realized that it was very difficult for me. I continued to dig further and came across binary options. The essence is the same as in Forex, but it’s much easier to understand. I started reading forums, studying trading strategies. I tried it on a demo account, then opened a real account. To be honest, I didn’t manage to start earning money right away, until I understood all the mechanics of options, I lost about 3,000 rubles, but as it turned out, it was a precious experience. Now I earn 5-7 thousand rubles a day. I managed to get the car buy after half a year, but in my opinion this is a good result, and it’s not about the car, my life has changed, I naturally quit my job, I have more free time for myself and my family. You’ll laugh, but I work directly on the phone)) If If you want to change your life like me, then here’s what I advise you to do right now: 1. Register on the site 2. Practice on a Demo account (it’s free). 3. As soon as you get something on the Demo account, top up your REAL ACCOUNT and go to REAL MONEY! I also advise you to download the application to your phone, it’s much more convenient to work from your phone. Download here.
- desiccant;
- tweezers;
- oil seal remover;
- mandrel for pressing caps.
Replacing valve seals VAZ 2110 8V
Replacing the MSK is shown using the example of engine 2111 (8kl). To do this, you do not need to remove the heads from the cylinder block, but you will need a tin rod with a diameter of about 8mm (for example, solder).
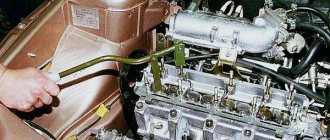
We begin the procedure by removing the air filter, fuel pump, ignition distributor and auxiliary drive housing, unscrewing the bolt securing it with a 5-point hexagon. Disconnect the negative terminal from the battery. Remove the timing pulley from the camshaft, and then the cylinder head cover.
| Remove the ground wires by unscrewing the two nuts “1”. Then unscrew two nuts 2 and bolt 3 securing the rear cover of the cylinder head. Please note that there is an O-ring under the bolt head. Remove the back cover from the block head. | |
| Unscrew evenly the four nuts securing the front 1 and six nuts securing the rear 2 camshaft bearing housings and remove the washers. Then remove both housings. | |
| If the key in the camshaft groove does not fit tightly, remove it so as not to lose it. | |
| Remove the camshaft from the cylinder head. | |
| Remove the oil seal from the camshaft. | |
| Rotate the crankshaft so that the piston corresponding to the caps being replaced is at top dead center. After unscrewing the spark plug, insert a tin rod through the spark plug hole between the piston and the valve (to prevent the valve from falling down). | |
| Install the valve spring compressor as shown in the photo. In this case, use a nut without a serrated shoulder. Compress the valve spring with the tool. | |
| Use tweezers to remove two crackers. Then remove the fixture. | |
| Remove the upper spring retainer and the inner and outer valve springs. | |
| Press the oil seal onto the valve guide. | |
| To do this, install the collet of the tool for removing oil seals onto the cap. | |
| Strike the tool bushing sharply with the striker. Then just as sharply hit the striker of the handle of the device, thereby pressing the cap off the sleeve. | |
| Remove the cap from the fixture collet. If you do not have a tool for removing caps, use pliers. In this case, the force must be applied strictly upward and not rotate the caps, so as not to damage the valve guides. | |
| Before installing new valve stem seals, it is recommended to remove the springs from them, otherwise the caps can be damaged when they pass through the grooves under the cracks on the valves. | |
| Dip the valve stem seal in engine oil and insert it into the mandrel. | |
| Carefully press the cap all the way into the bottom plate. | |
| Install the spring on the cap if it was removed. Replace the remaining oil seals in the same way. | |
| Install the springs and valve plate in the reverse order of removal. Install the cotters using the tool so that they fit into the grooves of the valve stem. Remove the tin rod from the candle hole. | |
| After installing the crackers, hit the ends of the valves with a hammer through a metal rod so that the crackers sit in place. Lubricate the camshaft journals and cams, as well as the bearing surfaces under the camshaft journals in the cylinder head and bearing housings with engine oil. | |
| Install the camshaft into the cylinder head supports so that the cams of the 1st cylinder are directed away from the valve tappets. | |
| Apply sealant to the cylinder head in the area of the outer camshaft supports. | |
| Install the camshaft bearing housings, place the washers on the studs and tighten the nuts securing them in two stages in the order shown: – tighten the nuts until the bearing housings touch the surface of the cylinder head. | |
| Make sure that the guide bushings fit into the holes in the bearing housings. Finally tighten the nuts in the specified sequence. | |
Putting parts in place
First, the cap is dipped in engine oil, installed in the mandrel and carefully hammered into the lower plate. The spring is returned to its place. All existing caps must be installed in the same way. In the same order as was done during removal, return all the springs and upper plates to their places. Then install the crackers back so that they fit exactly into the grooves for the rods on the valve.
A tin rod is removed from the hole from which the candles were removed. After installing the crackers, you need to hit the ends of the valve with a hammer or heavy object using a steel rod. They should fall into place. Lubricate the distribution shaft journals, cams and the places under them in the heads on the cylinder block with engine oil.
Install the camshaft into the head supports. In this case, it is necessary to install the cams of the 1st cylinder in the opposite direction in relation to the valve tappets. The area of the last support of the distribution roller is covered with sealant. The housings of its bearings are returned to their place and the studs are fixed in two stages with nuts, which are first tightened until the bearings touch the head.
It is necessary that the bushings fit exactly into the holes on the housings, and only then tighten the nuts until they stop. An oil seal is installed on the camshaft. At the last stage of work, the valve clearances are checked and adjusted. After this, the previously removed parts and devices are returned to their place. If everything described above seems difficult to perform, then you need to contact a car service center - where this work will be done by professionals.
It's easy to replace the caps yourself. The main thing is not to deviate from the above recommendations and follow the order of operations to replace parts. With timely prevention, the car will serve its owner for a long time.
Purpose and design of valve seals
A worn oil seal allows oil to enter the cylinder along the valve stem, causing it to burn along with the mixture, forming carbon deposits on the valve plates, as well as on the rings and cylinder walls. In advanced cases, coking leads to a drop in compression due to stuck rings and loose valve closure. It is generally accepted that the cost of timely replacement of oil scraper bushings is incommensurate with the repair of the piston group.
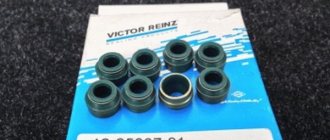
The design of the oil seal is quite elementary, it consists of only three basic elements:
- The base is a steel bushing, which represents the frame of the oil seal and gives it strength.
- Spring – ensures the tightest possible fit of the edge of the rubber seal to the valve stem.
- Oil seal - made of rubber or secondary rubber and serves to remove excess lubricant from the valve stem.
It is important to take into account that to replace valve stem seals on a VAZ 2110 8-valve car, it is better to buy appropriate high-quality consumables. First of all, this will affect the service life of the parts; they will not have to be changed ahead of time.
Product selection
The choice of valve stem seals should be taken seriously, since the normal operation of the power unit will depend on this.
A visual inspection is required before installation.
Typically, the manufacturer recommends installing only original (factory-produced) parts. As for AvtoVAZ, for 2110 it will be under catalog number 2112-1007026 . The average cost will be 700 rubles.
Analogs
Motorists recommend paying attention to analogues!
But, as practice shows, most car engine repair specialists do not recommend using original caps. Valve seals manufactured by Elring with catalog number 825.050 . Their price will be 700 rubles , the same as the original ones, but the quality is much higher.
In addition to the presented companies, there are a number of analogues that can be used for installation on the VAZ-2110.
| Manufacturer | Catalog number | Cost in rubles |
| At program | AT 7026-008SB | 100 |
| Master-sport | 825-050-FPM-SET/16/-MS | 500 |
| Trialli | CV 057 | 500 |
| Corteco | 19030310 | 500 |
| Reinz | 12-26058-01 | 500 |
| Payen | HR662 | 600 |
| Elwis royal | 9056004 | 650 |
Causes and signs of wear of rubber seals
During engine operation, oil removal seals are subjected to serious loads, because the valve performs more than 1000 operating strokes per minute. If we add to this the factor of the chemical effects of hot oil and exhaust gases, then it is not at all surprising that the rubber does not withstand and wears out. And the point here is not the quality of the product, although this is important, it’s just that the seal is a consumable material that should be changed after a run of about 100,000 km.
If you detect the wear of valve seals in time and replace them at an early stage of the malfunction, you will be able to avoid problems with the internal combustion engine. The primary signs of failure of rubber seals include the following symptoms:
- The candle thread is coated with oil.
- Smoke from the oil filler neck.
- Smoke coming from the exhaust pipe.
- The electrodes of the spark plug are covered with carbon deposits.
- Increased fuel consumption.
- Rapid oil contamination.
The presence of oil on the threaded part of the spark plugs does not always indicate the need to urgently change the seals. It happens that the thread is still dry, because a small amount of lubricant still gets into the chamber, and it has time to burn.
We change valve stem seals on a VAZ-2110 with an 8-valve engine
Many car enthusiasts were faced with the fact that the time had come to change valve seals on a VAZ-2110. These seals are also popularly called caps. The change process itself is quite simple, but it will require some knowledge of car design, as well as the availability of tools.
Video material
Video material about replacing valve stem seals, as well as the subtleties and nuances of the procedure.
Removing the cuff
- the cylinder head cover is removed;
Note. In order for the replacement of camshaft seals on a VAZ 2110 to be successful, it is not necessary to dismantle the engine or the VAZ camshaft.
Camshaft oil seal VAZ 2110 16 valves
The cuff itself is located behind the toothed pulley. To dismantle it, you should arm yourself with a special tool - 2085. If this is not available, a regular hook can help remove the oil seal. So, let's start removing:
- first of all, loosen the clamps of the poly V-belt tensioner;
- remove the belt;
- now you need to dismantle the damper;
- we reach the safety shields - upper and lower;
- disconnect them from the end of the engine;
- Now you need to turn the crankshaft until the cylinder piston reaches top dead center.
Note. When performing the above operation, it is recommended to use the ignition timing mark.
- loosen the toothed belt tensioner;
- we remove it.
Note. This belt can of course be secured accordingly rather than removed. But, as you know, the belt cannot be tightened, otherwise it will become deformed. Therefore, it is still better to remove it.
Camshaft oil seal VAZ 2110 8 valves
From this point on, the crankshaft cannot be turned either, since one of the pistons is already at top dead center. Let's continue:
- block the camshaft pulley accordingly;
- First, use a wrench to unscrew the bolt, and use a pry bar to keep the shaft from turning.
You can also ask an assistant, if you have one, to hold the shaft from turning. In addition, to prevent the shaft from turning, you can pass a 10-mm head with an extension through the hole in the pulley, and then put it on the nut that secures the rear timing belt cover.
- The camshaft pulley is removed.
Note. In order not to lose the key, you should remove it from the camshaft groove.
- Now we should start removing the oil seal that will appear before us;
- take a screwdriver and remove the cuff.
The puller is screwed into the oil seal as far as possible. At the same time, press the slip ratchet.
- you need to loosen the knurled screw and rotate the inner part in the direction of the camshaft until the oil seal comes out.
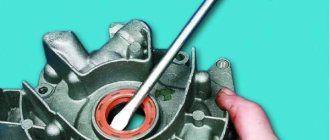
Installing a new cuff on the camshaft
VAZ 2110 camshaft oil seal
Note. It is recommended to lubricate the new cuff with machine oil. In addition, the threaded head of the tool, which we use along the shaft, is lubricated. Only after this is the cuff pressed inside using a rubber hammer.
To easily install a new cuff, it is recommended to use a bushing of a suitable size instead of a handy tool. You also need to take a long bolt and a large washer.
Note. The bolt that is selected must be the same diameter as the camshaft pulley.
- install the bushing on the outer diameter of the oil seal;
- install them together using a bolt and washer;
- tighten the bolt until the cuff is in place (that is, flush with the cover).
Note. If you don’t have a bushing at hand, the cuff can be pressed in with hammer blows through the bit. We remember that you cannot press the cuff in completely, because this can block the hole from which the oil drains.
Why is it necessary to change on time?
Naturally, timely repair of parts that have become unusable will extend the life of both the engine and the VAZ-2110 vehicle itself. The time after which it is necessary to change the oil seal directly depends on how old or new the car is, on the driving style of the car owner and operating conditions.
If you change them in a timely manner, this will help reduce the cost of car repairs, because such measures eliminate engine oil leaks, which negatively affect the operation of the engine.
If you do not change it in time, the VAZ-2110 car will “eat” more motor oil, and the engine itself will begin to collect dirt and dust, which cannot but affect the stability of its operation. Engine oil leaks negatively affect car parts that are not made of metal, and the contact in the terminals will become much worse, which, in turn, will affect how the car starts.
Dismantling
To replace the problematic oil seal, you will have to perform several disassembly steps. As a result, you will need to do the following:
- Remove the front protective cover, and then remove the timing belt;
- Remove the camshaft pulley mounting bolts. To do this, hold the element with a screwdriver to prevent it from turning, and perform the removal procedure itself using a 17 mm wrench;
- Remove the toothed pulley;
- Remove the oil seal. For this operation, you will need a flat-head screwdriver or needle-nose pliers.
This set of measures will allow you to remove and replace the oil seal. But we advise you to check the condition of the camshaft and, if necessary, replace it.
To get to the camshaft you need:
- Remove the oil pressure sensor completely. If you don’t want to dismantle it, then at least disconnect the wires from the device;
- Unscrew the camshaft bearing housing mounting bolts. There are as many as 20 of them there. After this you can easily remove the case;
- Do not forget about the plugs that are located in each technological hole. Take them out;
- Disassemble the potentially problematic camshaft and determine the need for repair or replacement.
Reassembly
When reassembling the assembly, be sure to take into account the position of each dismantled element. Be careful with the plugs. Make sure that each of them is strictly in its place.
Press-in
Before installing the oil seal and additional elements, do not forget to lubricate them thoroughly. The seal can be pressed into place using a hammer. Just not metal, but rubber or plastic. Make sure the edges are flush with where the component will be installed.
vote
Article rating
When is it time to change?
The car crankshaft has two oil seals: front and rear. They are dense elastic rings in a hard cage.
Their purpose is to prevent dust and dirt from entering the crankcase and to prevent oil leakage. The service life of the sealing rings is 150 thousand kilometers. But consumables may wear out sooner. The reason for this may be:
You can diagnose the replacement of oil seals by the oil stains that appear on the engine and gearbox. An oil leak can cause the timing belt to break, causing damage to the valves. In this case, it may be necessary not only to replace the valves, but also to overhaul the engine.
Completion of work
Once all the new oil deflectors have been installed, you can begin assembly. It is quite possible to replace valve seals without removing the head. After all, dismantling the cylinder head is a labor-intensive process that will require replacing the gasket and draining the antifreeze. Motor assembly:
- Install the cover using only a new gasket.
- Install the camshaft pulley and tighten the bolt.
- Install the camshaft and crankshaft pulleys, install the timing belt and tension it.
- Install all attachments.
After repairs, be sure to make sure that engine operation has returned to normal and there are no more symptoms of failure. If it is necessary to repair the VAZ-2110 valves, then simply replacing the oil deflectors is not enough. You will have to dismantle the cylinder head and change and grind all the valves.