Replacing the gasket
Surely, many have encountered a problem when oil begins to ooze under the valve cover. In this case, the valve cover gasket must be replaced. As a rule, this happens after a certain mileage of the car. To prevent such a problem, you need to replace the gasket in a timely manner. The process itself, called replacing the valve cover gasket of a VAZ 2110, is not that complicated, but it is not feasible without some knowledge and skills.
Replacing the valve cover gasket for Lada 2110 (VAZ 2110)
Surely many car enthusiasts have had a problem when oil begins to ooze under the valve cover. This indicates that the valve cover gasket needs to be replaced as soon as possible.
This usually happens after a certain mileage of the car. In order to prevent such a problem, you need to replace the gasket in time.
The replacement process itself is not particularly difficult, but if you do not have some knowledge and skills, you will not be able to carry it out.
Pad
Objectively speaking, this part is not the most significant element at all; it does not affect the performance of the engine or any other technical parameters. However, when the gasket fails and starts leaking, it can cause some trouble.
The main sign of caring for your car is a clean and dry engine, which is reflected in the condition of all kinds of gaskets, seals and seals.
The valve covers can be seen immediately after opening the hood. Some car enthusiasts specially paint it and the air cleaner housing in some bright color.
This part itself is needed to close the gas distribution mechanism; it has a neck for changing the oil in the engine. This neck is attached to the cover itself using several bolts. Between the neck and the lid is the part that interests us.
Note: the gasket is made from a special composition, the main component of which is rubber. In this case, all properties are preserved when exposed to high or low temperatures. In addition, the composition does not interact with motor oil.
However, over time, the part loses its elasticity and becomes hard. Then microcracks appear through which oil leaks.
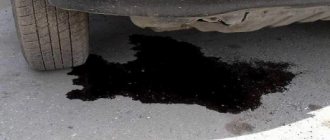
Even small leaks lead to the engine becoming covered in dirt, which is very difficult to clean.
When is replacement required?
Some may want to know exactly how often they should be replaced. It must be said that such a procedure should be quite commonplace for a car enthusiast, especially in cases where the car is actively used.
The VAZ 2110 valve cover gasket needs to be changed in the following cases:
Some drivers prefer to carry out the change every time they change the engine oil. These actions are completely rational, because in this case, oil leakage will be completely eliminated. When opening the cover, the car enthusiast inspects the timing parts to prevent wear or damage.
Often parts are replaced in a garage. You can quickly change the gasket yourself; all you need is your desire and some tools. In addition, you need to acquire consumables, including: a new gasket, a degreaser such as gasoline, thinner or anti-silicone, and a good high-temperature engine sealant.
Replacement process
Pulling out the old gasket is quite easy:
Note: if the cover is burdened with additional devices, for example, attachments, they are also dismantled. You can immediately discard the old gasket.
Mistakes that can be made when replacing a gasket
Of course, the replacement process is not always carried out correctly by car enthusiasts; mistakes are often made. Despite the fact that the procedure is not complicated, some car owners experience certain difficulties. For example, after installing a new part, oil still continues to flow.
The most common mistakes are the following:
Note: the operation should be performed on a cold engine, this will be much more convenient.
In order to eliminate possible errors, you can follow the instructions:
Note: apply the compound from right to left and make sure that the sealant layer is not more than 3 mm.
It will be very difficult for an inexperienced person to carry out the replacement on their own. Before you get started, you should watch the training video and read useful tips that will save a lot of time on repair work.
If you are inexperienced, you are unlikely to be able to remove it without damage the first time, so be sure to buy a spare one.
Instructions for replacing the gasket are contained in the car manual, but many car enthusiasts do not pay attention to it.
Note: it should be understood that each case is completely individual, so it is better not to trust the advice of friends. It would be better to read the instructions, because that’s what they are there for, don’t neglect them.
You should purchase only original parts. Many car enthusiasts and mechanics neglect this point, believing that there is no difference between rubber products. Even if you do everything correctly and carefully, a low-quality part will not bring a good result. As practice shows, many problems arise precisely because “non-original” spare parts were used.
You shouldn’t skimp on the little things, as they often play an important role. Also, pay attention to the correct use of sealant.
Few people know that improper use of sealant can cause all efforts to be in vain. In order to successfully complete the repair, the composition must set well, which will take about 10-12 hours.
When is replacement needed?
Perhaps many are interested in the question of how often valve gaskets need to be replaced. It is worth noting that such a procedure should be habitual for the driver, especially in cases where the car is actively used. Replacing the valve cover gasket on a VAZ 2110 should be carried out in the following cases:
- if traces of oil appear outside along the connection line between the cover and the cylinder head;
- during current or major engine repairs;
- when removing the head cover for technical inspection or for timing belt repair.
- Some drivers change the gasket under the cap constantly when changing the engine oil. There is a rational explanation for this. Oil leakage will be completely eliminated. When opening the cover, the driver inspects the timing parts to detect wear or damage.
In many cases, the gasket is changed in a garage environment. You can quickly change the gasket on your own; all you need is desire and a set of simple tools. In addition, you need to acquire consumables. Such materials include a new gasket, a good high-temperature engine sealant and a degreaser (this can be gasoline, solvent or anti-silicone).
Replacement process
Removing the old gasket is very easy. Let's get started:
- To do this, remove the air cleaner housing and unscrew the mounting bolts around the entire perimeter.
Note. If the cover is burdened with additional devices, for example, attachments, they can also be dismantled. The old gasket should be thrown away immediately.
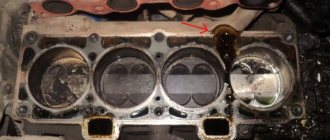
- The contact points between the cylinder head and the cover are cleaned of worn sealant and then degreased.
- The gasket is lubricated on both sides with sealant, placed in place and covered with a lid.
All parts must be assembled in reverse order. This video will help you do everything correctly.
Errors after replacing the gasket
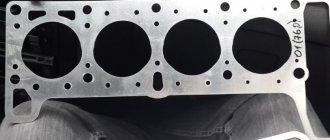
Photo of incorrect gasket replacement
Of course, the gasket replacement process is not always carried out perfectly, and some common mistakes may be made. Despite the fact that this is a simple procedure, many car owners may encounter certain difficulties. For example, after installing a new gasket, oil may still flow. Errors during replacement can be different, but the most common are:
- use of low quality gasket;
- uneven application or use of old sealant;
- Incorrect tightening of the bolts, which may result in the cover being skewed.
Attention: Before starting work, you need to find a diagram for tightening the cover fasteners; it is in the vehicle’s operating manual. Thus, everything must be done based on this scheme. The dynamic wrench will help control the tightening force. To carry out work comfortably and conveniently, you need to prepare the following tool:
- socket or socket wrenches;
- torque wrench;
- a little turpentine;
- universal screwdriver;
- automotive sealant;
- new gasket.
Note! It is better to carry out the operation on a cold engine, which is much more convenient.
In order to avoid mistakes when replacing the gasket, it is recommended to follow certain instructions:
- First, the mounting bolts from the valve cover are unscrewed. For these actions you will need a key set to “10”. The unscrewed bolts are completely removed. The corner of the valve cover is carefully picked out with a screwdriver. The cover is lifted and dismantled.
- All edges of the part are thoroughly cleaned of oil. In this case, you can use turpentine, which is sold at the pharmacy. In addition, the old sealant is removed.
- The tightening of the cylinder head bolts is rechecked, especially for situations where major repairs were carried out relatively long ago. If necessary, they are tightened to the correct torques and in the correct sequence as specified in the machine manual. If for some reason there is no manual, the information can be read on the Internet.
- The lid is thoroughly washed; the same turpentine is suitable for this. More attention needs to be paid to the oil separator.
- The old gasket is removed. Perhaps it will burst into pieces. Using turpentine, wash the groove under it.
- A new gasket is inserted into the corresponding groove, after which sealant is applied to the cylinder head and cover.
Note! It is recommended to apply the composition from right to left, and the sealant layer should be no more than 3 mm.
- To make installation of the cover as convenient as possible, it is better to remove the timing case.
- Now you can install the cover; you need to hold it level and lower it slowly. The holes for the candles are centered so that they fit exactly.
- Bolt tightening should start from the center and end with the outer bolts. Refer to the manual for the tightening sequence. As a rule, the first tightening should be done with a force of 5 Nm, and the second - 10 Nm.
- After this, oil is added to the engine and a test run is performed. At the final stage, you can evaluate how well the work was done by testing the gasket for leaks.
How to remove the valve cover and replace the gasket on a VAZ 2110-2112 8-cl.
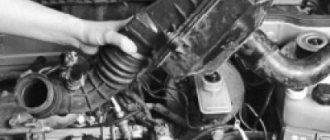
So, the first thing you need to do is open the hood of the car and, using a 10mm socket, unscrew the two bolts securing the throttle cable bar, as is clearly shown in the photo below.
Take it to the side and secure it so that it does not interfere with us in the future.
Then, using a Phillips screwdriver, unscrew all the clamp screws on the hoses that fit the valve cover. In the photo below they are all marked with arrows:
And remove all three pipes:
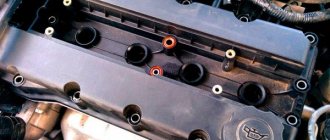
When you have completed this step, you next need to unscrew the two nuts securing the valve cover to the cylinder head body.
And only after this, carefully remove the valve cover, lifting it up without sudden movements.
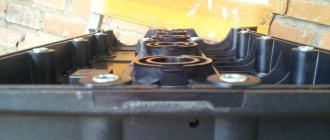
Now as for replacing the gasket. It is installed in the groove of the cover from the inside. We pry it with our fingers or a thin object and pull it out. This procedure is clearly shown in the picture below.
After this, we wipe the surface of the cylinder head and the groove of the cover dry, install a new gasket and you can put everything back in place.
Also, it is worth paying attention to the integrity of the rubber seals under the cover fastening nuts:
Typically, such rubber bands are sold complete with a gasket. The price of such a kit is about 120 rubles for VAZ 2110-2112 with 8-valve engines. After installation, we connect everything in place.
When do you need to replace the oil pan and its gasket?
The pan must be replaced if it is deformed, due to which the engine oil that was located in it begins to flow out of the pan itself.
The pan gasket must be replaced if it is strongly compressed and if it is torn, how do you understand this, you ask? Usually, when the gasket is deformed, engine oil begins to flow through it, but the leak can also be treated by simply tightening the bolts that secure the oil pan, but if tightening the bolts does not produce any results and the leak does not stop, then replace the gasket with a new one.
Symptoms of a problem
Replacing the crankcase is a complex and responsible procedure that must be performed in strict compliance with technological standards. Making mistakes is strictly not recommended.
If the replacement is carried out incorrectly, the rupture may occur again, foreign particles will get inside the crankcase, sealing will be insufficient, which will lead to failure of the engine or its individual components.
It would seem like a simple gasket, but what a burden of responsibility lies on it.
To determine the need to replace the gasket, you should pay attention to the characteristic signs of such a problem:
- Oil is leaking.
- There is a decrease in pressure in the oil system.
- The oil level drops more rapidly than usual.
Main reasons for replacement
In fact, replacing the oil pan gasket on a VAZ 2110 may be necessary if it is damaged. There are not many reasons:
- Impacts on the oil pan;
- Gasket deformation;
- Exposure to high internal pressure, which violates the integrity of the gasket;
- A confluence of several factors at once.
Replacing the valve cover gasket
2. Then slide the rubber bushing of the cable and unscrew the cable lock nut completely
3. Remove the cable from the bracket
4. Using a 10mm wrench, unscrew the two nuts securing the bracket to the receiver (this is for the VAZ-2111 engine)
6. Using a Phillips screwdriver, loosen the clamps of the two crankcase ventilation outlet hoses and remove the hoses from the valve cover.
7. Use a Phillips screwdriver to loosen the clamp of the crankcase ventilation supply hose and remove it.
8. Using a 10mm wrench, unscrew the two nuts securing the valve cover.
9. Remove the valve cover from the studs. If there are parts of the gasket left on it, remove them with a sharp blade and degrease its seat.
10. Rubber sealing bushings (“Soldiers”) are installed in the holes of the cover. It's better if you replace them.
11. Remove the valve cover gasket.
Before installing a new gasket, remove parts of the old gasket from the block and degrease the surface. You can also apply sealant to the joints (layer 2-3 mm). Check the tightness of the connection with the engine running and after the first trip. Also check the oil level.
Source
Removing the valve covers on engine 21120 (16v 1.5)
Briefly, the sequence looks like this: remove the filter box and the plastic trim, disconnect the wires and unscrew the ignition module. The key must be turned to position “0”.
Removing the air filter box
To remove the filter, loosen clamps 1 and 2, and then disconnect connector 3. Pipes 1 and 2 are removed from the box. Use a 10mm wrench to unscrew the screw on the body, then remove the box from its mountings.
With a plastic cover, everything looks simple: either it is screwed on with bolts (key “10”), or held on with rubber bands. In the first case, the bolts are unscrewed, in the second, the cover is pulled up. The main thing is to unscrew the filler plug.
To disconnect high-voltage cables, you need to pull the caps out of the wells. The cables are also disconnected from the ignition module. It is pressed to the valve cover with three 10mm nuts.
We figured out the ignition module
Don't forget to disconnect the low-voltage connector and dismantle the module. If you do not unscrew the module, you will not be able to remove the valve cover on a VAZ-2112.
The part called “receiver”
First of all, you need to remove the throttle assembly: unscrew the cap on the antifreeze tank, disconnect the TPS and IAC connectors, unscrew the two fastening nuts (wrench “13”). It is also advisable to disconnect the negative terminal from the battery.
What to do before removing the receiver
Using a 10mm wrench, unscrew the cable mounting bracket from the receiver. All that remains is to remove the throttle assembly : the operation is carried out so that the assembly remains above the expansion tank. The assembly itself is finally attached to the body partition.
Replacing the valve cover gasket for a VAZ 2110 8 cl.
Welcome, friends, to the DIY auto repair website. Periodic inspection of the car is a matter of principle.
It is advisable to open the hood before each trip, check the levels of main fluids (brake, coolant, engine oil), pay attention to the external condition of the engine and the operation of all systems.
In this case, special attention should be paid to the motor - at least to its appearance.
The appearance of a leak at the junction of the valve cover and the main block indicates one thing - the valve cover gasket of the VAZ 2110 has ceased to perform its functions and requires replacement.
Necessary parts and tools for repair
Troubleshooting the cylinder head begins with the purchase of original parts and various consumables, the list of which is as follows:
- Fuel intake system valve 8 pcs. (art. 21120-1007010).
- Exhaust gas valve 8 pcs. (art. 21120-1007012).
- Set of hydraulic compensators 16 pcs. (art. 21120-1007300).
- Gaskets for valve cover, cylinder head, intake manifold, exhaust manifold (all come as a set art. 21120-1002064-86).
- Bolts securing the cylinder head to the engine crankcase (art. 21120-1003271-018).
- Timing belt (art. 2112-1006040-02RU), timing tension roller (art. KT100507/100513), drive belt for mounted units (art. BP638).
- Engine oil and oil filter.
- Cooling system fluid.
Installation of valves on a VAZ 2112 is carried out using a standard set of tools, as well as several specialized types of keys:
- standard set of spanners from 8 to 24 mm;
- socket sockets in a set from 8 to 27 mm;
- end internal hexagons;
- mechanical valve retaining ring remover (depressurizer);
- torque wrench for tightening the cylinder head and camshaft bolts;
- paste for grinding valves (set for rough and fine grinding);
- metalworking cloth gloves to protect hands while working.
The work of replacing 16 valves on a VAZ 2112, the price of which as of this fall is about 50 thousand rubles at AvtoVAZ dealerships (or approximately 35-40 thousand rubles at ordinary car repair shops), is not a very complicated process. You can carry out the work yourself, for which it is enough to purchase the above-described spare parts and the necessary tools.
The main purpose of the valve cover gasket
The gasket under the valve cover can hardly be called a vital element of the car. But it's not that simple. On the one hand, it really does not affect the technical characteristics and performance of the power unit.
On the other hand, the appearance of a leak can lead to a number of other, more serious problems.
Attention! The gasket is made of rubber, and as you know, it also has its own service life, so as they say, nothing lasts forever.
The main task of the gasket is to ensure a tight connection between two components (valve cover and the rest of the engine). At the same time, the cap itself is not difficult to find - it has a neck for filling engine oil.
Removing the valve covers on engine 21124 (16v 1.6)
Remove the filter box and decorative trim (see Chapter 1). Next, remove the ignition coils: disconnect the plugs and use a “10” key to unscrew the fastening screws.
Customized ignition coils
What to do with the damper drive cable: remove the rubber holder from the bracket, cut the plastic clamp.
The throttle cable needs to be released
Now remove the throttle assembly according to the instructions from the previous chapter.
How to remove a plastic intake module
A wiring harness is attached to the front of the intake module. The cables go to the DPKV, DPRV (DF) sensors and to the adsorber valve. All connectors must be disconnected, then the wiring harness is removed.
We release all the pipes
The photo shows how the brake system hose is disconnected, as well as the crankcase ventilation hose. It is also necessary to remove the oil dipstick and tube by unscrewing screw 1.
Plastic part attachment points:
- Key “10” : two nuts 1;
- Key “13” : three nuts 2, two bolts 3.
All elements are shown in the photo.
Mounting the intake module
When to change the valve cover gasket?
As a rule, high-quality gaskets are installed at the factory. But over time, they can lose elasticity and harden.
Under conditions of long-term operation and high temperatures, cracks appear through which the lubricant flows.
Moreover, even with a small leak, the engine quickly becomes covered with dirt and dust.
The VAZ 2110 valve cover gasket is replaced in the following cases:
Most car enthusiasts replace the gasket at every engine oil change. This is the right decision, because you can completely eliminate the possibility of a leak.
Dismantling, basic operation
Using a 10mm wrench, unscrew the bolts on the brackets: one of them secures the injector cables, the second secures the throttle assembly wires.
Two “extra” brackets
Both brackets are removed. Using an “8” socket wrench, unscrew the 14 or 15 screws on the cover. This completes the dismantling, but the cover can be held in place with sealant.
During installation, the sealant is applied to the lower edge of the part. And the recommended screw tightening torque is 2.0-4.6 N*m.
Video.
It is recommended to replace the gaskets on the VAZ intake manifold after each removal. But I had to do this prematurely, as I discovered a significant air leak, which mainly manifested itself on a cold engine. Every cold start was accompanied by a terrible tripping.
In addition to the tripping when cold, there was a slight drop in speed when sharply pressing the gas pedal. This applies to both a cold and a hot engine.
A homemade smoke generator made from a cigarette helped me detect the air leak. A very simple and primitive contraption that has helped me out more than once.
My car (Kalina 1.6 8 valves) has a plastic intake manifold (receiver). The same will be installed on all VAZ family cars with an 8-valve 1.6-liter engine (2114, 2110, etc.). 4 rubber rings act as gaskets. According to reviews, black rings last much longer than white ones. And I was convinced of this personally - these gaskets lasted for about six months and began to let air through. They felt like plastic to the touch. Unfortunately, I didn’t find black ones, so I’ll install white ones again. I hope these last longer.
To remove the intake manifold (receiver), you must first unscrew the corrugation from the air filter, the throttle cable, and the small crankcase ventilation hoses. I will not remove the throttle and its heating.
The intake manifold is attached to 5 studs - one in the center, two on the sides. To unscrew them you will need a 13mm socket. After unscrewing the nuts, you need to remove the receiver itself from the studs and move it to the side. Remove the old gaskets and wipe the seats from oil and dirt. You also need to wipe the seat on the engine.
The manifold has special grooves for guides on the gaskets. The gaskets must be installed with the higher side in the plastic manifold. It is the guide that will prevent you from making mistakes.
I additionally coated the areas near the guides with sealant on the outside of the gasket. Because it felt like that was where the ring entered the groove the deepest. In addition, there was a place for air leaks on the old gaskets.
After all procedures, the intake manifold can be installed back. I couldn't find any information on how tightly to tighten the mounting nuts. I delayed it at my own peril and risk. The main thing is not to overtighten, as the manifold is plastic and can crack.
This is how I replaced the old intake manifold gaskets on my Kalina with new ones. There is no more air leakage, the engine stopped stalling when cold and began to behave much better when warm.
Source
How to remove the pan on a VAZ 2107
The pan is installed at the bottom of the engine under the cylinder block and acts as a reservoir for engine oil.
The tray is made of thin sheet metal and is a small bathtub. There is a drain hole at the bottom so that used engine oil can be quickly drained. The shape of the pallet may vary. It depends on the design features of the car. For example, on all-wheel drive vehicles, the front axle gearbox is installed directly under the pan. Their functioning should not interfere with each other in any way, therefore the pallet is made in such a way that it does not touch the gearbox.
In addition to the main function, the pallet also performs additional work.
During engine operation, rubbing parts release small particles of metal, which settle at the bottom of the pan, thanks to a special magnet fixed there, and do not interfere with the productive operation of the engine.
Also, at the bottom of the sump there remains unused oil, which is then sucked into the oil sump by the oil pump and supplied to the working part of the engine, while the other part of the oil ends up in the sump.
The last function of the pan can be considered to be oil level control. This is due to the fact that the oil dipstick measures the oil in the pan.
Engine sump protection
When driving on bad roads, the pallet is at risk of being exposed to external influences. These include various stones on the road and other solid bodies, the strength of which allows them to pierce the thin metal of the pallet. If there is even one hole in it, the oil will begin to leak and ultimately the engine will require very expensive repairs.
All this forced car manufacturers to produce a special protective device for the pan. It is made of thin sheet metal and installed under the pallet. Fastening is carried out to the car body using bolts. The principle of operation is to absorb the impact energy of any obstacle and prevent damage to the pallet.
During the long-term operation of vehicles and after acquiring the necessary experience, the following requirements began to be imposed on engine protection:
1. Stiffness. Deformation of the metal sheet should only occur in the place where the pallet is located. In addition, the protection must have a mandatory slope, which in the event of a car collision will lead the engine not into the passenger compartment, but under the car.
2. Durability . The metal sheet of protection should have as few holes as possible, otherwise such a structure will poorly withstand the energy of an impact on an obstacle.
3. Weight and dimensions . The weight of the protection should not exceed 15 kilograms, otherwise it will create additional load on the front of the car. The dimensions, in turn, should allow maintaining the vehicle's ground clearance. Protection that is too large and low will “catch” almost all the unevenness of the road surface.
Pan protection is not installed on all cars, but drivers install the protection themselves immediately after purchasing a car. For this purpose, the factory provides special mounting holes.
Types of engine protection
Depending on the material used to make the protection, there are several types of engine sump protection.
- Structural steel . It is the most excellent option for any car, which is achieved by the presence of stiffeners. In addition, the steel from which such protection is made has good elasticity, which allows it to return to its original shape after deformation.
- Aluminum . Unlike steel, aluminum protection does not have stiffening ribs stamped on it, but this does not prevent it from being a worthy competitor to steel, the weight of which is much higher than that of aluminum. Aluminum protection is quite expensive.
- Plastic . Usually, it is made of carbon, Kevlar, carbon fiber, etc. It has a fairly low weight, but is significantly inferior in strength, since it usually crumbles upon impact.
This is interesting: Do-it-yourself Dodge Caravan car repair
PAD
Objectively speaking, this part is not the most significant element at all; it does not affect the performance of the engine or any other technical parameters. However, when the gasket fails and starts leaking, it can cause some trouble.
The main sign of caring for your car is a clean and dry engine, which is reflected in the condition of all kinds of gaskets, seals and seals.
Thus, a good valve cover gasket is the key to a clean and well-maintained engine.
The valve covers can be seen immediately after opening the hood. Some car enthusiasts specially paint it and the air cleaner housing in some bright color.
This part itself is needed to close the gas distribution mechanism; it has a neck for changing the oil in the engine. This neck is attached to the cover itself using several bolts. Between the neck and the lid is the part that interests us.
Note: the gasket is made from a special composition, the main component of which is rubber. In this case, all properties are preserved when exposed to high or low temperatures. In addition, the composition does not interact with motor oil.
However, over time, the part loses its elasticity and becomes hard. Then microcracks appear through which oil leaks.
Even small leaks lead to the engine becoming covered in dirt, which is very difficult to clean.
WHEN IS REPLACEMENT REQUIRED?
Some may want to know exactly how often they should be replaced. It must be said that such a procedure should be quite commonplace for a car enthusiast, especially in cases where the car is actively used.
The VAZ 2110 valve cover gasket needs to be changed in the following cases:
Some drivers prefer to carry out the change every time they change the engine oil. These actions are completely rational, because in this case, oil leakage will be completely eliminated. When opening the cover, the car enthusiast inspects the timing parts to prevent wear or damage.
Often parts are replaced in a garage. You can quickly change the gasket yourself; all you need is your desire and some tools. In addition, you need to acquire consumables, including: a new gasket, a degreaser such as gasoline, thinner or anti-silicone, and a good high-temperature engine sealant.
REPLACEMENT PROCESS
Pulling out the old gasket is quite easy:
Note: if the cover is burdened with additional devices, for example, attachments, they are also dismantled. You can immediately discard the old gasket.