› Logbook › 059: Replacing the valve cover gasket, cleaning the lid and oil separator
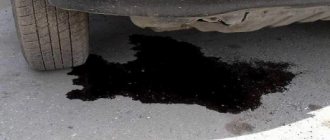
So, there was no special testimony to the substitution, so, sometimes, it sweated with oil) But not what would have run there or something else) It was also interesting to look at the condition of the oil separator, well, in general on the lid from the inside))
We went with the family to the parents in the village and there it was decided to carry out this procedure))
Already some time ago the valve cover was ordered and waited for its hour:
Elring (number in the catalog: 559431) Price: 40 rub.
Also bought in any case in the local store a spare pad (the declared production of Balakovo). The price: 70r.
In the photo below there are visible differences))
If the Elring gasket was flat, then Balakovskaya all some kind of a mowing, in extra pieces of rubber))
Acquired sealant with copper DoneDeal, red. Price: 195 RUR. There was still a sealant ABRO white, cheaper, but I did not take it))
Also I picked up new mushrooms. The price: 35r. thing.
So, what I did)) Opened the throttle and pulled out the gas cable, then unscrewed the two bolts by 10, which fastened the bracket of the gas cable to the receiver.
Then in the photo at number 1, removed the branch pipes of the crankcase gas in the amount of 3 pieces) Under number 2, a key for 10 turned the bolts, along the edges of the valve cover, and also pulled out rubber mushrooms)
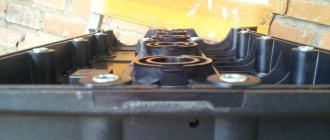
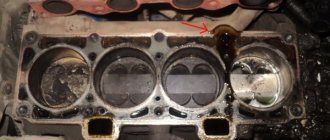
I took it off … and … was horrified by the infernal nagara))) There already was a bush (( Below is a photo)
He turned the two bolts to 10, which secure the cover of the oil separator.
Setochka oil separator is crammed with vlahm)) Of course it will poddavlivat oil from under the pads!)
I wanted to buy kerosene, but my father-in-law had a bucket of carpentry) In it I soaked and washed for a long and tedious whole 3 hours, a hard metal brush, then a metal sponge))
All this was long and tedious, and I wiped my hands in the blood))
I also tried using a carburetor cleaner, but the solarol was better)))
Then I dialed a basin of warm water and poured in a lot of faerie))
Left a little soaking, then washed with clean water and left to dry))
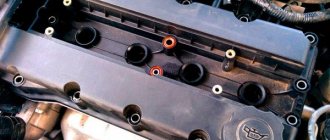
Next, the photo result, yes, I agree, it's not perfect, but the Nagar in the corners was cleaned out simply unreal)) Scored and left so)) It's better than it was in the beginning))
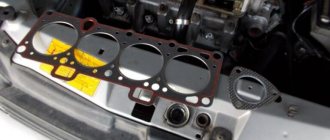
It was possible to proceed with the replacement of the gasket)
Thoroughly wiped and then degreased the solvent cover itself, installation place and gasket.
In the corners smeared a little sealant, the photo shows exactly where.
Then I smeared it on the block in the corners and carefully set it with my father-in-law. It is advisable to have an assistant, I myself would probably have folded from the 10th, since the gasket is always trying to get here, then get out there)))
He put new fungi and tightened the bolts properly.
Put all the nipples and gas cable back.
Started, worked, paid off. There were no floods.
ATTENTION! The next morning I extended the bolts for almost a whole turn! They tend to sit down a little, so do not forget to pull them out a few more days))
The next day we went back to the city 150 km along the road, then another 2 days in a row I did not regret the car and cut it to the cutting off)) As a result, there were no streaks, nothing sweats anywhere) ) I'll watch further))
Most interesting, the oil changed almost 800 km ago, on the dipstick all this time it was clean, and only after I covered the lid with the oil separator, the oil immediately turned black… Hmm, why would this))
How repairs are made
To replace the seals yourself, you must have:
- a device for dismantling the oil seal;
- device for removing crackers;
- tweezers;
- two flat screwdrivers;
- hammer;
- spanners;
- socket heads;
- ratchet;
- rags;
- soft metal rod (no more than 8 mm);
- pliers;
- new seals;
- press-fit mandrel for new seals.
Replacement instructions:
- First, the hood is opened and the terminal with a minus sign is disconnected from the battery.
- Then the high-voltage wires are removed and the spark plugs are unscrewed.
- The timing belt is removed, the GB head cover and the camshaft toothed pulley are removed. At the same time, it is necessary to monitor the key so as not to lose it.
- Next, unscrew the back cover fasteners so as not to damage the block gasket and other connections.
- Now you need to remove the camshaft, leaving only the bushing.
- Then the crankshaft must be turned until the piston stops at the TDC position, where the seal must be replaced. Note: to prevent the valve from falling into the cylinder, it is necessary to unscrew the spark plug and insert a rod made of material that will not damage the thread (for example, tin) into the connector.
- By squeezing the valve spring, the crackers can be easily removed with tweezers. The upper and lower plates are also disconnected. Then the cap is removed from the guide sleeve, a collet is installed on it, and the oil scraper cap is pressed out with a quick and precise blow of a hammer. Next, everything must be repeated with the second valve.
- New oil seals (the inside of which must be lubricated with engine oil in advance) are inserted into the frame and then pressed into place. And then you can mount springs and plates. The crackers must be inserted into the lower groove of the valve using a special device. The crankshaft is then rotated until there are two cylinders at TDC. The rod is removed from the spark plug hole and inserted into the next socket. All work is repeated exclusively in the order in which the parts were removed.
- The camshaft supports, as well as washers, adjusting tappets, journals and cams must be lubricated with oil. Note: before installing the support seal, it is recommended to check its technical condition.
- If necessary, the gap between the valves is adjusted.
- Finally, the terminals are connected to the battery and the engine is started. If the work and installation are done correctly, the motor will run smoothly and without unnecessary noise.
The bottom line can be summed up as follows: take care of your car, check it in a timely manner in order to track all faults in time and eliminate them, and it will serve you for a long time.
Why do you need a gasket?
It is clear that without such a gasket the car will work as before. But you need to understand that it plays a certain role, even if it does not affect the technical features of the car. It is important that when a leak occurs, a number of serious problems can arise.
The gasket has a certain service life. It must be promptly replaced as it wears out.
If we consider the main task of this part, then it is worth saying that it is to ensure the tightness of the connection. In order for the connection between the valve cover and the engine part to be tight, a gasket is needed. You don’t need any special skills to find the cap, because it has a neck for filling engine oil.
Replacing the valve cover gasket
1. First you need to loosen the adjusting nut of the throttle cable 2. Then slide the rubber bushing of the cable and completely unscrew the cable lock nut 3. Remove the cable from the bracket 4. Using a 10mm wrench, unscrew the two nuts securing the bracket to the receiver (this is for the VAZ-2111 engine) 5. Remove it. 6. Using a Phillips screwdriver, loosen the clamps of the two crankcase ventilation outlet hoses and remove the hoses from the valve cover.
7. Use a Phillips screwdriver to loosen the clamp of the crankcase ventilation supply hose and remove it.
8. Using a 10mm wrench, unscrew the two nuts securing the valve cover.
9. Remove the valve cover from the studs. If there are parts of the gasket left on it, remove them with a sharp blade and degrease its seat.
10. Rubber sealing bushings (“Soldiers”) are installed in the holes of the cover. It's better if you replace them.
11. Remove the valve cover gasket.
About a year ago I went to adjust the valves, and not just anywhere, but to the VAZ branded station in Mogilev (Berezina-Lada) - don’t consider this an advertisement, but vice versa. So: there a handy mechanic adjusted them for me, they took a lot of money for this job (about $50) and I left. But they were lucky that I managed to drive a little far, because... smoke started coming out from under the hood(((. When I opened the hood, everything was splattered with oil. This handyman installed the gasket poorly. I had to finish everything on the spot for him. Everything seemed to be going fine, but there was a little oil pressure. And since I plan to wash the engine , I decided to get rid of even the hint of a leak from under the cover. And so off we go))) Remove the valve cover:
By the way, I wrote that I use Lukoil oil, in this article I described all the pros and cons of Lukoil oil. Now we look under the valve cover - everything is fine. Let's look at the cover itself:
None
Full size washed drain
Let's look at the color of gasoline:
None
Full size of this sealant
Spread it well on the valve cover, which has been wiped free of oil: Take a silicone gasket:
Full size silicone gasket
insert it into the lid and coat it in the same way:
We will apply the full size onto the gasket
And now we take the pre-purchased elongated studs (we unscrew the old ones with a 13 key, tighten the new ones):
None
Full size, cap in place) The only thing: I didn’t start it right away, but let it sit (as the instructions say). We check everything the next day - everything is dry all around))) Still, you do it yourself longer but with better quality))) At the prices it turned out: gasket 70 Russian rubles, sealant 40,000 Belarusian rubles (130 Russian rubles) studs 2 pieces, 30 Russian rubles TOTAL 260 Russian rubles And finally: today we again got into the TOP Mogilev and immediately took 84th place)))
Full size YAY! We are at the TOP)))
GOOD TO EVERYONE! Issue price: 260 ₽.
- Remove the decorative trim from engine 11183 (1.6i)
- We disconnect the drive cable from the throttle valve and, together with the mounting bracket, move it towards the radiator
- Using a Phillips screwdriver, loosen the clamps securing the three hoses of the crankcase ventilation system. Remove the hoses from the cylinder head cover pipes.
- Using a 10 mm socket wrench, unscrew the two nuts securing the cylinder head cover
- Remove the washer and rubber bushing from both studs.
- Remove the cover.
- Remove the gasket from the cover.
- Unscrew the oil filler plug.
- Using a 10 mm socket wrench, unscrew the two bolts securing the oil separator housing.
- We remove the body.
- Remove the oil separator screens.
- We wash the removed parts in kerosene, wipe with a rag and blow with compressed air (from a tire pump).
- We assemble the oil separator in reverse order.
We remove any remaining oil from the mating surface of the cylinder head, to which the cover gasket is pressed. Place a new gasket in the cover
When installing, please note that the radii on the right and left sides of the cover are different. Make sure the gasket is installed correctly. Apply a thin layer of Loctite-574 sealant or similar to the corners of the gasket. Install the cylinder head cover in the reverse order of removal.
- www.drive2.ru
- xn—-8sbapc1bfiir0a.xn--p1ai
- www.drive2.ru
- remont2114.club
Design features of the engine on the VAZ-2114
Valve cover gasket replacement process
Before moving directly to the process, you need to know some structural elements of the VAZ-2114 engine.
The valve cover gasket is located directly under the cover itself and this can be clearly seen in the diagram below.
So, first, let's look at what the engine consists of:
Diagram of internal combustion engine components
| № | Detail number | Part name |
| 1 | 2108-1003298 | screw |
| 2 | 2108-1003278-01 | Washer |
| 3 | 2108-1003277-01 | Sleeve |
| 3 | 2108-1003277-02 | Sleeve |
| 4 | 2108-1003274 | Cover pin |
| 5 | 2111-1003260 | Cylinder head cover |
| 6 | 2108-1003271 | Bolt M12x1.25x135 |
| 7 | 2108-1003265 | Washer |
| 8 | 14328201 | Plug 10 cup |
| 9 | 14329101 | Plug 30 cup |
| 10 | 1118-1003011 | Cylinder head |
| 11 | 2101-1002042 | Sleeve |
| 12 | 14329201 | Plug 36 cup |
| 13 | 10158601 | Plug 16 spherical |
| 14 | 11183-1002011-10 | Cylinder block |
| 15 | 14234330 | Bolt M10x1.25x65 |
| 16 | 2108-1003284-10 | Ring sealing |
| 17 | 2111-1003284 | Ring sealing |
| 18 | 2111-1003286 | Bolt |
| 19 | 2111-1003288-10 | Stub |
| 20 | 10725911 | Nut M6 low |
| 21 | 11197773 | Conical spring washer 6 |
| 22 | 13541221 | Hairpin M6x22 |
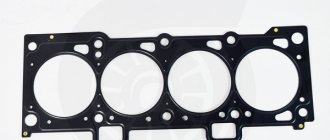
| 23 | 2108-1003270-10 | Cover gasket |
| 23 | 2108-1003270-11 | Cylinder head cover gasket |
| 24 | 21083-1003020-10 | Head gasket |
| 24 | 21083-1003020-11 | Head gasket |
| 25 | 2112-3855020 | Knock sensor |
| 25 | 2112-3855020-01 | Knock sensor |
| 25 | 2112-3855020-02 | Knock sensor |
| 25 | 2112-3855020-03 | Knock sensor |
| 26 | 2101-1002040 | Sleeve |
Now that all the elements are known, you can proceed directly to the replacement process.
Valve cover replacement process
Valve cover removed from a VAZ-2114 engine
So, in order to replace the valve cover gasket on a car, you will need certain tools. What exactly is needed? Let's consider this question: a ratchet with an extension, a 10-mm socket, a screwdriver with a Phillips head.
Now that everything is ready, we buy a new gasket from the list recommended below and we can get to work.
Don't forget about the new sealant.
Let's consider the sequential stage of performing replacement operations:
- Loosen the clamps and remove the hoses shown below.
Shows which hoses need to be removed
Remove the locking plate and dismantle the throttle cable
The process of dismantling the accelerator cable bracket
Unscrew the valve cover mounting bolts
When the nuts are unscrewed, it is necessary to remove the seals
Place the gasket on the sealant
Gasket selection
The choice of gasket must be approached carefully. Thus, a low-quality rubber product must have good chemical and technical-physical properties. So, let's consider possible options for purchasing a valve cover gasket for a VAZ-2114.
Self-replacement - what needs to be taken into account?
The replacement process is considered quite simple, but you need to understand that it is not always possible to carry out the work smoothly.
That is why when carrying out work you should follow simple tips that will help you avoid mistakes:
- When removing the lid, you should wash it in turpentine.
- The optimal solution would be to use high-quality gaskets.
- All parts used must be clean; when carrying out work, experts advise wiping the edges of parts to remove any existing oil.
- During installation, you can use a sealant; it is applied to the joints.
- After the replacement is completed, you need to check the oil level.
- To check the system, you need to start the car; carry out a second inspection after making the first trip.
- The groove under the gasket should be cleaned as thoroughly as possible.
Typical mistakes of car enthusiasts who undertake to change the valve gasket themselves
Often, when performing this manipulation using artisanal methods, it is not only impossible to stop the flow of oil, on the contrary, it even intensifies. The following errors are to blame:
- Using a gasket of insufficient quality.
- Using a sealant that has lost its quality characteristics.
- Uneven application of force when tightening the bolts that hold the cover in place, which led to its distortion.
Entrust your car to the specialists from and they will do everything at the highest quality level.
Cylinder head cover for engines 2112 and 21124 (16v) - removal and installation
The work is shown on the 21124 engine. Features of removing the cylinder head cover from the 2112 cm engine are in the text.
To complete the work you will need a 10 mm wrench,
8 mm
socket wrench 1. We prepare the car for work (see “Preparing the car for maintenance and repair”).
2. Remove the air filter (see “Air filter - removal and installation”).
3. Remove the decorative trim of the engine (see “Decorative trim of the engine - removal and installation”).
4. On engine 21124
remove the ignition coils (see “Ignition coils of engine 21124 (1.6i 16V) - check and replacement”),
on engine 2112
remove the ignition module (see “Ignition module of engine 2112 (1.5i 16V) - check and replacement”) .
5. Remove the intake pipe on engine 21124
(see “Intake pipe of engine 21124 (1.6i 16V) - removal and installation, replacement of o-rings”),
on engine 2112
we remove the receiver (see “Receiver of engine 2112 (1.5i 16V) - removal and installation”) and disconnect the crankcase ventilation hose from the cover pipe.
6. 10 mm
Unscrew the fastening bolt and remove the injector wiring harness block bracket from the cylinder head cover.
7. 10 mm
Unscrew the fastening bolt and remove the mounting bracket for the wiring harness of the throttle position sensor and idle air control from the cylinder head cover.
8 mm socket wrench
unscrew the 15 bolts securing the cylinder head cover.
9. Remove the cover.
10. 8 mm
Unscrew the six bolts securing the oil deflector.
11. Using a slotted screwdriver, press out the clamps of the oil filler neck.
12. Remove the oil deflector from the cylinder head cover.
13. Rocking from side to side, remove the oil filler neck.
1. Assemble the cylinder head cover in the reverse order.
2. Apply a thin layer of heat-resistant sealant “Loctite” No. 574 or similar to the mating surfaces of the bearing housing in accordance with the diagram shown in the photograph.
When repairing an engine, do not use sealant with a high content of silicone (silicon compounds), the vapors of which can get through the crankcase ventilation system into the cylinders and then into the exhaust tract. You should use a sealant that specifically states on the packaging that it is safe for the oxygen concentration sensor.
3. Reinstall the cover. We tighten the cover fastening bolts in the direction from the middle to the edges.
Source
What do you need to know about the motor?
Before the valve cover of the VAZ 2114 is removed and the gasket is replaced, it is worth talking about the features of the engine. If you don’t know anything about design features, then the best solution would be to turn to specialists. Remember that to carry out such work you will need a certain tool.
| № | Detail number | Part name |
| 1 | 2108-1003298 | screw |
| 2 | 2108-1003278-01 | Washer |
| 3 | 2108-1003277-01 | Sleeve |
| 3 | 2108-1003277-02 | Sleeve |
| 4 | 2108-1003274 | Cover pin |
| 5 | 2111-1003260 | Cylinder head cover |
| 6 | 2108-1003271 | Bolt M12x1.25x135 |
| 7 | 2108-1003265 | Washer |
| 8 | 14328201 | Plug 10 cup |
| 9 | 14329101 | Plug 30 cup |
| 10 | 1118-1003011 | Cylinder head |
| 11 | 2101-1002042 | Sleeve |
| 12 | 14329201 | Plug 36 cup |
| 13 | 10158601 | Plug 16 spherical |
| 14 | 11183-1002011-10 | Cylinder block |
| 15 | 14234330 | Bolt M10x1.25x65 |
| 16 | 2108-1003284-10 | Ring sealing |
| 17 | 2111-1003284 | Ring sealing |
| 18 | 2111-1003286 | Bolt |
| 19 | 2111-1003288-10 | Stub |
| 20 | 10725911 | Nut M6 low |
| 21 | 11197773 | Conical spring washer 6 |
| 22 | 13541221 | Hairpin M6x22 |
| 23 | 2108-1003270-10 | Cover gasket |
| 23 | 2108-1003270-11 | Cylinder head cover gasket |
| 24 | 21083-1003020-10 | Head gasket |
| 24 | 21083-1003020-11 | Head gasket |
| 25 | 2112-3855020 | Knock sensor |
| 25 | 2112-3855020-01 | Knock sensor |
| 25 | 2112-3855020-02 | Knock sensor |
| 25 | 2112-3855020-03 | Knock sensor |
| 26 | 2101-1002040 | Sleeve |
In particular, a car enthusiast needs to have on hand the following details:
- ratchet with extension;
- head at 10;
- screwdriver with Phillips head.
Replacing valve stem seals - pro tips
I decided to replace the valve stem seals, the reason was the spark plugs, or rather their condition, and recently there was smoke when starting up when cold and too much oil.
As they say: the eyes are afraid, but the hands do)))
As it turned out later, the cause of the plaque on the fourth spark plug was the caps falling off, both of them.
Prepared the tool
An approximate list of what is needed.
Unscrew and disconnect everything that gets in the way, remove the valve cover.
We remove the camshaft pulley, two housings, and the camshaft itself.
We remove oil and dirt.
We provide access to the crankshaft pulley and set the top dead center of cylinders 1 and 4.
We fix the valve we need with tin.
TRIALLI valve stem seal set from old stock.
Bushings for putting on, so as not to damage the grooves of the cracker. You need to remove the spring from the seals and dip them in oil.
We change the seals on cylinders 1 and 4.
We put on the bushings and the seals themselves.
We press in the bushing and put on the springs.
We put the pushers and adjusting washers in their place, the main thing is not to mix them up.
We turn the crankshaft and do the same with the 2nd and 3rd cylinders.
Lubricate all rubbing elements with oil.
At the same time I changed the camshaft seal, just in case)))
We install the camshaft, the cams of the first cylinder should point to the sides, put on the oil seal and apply sealant to the corners.
On the other hand, it also needs to be lubricated with sealants.
We install a new lid ring, lubricating it with sealants.
We install the camshaft housings, rear cover and pulley, not forgetting the key.
We catch the mark on the flywheel
Place a mark on the pulley, put on and tension the belt
To put your mind at ease, you can check the gaps)
We collect and connect everything necessary to start the engine, then we try envy.
If all is good.
We install and screw everything else... and that's it)))
On cylinder 4, both caps fell off, on the rest, the exhaust caps were removed by hand, and the intake caps were removed with a puller; all caps were hard.
After the replacement, there were already a couple of morning starts and I didn’t notice any smoke like before), I also unscrewed the spark plugs and everything was fine too. In general, everything seems to be good, I think time will tell.
Analogues (manufacturers)
Valve cover gasket made by Goetze
Of course, the manufacturer and many automotive experts recommend installing the original valve cover gasket, but, as practice shows, substitutes are often of higher quality and have a much longer service life.
So, let's look at which analogues of the original part are recommended for installation on a car:
| Manufacturer's name | Catalog number | Cost in rubles |
| Glaser | X08964-00 | 300 |
| Goetze | 50-025881-00 | 750 |
| Ajusa | 56021200 | 1000 |
| Trialli | GZ 101 7022 | 1500 |
As you can see, the cost of alternative gaskets is quite high, but as practice has shown, the service life of the parts is twice as long as the original.
Valve cover gasket made by Elring
breather VAZ 2112 16 valves - hello. thank you very much. I have a VAZ 2112 - 22 answers
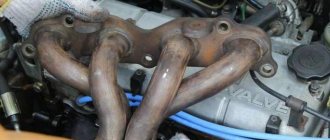
In the Service, Maintenance, Tuning section, hello to the question. thank you very much. I have a VAZ 2112 asked by the author Ask for the best answer It may have overheated and the rings are stuck.
Reply from 22 replies Hello! Here is a selection of topics with answers to your question: Hello. thank you very much. I have a VAZ 2112 Reply from Alexander Sudorgin overfilled the oil Reply from Eurovision On the upper plane of the head, the valve drive parts are fixed, which are covered with a lid with a cap. A breather is mounted on the cap. It communicates the crankcase cavity with the atmosphere. The breather is necessary to prevent oil from being squeezed out through the crankcase seals by gases penetrating from the cylinders. Air and gases that have escaped from the cylinders into the crankcase come out through the breather. If, after stopping the engine, the pressure of the cooled air in it becomes below atmospheric pressure, the air enters the crankcase from the outside through the breather. Wire packing soaked in oil cleans the air of dust. In some engines, the breather is located on the side wall of the block (from the side of the rod chamber) or in the neck cover for pouring oil into the crankcase. Most car engines have forced crankcase ventilation. A pan is attached to the bottom plane of the crankcase, which serves as a reservoir. In general, check the oil level)) Answer from Ashera? Is this when they started installing the Priora engine on the VAZ 2112? 16 valves does not mean at all that it is a Priora one. And how did you notice this oil? The breather drives gases into the spider and not into the air vents. There are 2 breathers. Which one does it drive from? Most likely, the partition between the rings on one cylinder has burst. Answer from Theosophy: Check the crankcase ventilation system, there should be a primitive oil separator, so check it first of all with engine diagrams on the Internet, so start by studying the hardware.
The engine crankcase ventilation system 2111 of VAZ 2108, 2109, 21099 cars with fuel injection is designed to effectively remove gases from its crankcase and burn them in the combustion chambers. As a result, the emission of harmful substances into the atmosphere is reduced.
Design of the crankcase ventilation system for engine 2111 (diagram)
1. Engine crankcase.
3. Hose from the breather to the valve cover pipe.
4. Oil separator under the valve cover.
5. A thin hose from the valve cover to the fitting with the throttle body nozzle.
6. Fitting with a jet on the throttle valve block.
7. Thick hose from the valve cover to the inlet pipe.
Operating procedure for the 2111 engine ventilation system
— At idle, with the throttle valve closed, crankcase gases under high vacuum are sucked through the breather and its hose under the valve cover to the oil separator. Further, under the influence of the same vacuum, through a thin hose from the valve cover to the fitting with the nozzle into the throttle assembly, under the throttle valve and further into the combustion chambers (small branch). The jet limits the amount of crankcase gases entering at idle, as normal operation in this mode may be disrupted.
— In operating and power modes, when the throttle valve is slightly open and more efficient crankcase ventilation is required, crankcase gases also flow through the breather, its hose, to the oil separator under the engine valve cover. And then they are sucked through a thick hose from the valve cover into the intake pipe to the throttle body (large branch). Crankcase gases practically do not flow through a thin hose, since when the throttle valve is open, the vacuum behind it drops significantly.
Engine crankcase ventilation system malfunctions 2111
— The main and most common malfunction of the ventilation system is clogging. A clogged crankcase ventilation system can lead to negative consequences in the operation of the car engine. The hoses or oil separator or jet in the throttle assembly may become clogged.
The consequences may be the following:
— violation of the normal operation of the engine at idle (increasing the idle speed control steps more than normal - the speed increases);
— engine oil leaking from under the engine seals (as excess pressure is created in the crankcase);
— oil contamination of the engine air filter and, accordingly, a drop in power plus an increase in fuel appetite;
— contamination of the engine itself with tar deposits.
If, while operating a LADA car, you notice that during load (when the air conditioner is running, the heating is on, etc.) in a traffic jam, the engine begins to operate unstably (troits, pulls poorly, etc.), perhaps the reason lies in the ventilation system crankcase The article proposes to solve the problem by installing a PCV valve from a foreign car.
Brief information
The valves have a simple design and are highly wear-resistant. The latter is due to the manufacturing material, which must withstand increased loads.
The valve itself consists of several sections:
- plates (lower expanded part of the part);
- rod (the upper narrow part of the part, going from the plate upward);
- chamfers (the place where the plate adheres to the cylinder block);
- plate edges;
- the end of the rod (its upper part located above the groove);
- recesses for crackers (small groove under the end).
The contact point between the plate and the cylinder head is called the seat. It is made of steel or cast iron and pressed into the cylinder head.
According to their purpose, valves are of two types:
Inlet
Responsible for supplying the air-fuel mixture to the cylinder-piston system. They have a solid rod and, usually, a larger diameter plate to improve working properties.
High school graduation
Responsible for the removal of exhaust gases during the operation of the internal combustion engine. The stem of this type of valve is made hollow; Sodium is placed inside it. This design allows the exhaust valve to be cooled, since it is subject to higher heat than the intake valve. For its production, heat-resistant metal is necessarily used.
Why is there a need to replace valves?
Under normal operating conditions, valves may need to be replaced due to wear. This happens after about 300 thousand km.
There are usually two reasons for the need for unscheduled replacement: burnout and deformation.
Premature burnout can happen due to:
- constant driving at the highest possible speed and, as a result, a knocking engine;
- frequent refueling with low-quality fuel;
- incorrectly adjusted gap (the gap is too small and the heat dissipation is impaired);
- inappropriate number of spark plugs, etc.
The valve becomes deformed when the timing chain breaks or when it moves several links (this happens when the tension is poor). As a result, the rod bends, which leads to a loose fit of the plate to the seat.
Cylinder head repair
We mark all hydraulic compensators with numbers using an ordinary clerical touch and put them away. An ordinary magnet will help you pull them out. We dry out the valves and remove the oil seals (valve seals), the valves into scrap metal, the oil seals into the trash. We clean all channels. We take the head for grinding, just in case. After washing it again with kerosene after sanding and blowing it with air, we begin to assemble it.
We arrange the freshly purchased valves in the sequence in which they will stand in the cylinder head and begin to grind in one by one. Lubricate the valve stem with clean oil and apply lapping paste to the edge.
We insert the valve into place and put a valve grinding tool on the valve stem. The stores sell a device for manual lapping, but since this is the twenty-first century, we are mechanizing the process. We take the old valve and cut off the rod from it, select a rubber tube for it of such a diameter that it fits tightly. The rod is in a reversible drill, one end of the tube is on it, the other is on the valve being ground in. At low speeds we begin to grind the valve, constantly change the direction of rotation and periodically press it to the seat or weaken the force. On average, the valve takes about twenty seconds. We take it out and wipe it. The valve is considered ground in if a uniform gray strip of at least 1.5 mm wide appears on the chamfer.
The same stripe should appear on the valve seat.
Valve stem seals
While adjusting the valves, it is quite possible that you had no idea that you were next to another very important element of the gas distribution mechanism - the valve stem seals.
Oil scraper seals are located on the valve stems of the gas distribution mechanism
Purpose of valve stem seals
While the engine is running, the camshaft, rocker arms, valve springs and valve tops operate in an oil mist. Oil is deposited on all parts and mechanisms located under the valve cover. Naturally, it also ends up on the top of the valves, called stems.
Under the influence of gravity, the oil will tend to flow into the combustion chamber. As you know, it shouldn't be there. Oil seals are designed to prevent oil from flowing down the valve stem into the engine combustion chamber.
Engine malfunctions associated with worn caps
The sole purpose of the oil seal is to prevent oil from draining into the engine combustion chamber. Over time, the rubber of this element loses its functions and is destroyed under the influence of an aggressive environment. This leads to the penetration of oil into the air-fuel mixture, where it burns successfully.
A working engine should have oil consumption of about 0.2 - 0.3 liters per 10 thousand kilometers. With worn valve stem seals, it can reach one liter per thousand kilometers.
Oil burning in the cylinders:
- clogs and destroys catalytic converters and particulate filters (devices that reduce the content of harmful substances in exhaust gases), which themselves are very expensive;
- causes overheating and premature failure of engine exhaust valves;
- greatly increases exhaust smoke;
- increases the risk of engine oil starvation due to lack of oil.
The service life of valve stem seals on domestic cars fluctuates around 80 thousand kilometers. This parameter very much depends on the quality of the caps themselves and the oil used.
What components are best to use?
Today, the greatest trust among car enthusiasts and mechanics is in the products of such well-known brands as Corteco and Elring - these brands have proven themselves to be the best in the production of gaskets, oil seals, seals, and valve stem seals.
There are products from domestic manufacturers on the market. Their quality varies greatly, but nevertheless does not reach the quality of the products of leading companies.
How to change valve stem seals
The topic of replacing valve stem seals is extensive and worthy of a separate article. Briefly it is done like this.
- Remove the valve cover.
- Remove the camshaft sprocket.
To remove the camshaft sprocket, you need to unscrew the bolt holding it with a lock washer.
- Remove the camshaft from its beds.
To remove the camshaft, you need to unscrew the bolts securing its bearing housing
- Support the valves with a tin rod through the spark plug well.
To prevent the valves from falling down, they need to be supported with a tin rod.
- Dry the valve.
Squeeze the valve spring and remove the crackers from the groove.
- Replace the oil seal.
The old oil seal can be removed using two screwdrivers.
How to properly remove valves
Before you begin, you need to prepare the appropriate tool. In particular, to replace you will need:
- Set of socket and open-end wrenches.
- Torque wrench.
- Spare parts for replacement (new set of valves, gaskets if oil seals need to be replaced, etc.)
- Container for draining antifreeze.
Initially, the machine must be de-energized. This is done by removing the negative terminal from the battery; the next step is to free the cooling system from antifreeze. Drain the coolant into a specially prepared container; releasing pressure in the fuel system. To do this, you need to unscrew the fuel hose fittings. To do this you will need a 17 key; disconnecting the exhaust pipe from the exhaust manifold and dismantling the thermostat; retraction to the side of the bracket. It is held on by several nuts that will need to be unscrewed; removing the cylinder head along with bearings and fuel rail; desiccation. When dismantling the crackers, you must be extremely careful, since they are under high tension on the springs. Therefore, they can simply “shoot” at you; dismantling the valve plate along with the springs
Please note that removing the lower plates may require removing the seal and this also requires a special tool
That's all, actually. The procedure is completed, and then you can begin repair and maintenance work. If you intend to change valves, do not rush to install new ones. Inspect them carefully, because it is quite possible that you will be able to restore them, and they will still serve. At the same time, as a rule, restoration is more often practiced on old cars; on a VAZ-2112 this is not always possible. The reason for this is the quality of old parts, which is considered higher than the current one.
If you do intend to restore a damaged part, it is best to mark the cylinder on which it sat. You should also evaluate the condition of the device guide bushings. After an initial assessment of the condition has been made, repair or maintenance can begin.
Hello) A little about my VAZ 2105 with 16 cells. two-wheel engine. I bought it from a friend with the engine already installed, freshly painted, on 15 chrome wheels. After two years of daily rape of the car, and the final drive into a ditch (I gave it to a friend for a ride(()) with the tearing out of the beam, the car was up for repairs.
Full size before major overhaul I always didn’t like the constant leaking oil from under the oil filler cap and the burning zero filter located above the exhaust manifold. I was surfing the Internet and came across a flat valve cover from Clubturbo.
There on the website they immediately recommended buying an external oil separator as a kit, because... on a standard engine it is located in the cover itself.
Full size External oil separator
Full sizePurchased almost everything you need
Full size We assembled it and started to figure out what the cover, receiver and oil separator would look like
Full size The cover bolts had to be filed
Initially we decided to leave the oil separator here. But. For front-wheel drive cars this might be suitable, but in 16 cl.
the classics would not have come close to it.
Skipping many details of the installation description, here is a photo of what happened. The oil separator is installed on the body, an additional oil sump is installed. The flat valve cover of the clubturbo is poorly made, leaks along the weld seams ((at first I was guilty of a bad gasket between the oil filler nut, but nothing. An oil pressure sensor from the classics was installed. The ignition module was moved to the receiver (they used clamps, I don’t know where to place it) after the previous one failed due to overheating
Full size This is how I ride now. This is my first post, so I apologize in advance if anything is wrong)
Source
How to replace?
Domestic cars are not perfect; over time, you may notice that oil is leaking from under the gasket. In this case, it is simply necessary to make a replacement. Of course, you can try to tighten the bolts more tightly, but this is unlikely to help solve the problem. If you are wondering how to change the valve cover gasket on a VAZ 2114, then you should proceed sequentially. Anyone can cope with such a task as replacing the valve cover gasket 2114.
The sequence of your actions should be as follows:
- First you need to loosen the clamps and disconnect the hoses.
- You will see two nuts that will also need to be unscrewed and removed, as well as the rubber bands that are used for the seal.
When the cover is removed, it is worth cleaning the oil separator screens. This manipulation can be done by unscrewing the bolt and removing the cover.
Removing and disassembling cylinder covers.
First remove the high pressure pipes (to the injector), the valve box, the drive rods and the exhaust and intake manifold pipes. After this, the cylinder covers are evenly loosened and then the stud nuts are unscrewed. In order to protect them and the crankshaft from damage, safety shields are placed on the cylinder liners. When disassembling the covers and lever mechanism, the parts are not disassembled unless they require replacement. If wear exceeds the permissible value, the valve guides, lever heads and sockets (11D45) are pressed out of the cylinder cover.