Valve cover sealant operates in high temperature environments and also in contact with oil. Therefore, the choice of one or another product should be based on the fact that the sealant should not lose its performance properties in difficult conditions.
There are four main types of sealants - aerobic, hardening, soft and specialty. The latter type is best suited as a valve cover sealant. As for color, in most cases this is only a marketing ploy, since products with similar characteristics from different manufacturers may have similar colors, while differing in operation.
Review of sealants by popularity
Knowing the most popular sealants for the valve cover, you don’t have to worry about choosing and buy a quality one. Remember that such a trifle affects the tightness of the internal combustion engine. Usually, drivers who have used very bad or very good products leave reviews.
So, what are the best valve cover sealants:
DoneDeal
ABRO 11-AB
ABRO 11-AB (ABRO 11 AB) - this sealant has good qualities and is not a high price. Just like the previous option, it has a wide range of applications for car repairs.
Characteristics of ABRO 11 AB:
There is a Chinese analogue ABRO RED, which has worse characteristics.
Victor Reinz
Victor Reinz sealant dries quickly - this is an advantage. Basically, the instructions for use say to apply the sealant in a thin layer, then wait 10-15 minutes, then install the gasket. When using valve cover sealant of this brand, the car can be started within half an hour after repair.
Dirco
Dirco (Dirko) is a sealant from Elring (Elring).
There are three popular modifications of this brand, these are:
Just like other models, they are resistant to aggressive substances. They are resistant to mechanical impact.
Permatex Anaerobic Gasket Maker
Permatex Anaerobic Gasket Maker (Permatex Anaerobic Gasket Maker) is an anaerobic sealant. Durable, elastic, dense. Tube weighing 50 ml. Price 700 rub. Other characteristics are similar to previous brands.
CYCLO HI-Temp C-952
CYCLO HI-Temp C-952 (Silko Hi-Temp) is a silicone auto sealant. Color: red. Tube weighing 85 grams.
Curil
Curil (Kuril) - sealant is also produced by Elring. There are two brands:
MANNOL 9914 Gasket maker RED
The above popular sealants, which can be used to seal the engine valve cover, are not destroyed by exposure to various chemicals, acids and alkalis.
Let's sum it up
The above information allows us to conclude that various compositions can be both universal and have a limited scope of application. Certain characteristics and features make it possible to use sealants both for connecting parts during engine assembly and for repairing internal combustion engines in the event of leaks.
This means that drivers who drive long distances are advised to have repair sealants for the oil system and engine cooling system in their car. At the same time, there are tire sealants that allow you to repair a wheel in the field.
We also note that the selection of the type of sealant for a specific malfunction or task can be considered optimal and correct, and not the widespread use of universal products. It is important to remember that the quality, reliability and service life of the resulting seal will depend on compliance with all conditions and recommendations of the manufacturer of the composition for applying a particular product.
Source
Replacement of valve cover sealant and camshaft bed. Let's start small
Good day to all!
While there is a large purchase of spare parts for repairs after an accident and the search for a normal service, I decided, so to speak, to start small, re-glue the sealant of the valve cover and camshaft beds.
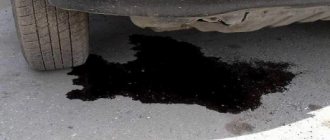
The reason for this was the oil in the 1st, 3rd and 4th spark plug wells, as well as the general sweating of the cylinder head at the seams. The fact is that 21126 engines of 2011 were assembled exclusively for varnish, and not for sealant. Therefore, over time, this whole system begins to get pretty snotty.
It’s clear that you can’t get into the engine without a torque wrench, so I had to expand my collection of torque wrenches by adding Jonnesway 1/4 T21025N 5-25 N/m (increased accuracy). Yes, not cheap, 8740 rub. I wanted variety. That's why I bought this one. As a result, all 3 of my torque wrenches are of different designs.
I recorded a video review. There was no such key on YouTube yet.
Started disassembling. So, the list of works 1) remove the air filter housing 2) crankcase protection 3) front left wheel 4) front part of the left fender liner 5) engine mudguard (comes from a car with automatic transmission) 6) adsorber purge valve 7) vacuum hose timing belt casing 9 ) generator belt tension roller 10) generator 11) oil dipstick 12) timing rollers 13) camshaft gears 14) throttle valve 15) ignition coils and their wiring harness 16) breather pipe 17) breather fitting (force it to rotate with a hammer, then shake it out by hand) 18) unscrew the receiver 19) remove the fuel rail 20) remove the receiver 21) remove the valve cover 22) camshaft bed 23) camshafts
Well, in short, you understand, there is enough work.
After I removed the receiver, the following picture appeared in front of me. Everything is covered in oil!
Decent carbon deposits inside the intake channels. Either oil was drawn in through the O-rings of the receiver, or it was due to the fact that there is no normal oil sump. Well, in short, there are decent deposits in the channels
The fuel rail was also completely clogged
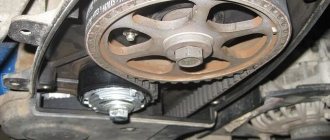
To unscrew the camshaft gear bolts, I used a homemade device consisting of two 25 mm pipe couplings, an M8*100 bolt and a nut
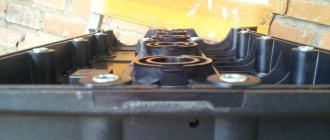
Condition of the engine after 58,000 km. Oil Motul 8100 Xcess 5W40
I think it's pretty good. There are no deposits.
But the varnish needs to be removed
All that remains is to wash it all, clean it, and then you can assemble it. The tale is told quickly, but the deed is not done soon. Well, in short, I washed the whole thing for at least 8 hours
. Eventually
Many bad words were sent to the designers of AvtoVAZ. Not only does this varnish not seal the engine at all, but it also cannot be easily washed off. The only way to clean it is with red Scotchbrite. I had to run to the store several times. Each surface takes at least 1.5 hours. Well, what can you do here, you can’t use a screwdriver, sandpaper or other abrasive, because... There will be scratches, then the oil pressure will disappear. It takes a long time and is tedious, but it is of high quality. After removing the varnish, scraps of Scotch Brite remain. We wash the paint bed and valve cover with carburetor cleaner. Well, the main question. When people take their car to a service center to re-glue the sealant for 5000 k+, do the craftsmen worry about it or just smear sealant on top of the varnish for good measure?! Somehow it seems to me that they don’t give a damn... But we will!
Degrease. We apply Loctite to the camshaft bed. I didn't cut off his nose. With a low flow rate, the sealant is applied more evenly. True, he crushed all his fingers while applying it, because he doesn’t really want to get out of there. But overall the tube is comfortable. We apply only around the perimeter, around the spark plug wells and through bolts securing the valve cover. Under no circumstances do we lubricate the oil channels, and do not listen to nonsense from the magazine “Behind the Wheel”. This is not a foreign car where additional grooves are made in front of the oil channels to collect the squeezed out sealant. This is Lada. There is no such thing here. There is no need to seal oil channels! Dealers don't do this, the factory doesn't do this. There wasn't even any varnish there. Therefore, we don’t suffer from bullshit!
Before reinstalling, lubricate the camshaft journals, install new oil seals and camshaft plugs. Camshafts are keyed up! First tighten the 4 bolts of the camshaft journal cover of the 4th cylinder, because in this position, the camshafts slightly press the hydraulics together with the valves, then we pull the bolts in the required sequence (according to the Murzilka) in 3 stages. 12N/m, 15 N/m, 18 N/m. The murzilka says 18-24 N/m. People pull 12N/m, because... with a higher torque, the bolts may break. I took a chance and reached 18 N/m. Very carefully, and not thoughtlessly until it clicks. Then pour a little more oil on the camshaft cams.
When washing the valve cover, I removed the oil separator. I screwed it back on and put the bolts on a thread locker just in case. I also put sealant on the bolts securing the timing case to the head (4 pieces), because very often the timing belt breaks due to a loose bolt, which gets between the belt and the roller and grinds the first one into soup.
Source
Removing the valve covers on the 21120 16v 1.5 engine
Briefly, the sequence looks like this: remove the filter box and the plastic trim, disconnect the wires and unscrew the ignition module. The key must be turned to position “0”.
Removing the air filter box
To remove the filter, loosen clamps 1 and 2, and then disconnect connector 3. Pipes 1 and 2 are removed from the box. Use a 10mm wrench to unscrew the screw on the body, then remove the box from its mountings.
To disconnect high-voltage cables, you need to pull the caps out of the wells. The cables are also disconnected from the ignition module. It is pressed to the valve cover with three 10mm nuts.
We figured out the ignition module
Don't forget to disconnect the low-voltage connector and dismantle the module. If you do not unscrew the module, you will not be able to remove the valve cover on a VAZ-2112.
The part called “receiver”
First of all, you need to remove the throttle assembly: unscrew the cap on the antifreeze tank, disconnect the TPS and IAC connectors, unscrew the two fastening nuts (wrench “13”). It is also advisable to disconnect the negative terminal from the battery.
What to do before removing the receiver
Using a 10mm wrench, unscrew the cable mounting bracket from the receiver. All that remains is to remove the throttle assembly: the operation is carried out so that the assembly remains above the expansion tank. The assembly itself is finally attached to the body partition.
On motor 21120 we remove the receiver, that is, the upper part of the intake module:
- The ignition wires come out of brackets 1 and 2. Then, loosening the clamp, you need to disconnect the brake system hose.
What needs to be disconnected from the receiver
The crankcase ventilation hose is disconnected from the cylinder head cover.
The final touch before dismantling
In the photo, the intake manifold holes are closed with plugs. The filler plug is screwed in.
When should you change the gasket?
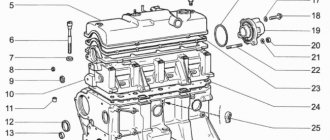
Every engine has a valve cover that is attached to the cylinder head with several bolts. Between the cover and the head there is a rubber gasket that can withstand sudden temperature changes and exposure to technical fluids. Over time, the gasket wears out - its elasticity decreases and small cracks appear. As a result, oil begins to leak into the engine compartment, after which dust and dirt adhere to the spots.
Installing the cylinder block cover on a car engine
To avoid the appearance of stubborn stains, you need to change the gasket in a timely manner and monitor the condition of the engine as a whole. It is usually recommended to do this after 7,000–15,000 km, which virtually eliminates oil leaks and prevents problems with the engine and timing belt. There are other situations in which it is necessary to change the rubber gasket (usually together with repair of the cylinder head (cylinder head)):
In addition, the rubber gasket must be replaced during any repair of the cylinder head, engine, or during maintenance of the timing belt. During installation, sealants are used to improve insulation and enhance the service life of the seal.
Dismantling, basic operation
Using a 10mm wrench, unscrew the bolts on the brackets: one of them secures the injector cables, the second secures the throttle assembly wires.
Two “extra” brackets
Both brackets are removed. Using an “8” socket wrench, unscrew the 14 or 15 screws on the cover. This completes the dismantling, but the cover can be held in place with sealant.
During installation, the sealant is applied to the lower edge of the part. And the recommended screw tightening torque is 2.0-4.6 N*m.
Valve cover sealant requirements
The main characteristic that a sealant must have is heat resistance. A good product should work at elevated temperatures, and the more heat it can withstand, the better. Other requirements for sealants:
You also need to monitor the expiration date - it must be normal, otherwise the sealing properties may decrease.
The procedure and torque for tightening the cylinder head on a VAZ-2112 with 16 valves: tightening the cylinder head bolts
VAZ cars of the 2112 family were produced with two 16-valve valves: 21120 and 21124. The cylinder head of these engines has different intake ports.
In theory, there are no other differences. And therefore, the tightening torque of the bolts on the VAZ-2112 cylinder head will be the same if we talk about any 16-valve internal combustion engine. Tightening is performed in three steps, although repair books give another option (it is for 8-valve engines). The following video shows how the cylinder head is installed in 5 minutes:
Installation and dismantling procedure
The part called the cylinder head is attached to the cylinder block with 10 screws. They are unscrewed with a 10mm socket wrench. The procedure for dismantling the cylinder head is shown in the first photo.
The standard screw length is 93 mm. If the screw has been pulled out to at least 95 mm, it is replaced with a new one (AvtoVAZ requirement).
During installation, a different scheme is used (photo 2). Each screw is lubricated with machine oil, otherwise the efforts will be reduced to nothing.
Tightening torque for cylinder head cover bolts
For VAZ-2112, the cylinder head tightening torque is standardized:
- First pass – the force is 20 N*m;
- Each screw is turned 90 degrees to the right;
- Wait 20 minutes, then turn the screws another 90 degrees.
At first the effort is very small. But at “step 3” it will be difficult to cope with the work. Use the lever.
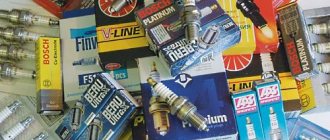
Review of popular sealants
To purchase a truly high-quality composition, you should pay attention to trusted brands, which are presented in most automobile stores.
Black Heat Resistant DoneDeal
This sealant is produced in the USA and easily withstands operation at -70...+345 degrees. It does not deteriorate from the action of any automotive chemicals, does not evaporate and does not shrink over time, is not afraid of water, and does not swell with air flow. The product is suitable for any engines, including those with oxygen sensors. In addition to the valve cover, the sealant can be used for engine oil pans, gearboxes, thermostat housings, cooling system pumps, and intake manifolds. Other advantages of the composition:
ABRO 11 AB
This sealant is also produced in the USA, has a low price and excellent quality. Used when installing any gaskets, including when replacing the valve cover. It is considered a universal automotive sealing compound.
Victor Reinz
Another popular universal sealant for cars is based on solvent-free polyurethane. It is available in two variations - “Reinzoplast” and “Reinzosil”; to seal the valve cover you need to use the first one (blue). The sealant can withstand changes within –50...+300 degrees, and is resistant to auto chemicals and aggressive substances. Dries quickly: a thin layer sets in just 15 minutes, and you can install a gasket on it, and you can start the car after another 30 minutes.
Dirko
Dirko sealant from Elring is available in the following modifications:
When working with valve cover gaskets, it is best to choose the third option of sealant in gray packaging, because it is famous for its high ductility and does not deteriorate even when applied to moving parts. After drying, the finished seam can easily withstand heavy loads and is resistant to petrochemicals and other aggressive liquids and gases. The product does not require any waiting time before applying the rubber gasket. But all three sealants can be used to seal the valve cover.
Anaerobic composition Permatex Anaerobic Gasket Maker
Permatex sealant belongs to the anaerobic category - it hardens in an airless environment. It is very thick and quickly compacts during vulcanization, forming a strong elastic connection that is resistant to mechanical stress and vibration. The sealed seam does not deteriorate from the influence of aggressive chemicals, is not afraid of temperature changes, and can be used in winter. Sold in small convenient tubes of 50 ml.
CYCLO HI Temp C 952
Silicone auto sealant quickly seals, glues, provides complete waterproofness, and isolates the gasket from the action of petrochemicals. Maintains flexibility and elasticity throughout its entire service life. Instantly forms tight gaskets on engine parts of any type. Contains no additives, only pure 100% silicone. But it is very rarely found on sale.
Curil
A product with the same name is also produced by Elring in two versions:
Both products are excellent for repairing internal combustion engines. After application, you need to wait about 5 minutes, and only then install the gasket. It is recommended to apply a thin layer of sealant (less than a millimeter).
MANNOL 9914 Gasket maker RED
This silicone sealant works at -50...+300 degrees, is resistant to sudden temperature changes, as well as to the action of aggressive substances and petrochemicals. It vulcanizes to the state of plastic rubber at room temperature under the influence of water vapor from the air. Creates a reliable gasket that does not crack, shrink, or move during service.
Other popular brands
There are other compounds in stores that can be used with the valve cover to seal it:
Comparison of models
Compositions for sealing automotive elements have earned the trust of users due to their quality. But motorists' ratings for the product are slightly different - this allows us to compile a rating.
| Name | Volume (g) | Bonding time (min) | Temperature (оС) | Element thickness (cm) | Price, rub.) | Rating based on customer reviews |
| Engine sealant | ||||||
| ABRO 9-AB | 75 | 60 | -40 – +210 | 0,3 | 220 | 9,5 |
| Done Deal DD6715 | 226 | 60 | -75 – +325 | 0,4 | 840 | 9,3 |
| Mannol Gasket Maker 9913, 0.085 kg | 85 | 50 | -40 – +230 | 0,5 | 170 | 9,2 |
| Sealant for cooling systems | ||||||
| ABRO 12-AB | 85 | 55 | -40 – +260 | 0,33 | 100 | 9,8 |
| LIQUI MOLY KuhlerDichter 1997 | 250 | 60 | -50 – +310 | 0,4 | 450 | 8,9 |
| Done Deal DD6731 | 42,5 | 50 | -70 – +370 | 0,4 | 200 | 8,3 |
| Glass sealant | ||||||
| PERMATEX 81730 | 42 | 60 | -62 – +320 | 0,3 | 315 | 9,3 |
| Mannol Gasket Maker 9916 | 85 | 1440 | -40 – +180 | 0,5 | 170 | 9,3 |
| Lavr Ln1740 | 70 | 1440 | -50 – +220 | 0,3 | 115 | 9,1 |
| LIQUI MOLY Silicon-Dichtmasse schwarz 6185 | 200 | 120 | -65 – +260 | 0,4 | 1630 | 9,0 |
Thanks to a visual comparison of ratings and costs, choosing a good composition will be much easier.
How to use valve cover sealant?
Exact information about the procedure for using the composition is indicated on the packaging; different products have their own characteristics and specific application. Sealants of various brands completely harden within a certain period of time: for some, 15–30 minutes are enough, for others, several hours are needed for complete polymerization. You cannot start the car until this time has expired, otherwise the composition will not dry out and gain strength.
Preparation and installation of the cylinder head gasket
First you need to make sure that the surface is smooth, the cylinder block is not damaged, and has no cracks. Before installation of the gasket, all technological holes are cleaned and blown with compressed air to remove dirt and dust. The surface is degreased with a solvent suitable for the car. If there are dense contaminants, they can be removed with sandpaper or a wire brush.
Next, a small amount of sealant is applied. If there is a lot of compound, it will get into the engine when tightened. The sealant is squeezed into the groove of the cover, smeared, and after about 10 minutes the rubber gasket is installed. The bolts are tightened with a torque wrench in a certain sequence (first a preliminary tightening is done, then a full tightening).
When replacing a gasket, sealant is a necessary tool that seriously improves the quality of the repair. It is especially needed if a non-original part is used, which may not fit tightly to the surface. In any case, the sealing compound provides a 100% guarantee of reliable service for the unit if all work on its application was carried out correctly.
Source
Removing the valve covers on engine 21124 (16v 1.6)
Remove the filter box and decorative trim (see Chapter 1). Next, remove the ignition coils: disconnect the plugs and use a “10” key to unscrew the fastening screws.
Customized ignition coils
What to do with the damper drive cable: remove the rubber holder from the bracket, cut the plastic clamp.
The throttle cable needs to be released
Now remove the throttle assembly according to the instructions from the previous chapter.
How to remove a plastic intake module
A wiring harness is attached to the front of the intake module. The cables go to the DPKV, DPRV (DF) sensors and to the adsorber valve. All connectors must be disconnected, then the wiring harness is removed.
We release all the pipes
The photo shows how the brake system hose is disconnected, as well as the crankcase ventilation hose. It is also necessary to remove the oil dipstick and tube by unscrewing screw 1.
Plastic part attachment points:
- Key “10” : two nuts 1;
- Key “13” : three nuts 2, two bolts 3.
All elements are shown in the photo.
Mounting the intake module
When should you change the gasket?
Every engine has a valve cover that is attached to the cylinder head with several bolts. Between the cover and the head there is a rubber gasket that can withstand sudden temperature changes and exposure to technical fluids. Over time, the gasket wears out - its elasticity decreases and small cracks appear. As a result, oil begins to leak into the engine compartment, after which dust and dirt adhere to the spots.
Installing the cylinder block cover on a car engine
To avoid the appearance of stubborn stains, you need to change the gasket in a timely manner and monitor the condition of the engine as a whole. It is usually recommended to do this after 7,000–15,000 km, which virtually eliminates oil leaks and prevents problems with the engine and timing belt. There are other situations in which it is necessary to change the rubber gasket (usually together with repair of the cylinder head (cylinder head)):
In addition, the rubber gasket must be replaced during any repair of the cylinder head, engine, or during maintenance of the timing belt. During installation, sealants are used to improve insulation and enhance the service life of the seal.
Action
High-Gear sealant stops leaks that form through:
- Valve cover gaskets.
- Oil pan
- Timing chain cover.
- Rough, worn crankshaft and camshaft seals.
The effect does not occur instantly, but after approximately 500-800 km. It depends on the degree of wear. But in just one application the elasticity and size of gaskets and seals returns to normal.
Types of sealants
To seal the valve cover, only special means are used - ordinary sealants will not last long here. They are also different in composition and properties:
Silicone gasket sealant for car engine
A high-quality sealant can withstand heat and high pressure, so it is well suited for internal combustion engines. A product of dubious origin can simply dissolve in the oil, clog the timing mechanism and cause a breakdown.
Cleaning SVKG in Lada Priora
After prolonged use, gas deposits accumulate in the crankcase ventilation system. This deposit makes it difficult for gases to pass into the cylinders. As a result, the gas pressure in the engine increases, which leads to oil leakage. Timely cleaning of the SVKG will help prevent this. The manufacturer of Lada Priora recommends carrying out this procedure after every 60 thousand kilometers. This service manipulation can be performed in a car workshop or independently.
To do this, you need to have tools (narrow pliers, 8mm nut wrench, Phillips screwdriver).
When cleaning the SVKG yourself, you need to perform the following steps:
- Remove the decorative engine cover.
- Remove the air filter.
- Carefully loosen the clamp on the ventilation hose clamp on the engine.
- Remove the crankcase ventilation hose (CVH) from the air supply sleeve.
- Loosen the clamp on the air supply sleeve.
- Disconnect the air vent hose from the throttle assembly.
- We loosen the clamp of the clamp and disconnect the ShVK of the large branch from the cylinder head cover (cylinder head).
- Using the same actions, we remove the small branch shvk, disconnecting it from the cylinder head cover and the throttle fittings.
- Loosen the clamp of the inlet ShVK clamp.
- We remove the supply ventilation hose and remove it from the cylinder head cover.
- Disconnect the supply ventilation hose from the cylinder head pipe.
- We wash all the hoses with gasoline, blow them out and dry them with a hairdryer. We also clean and dry all pipes and hose connections.
- Unscrew the cylinder head cover.
- We remove the separator by tightening its fastening in the form of 6 bolts, which are located inside the cylinder head cover.
- Using pliers, squeeze the oil deflector clamps and pull it out.
- Using a screwdriver, pull out the ring-shaped rubber seal. If it has lost its shape, then replace it with a new one.
- We clean the cylinder head cover and all mating surfaces from the sealant and degrease it with gasoline. Before installing the cylinder head cover, apply new sealant.
- We assemble the SVKG in reverse order.
This will lead to the release of toxic substances into the environment and disruption of the crankcase.
Valve cover sealant requirements
The main characteristic that a sealant must have is heat resistance. A good product should work at elevated temperatures, and the more heat it can withstand, the better. Other requirements for sealants:
You also need to monitor the expiration date - it must be normal, otherwise the sealing properties may decrease.
Criterias of choice
The fundamental criteria for purchasing a good sealant are the composition of the product, its properties and purpose. For liquid sealants, resistance to liquids and high temperatures is of greatest importance. The best sealants for engines do not lose their properties when heated to +360°C.
For other engine compartment elements, a heat resistance of +200 °C will be sufficient. Other selection criteria include:
- Volume of composition, shape of packaging and method of application.
- Time for the product to completely harden.
- Performance characteristics - in addition to resistance to high temperatures, resistance to temperature changes is taken into account. The higher the temperature a substance can withstand, the better.
- Resistant to liquids. In a car, in addition to water, the sealant can be affected by aggressive chemicals. Resistance to most of them is an indicator of a good product.
- Resistance to vibrations accompanying machine operation. Weak sealants break down and spill out during vehicle operation.
- Best before date.
Choosing a sealant to service car components has one difficulty - the abundance of available products. Therefore, even at the stage of planning technical work, you need to consider suitable brands and settle on a sealant that meets even the strictest requirements. Then the repair will be easy and successful, and the result will last for a long time.
Review of popular sealants
To purchase a truly high-quality composition, you should pay attention to trusted brands, which are presented in most automobile stores.
Black Heat Resistant DoneDeal
This sealant is produced in the USA and easily withstands operation at -70...+345 degrees. It does not deteriorate from the action of any automotive chemicals, does not evaporate and does not shrink over time, is not afraid of water, and does not swell with air flow. The product is suitable for any engines, including those with oxygen sensors. In addition to the valve cover, the sealant can be used for engine oil pans, gearboxes, thermostat housings, cooling system pumps, and intake manifolds. Other advantages of the composition:
ABRO 11 AB
This sealant is also produced in the USA, has a low price and excellent quality. Used when installing any gaskets, including when replacing the valve cover. It is considered a universal automotive sealing compound.
Victor Reinz
Another popular universal sealant for cars is based on solvent-free polyurethane. It is available in two variations - “Reinzoplast” and “Reinzosil”; to seal the valve cover you need to use the first one (blue). The sealant can withstand changes within –50...+300 degrees, and is resistant to auto chemicals and aggressive substances. Dries quickly: a thin layer sets in just 15 minutes, and you can install a gasket on it, and you can start the car after another 30 minutes.
Dirko
Dirko sealant from Elring is available in the following modifications:
When working with valve cover gaskets, it is best to choose the third option of sealant in gray packaging, because it is famous for its high ductility and does not deteriorate even when applied to moving parts. After drying, the finished seam can easily withstand heavy loads and is resistant to petrochemicals and other aggressive liquids and gases. The product does not require any waiting time before applying the rubber gasket. But all three sealants can be used to seal the valve cover.
Anaerobic composition Permatex Anaerobic Gasket Maker
Permatex sealant belongs to the anaerobic category - it hardens in an airless environment. It is very thick and quickly compacts during vulcanization, forming a strong elastic connection that is resistant to mechanical stress and vibration. The sealed seam does not deteriorate from the influence of aggressive chemicals, is not afraid of temperature changes, and can be used in winter. Sold in small convenient tubes of 50 ml.
CYCLO HI Temp C 952
Silicone auto sealant quickly seals, glues, provides complete waterproofness, and isolates the gasket from the action of petrochemicals. Maintains flexibility and elasticity throughout its entire service life. Instantly forms tight gaskets on engine parts of any type. Contains no additives, only pure 100% silicone. But it is very rarely found on sale.
Curil
A product with the same name is also produced by Elring in two versions:
Both products are excellent for repairing internal combustion engines. After application, you need to wait about 5 minutes, and only then install the gasket. It is recommended to apply a thin layer of sealant (less than a millimeter).
MANNOL 9914 Gasket maker RED
This silicone sealant works at -50...+300 degrees, is resistant to sudden temperature changes, as well as to the action of aggressive substances and petrochemicals. It vulcanizes to the state of plastic rubber at room temperature under the influence of water vapor from the air. Creates a reliable gasket that does not crack, shrink, or move during service.
Other popular brands
There are other compounds in stores that can be used with the valve cover to seal it:
Option for eliminating leakage through glass seals PERMATEX 81730
Used for sealing auto glass. Made on a silicone basis, it has a wide range of operating temperatures: from –65 to 232°C. Recommended for sealing headlights. Suitable for PTF and headlights with halogen lamps, which get very hot during operation. Can also be used for car windows, including the windshield.
PERMATEX 81730 is completely transparent, after hardening its layer is almost invisible. Sold in tubes of 42 g. It has capillary permeability, flowing into the smallest crevices. After drying, it completely blocks the possibility of wind blowing and water flowing through the seals of car windows, sunroofs, and lighting fixtures.
The use of the substance is simple. It is enough to clean and degrease the surface to be sealed and carefully apply the substance. Excess and drops are removed with a clean napkin or rag. Hardening time – 1 hour. The package sells for 180–250 rubles.
Pros:
- ease of application;
- dries in 1 hour;
- inexpensive;
- flows well into cracks;
- operating temperatures from –65 to 232°C.
Minuses:
How to use valve cover sealant?
Exact information about the procedure for using the composition is indicated on the packaging; different products have their own characteristics and specific application. Sealants of various brands completely harden within a certain period of time: for some, 15–30 minutes are enough, for others, several hours are needed for complete polymerization. You cannot start the car until this time has expired, otherwise the composition will not dry out and gain strength.
Preparation and installation of the cylinder head gasket
First you need to make sure that the surface is smooth, the cylinder block is not damaged, and has no cracks. Before installation of the gasket, all technological holes are cleaned and blown with compressed air to remove dirt and dust. The surface is degreased with a solvent suitable for the car. If there are dense contaminants, they can be removed with sandpaper or a wire brush.
Next, a small amount of sealant is applied. If there is a lot of compound, it will get into the engine when tightened. The sealant is squeezed into the groove of the cover, smeared, and after about 10 minutes the rubber gasket is installed. The bolts are tightened with a torque wrench in a certain sequence (first a preliminary tightening is done, then a full tightening).
When replacing a gasket, sealant is a necessary tool that seriously improves the quality of the repair. It is especially needed if a non-original part is used, which may not fit tightly to the surface. In any case, the sealing compound provides a 100% guarantee of reliable service for the unit if all work on its application was carried out correctly.
Source
Packaging Features
Foreign manufacturers often use plastic or aluminum tubes as packaging for medications. The tubes are equipped with a dispenser cap and are filled with 40 or 90 grams.
- Products with a dispenser are convenient to apply;
- the product does not dry out after opening the tube;
- Excess from the dispenser is easily removed with a match.
Russian drugs are usually offered in aluminum tubes with a plastic cap.
Professional sealants require the use of a special gun; without it it is impossible to apply the product.
It is recommended to purchase large-volume tubes for frequent repairs - for car service specialists
, For example. For one car, it is more practical to take a small volume, although it is somewhat more expensive, it will not have time to dry out until the shelf life expires.
Foreign manufacturers are trying to more often use tubes made of plastic or aluminum. These tubes are offered with a dispenser cap, which has valuable advantages:
- convenient application to the surface;
- protects the product from drying out after opening the tube;
- Excessive amount squeezed out from the dispenser can be removed with a match.
The volume is 40–90 grams.
Russian manufacturers usually use aluminum tubes complemented by a plastic cap.
Professional sealants require the use of a special gun. Otherwise, application of the product will no longer be possible. In this case, the volume of tubes may be larger, since the product is used more often than in other situations.
see also
Comments 19
To prevent the channels from clogging, you need to use Loctite and not ordinary sealants. And don’t smear it, but apply it from a spitz, let’s say, a 2mm sausage
Personally, I smeared it like this www.drive2.ru/l/6876946/, left the old plugs, and first applied a thin layer of gray sealant to them. So far everything is holding up great.
Did you drain the antifreeze to replace the pump? What material are the plugs made of? It’s confusing that the instructions don’t say a word about sealant, but everyone seems to use it
The antifreeze was drained. The plugs in the cylinder head, in my opinion, are made like oil seals, i.e. rubberized metal base. I applied sealant to ensure a reliable seal.
Do you need to lubricate the cover on the 8 valve?
I don’t know, but most likely the gaskets are bought there or cut from paranit.
Do you need to lubricate the cover on the 8 valve?
This kind of nonsense should only happen in 16th grade.
the one that “or” requires great care in operation and theoretically stops leakage from the oil lines. the other is simpler and made from the factory. I made it “simpler” using Reinz. plugs are used in other cases. I left the old plugs and put them again on the Reinz technology, you need to use Loctite, the main thing is moderation and not to snivel
“plugs are used in other cases.” what kind of plugs?
Are the plugs rubber or metal or rubberized metal?
According to the instructions, they seem to need to be pressed in like camshaft seals without any sealant. Probably won't be able to be pulled out with sealant later?
A spare part is called without indicating the material from which it is made, but only for its intended purpose. sealant will not hurt in the right amount. but whether to use it or not is a personal matter, and the “gags” are taken from your text
Shouldn't it be coated with anaerobic sealant?
Of course, I don’t know the exact properties of this miracle, but it seems like it shouldn’t harden upon contact with oxygen, i.e. oil channels should not be clogged
The question here is not the properties of the sealant, but the correct application. When the engine heats up and comes into contact with hot oil, it will in any case get into the oil and the narrow channels will still become clogged, even if not completely. He won't dissolve. Hot oil is not oxygen.
Anaerobic sealants and adhesives are a special class of acrylic adhesives, which are liquid compositions of varying viscosity that can be stored for a long time (≥1 year) in thin-walled oxygen-permeable polyethylene containers without changing their properties and cure at a temperature of 15 - 25 ° C in narrow metal gaps
(in pores, threaded, flanged and cylindrical connections) with the formation of a durable polymer layer.
those. judging by the definition, it will harden only in the gap between the metal. And judging by its properties, it hardens only upon contact with metal... “Contact of the initiating system with metal promotes the formation of active particles - radicals, which are responsible for the depletion of oxygen and the occurrence of the polymerization (hardening) process. Therefore, the metal is a necessary component due to which the anaerobic composition is transformed from a stable liquid state into a transparent solid polymer.”
those. it will not dry out in oil, everything will settle in the filter.
It's more likely that the oil pan will clog
theory is theory, but in practice it is a little different, it depends on the amount of sealant in the lubrication system - I found examples on the Internet with clogged oil channels in the head, smeared in the second way using anaerobic sealant.
Of course, I don’t know the exact properties of this miracle, but it seems like it shouldn’t harden upon contact with oxygen, i.e. oil channels should not be clogged
Why are guide bushings needed?
Before installing the cylinder head, perform the following steps: clean the threaded holes, as well as all holes for the bushings (photo 1). Each bushing is installed in place, and only then a gasket is placed on top.
Metal parts adjacent to the gasket must be degreased. We looked at the cylinder head tightening diagram, but the cylinder head itself must be installed correctly:
- We place the cylinder head on the cylinder block;
- By moving the part in different directions, we ensure that the bushings fit into the recesses.
After “step 2” the screws can be tightened.
Sealant
No sealing compounds are used when installing the gasket! Solidol, CIATIM and other lubricants are not even needed. The main thing is that the metal must be degreased. And the cylinder head gasket must be new.
Cylinder head cover and tightening order of its bolts
The metal cover installed on the cylinder head must not allow air to pass through. At points of contact with other parts, tightness must also be maintained. Therefore, sealant is applied to the edge of the lid. An example is shown in the photo.
Here you need to use materials: Loctite-574, ANACROL, etc. The screws on the cover are tightened with an “8” key.
Recommended screw tightening torque
The recommended screw tightening torque is only 3-4 N*m. Don't be surprised: the sealant will do its job. You just need to let it dry after putting the cover in place.
You can unscrew the screws in any order. Their number is 15 or 14. When installing, it is better to follow the sequence shown below.
There is usually no need to replace the screws - the load is too small. We wish you success.
Common Misconceptions
If the bolts are pulled out too much, they are tightened in four steps. At “step 2” the tightening torque will be 70-85 N*m. All of these are common misconceptions that do not apply to 16-valve internal combustion engines.
All steps in one video: replacing the cylinder head gasket
If you find an error, please select a piece of text and press Ctrl+Enter.
Source