Domestic production today is moving forward relative to its level of development and continues to improve every year. These efforts lead to more comfortable driving and greater driving pleasure. It is worth mentioning in a separate word the appearance of cars, which in domestic manufacturers such as VAZ has changed a lot over the past 10 years. These changes were more cosmetic than radical, but contributed to visible improvements. But there are ways to independently influence the appearance of almost any car, one of which is the procedure for painting it. Today we will cover this topic in detail and do this using the example of a VAZ 2107 car.
Garage painting
For most modern cars, the most critical areas of the body from this point of view are those that are subject to mechanical or chemical influence, that is, areas where moisture and dirt enter from under the wing, or where water can accumulate. These include doors, namely their lower parts and edges, sections of the wing located near the wheels, thresholds, and places under poorly fitting seals. However, taking into account the lack of anti-corrosion treatment and the poor quality of the paintwork for the VAZ 2107 body, there are much more such places.
As is clear from this, after a short period of operation of such a car, and perhaps immediately after purchase, painting will be required. In addition, this procedure is carried out to give the desired color to the car. This is especially true if it is impossible to choose it when purchasing.
Painting a car with your own hands allows you not only to change its color, but also to increase the anti-corrosion protection of the body.
Naturally, painting can be done to order in one of the many workshops. However, by doing such work yourself, you can save a lot. And taking into account the fact that the VAZ 2107 belongs to the segment of the most inexpensive cars, this car does not require complex technologies, expensive equipment and materials. Therefore, painting such cars with their own hands is very common among car owners.
Problems of body iron "seven"
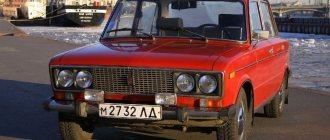
The VAZ 2107 is famous for its body, the simple geometry of which still attracts car enthusiasts today. This car model is a luxury version of the VAZ 2105 and was produced from 1982 to 2012 in various modifications and configurations, including a pickup body. The car body is a four-door sedan with rear-wheel drive. The frame has steel parts connected by non-contact welding.
Those parts on which a large load is distributed are additionally strengthened by arc welding. Do-it-yourself body repair of a VAZ 2107 includes several operations: modernization of the metal frame of the car, replacement of one or another spare part, painting, welding, etc. Over time, in the process of dynamic loads, the body hardware of the “seven” undergoes the following changes:
- some parts are deformed;
- the doors begin to sag;
- the design of the openings is disrupted;
- the integrity of the paintwork is destroyed;
- cracks appear at the junction of the body and the racks;
- welding points are destroyed, structural elements are disconnected;
- corrosion appears.
Replacing parts is not difficult, since spare parts for the “seven” are easy to find. Removable body hardware, such as the hood, front fenders, trunk lid, doors, etc., is much easier to repair with your own hands, since to do this you need to unscrew the necessary parts using a key and replace them with other spare parts.
Fixed body iron: rear fenders, inner door panels, grille and other welded elements are much more difficult to repair with your own hands. They must be carefully cut without damaging the structures to which they are welded.
Information! To install new spare parts yourself, you will need skills in working with a welding machine.
Preparatory stage
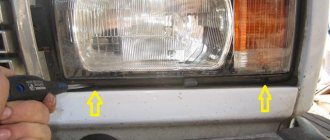
First of all, it is necessary to remove additional body elements presented for the VAZ 2107 in the form of bumpers, radiator grille, lighting fixtures (headlights, side lights, turn signal repeaters on the front part of the wing).
After this, the body is washed with water. Then the peeled off areas of the coating are removed with a spatula or brush. Next, wet grinding of the prepared surface is carried out with abrasive 55С 4-П or 68С 8-П. If there is no mechanical damage to the coating and its thickness is small, sand it down to the epoxy primer of factory paint. If the body has areas significantly affected by corrosion, or is painted with nitro enamel, it must be cleaned to bare metal.
To remove the complex coating, use SP-7 remover: it softens the material, after which it can be cleaned off.
The body is then cleaned by washing with water, blowing with compressed air and drying. Next, the surface is degreased with gasoline solvent BR-1 or white spirit. The joints of the replaced parts and welds are treated with Plastisol D-4A sealing mastic, and excess material is removed with a rag moistened with white spirit. Parts that are not to be painted are covered.
Factors affecting paint consumption
In addition to the quality characteristics of the selected material, specific conditions can affect consumption. It is not difficult to guess that thick enamel will require a larger volume, but the working viscosity of the paint may depend not only on the manufacturer’s instructions, but also on the ability of the master to control the process. An attempt to fill the surface with enamel diluted to the limit will lead to the appearance of smudges, but temperatures above normal will require a liquid material. The solvent should completely evaporate from the car enamel during the drying process, but the air temperature and the viscosity of the substance make serious adjustments to the car painting process.
The amount of hardener should not depend on temperature, but the volume of solvent is indicated by the manufacturer for a temperature of 20-23 ˚C. The selection of viscosity should not be done by eye, otherwise it will be difficult to avoid not only increased material consumption, but also obvious defects. The technology for controlling viscosity with a viscometer is to determine the viscosity of a substance by measuring the time of pouring the required volume of liquid through a hole of a certain diameter - you will need the viscometer itself and a stopwatch.
Surface preparation also has its share in quantitative costs. Surface treatment for different types of materials differs, and this difference is most noticeable in the grain size of the abrasives. It is difficult to coat a primer sanded with P400 with acrylic, but preparation for the primer itself involves working with coarse grains. For standard enamels, matting the primer or metal with P800-P1200 abrasives is required: finer-grain sandpaper will lead to worse adhesion, coarse grain will require a larger volume of substance and will cause defects.
Padding
It is recommended to use VL-023 or GF-073. Viscosity at 20°C should be 22-24, according to the readings of the VZ-4 viscometer. To achieve this value, the primer is diluted with xylene, and a paint sprayer is used to apply this material. After 5 minutes, EP-0228 primer is applied on top, diluted with the MTT-75 catalyst or NF-1 desiccant at 3–4 or 6–8% by weight of the primer, respectively. The shelf life of the material with a catalyst is 7 hours. To bring it to the target viscosity of 23-25, according to VZ-4 indications, use xylene or RE-11V solvent. After cooling, wet grinding is carried out with 55C 4-P abrasive. Next, the surface to be treated is washed, blown and dried.
If there are body defects in the form of dents, they must first be filled with MS-OO-6, diluted with xylene to a comfortable viscosity, up to 3 mm thick, or the damaged parts, which are most often presented in the form of a wing, must be replaced. Afterwards, the treated areas of the body are dried, ground with 55C 4-P abrasive, washed, blown and dried again. The surfaces to be painted are degreased with white spirit.
Services of our organization
If you are looking for a place where you can paint a car like VAZ 2107, then feel free to contact our organization. Here you will get excellent quality painting in the shortest possible time. Often, complete painting with the preparation process takes about a week. At the same time, you will be issued a warranty document that will allow you to receive full technical support in the event of defects occurring after painting, which is very rare. In any case, the advantages of using our organization are obvious, and the quality of work has already been appreciated by many drivers.
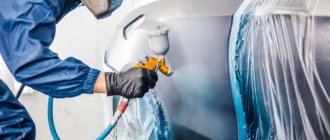
Painting
You must first purchase enamel of the required color: materials such as ML-1195 or ML-197 are recommended. Before use, the enamel is diluted by 10% with DGU-70 catalyst. ML-197 can be diluted with 20% maleic anhydride in ethyl acetate. The material is brought to a viscosity of 20 with solvent R-197 and filtered through mesh No. 015K.
The application of enamel begins with the internal surfaces to be painted, of which there are a lot of classic VAZ cars due to the lack of trunk lining, soundproofing of the hood and the presence of bare metal in the cabin. These surfaces also include door edges. These areas are treated in 2 layers with an intermediate exposure of 7-10 minutes. External surfaces are painted in 3 layers with the same intermediate exposure. The coating is dried at 90°C for 1 hour and cooled under natural conditions.
As you can see, painting it yourself is not difficult and can be done by ordinary users.
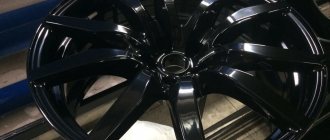
Ways to paint wheels yourself
Do-it-yourself painting of wheel rims can be divided into three stages:
- cleaning;
- primer;
- painting.
The more carefully the first step is completed, the longer the appearance of the disc will remain after painting. Of course, the paint used and the painting method also matter, but only in secondary roles.
Powder painting must be considered the best way to paint car wheels, but this method requires special equipment, which is not acceptable for garage conditions.
Another method of painting wheels with “liquid rubber”, for example “plasti dip”, essentially protects them and requires the same rules as painting from a spray can. Such processing would not be superfluous, but the price for it is high and in the case of stamped disks it is better to buy new ones.
At the first stage of cleaning, you can go not by mechanical treatment to remove rust and old paint, but by using chemical reagents, for example, “Tsinkar”. I used it too, although it’s impossible to do without mechanical processing.
You need to be prepared that the time that will have to be spent for quality work will be around 2-3 days.
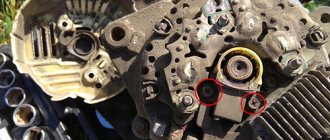
Repair of ball joints VAZ-2101–2107.
The lower ball joint, although considered more loaded, lasts longer than the upper one; it seems that more attention was paid to it during development. Once upon a time, ball joints were dismountable and had grease fittings for lubrication. Now it is not profitable for a manufacturer to produce an almost eternal product. Therefore, the balls are welded and there is no way to lubricate the rubbing part to extend its service life. But there is a way to independently extend the life of ball joints. To do this, you need to buy a repair kit for liners. Using a hammer and chisel, split the ball joint at the welding point; these are three points; they are not fully welded. If the body is deformed, straighten it. On the half without a hole for a finger, you can and should install a grease fitting; if you can’t do it yourself, turn to a mechanic for help. Replace the liners, lubricate them as if for yourself, and not like at the factory! When assembling by hand, it is impossible to compress the two halves of the supports; the liners do not allow it; this is done with bolts. After compression, you can put welding points (grab) for peace of mind, I just clamped them with new bolts with a control nut. Lubricated with refractory grease. The service life has increased significantly, definitely more than 50,000 km. The main thing is to periodically change the boots and lubricate the ball joints. Ideally, install a grease fitting on the new ball joint, because there is almost no factory lubricant in it, and lubricant is the key to long service life of the part.
Online auto parts store "AvtoPasker"
The online store "AvtoPasker" is one of the largest and most convenient catalogs of auto parts for Russian-made cars, such as VAZ, GAZ, Oka, Moskvich, as well as neighboring countries - ZAZ, RAF, LuAZ. You can easily find the necessary part for your car using our catalog with illustrations and explanations. The catalog also includes a search by spare part number or name. To order auto parts, simply add the required product to your online cart - it’s very fast and convenient.
The online auto parts store "AvtoPasker" is always happy to welcome new customers. Please note the system of discounts for customers through our network of stores.
Popular goods
Correcting car body irregularities using solder
You will need tin and solder, as well as sulfuric and hydrochloric acids, a solution of zinc chloride or zinc and a hair brush. If there is no solution of zinc chloride, you will have to prepare pickled acid yourself - to do this, you need to dissolve pieces of zinc in hydrochloric acid until completely saturated, when the release of hydrogen bubbles stops.
Before tinning, the surface is thoroughly cleaned of dirt and grease. This is done either mechanically - with steel brushes, sandpaper, until a metallic shine, or chemically - when the metal is etched for half an hour with a weak, 20-30% solution of sulfuric acid. The second method is more reliable and therefore preferable. The etched part must be thoroughly rinsed with cold water.
After this, the treated surface is lubricated with a solution of zinc chloride or etched hydrochloric acid using a hair brush and sprinkled with solder powder.
What are spring spacers and why are they needed?
Spacers are such devices - liners that are installed in the suspension structure. Their installation allows you to solve many different problems. They can be intended to increase ground clearance, or to increase the stiffness of springs that have sagged, as well as for tuning the car.
Spacers can be installed in both the front and rear springs of a VAZ 2107. If you often have to transport heavy loads in a car, then installing inserts is mandatory. The use of the devices in question allows you to increase the weight of the cargo transported in the car. They are made from a dense and durable material that is designed to withstand heavy loads. Moreover, this material is not metal, but polyurethane, ABS plastic, aluminum or rubber.
Before installing inserts on a car, you need to understand their types, as well as their distinctive features.
Types
The materials used for manufacturing must be distinguished not only by high strength, but also by resistance to the negative influence of the external environment. That is why rubber, polyurethane, plastic and aluminum materials are used for manufacturing. Most often, polyurethane or rubber reinforced spacers are used to increase ground clearance.
To make a choice, you need to understand what types of spacers are produced and how they differ.
How to raise the suspension of a VAZ car
If the car suspension is raised, then you need to make sure that the car does not lose its characteristics. The main suspension components need to be replaced:
- Shock absorbers, when replacing there is no need to do anything on your own. In the catalog you need to select those shock absorbers that the manufacturer offers for a specific car model.
- But to raise the suspension, stiffer and shorter shock absorbers are chosen.
- Anti-roll bar. It is better to change the stabilizers together with the struts.
- The springs are chosen to be stiffer and shorter.
The suspension of a VAZ car is raised for several reasons. As a rule, car owners decide to raise the suspension in 2 cases: to increase load capacity and increase ground clearance (cross-country ability). Most often questions arise about how to properly raise the rear suspension. There are lift kits on the market today for different car models. These kits allow you to raise the suspension to a certain height.
We must not forget that an increase in vehicle clearance is accompanied by some changes in the physical properties of the car. For example, the center of gravity increases. This may negatively affect the vehicle's performance when cornering at certain speeds. The important thing is that before you raise or lower the suspension yourself, you need to take into account a very important value - the redistribution of weight, which matters when the car turns.
Weight redistribution is affected by lowering the center of gravity and increasing the distance between the wheels. Increasing the distance between the wheels is done by switching to wider tires. But this method is limited by the dimensions of the car. Lowering the vehicle's center of gravity can be achieved by installing short struts. This reduces the suspension travel. The racks must be chosen sufficiently rigid.
If the motorist is not ready to calculate all the relationships between parts, physical properties of the car and suspension components, then in order to raise or lower the suspension, you need to choose the second option - purchasing a complete suspension package for a specific car model. On request, as a rule, there are various proposals for modifying the suspension. Specialists will select components for the VAZ based on their preferences and the requirements of the car owner.
But you will need to install them yourself. If you think that raising or lowering a car’s suspension is just a matter of replacing springs and shock absorbers, then this will be a big mistake. Suspension tuning requires making changes to the type of tires and wheels, calculating how the behavior of the car will be affected by changing the suspension. This is provided that the result of the modification is necessarily positive.
Air suspension
The “Seven” has great potential in terms of modernizing the front suspension. And many car owners decide to install an air suspension with an electric compressor, hoses and a control unit.
The air suspension kit includes a compressor, hoses, tubes, struts and other equipment
This is a real electronic assistant that makes it possible to change the ground clearance depending on driving conditions. Thanks to this innovation, the stability of the car at high speeds increases, trips over long distances become comfortable, the car goes over bumps more smoothly, in a word, it becomes like a foreign car.
The system modernization goes like this.
- VAZ 2107 is installed on a pit.
- The battery is de-energized.
- The wheels are removed from the car.
- The front suspension is completely disassembled and air suspension elements are installed in its place.
- Under the hood there is a control unit, compressor and receiver. Then the elements are connected to each other by pipes and hoses.
Air suspension elements under the hood are connected via hoses and integrated with the on-board system - The compressor and control unit are integrated with the vehicle's on-board network.
DIY alligator hood
Expert opinion
Ilya Vyacheslavovich
Consultant for body repair at krasymavto.ru
Ask a Question
To gain greater access to the engine compartment, many car owners install other hinges and opening mechanisms on the hood, which visually resembles the mouth of an alligator.
It's quite easy to do it yourself. To do this you need the following parts:
- loops;
- fasteners (M8 bolts);
- locks;
- two pieces of corners 50x30 1.5 mm thick.
To install a part such as an alligator hood, you should follow these steps sequentially.
- Make 2-3 holes in the corners for fasteners to hold the hinges.
- Weld the bolts on the inside to prevent twisting.
- Attach the corners to the body, placing the clamps symmetrically.
- Place the new hood in place, marking the areas for the holes.
- For reliability, it is better to reinforce the place where the hinges are attached with metal plates.
- Install the locks and release cable. To install locks in a standard panel, make 2 holes, reinforcing the areas around with metal plates. Cut a hole for the fasteners that secure the spring.
Useful! The system works this way: pull the lever towards you from inside the cabin, the cable will pull the lock spring, and its cylinder will open the hood. If gaps form, use rubber seals.
Choice of springs and wheels
Both stock springs and those with variable pitch without lowering are suitable for us. To achieve overall stiffness, the front springs must be less stiff than the rear springs. The original rear suspension is no good, it is too soft, so if there are several people in the cabin, the car instantly loses controllability, and what to hide, you risk running into the first bump and damaging the bottom of the car. The wheels may begin to catch on the fender liners.
The correct choice of tires and rims is important.