If you detect a leak of engine oil or coolant at the junction of the head and the cylinder block, remove the head and replace its gasket. A leak can also occur due to warping of the block head due to overheating.
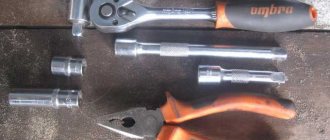
You will need: a torque wrench, keys “13”, “17”, “19”, socket heads “10”, “13”, “17”, “Togh”, screwdriver.
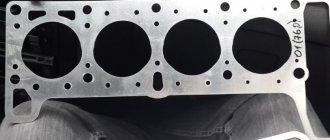
Warning! The head gasket is a one-time use unit, so the gasket must be replaced each time the head is removed.
1. Disconnect the wire from the “-” terminal of the battery.
2. Set the piston of the 1st cylinder to the TDC position of the compression stroke (see “Installing the piston of the 1st cylinder to the TDC position of the compression stroke”).
4. Reduce the pressure in the power system if the work is performed immediately after a trip (see “Reducing pressure in the power system.”
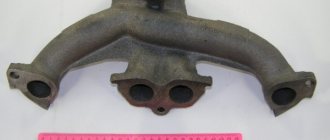
5. Disconnect the exhaust pipe of the muffler from the exhaust manifold (see “Replacing the exhaust pipe”.
6. Remove the cylinder head cover (see “Replacing the cylinder head cover gasket”).
7. Disconnect the wiring harness block from the mass air flow sensor, loosen the clamp securing the air supply pipe to the throttle body and remove the pipe with the air filter housing and the air intake hose from the throttle body (see “Removing and installing the air filter”).
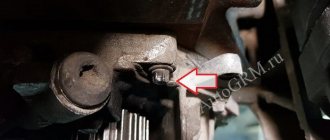
8. Unscrew nut 1 securing the bracket for the water pump supply pipe. Loosen nut 2 securing the inlet pipe bracket to the exhaust manifold.
9. Move the bracket to the side.
10. Loosen the clamps.
11. ...and disconnect the inlet and outlet hoses of the cooling system from the throttle body.
12. Loosen the clamp securing the vacuum brake booster hose to the fitting on the receiver...
13. ...and remove the hose.
14. Turn the throttle drive sector all the way and disconnect the throttle drive rod from it.
15. Unscrew the two nuts securing the tips of the “mass” wires to the rear cover of the cylinder head...
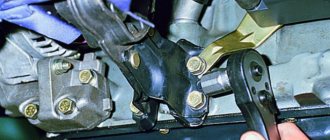
16. ...and remove the wires from the studs.
17. Unscrew the nut of the lower fastening of the spacer 1 and remove the bolt of the lower fastening of the spacer 2...
18. ...unscrew the nuts of the upper fastenings of the intake manifold struts on the right...
19. ...and on the left side, remove the spacers.
20, Disconnect the wiring harness connectors from the crankcase oil level sensors...
21. ...from the throttle position sensor...
22. ...from the idle air control...
23. ...from the injector wiring harness...
24. ...from the coolant temperature sensor...
25. ...from the crankshaft position sensor and the knock sensor.
26. Disconnect the wire connectors from the coolant temperature gauge sensor...
27. ...and from the oil pressure sensor.
28. Disconnect the high-voltage wire tips from the spark plugs.
29. Pull the wiring harness out from under the receiver.
30. Remove the three screws securing the front camshaft drive belt cover, remove the cover...
Warning! It is forbidden to turn the crankshaft and camshaft before installing the camshaft belt.
32. Secure the camshaft toothed pulley from turning, remove the bolt securing the pulley to the camshaft...
33. ...and remove the bolt and washer.
34. Remove the pulley from the camshaft. Do not damage the camshaft oil seal.
Note. If the key does not sit tightly in the groove of the camshaft nose, remove it so as not to lose it.
35. Unscrew the nut securing the rear camshaft drive cover at the top of the cylinder head.
36. Remove four bolts (three of them also secure the water pump) and remove the rear cover (see “Engine repair (disassembly, troubleshooting, assembly)”).
37. Unscrew the nut securing the “mass” wire...
38. ...and remove the wire from the stud securing the exhaust pipe of the cooling system to the cylinder head.
39. Loosen the clamps and remove the radiator inlet pipe 2, the inlet hoses of the throttle unit 4 and the heater 3 from the outlet pipe, disconnect the thermostat 5 along with hose 1.
Signs of gasket failure
The main signs of gasket failure are:
- the appearance of a white emulsion on the dipstick when checking the oil level. This deposit on the dipstick means that the gasket has ruptured between the holes through which oil and coolant pass;
- thick white smoke. Indicates that there is a breakthrough in the gasket between the hole through which the coolant flows and one of the cylinders. In this case, the white color of the exhaust gases is given by the evaporating liquid that has entered the cylinder. Additionally, placing your hand near the exhaust pipe while the engine is running will help you verify that the gasket is broken. The coating remaining on the hand should be tasted on the tongue - if it is sweet, then the liquid is getting into the cylinder;
- the presence of oil stains on the surface of the coolant in the expansion tank. Multi-colored oil spots will indicate that, as a result of a breakdown, oil began to enter the channel with the passing coolant;
- bubbles in the expansion tank when the engine is running. This sign will indicate that, as a result of a gust, exhaust gases penetrate into the coolant channel;
- a sharp whistle when the engine is running, accompanied by oil leaks on the cylinder block. This is the clearest sign that there has been a breakdown of the gasket with an outlet. It occurs rarely, often after the engine has been modified with preliminary removal of the head;
- the most hidden type is a breakdown between the cylinders. There are no particularly obvious signs, except for a drop in power and an increase in fuel consumption, which may be the result of a malfunction of other mechanisms. Only a compression test will help verify the presence of such a breakdown, and even then not always. The same misalignment of the valves can give such symptoms;
If such symptoms appear, the only option for eliminating this malfunction is to replace the cylinder head gasket of the VAZ 2114.
It is noteworthy that this gasket is disposable and is replaced every time, so any modification to the engine associated with removing the head must be accompanied by a replacement.
When is it time to change the block head?
The cylinder head is a fairly strong unit and its replacement and repair is infrequent. On domestically produced cars, as a rule, it has to be removed due to cylinder leakage or gasket wear.
New gasket
Also removed for revision. Removing and replacing, on a car with any number of valves, the process itself is not difficult, but some skills and some experience are required. Therefore, if you are removing the cylinder head for the first time, it would be better to invite a more experienced car enthusiast as an assistant. One who has already dealt with this work, or better yet, if he has already completed modifications or repairs to this unit.
Necessary tool
Engine repairs involving gasket replacement, although labor-intensive, can be done independently if you have the necessary equipment at hand.
Everything you need to perform the operation is listed below:
- sets of open-end and socket wrenches (you will especially need keys for “10”, “13”, “17” and “19”);
- a set of heads of the same dimensions, as well as a special “Torh” head;
- torque wrench;
- screwdrivers;
- pliers;
- containers for draining technical fluids;
- rags;
- sealant;
Replacement
Now, knowing all the intricacies of the replacement procedure, you can talk directly about how you can remove the old rubber from the cylinder head on your own and install a new one in its place.
To work you will need a certain set of tools and materials:
- Torque wrench;
- Wrench;
- Socket head;
- Screwdriver;
- Pad;
- Container for draining coolant;
- Clean dry rags.
We begin the replacement procedure.
- Remove the negative terminal from the battery. The procedure is standard, but it is prohibited to continue working without it.
- Fix the piston of the first cylinder at top dead center - TDC.
- Drain the coolant into a container prepared in advance.
- Relieve pressure in the fuel system if you have just recently driven into the garage after a trip.
- Next, disconnect the exhaust pipe from the exhaust manifold.
- The cylinder head cover is removed, and along with it it will not be superfluous to disconnect the receiver, throttle assembly, exhaust and intake manifold.
- Loosen the clamps that hold the air supply pipe to the throttle body. Remove it from the assembly, grasping it together with the air intake hose. Remove the air filter together with the housing in parallel.
- On the left end of the cylinder head there are mass wires that are disconnected and thereby the fuel frame is removed.
- Unscrew the fasteners that hold the front cover in place. Remove the cover and timing belt. Secure the crankshaft to prevent possible spinning.
Important cleaning step
Remove the tension roller and spacer washer along with it.
Remove the mounting bolts to remove the timing pulley from the camshaft.
Now you need to remove the back cover. To do this, unscrew the mounting nuts and bolts.
Using a Phillips screwdriver, remove the screws, loosen the grip of the clamp and gradually begin to disconnect all the hoses from the head outlet.
By unscrewing the fastening nuts, the fuel supply and drain hoses are removed from the fuel pipes.
10 mounting bolts are removed using a hexagon
Unscrew each bolt half a turn one after another to relieve tension and avoid deformation of the cover.
Remove the screws and washers.
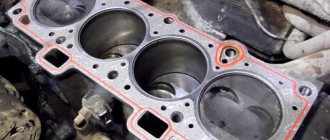
Remove the head and gasket.
Clean all contacting surfaces, remove all traces of metal shavings, and clean threaded connections and holes.
Install a new gasket, taking into account the two centering sleeves. The holes with copper trim should be between cylinders 3 and 4
These holes allow oil to pass through.
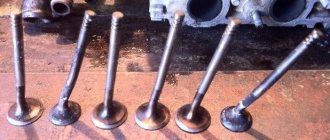
Make sure that both valves on the first cylinder are closed, after which you can return the head to its place.
Installation process
- Insert the mounting screws into the holes and tighten them. This is done in four stages according to the diagram below:
- At the first stage, tightening is performed with a torque of 20 Nm;
- At the second stage, a tightening torque is used in the range of 69.4-85.7 Nm;
- At the third stage, the fasteners are rotated 90 degrees;
- At the final cycle, a final tightening of another 90 degrees occurs.
After replacing, carry out the reassembly procedure, moving in the opposite sequence. If you disassemble the unit correctly, there should be no problems with assembly.
Probably, many motorists were faced with the fact that the time had come to change the cylinder head gasket on a VAZ-2114. This procedure is labor-intensive and not everyone can do it, but if you wish, you can handle this process yourself. Of course, you will need to remove the cylinder head itself and perform a number of operations that require some knowledge of the engine structure.
Sequence of repair work
Also need a new head gasket and valve cover gasket. Having all this, you can begin the renovation. The sequence of actions for repairs is as follows:
- The car is placed in the garage, the gearbox is set to neutral, and chocks are placed under the rear wheels. The first thing that is done after setting up the car is to de-energize the on-board network by disconnecting the “-” terminal from the battery.
- The pressure in the fuel system is relieved. For this purpose, there is a control valve on the fuel rail in the form of a regular tire valve. You need to place a container under this valve and clamp the spool. When the pressure is released, gasoline will leak out. You will also need to drain the coolant using drain plugs.
- On the engine, you need to set the piston of the 1st cylinder to the TDC position. To do this, remove the protective cover of the timing belt and rotate the crankshaft until the marks on the pulley, camshaft and flywheel match.
- The next step is to remove the valve covers. To do this, all pipes, the throttle drive rod, the accelerator drive bracket and the valve cover mounting nuts are disconnected from the cover fittings.
- The exhaust pipe of the exhaust gas removal system is disconnected from the exhaust manifold. These works are carried out under the car.
- The wiring is disconnected from the mass flow sensor, the air supply pipe to the throttle assembly is removed, after which it is completely dismantled along with the air filter housing.
- Then you need to disconnect from the head all the elements suitable for the head - pipes of the cooling system of the throttle assembly, vacuum booster, throttle drive linkage, ground wires, bracket for the exhaust manifold supply pipe.
- The intake manifold strut mounts are also loosened, and the struts themselves are removed. Next, the wiring is disconnected from - oil pressure sensors, coolant temperature and throttle position sensors, XX regulator, injectors, high-voltage wires from spark plugs.
- Then the timing belt is removed. Before this, you need to once again check the alignment of the marks on the crankshaft pulley and the timing gear. After this, the belt tension is loosened and it is removed from the timing gear.
- To remove the camshaft gear, you will need to fix it through the technological holes and unscrew the fastening bolt. You need to remove it from the shaft carefully so as not to lose the key. After this, you will need to remove the rear cover, located behind the removed gear, from the head and block.
- The cooling system pipes are removed from the head along with the thermostat from the head, as well as the rest of the wiring. The fuel supply and drain pipes are also disconnected.
- All that remains is to unscrew the head bolts. But to do this, they must first be weakened, and in a strictly defined order. And only after relaxation do they completely unscrew. If disassembly is done correctly, after removing the bolts, you can remove the head and remove the damaged gasket. At this point, the first part of the repair is considered complete.
Types of modern cylinder head gaskets
The greatest demand today on the world market is for Metaloflex multilayer metal cylinder head gaskets, which are plates made of spring steel with an elastomeric coating with structural profile grooves located on the surface. Depending on the application, they have a multi-layer or single-layer design. Their use is most effective in diesel engines.
Next in popularity and applicability are metal-elastomer cylinder head gaskets, consisting of a metal plate with an elastomeric profile applied by vulcanization. As a rule, they are used in engines with four valves in each cylinder, increased cycle pressure and increased power. The material for the manufacture of such gaskets is selected individually for each engine model.
For low-power engines, metal-soft material Ferroflex/Ferrolastic cylinder head gaskets are most often used, which are a perforated supporting plate with a soft material rolled onto it on each side. The openings of the combustion chambers are equipped with a metal edging, which protects the soft material from hot gases.
The main advantages of metal-soft gaskets are as follows:
- Tight fit to the surfaces of the block and lid is ensured by elastic material
- The metal edging of the openings of the combustion chambers eliminates the interaction of hot gases with soft material
- Microsealing thanks to the application of an ultra-thin special surface layer with a thickness of 10-20 microns
- Silicone stenciling provides an additional level of liquid sealing
Mainly, gaskets of the third type are used for repairing cars manufactured in previous periods. In modern engines they are confidently being replaced by Metalo-flex gaskets and metal-elastomer.
How much it costs to replace a cylinder head gasket directly depends on the design of the engine and the complexity of disassembling it. While the price of a gasket depends on the material from which it is made and the brand. Unfortunately, today many semi-legal manufacturers have flooded the market with low-quality gaskets, the use of which often leads to serious engine damage due to impaired coolant circulation.
Assembly Features
Before assembly, you should check the bolts securing the head to the hood; their length should not be more than 13.5 cm; if they are longer, they can no longer be used.
You should also check the flatness of the head. If it was overheated, it is possible that it was warped and will require repair in the form of trimming the plane.
During assembly, the head bolts are tightened in a certain sequence and with a strictly defined tightening torque. Next, everything is assembled in the reverse order of disassembly.
Disassembly is also carried out in the same sequence if the power plant is being modified.
Uniform principles for replacing the cylinder head gasket
Following the general instructions of the manufacturer of a specific engine is a necessary, but not sufficient condition for a high-quality gasket replacement. The following operations must be performed:
The sealed areas of the cylinder head and block must be thoroughly cleaned and degreased. Any remnants of previously used gasket or covering materials must be removed
All threaded holes for bolts must be cleaned of dirt, and the threads must be checked for ease of movement. The presence of oil in blind threaded holes is strictly unacceptable.
The sealed surfaces of the cylinder block and head should not have irregularities in the longitudinal direction of more than 0.05 mm, and in the transverse direction - 0.03 mm. If there are metal build-ups, they must be removed with a whetstone, and if this is not possible or there are deep defects, the part must be sent for grinding
When installing, the gasket must be carefully centered along the guide elements
The slightest deviation will lead to the impossibility of proper engine operation for a long time.
Particular care should be taken when reinstalling the cylinder head. Do not scratch the gasket or mating surfaces
The presence of foreign particles on parts, especially metal shavings, is strictly unacceptable. Video tutorial on how to replace the cylinder head gasket
Most manufacturers recommend using new bolts when replacing a head gasket. In addition: Always install washers under the bolts;
When installing the washer, only the surface between the bolt head and the washer should be lubricated;
It is strictly not recommended to lubricate the surface of the washer in contact with the cylinder head;
When tightening the bolts, follow the order specified in the engine manufacturer's instructions. Additional tightening of bolts must be carried out to the values specified by the manufacturer. Be sure to take into account that the bolts on a cast iron head are retightened on a warm engine, and on an aluminum head - on a cold one.
There is no fundamental difference in the mechanism for replacing the gasket on the ZMZ 406 engine of the Zavolzhsky Motor Plant, which has 16 valves and is installed on GAZelles and some Volgas or on the Lada Kalina, which has 16 or 8 valves. It is enough to follow the instructions and not damage the polished surfaces
It is very important not to displace the timing gears to avoid improper operation of the assembled engine.