What is an electric heater valve?
Electric heater valve (heater control valve with electric drive, heater valve) is a component of the vehicle interior/cabin heating system; a tap or valve to control the supply of coolant from the engine cooling system to the heater radiator (heat exchanger).
An electrically operated faucet is similar to a mechanical faucet, but is driven by a built-in electric motor or solenoid. This solution made it possible to abandon the cable drive and implement control of the heater using a button. Electric cranes make it possible to implement various schemes for heating the interior and operating the engine cooling system, while they are easy to use, reliable in operation and have a simple design.
Design of the cooling system for UMZ-4213 and UMZ-4216 engines on UAZ and GAZelle vehicles.
To increase energy performance, improve fuel efficiency, reduce toxicity and noise, models with an integrated microprocessor fuel injection and ignition control system were developed on the basis of the UMZ-421 carburetor engine: the UMZ-4213 engine for UAZ cars and the UMZ-4216 engine for GAZelle cars. The design of the cooling system on the UMZ-4213 and UMZ-4216 is somewhat different, since it has differences in the connection diagram of the expansion tanks and heating radiators.
Types, design and operating principle of electric heater valve
Electrically controlled faucets existing today are divided into groups according to the type of shut-off element and its drive, and according to the number of circuits (and, accordingly, pipes).
Based on the number of circuits and pipes, heater valves are:
- Single-circuit / 2-pipe - ordinary taps / valves;
- Double-circuit / 3-pipe - three-way valves.
Double-port valves are valves that can only open and close the flow of liquid. In such a faucet, one pipe is inlet, the second is outlet, and between them there is a shut-off element. The dual-port heater valve is used in conventional interior heating systems and is located between the engine cooling system outlet and the heater core inlet to control the flow of hot coolant.
Three-way valves are three-way valves that can direct fluid flow into two different pipelines. This faucet has one inlet and two outlets, and the shut-off element is designed in such a way that it can direct liquid from the inlet to one of the outlets while simultaneously blocking the other. A heater valve with three pipes can be used in various interior heating systems: with bypass, with an additional heater, etc.
According to the type of shut-off element and its drive, taps are:
- Gate valves driven by an electric motor;
- Shut-off valves driven by a solenoid.
The design of gate valves is simple. They are based on a plastic molded body with pipes, inside of which there is a rotating plate in the form of a solid sector or a sector with holes the size of the pipes. A compact electric motor with a simple gear reducer is installed on the housing, with the help of which the plate rotates. In faucets with two nozzles (double-circuit), both nozzles are located opposite each other, with a plate between them. Three-way faucets have an inlet on one side and two outlets on the other.
The heater valve with an electric motor works as follows. When the heater is turned off, the valve plate is located between the pipes, blocking the flow of liquid - in this case, hot liquid does not flow into the heater radiator, and the interior heating system does not work. If it is necessary to turn on the stove, the driver presses a button on the dashboard, current is supplied to the electric motor of the faucet, it turns the plate and opens the path of coolant - the heater radiator heats up, the interior heating system begins to work. To turn off the heater, the driver presses the button again, all processes occur in reverse order, and the heater turns off.
A heater tap with three pipes also works easily if there is a bypass in the heating system. When the heater is turned off, the rotary plate is in such a position that the coolant passes through the tap and through the exhaust pipe enters the inlet of the engine cooling system (to the pump). When the heater is turned on, the plate rotates, closes one outlet pipe and opens the second - now the fluid flow freely passes into the heater radiator, and from it enters the exhaust pipe and the inlet of the engine cooling system. When the stove is turned off, all processes occur in reverse order.
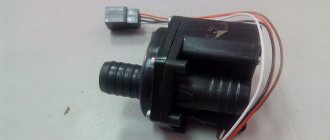
The design of shut-off solenoid valves is different. They are based on a plastic case, inside of which there is a lifting valve in the form of a truncated cone. In the closed position, the valve sits on its seat, blocking the flow of liquid. The valve is connected via a rod to the solenoid armature, which is mounted on the valve body. Double-circuit valves can be single- or double-solenoid. In the first case, both locking elements are located on the solenoid rod, in the second, each locking element is controlled by its own solenoid.
The operation of the heater solenoid valve is also simple. The valves are normally open - without voltage on the solenoid, the valve is raised by a spring, the channel is open. When the engine starts, voltage is applied to the solenoid and the valve closes. When the stove is turned on, the solenoid is de-energized, the tap opens and supplies hot liquid to the heating radiator. When the stove is turned off, voltage is supplied to the solenoid again and the tap closes. A dual-circuit valve works in a similar way, however, one of its circuits is always closed when the ignition is turned on - this prevents the supply of coolant to the heater radiator; the liquid flows through the bypass. When the heater is turned on, the circuits switch, the coolant flows to the heater radiator, and when the heater is turned off, the valve returns to its original position. Both solenoids of a double-circuit valve never open or close at the same time (except during a complete blackout, when both valves are open).
The tap pipes of all types are serrated; this shape ensures a tight fit of the rubber pipelines. Installation of pipelines on branch pipes is carried out using metal clamps; the tap itself usually hangs freely on the pipelines (since it has a low mass). The tap is connected to the electrical system using a standard electrical connector.
Today, electric heater taps are widely used on domestic and foreign cars; they have practically replaced their mechanical counterparts and made control of the interior heater more convenient.
Questions about choosing and replacing a heater tap
The heater valve is very important for the operation of the interior/cabin heating system, however, selecting and replacing this part in most cases does not cause any problems. To select the right faucet, you must follow several recommendations:
- The power supply voltage of the crane motor must correspond to the voltage of the vehicle’s on-board electrical network - 12 or 24 V;
- The type of tap - 2 or 3 pipes - must correspond to the interior heating system diagram. For conventional systems, a tap with two pipes is required; for systems with bypass, a tap with three pipes is required. Also, a tap with three pipes can be used to create a heating system with an additional heater;
- The diameter of the pipes must correspond to the diameter of the heating system pipelines, but if necessary, adapters can be used;
- The faucet and vehicle must have the same type of electrical connector. If necessary, it is necessary to replace the type of connector on the vehicle;
- The crane must have dimensions suitable for its installation.
The heater valve must be replaced after draining the coolant; metal clamps must be used for installation. It is necessary to ensure that the tap is installed correctly - position its inlet and outlet pipes in accordance with the direction of the liquid. For convenience, there are arrows on the nozzles indicating the direction of fluid flow. If you install a regular 2-pipe valve incorrectly, the system will work, but incorrectly installing a 3-pipe valve will make the system completely inoperable. If the faucet is installed correctly and reliably, the stove will start working immediately, providing warmth and comfort in the car interior.
How to choose an electric crane for a Gazelle
Replacing the heater tap on a Gazelle yourself requires you to first purchase a new device.
In the vast majority of cases, there are no problems with choosing a node. When selecting a device, you should follow a few simple rules:
- Supply voltage. Depending on the electric motor of the faucet, the corresponding voltage in the on-board network may be required from the on-board network. Accordingly, it is 12 or 24V.
- Faucet type. This refers to the number of pipes. There can be 2 or 3 of them. The choice directly depends on what heating system scheme is used on your Gazelle. If this is a conventional system, the 2-pipe option is required. Three-pipe ones are relevant for those schemes where a bypass is provided. Also, 3 pipes can be installed in situations where the Gazelle car owner wants to independently equip the car with an additional heater.
- The choice of pipe diameter depends on the diameter of the pipelines in the heating system. Although this is not necessary, since special adapters are available for sale.
- It is important to select a unit that matches the same type of electrical connector for both the tap and the machine. If the need arises, the connector on the machine can be changed.
- The tap must have suitable overall dimensions to fit in the location of the heater tap.
If we talk specifically about Gazelle, then electric cranes with 2 and 3 pipes can be used here. This directly depends on the car model, year of manufacture and engine used.
Two-pipe devices are used on the GAZ 3302 model line in the following modifications:
- engines with a volume of 2.3 and 2.5 liters, produced from 1994 to 2006;
- with engines of 2.4, 2.7 and 2.9 liters of the 1994-1996 model;
- with 2.5 and 2.7 Euro III engines, which have been produced since 2008;
- for 3302 with injection engines of 2.3, 2.5, 2.7 liters, including versions with power steering from 1997;
- for ICE 2.4 from Chrysler since 1999.
There are many more options for using 3-pipe models with electric cranes.
These are the following car versions:
- 3302 with 2.3 and 2.5 liter engines from 1994 to 2006;
- 3302 with 2.4, 2.7 and 2.9 liter engines from 1994 to 1999;
- 3302 with 2.5 and 2.7-liter Euro 3 internal combustion engines, produced since 2008;
- 3302 with Chrysler engine;
- 33025 with a 2.9 injector and a 2.8 liter diesel engine;
- 33025 with a 2.8-liter Cummins engine and a 2.9-liter Euro 4 engine;
- 33025 with a 2.9 liter injector;
- 33027 with 2.7 and 2.8 liter diesel engines;
- Gazelle Business with all internal combustion engines, including 2.9 liter injector, 2.4 liter Chrysler, 2.8 liter diesel engine, Cummins engines, etc.
The estimated cost of an electric crane from a good manufacturer will be from 1 thousand rubles. At the same time, traditionally three-pipe devices cost 200-300 rubles more than analogues with 2 pipes.
Heater heater valve
The car heater heater valve is one of the simplest parts of the car heating mechanism from a technical point of view. However, the failure of the faucet is quite unpleasant, since in the midst of cold weather you can be left without heating the interior, or, conversely, in the warm season the stove will “fry to the fullest.” Of course, you can replace the faucet at any car service center, but you can also fix the problem yourself.
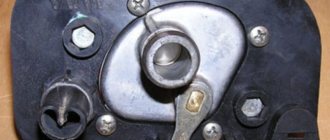
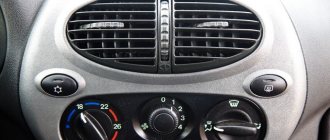
The heater valve is a regulator of the flow of coolant flowing through the heater radiator of the car. The heater valve is controlled by a lever on the front console - in the warm season, when heating the car interior is not needed, the valve is closed with a lever, and the coolant bypasses the heater radiator. In winter, the lever is placed in the right position. In this case, the coolant, passing through the heater radiator, heats the air supplied by the fan, which allows heating the car interior.
Diagnostics
If signs of malfunction or malfunction are detected, it is necessary to carry out diagnostics to identify the causes of the breakdown. One of the reasons why the heater begins to heat worse, or when very cold air comes out of it, is the valve of the Gazelle stove. It either does not open completely or is completely closed. If any of these signs occur, you must first check the correct operation of the electric crane.
- With the engine warm, touch the pipes before and after the electric valve. In the extreme hot position of the temperature adjustment handle, the pipe before and after the electric tap should be the same temperature.
- Check the power supply to the electric valve when switching temperatures.
- If there is no power, check the fuse and replace if necessary.
- Check the strainer on the inlet pipe; liquid should flow freely through the holes.
- When the tap is removed and the power is connected, you need to look into it through the light. When changing the position of the temperature regulator (from minimum to maximum), ensure that the shutter is fully opened when the handle is in the hottest position.
For correct diagnostics and repairs, it is necessary to know the structure and operating principle of the heater in order to diagnose a breakdown or carry out repairs at the first sign of a malfunction, preventing failure of the entire unit as a whole. Most faults can be predicted by indirect signs and their progression can be prevented. To do this, you need to know and understand what each element is responsible for and what the principle of its operation is.
Where is the heater valve located?
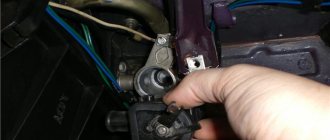
The car heater valve is located under the center console of the car. In most cars it is located on the right side of the console closer to the passenger seat, but in some models it is located on the driver's side. You can get to the tap by removing the plastic cover of the dashboard and removing the mat.
However, access from the passenger compartment will not allow removing the heater tap. Depending on the car model, the tap can be reached from under the bottom of the car (in most older cars) or directly from the engine compartment.
The design of the stove heater valve and the principle of operation
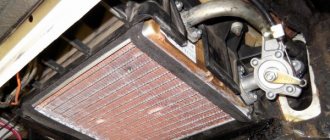
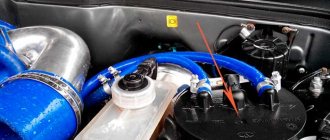
The faucet is attached to the stove radiator using bolts. Using a lever and a control cable, the faucet is connected to a lever on the front panel. By switching the interior lever to the blue or red zone, the motorist opens or closes the tap. Using hoses extending into the engine compartment, the faucet is connected to the general engine cooling system. It is through the hoses that coolant flows into the heater radiator.
When the valve is open, the coolant passes through the heater radiator and heats its metal surface. The air forced by the fan is heated from the surface and warms the interior.
Fault identification
An electronic regulator is located on the heater body, due to which it is possible to smoothly adjust the fan speed. There is also a problem with access to it, as well as to other elements of the unit. The only thing you can get to without disassembling a significant part of the system is the heater core. To do this, simply remove the glove compartment. What to do if the stove does not work in the GAZelle Business system? Indeed, due to the lack of full access, the ability to diagnose equipment is lost. In such cases, the first thing to check is the fuse. To check the functionality of the gear motor that controls the windshield defrost flaps, there is no need to remove the entire panel - its lower part on the driver's side is removed. To diagnose it, a voltmeter or test lamp is connected to the connectors with the electric motor and the clamp. We activate the damper with the corresponding button in the ignition on mode. If the lamp is on and the gearmotor shows no signs of life, it means it must be replaced. How to remove the faucet of a GAZelle Business stove (like the electric heater itself) cannot be described in words, but with the help of a diagram you can familiarize yourself with its structure and figure out what’s what.
If it is not possible to replace the damper actuator, then on the driver's side you can remove the rod from the damper lever by manually turning it to the open position. To do this on the passenger side, you will need to first unscrew the screws securing the gearmotor and fix it in the same way by turning the housing. In order to diagnose the fan motor and determine the causes of its failure, it will be necessary to remove the air intake, which is located under the hood. This will need to be done if the fan does not work. After dismantling the air intake, the connectors of two wires will become visible. Having connected a test lamp to these connectors, you must turn on the ignition, and the lamp should light up brightly. As the speed is adjusted downward, the brightness of the lamp should decrease. This is precisely an indicator of the serviceability of the speed controller. If the lamp is on, but the fan does not function, the problem is in its electric motor. Problems with the electric motor may be caused by stuck brushes. In such a situation, you can try to knock on the heater unit. The fan may resume its operation for a short time, and this will be enough at least to get to the service without freezing. If during the test it becomes clear that the speed controller has failed, the positive wire can be transferred to the fused connector next to the battery. This will also be a temporary solution to a problem that arises on the road when it’s cold outside. Also below is a diagram of the GAZelle heater valve.
Types of stove heater taps
There are several types of heater taps suitable for one car model.
- Standard factory plastic faucet with a rubber membrane as a locking mechanism. As is often the case with domestic car models of past years, this crane is the least expensive and the most unreliable. Such a faucet “likes” to oxidize, stick and rust.
- Ball valve. In such a unit, instead of a rubber membrane, a ball with holes is installed. This design of the part is much more reliable, but still does not prevent oxidation. The cost of a ball valve is much higher than a standard factory one.
- The ceramic heater tap consists of a plastic body and two ceramic plates that perform shut-off functions. The most reliable option for a stove heater tap, however, due to the low throughput of a ceramic tap, its heat transfer is low. In addition, ceramic taps are prone to leaks. A ceramic tap is the most expensive option for stove heater taps.
Heater heater valve malfunction
Since the tap is not used during the warm season, when turning on the stove during cold weather, the driver may encounter a malfunction. There are three main problems with the heater valve.
- Faucet souring due to prolonged non-use of the stove during the warm season. In spring, summer and autumn, the stove is used only for air ventilation, so the tap switch lever is moved to the extreme left position. During this period, the faucet damper may become sour, which makes it impossible to turn on the stove. In the early stages, the malfunction is manifested by a weak supply of hot air, even with the damper open as much as possible. If you use excessive force when the faucet turns sour, you can completely break it. The malfunction cannot be called critical, but it must be eliminated before the winter cold.
- Faucet leakage due to depressurization of the body, when the O-rings and seals wear out, which leads to incomplete closure of the faucet. The consequence of this is a decrease in the level of coolant in the tank and, accordingly, in the entire engine cooling system. A leaking faucet is manifested by wet spots on the carpet, the smell of antifreeze in the cabin, and a grease mark on the bottom of the windshield.
- Faucet jamming with antifreeze decomposition products and other debris. The malfunction manifests itself in a similar way to a souring faucet, but its cause is different. Antifreeze deposits and dirt accumulating in the faucet mechanism lead to jamming of the faucet, which makes it impossible to regulate the level of liquid entering the heater radiator.
If souring and jamming of the faucet is a serious, but not critical breakdown, then it is better to fix the malfunction associated with the leaking faucet as soon as possible. Otherwise, due to a decrease in the coolant level, the entire cooling system of the car’s engine may suffer.
System modernization
The main problem that causes electronics to fail is moisture. And in the tap the liquid circulates constantly, even when the shutter is closed. And when the oil seal leaks, liquid floods the entire electrical part, and it fails.
Installation of shut-off valves
To avoid this, you can install conventional shut-off valves, fitting them to the outlets of the cooling system. But in order to open or close the supply of hot liquid, you need to move the tap to the desired position manually. And since it is installed under the hood (in a regular place), it is not possible to do this while driving. But this mechanism has a much greater resource.
Pre-sealing
Before installing a new electric faucet, you need to disassemble it and fill the electronic board with hot glue to avoid moisture getting on it, coat all joints with sealant. This method can only prolong performance, because if liquid gets into the electronic part, the electric motor will be damaged, without which the mechanism will not be able to function correctly.
Selection of similar equipment
Installation of a tap with a similar arrangement of fittings from other car brands. This method is the most effective, since imported manufacturers of this equipment have a much higher resource than domestic ones. The main thing is to choose the most similar copy. And after installation, check its operation on the car.
The above diagnostic and repair methods will help you quickly identify the cause of the malfunction and replace or repair faulty equipment. Repairing and installing a heater tap on a Gazelle Business UMZ 4216 will not cause you any particular difficulties. This type of repair does not require extensive experience. It can be done on the road with a minimum set of tools.
The owner of a long gazelle business came to us from the distant northern Urals, the city of Novy Urengoy, with a complaint about a faulty stove, he says the stove doesn’t heat at all, but he bought this workhorse second-hand the other day and didn’t check the functionality of the stove, so we need to figure out the fault. Errors E3 and E7 (E3 and E7) light up on the display.
And so, we begin the check with a visual inspection of the heater control unit (HCU) 2705-8121020. E3 lights up on the display . Looking ahead, let's say that this malfunction is associated with the heater damper gear motor (90.3780) or MP-2-01 , which is located next to the driver’s right foot under the panel. Looking under the panel and deciding to check whether both connectors were latched, we did not find this gear motor, but only the connectors were dangling. Apparently the previous owner removed the gear motor, but did not install a new one. We install a new gear motor.
Prevention of malfunction of the heater valve
Preventative maintenance of the heater valve allows you to prevent early failure of the mechanism. In order not to be left with a non-working stove before the start of the “heating season”, it is necessary to switch the lever from the red zone to the blue zone and back from time to time. This will prevent the heater tap from souring and jamming.
It is also necessary to carefully monitor coolant leaks in the car interior - for example, from time to time lift the rugs and examine the floor of the car for stains from leaking coolant.
Replacing the heater valve
The heater valve mechanism is so simple that it cannot be repaired. The malfunction can be eliminated by replacing the assembly part itself. To do this, you will have to work hard, since replacing a faucet requires access to it both from the interior and from the engine compartment and from under the bottom of the car.
- First you need to place the car on a flat surface. You need to place an empty container under the radiator into which you can drain the coolant from the radiator.
- Next, you need to move the container under the car engine and drain the “coolant” from the engine. To do this, you need to unscrew the special bolt on the block on the left side.
- Then you need to loosen the screws of the clamps from the engine compartment that secure the hoses connecting the faucet to the engine cooling system. After this, the hoses must be removed from the tap pipes.
- After this, you need to loosen the screws of the hose clamps on the tap side. To do this, you will have to go into the car interior and remove the plastic dashboard cover. After the screws have been loosened, you need to remove the hoses where they are attached to the heater radiator.
- From the engine compartment, unscrew the nuts holding the valve.
- After this, the faucet can be removed from the car interior. All that remains is to disconnect the rod connecting the crane to the control lever on the front console. To do this, using pliers, you need to disconnect the bracket on which the rod is attached. After this, the tap can be finally removed.
Installing a new heater tap is done in the reverse order, except for one thing. First, the hoses connecting the faucet to the engine cooling system are connected, and only then the bracket and rod are installed. After this, coolant can be added to the system.
How to remove the heater valve and additional heater pump for a gazelle
Page 1 of 2
We remove the heater valve if there is a coolant leak. We remove the electric pump of the additional heater to access the tap during replacement, and if the pump itself malfunctions.
Removing the additional heater electric pump
1. Drain the coolant (see Replacing the engine coolant of a Gazelle car).
2. Disconnect the plug block from the pump motor connector.
3. Use a screwdriver to loosen the clamps on the hoses
4. Remove the outlet hose
5. Remove the supply hose from the pump nozzle.
6. Using a 10mm wrench, unscrew the two pump mounting bolts
7. Remove the pump
Install the electric pump in reverse order.
Heater Gazelle business principle of operation.
The Gazelle Business heater is not a bad parody of foreign car heaters, but only at first glance. The heater is controlled by buttons and knobs on the electronic unit located on the control panel. The air in the heater, as on all Gazelles, is sucked in by an electric fan through the grilles under the windshield and, passing through air ducts and deflectors, enters the cabin. Coolant is supplied to the heater radiator through a tap, the opening and closing of which is carried out by an electric drive. It is distinguished from the same taps of previous models by the presence of an additional fitting. When the valve is closed, the liquid is redirected back to the cooling system.
How the stove works in Gazelle Business
For correct diagnostics and repairs, it is necessary to know the structure and operating principle of the heater in order to diagnose a breakdown or carry out repairs at the first sign of a malfunction, preventing failure of the entire unit as a whole. Most faults can be predicted by indirect signs and their progression can be prevented. To do this, you need to know and understand what each element is responsible for and what the principle of its operation is.
Car cooling system
In Gazelle Business the stove is an integral part of the engine cooling system. When the engine operates, a large amount of heat is generated that must be removed. Heat is released due to fuel combustion and from rubbing surfaces. If the heat is not removed, the engine will heat up very quickly and fail. The cooling system has two circuits (small and large circle), they are separated by a thermostat. When the liquid is cold, it circulates in a small circle, and when it warms up, it circulates in a large circle. This allows you to quickly reach operating temperature and not overheat. During the warm season, heat is released into the atmosphere, and when cold weather sets in, part of the heat is spent on heating the cabin.
Heating
After we have figured out how the cooling system works, we can move on to heating the interior. The heater circuit on a Gazelle car is identical to the heaters of other cars that have a liquid-cooled engine. Fluid can circulate through the heater core whether the thermostat is open or not. For better heating, the heater fluid comes from the hottest part of the engine (the cylinder head). Therefore, on an engine that has not yet reached operating temperature, warm air still comes out of the deflectors. The heater has a valve in its design that either allows liquid to flow into the radiator or dumps it back. And the temperature of the air leaving the deflectors depends on how much it is open. The valve position is adjusted from the heater control panel. The faucet is equipped with an electric drive that changes the position of the valve. It is also possible to change the blowing intensity and direction from the control panel. The intensity is controlled by a motor with an impeller, the rotation speed of which changes the intensity of the airflow.
Changing the position of the dampers changes the direction of the airflow (to the face, to the legs, to the chest, to the glass). The heated coolant from the engine enters the heater radiator through the highways, causing it to heat up. At this time, air blown by a fan passes through it. Then it passes through air ducts, the dampers of which are open. The hot air then enters the car interior and heats it. To repair or diagnose a malfunction of this equipment, there is an electrical diagram that shows all the components of the electrical devices. And in case of breakdowns or incorrect operation of devices, it is necessary to read it in detail in order to understand where it is powered from and how the failed device is regulated.
When you know the principle of operation and the device, it is much easier to navigate in case of breakdowns. After all, to successfully carry out repairs, it is important to understand the cause of the malfunction, otherwise the repair will not be completed successfully. For correct diagnosis, it is also important to understand the algorithm of operation of the entire mechanism as a whole. Currently, a driver does not have to know how to repair a car; there are service stations that can handle repairs of any complexity. But it happens that a breakdown catches you on the road, and there is no opportunity to use the services of specialists. This is when knowledge of the structure of a car and its mechanisms comes in handy. When you know how the Gazelle stove works, then if a malfunction occurs on another car, it will be easier to navigate when repairing or diagnosing, since in all cars they are almost the same, with the exception of small nuances. And you can easily diagnose the problem.
Heater Gazelle business device.
The tap is controlled automatically by the heater control unit depending on the selected temperature. In addition, the temperature of the air supplied to the cabin is regulated by a central damper, which, by turning, directs the air flow, or part of it, through or bypassing the radiator. In addition to the central damper, there are a number of dampers that redistribute the air flow. The dampers of the Gazelle Business heater, unlike previous models, are controlled by gear motors, not cables. The control is carried out by the heater control unit. The electric heater fan is located inside the housing and to access it it is necessary to remove and disassemble the entire heater. Despite the fact that the fan electric motor is imported, this arrangement completely negates all the advantages of the heater.
The speed of the electric motor is regulated smoothly by turning the handle on the control unit, due to the electronic regulator located on the heater body. To access it, as well as access to almost all elements
heater, it is necessary to remove the front panel completely. The only thing that can be changed without removing the panel is the heater core. To change it, just remove the glove compartment.
Diagnostics and repair
The design of the heater is thought out in such a way that in order to check the functionality of any of its parts, not to mention diagnostics, it is necessary to completely remove the entire heater body and disassemble it, having previously dismantled the entire front panel in the cabin.
Without removing the dashboard, only the radiator can be replaced, because it can be accessed through the glove compartment
.
As one of the drivers put it, in order to replace the same faucet damper motor, you need to “pick up a bucket of screws” while removing the front panel.
In order to protect yourself as much as possible from this time-consuming operation, it is better to first check the electrical supply circuit
voltage to the stove. Power to the heater is supplied through the fuse box and fan relay.
First, the integrity of the fuse is checked, without applying voltage. After this, you need to check the functionality of the relay. There are cases where the relay had a poor contact connection and constantly came off.
You need to apply power and move the relay body. If a miracle does not happen and the fan does not hum, then it needs to be replaced.
check the electric damper drive by ear
. When the power is turned on and the temperature setting knob is turned, the sound of the gear motor operating should be heard. In extreme cases, when the gear motor fails on the road and it is necessary to direct air to the windows, it is necessary to remove the rod from the damper and set it to the required position manually.