Burnout of the gasket under the cylinder head on VAZ 2109-2108 cars is the most common reason why the head has to be removed from the engine, and accordingly with further repairs, or rather, replacement of the gasket. If this problem is not noticed in time, it can lead to quite sad consequences, since the engine can overheat and even jam.
The procedure itself for removing the cylinder head and replacing its gasket is not complicated, but at the same time it requires certain technical skills and a small number of tools, the list of which is given below:
- Hex or similar bit with adapter for use with wrench
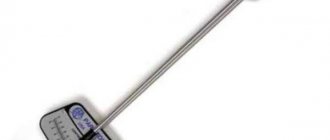
- Torque wrench - in this case I used the Ombra model with a range from 10 to 110 Nm, which is quite enough
- Flat screwdriver
- Extension
- Gasket Remover
Procedure for replacing the cylinder head gasket on a VAZ 2109-2108
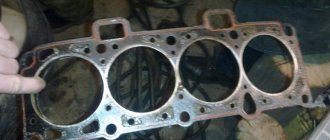
The gasket may remain either on the surface of the head or stick to the block itself. You can try to remove it by hand without using any tools, and if that doesn’t work, you can carefully pry it off with a flat-head screwdriver without damaging the surface of the part.
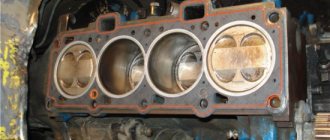
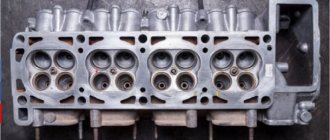
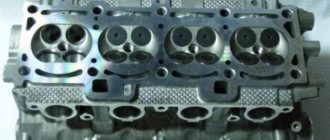
Carefully inspect the surface of the cylinder head and if pronounced traces of corrosion are found on it, especially in close proximity to the coolant channels, then it is necessary to repair it: milling, grinding, etc. If everything is normal, then we remove traces of the old gasket using special means:
We wait a few minutes until the whole thing has cooled down and remove the residues that have not succumbed to the chemicals, if any remain, with a razor blade. Then we wipe everything dry and you can even degrease it so that no foreign traces remain on the surface:
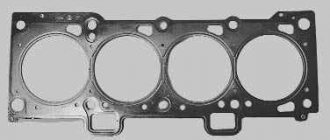
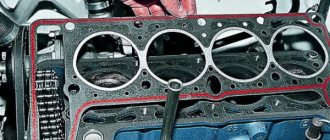
The engine block also needs to be cleaned and then a new gasket installed on it. It is important that the holes in the gasket coincide with the guides, which are located at the corners of the block:
When is it time to change?
- There may be a need to replace or repair the cylinder head if you begin to notice that fuel consumption has increased or the power of the power plant has decreased.
- Incorrect assembly and installation of valves and cylinders can also lead to malfunctions in the cylinder head system.
- If you constantly fill your car with low-quality gasoline, then do not be surprised that over time this system will begin to malfunction and will need to be repaired.
- A crack that appears in a block cannot be eliminated in any other way than by completely replacing this element.
- A symptom indicating problems in the cylinder head may be white smoke coming from the exhaust pipe, this is caused by antifreeze getting into the engine cylinders.
White smoke from the exhaust pipe
- If oil stains appear on the surface of the coolant in the tank, this also indicates that repair of the unit is necessary. This is due to the fact that oil, in one way or another, began to get to places where it should not be.
- Not often, but sometimes exhaust gases begin to break through the gasket. There is no other choice but to dismantle the head and replace the gasket.
- Removing the head may be necessary in the case of VAZ 2109 tuning, modifications, problems with plugs, tightening bolts or boring cylinders.
Reinstalling the head
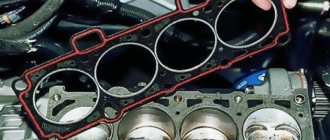
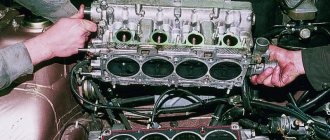
Now you can carefully install the cylinder head in its place, making sure that at this moment the gasket does not slip out or move to the side. Of course, the guides fix it, but you should still be extremely careful.
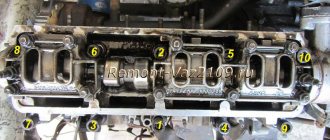
Next, we will need a torque wrench, since the bolts will have to be tightened with a certain torque. It is also worth keeping in mind that the tightening order must be observed. The diagram below shows the sequence in which to twist:
Now regarding the force with which it is necessary to tighten the bolts. This should be done in 4 steps:
- First, a torque of 20 Nm
- Second reception with a torque of 75-85 Nm
- Tighten each bolt another 90 degrees.
- Finally turn it 90 degrees.
After this, all that remains is to install all the equipment removed from the car, fill in the coolant, connect all the sensors, wires and hoses and check the work done. Usually everything becomes visible immediately after pouring antifreeze. If wet marks appear at the junction of the head and block, you can take everything back and do the whole job again! But I hope that this will not happen in your practice! Happy renovation!
Puff
Reassembling the unit if you strictly follow the instructions for dismantling work will not pose any particular problems.
An incredibly important aspect of replacing the cylinder head gasket and all other activities associated with removing the head is the correct adjustment and tightening of the bolts.
Tightening the bolts is done strictly with a torque wrench, which will allow you to control the tension torque.
Here are some guidelines for using this specialized wrench and checking the current tension condition:
- Place the holder in the zero position. This will indicate that now the key data is equal to the moment of the original position;
- Look at the torque tool readings as you begin to tighten the bolts;
- Rotate the holder, monitor the indicators;
- If the torque does not change, the fastener may be stretchable, which is normal. This is exactly what should happen;
- If the torque increases rapidly, bolt movement should be achieved. That is, the stretch of the holder is small, it needs to be stabilized.
Golden rules of tightening
To properly reassemble the cylinder head, you need to adhere to the golden rules:
- Strictly follow the tightening torque data corresponding to the VAZ 2109;
- Make adjustments only using a torque wrench. Other tools do not allow you to get the desired result;
- To install the cylinder head, use only serviceable bolts that meet the requirements of your engine installed on the VAZ 2109;
- Before work, make sure that the holders are in good condition.
Checking the bolts
Tightening diagram
In addition to observing the required tightening torques for the cylinder head mounting bolts, one more rule must be observed here.
Returning the bolts to their places is carried out strictly according to the diagram below.
Tightening sequence
Next, do the work according to the table, and you will do everything right.
Tightening is performed in four circles, following the sequence of work with the mounting bolts indicated in the diagram.
| Tightening circle | Your actions |
| First round | All bolts are tightened using a torque wrench according to the diagram with an applied torque of up to 2.0 kg/cm m |
| Second round | Tightening in the second circle is carried out even according to the diagram, but the torque is applied up to 8 kg/cm m |
| Third circle | Each bolt on the third installation circle must be tightened 90 degrees. |
| Fourth circle | The fourth and final round of tightening the cylinder head bolts requires re-tightening the fasteners an additional 90 degrees. |
Make sure your bolts meet the specifications before following the instructions and diagram. Otherwise, even the most correct, strictly observed tightening will not give any result.
Replacement process
Replacing the cylinder head gasket on a VAZ 2109 is a simple procedure and is similar for engines that have both a carburetor and an injector.
Required Tools
In order to change the gasket, the cylinder head must be removed, and the following tools may be required for removal and replacement:
- hexagon;
- a set of keys;
- set of heads;
- torque wrench;
- extension;
- gasket remover;
- flat screwdriver.
To perform this procedure, the vehicle must be placed on a suitable lifting device.
Stages
Replacement is carried out as follows:
- The vehicle's power is turned off by disconnecting the negative terminal from the battery.
- Next, you need to drain the working fluids. The coolant may not be completely drained. The oil is drained if antifreeze gets into it.
- Next, you should disconnect all the wires with the sensors, remove the thermostat, the air filter along with the pipes.
- Then the timing cover is removed and the muffler pipe is disconnected.
- Next, you need to set the alignment marks and remove the timing belt.
- After disconnecting all supply hoses, you need to dismantle the carburetor.
- Next, remove the cooling system pipes and the protective timing cover.
- After this, the mounting bolts are unscrewed and the cylinder head is dismantled.
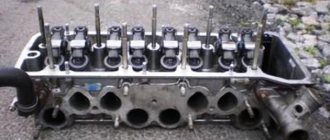
Dismantling the cylinder head on a VAZ 2109
Bolt tightening diagram
Sorry, there are no surveys available at this time.
Step-by-step scheme of work
The procedure and torque for tightening the cylinder head of a VAZ 2109 with various types of engines was initially established at the manufacturer’s factory and written in full and step by step in the book. According to the diagram, the procedure for pulling the cylinder head of a VAZ 2109 should be done with 2 central bolts.
How to properly tighten the cylinder head of a VAZ 2109:
Replacement process
Replacing the cylinder head gasket on a VAZ 2109 is a simple procedure and is similar for engines that have both a carburetor and an injector.
Required Tools
In order to change the gasket, the cylinder head must be removed, and the following tools may be required for removal and replacement:
- hexagon;
- a set of keys;
- set of heads;
- torque wrench;
- extension;
- gasket remover;
- flat screwdriver.
To perform this procedure, the vehicle must be placed on a suitable lifting device.
Stages
Replacement is carried out as follows:
- The vehicle's power is turned off by disconnecting the negative terminal from the battery.
- Next, you need to drain the working fluids. The coolant may not be completely drained. The oil is drained if antifreeze gets into it.
- Next, you should disconnect all the wires with the sensors, remove the thermostat, the air filter along with the pipes.
- Then the timing cover is removed and the muffler pipe is disconnected.
- Next, you need to set the alignment marks and remove the timing belt.
- After disconnecting all supply hoses, you need to dismantle the carburetor.
- Next, remove the cooling system pipes and the protective timing cover.
- After this, the mounting bolts are unscrewed and the cylinder head is dismantled.
Dismantling the cylinder head on a VAZ 2109
- If the old gasket has become stuck and is difficult to remove, you can use a special product.
- Before installing a new consumable, carefully inspect the surrounding surfaces. There should be no defects on them, otherwise the head should be ground.
- When the surfaces are ready for installation, they need to be cleaned of dirt, degreased, and a new part can be installed. It is installed along guides located in the corners. For better sealing, a layer of sealant is applied at the joint.
- The fastening bolts must be tightened with a torque wrench to the torque specified in the VAZ 2109 operating manual.
Bolt tightening diagram - After installing the cylinder head, you need to replace all the removed parts in the reverse order.
Sorry, there are no surveys available at this time.