January 14, 2015 Lada.Online 560 472 0
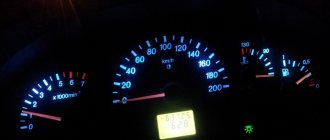
The Lada Priora/Kalina instrument cluster is designed to display driving characteristics, the current state of vehicle systems that ensure traffic safety, as well as the correct operation of the entire vehicle as a whole. If you are a novice driver, then this description of the dashboard will help you understand the readings of instruments and indicators.
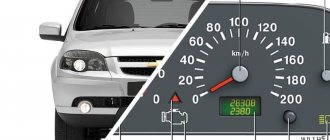
- Tachometer. Shows engine speed in real time. The red scale zone indicates a dangerous operating mode for the engine;
- Malfunction lamp of the electronic brake force distributor. To check, the lamp lights up red for a few seconds when the ignition is turned on. The burning of the lamp in other cases indicates a malfunction; when driving with a burning lamp, increased safety measures must be observed;
- Battery charge lamp. To check, the lamp lights up red when the ignition is turned on and goes out after the engine starts. If the lamp is lit in other cases, it indicates a lack of battery charge;
- Left turn signal lamp. Flashes when the turn signal or hazard lights are on;
- Speedometer. Shows at what speed the car is currently moving;
- Engine oil pressure warning lamp. To check, the lamp lights up when the ignition is turned on and goes out after the engine starts. In other cases, the lamp is lit indicating low pressure in the engine lubrication system. It is not recommended to operate the engine in such conditions;
- Right turn signal lamp. Flashes when the turn signal or hazard lights are on;
- Handbrake lamp. Lights up red when the parking brake is applied;
- Coolant temperature gauge. Engine operating temperature is 90 degrees and above to the red zone. It is prohibited to operate the vehicle if it overheats. When the arrow reaches the red zone, a buzzer will sound. To extend engine life, it is recommended not to operate the engine at high speeds until the coolant temperature reaches operating temperature;
- Gasoline level indicator in the tank. The arrow shows the fuel level. Lack of gasoline can damage the fuel pump;
- Fuel reserve lamp. Lights up with an accompanying buzzer signal when there is less than 10 liters of fuel left in the tank;
- Button for switching display modes and resetting daily mileage readings. A short press switches between daily and total mileage. When you hold the button, the daily mileage is reset, accompanied by a sound;
- Hazard warning light. Flashes red when the emergency lights are turned on simultaneously with the turn signals.
- Electric power steering (EPS) malfunction lamp. To check, the lamp lights up yellow when the ignition is turned on for a few seconds. Lighting of the lamp in other cases indicates a malfunction of the EUR;
- Headlight high beam lamp. Lights up when the high beam headlights are turned on;
- Lamp for turning on external lighting. Lights up when the headlights are turned on or the headlights are low beam;
- Airbag system malfunction lamp. To check, the lamp lights up yellow when the ignition is turned on for a few seconds. In other cases, if the lamp is illuminated, it indicates a malfunction in the airbag system. In this case, in the event of an accident, the airbags will not deploy;
- Immobilizer lamp. If the system is working properly and the engine is allowed to start, when the ignition is turned on, the lamp flashes once and goes out. If the lamp flashes constantly (accompanied by short beeps), then the system is faulty. If, after turning on the ignition, the lamp lights up for 15 seconds and goes out, then the anti-theft system is not activated;
- Liquid crystal display of the on-board computer (BC). Displays daily and total mileage, as well as information from the BC;
- Seat belt warning light (optional). The lamp lights up when the driver's seat belt is not fastened, accompanied by buzzer signals for 1.5 minutes;
- Brake system emergency lamp. To check, the lamp lights up red when the ignition is turned on for 4 seconds. In other cases, the lamp is lit indicating an insufficient level of brake fluid, or another malfunction of the brake system;
- Front passenger airbag lamp (optional). Passenger airbag deactivation lamp;
- Anti-lock braking system fault lamp (optional). To check, the lamp lights up when the ignition is turned on and goes out after a few seconds or after the engine starts. When the lamp is lit, there is a malfunction in the ABS system, but the brakes remain fully operational;
- Engine management system malfunction lamp (Check Engine). To check, it lights up when the ignition is turned on and goes out after the engine starts. In other cases, the lamp is lit indicating a malfunction in the system. See the error code.
Instrument panel Kalina instructions
The instrument panel is precisely the element that can indicate the state of “health” of the car. All kinds of sensors and alarms are located along the entire perimeter of the shield. It is recommended to regularly and carefully monitor the condition of this electrical unit and carry out the necessary checks and diagnostics of light bulbs and indicators. Special instructions that every driver should read will help you understand the instruments, indicators and signals.
Almost all Lada Kalina owners are satisfied with the instrument panel of this car. It is informative and simple. It has a certain combination of instruments and controls.
Possible faults
The following malfunctions are possible with the dashboard:
- Fuel level or temperature gauges do not work. The reason may be faulty sensors or damaged wiring.
- When the tank is full, the fuel level needle drops to the zero position.
- The arrow on the fuel level indicator moves abruptly and often drops to the zero position.
- The fuel reserve indicator does not go out.
- If any indicators on the device do not light up, the reason may be burnt out light bulbs, insufficient contact between the light bulb socket and the printed circuit board, oxidation of contacts, broken wires, or a malfunction of the indicator sensor.
- If the speedometer is not working, the reason may be in the flexible drive shaft of the device: the nuts are poorly tightened, a break, mechanical damage, etc. (video author - RasH19).
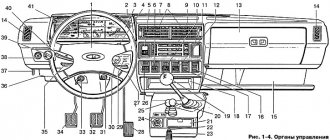
Indicators included in the panel
The Kalina dashboard consists of 23 main elements. These include:
- rotation speed meter;
- indicator showing battery charge;
- speed meter;
- indicator displaying lubricant pressure in the engine;
- temperature indicator;
- turn signals;
- fuel level sensor in the tank;
- hand brake;
- daily mileage reset;
- reserve fuel quantity lamp;
- computer display.
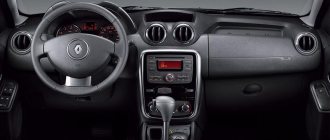
About controls that do not touch the dashboard
The main elements include the following attributes of the driver's seat:
- clutch pedal;
- pedal drive brakes;
- accelerator pedal;
- of course, the steering wheel.
The central part of the panel also has additional “organs”:
- levers and regulators that control the heating and ventilation modes of the interior;
- climate system activation organ;
- Lada Kalina stern glass heating button;
- mechanism for opening and removing the ashtray.
see also
Comments 182
Please tell me how to solve the problem? . The problem is that the warning lights (!), (ABS), (ESP) are constantly on, so these systems are not included in my configuration. Some people advise to reflash the device, others say that the problem can be solved in 5 minutes using a programmer. What needs to be done to keep the warning lights off?
And another question, in order for this dashboard to work correctly on Kalina Cross, do I need firmware 2192-50 1.2? The photo shows what it is like now. Now my low beam and high beam are not working at the same time, and the emergency lights are not working properly.
Is it the same with two screens? Why connect to the power supply when you can rearrange the jumpers, what is the difference?
I flashed grants for the tidy, everything works except for the backlight, that is, the screen lights up but where the arrows are there are no numbers, if you do a test of the tidy, everything lights up
Hello . Is it possible to flash a Priora 2 tidy with firmware 17 to 19?
Hello, I ordered USBDM v-4.95, but the Chinese sent USBDM-jb16-001, not USBDM-js16-001. Will it be possible to flash the KALINA 2 tidy and what needs to be done. THANK YOU.
I have USBDM-jb16-001. Still doesn't want to sew. It just doesn’t select the firmware, it gives an error
Thanks for the article and the used firmware! I edited the mileage, flashed the tidy from Granta Lux and put it in Kalina!
I don’t think it’s relevant anymore, but still. you need to reset the device. because this abs data is recorded when the device is connected to the car. I did that, everything is fine
Yes that's right. The problem has already been solved. Nevertheless thank you.
I don’t think it’s relevant anymore, but still. you need to reset the device. because this abs data is recorded when the device is connected to the car. I did that, everything is fine
You need to do everything as written in the article above. Select EraseSelective and check the box. (if you want to reset the mileage and erase the immo, use EraseMass or erase all)
| Equipment | Firmware version | DTNV* | DTOZH* | What is needed for firmware | Note |
| Granta Standard | 015 | No | No | Changing the display and working with a soldering iron | Old board |
| 029-040 | No | No | Changing the display and working with a soldering iron | Updated board | |
| Granta Norma | 053, 060, 076, 087 | No | No | Work with a soldering iron or use modified firmware 2190-20_092_for_076 | |
| 090, 091 | Yes | No | Suitable 092 and 009 or 012 from Kalina | ||
| 092-095 | Yes | Yes | |||
| Granta Lux | 032, 038, 042 | Yes | No | Firmware 046 is suitable | |
| 046 | Yes | Yes | Shows the transmission number | ||
| 047 | Yes | Yes | |||
| Kalina Norma | 007 | Yes | No | Suitable firmware 009 or 012 | |
| 014 | Yes | Yes | Added on/off gear shift sound | ||
| Kalina Lux | 009 | Yes | Yes | Firmware 012 is suitable | |
| 012 | Yes | Yes | Shows the transmission number | ||
| 014 | Yes | Yes |
Expert opinion
It-Technology, Electrical power and electronics specialist
Ask questions to the “Specialist for modernization of energy generation systems”
Fuses and relays of the mounting block To obtain four-digit combinations of faults, you need to use special equipment or resort to the services of service station specialists. Ask, I'm in touch!
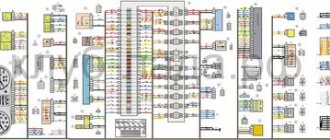
Electrical diagram of the front wiring harness Kalina 2
1 – right headlight; 2 – electric motor for washers; 3 – left headlight; 4 – starter; 5 – rechargeable battery; 6 – main fuse block; 7 – generator; 8 – sound signal; 9, 10, 11 – front wiring harness blocks to the instrument panel wiring harness blocks; 12 – air conditioning fan electric motor; 13 – electric fan of the engine cooling system; 14 – ABS hydraulic unit; 15 – right front speed sensor; 16 – left front speed sensor; 17 – front wiring harness block to rear wiring harness block; 18 – right fog lamp; 19 – left fog lamp; 20 – ambient temperature sensor; 21 – automatic transmission control controller; 22 – air conditioning compressor; 23 – audible alarm signal; 24 – rear window washer electric motor; 25 – automatic gearbox; 26 – block for automatic gearbox; 27 – block to the automatic transmission selector switch; 28 – block to the automatic transmission speed sensor.
Instrument clusters and tuning
Tuning the Kalina torpedo
The listed devices and controls are located on the so-called dashboard of the car. You can install an original torpedo on Kalina, thereby diversifying the interior of the car.
The instrument cluster is closed with a special cover, which is an overlay on the panel. If necessary, the cover can be easily removed and replaced.
Auto-tuning instructions can be found on special websites and forums. Tuning the combination of all devices is not difficult if you have minimal skills in working with a soldering iron. The instrument cluster on Kalina is identical to the combinations on the VAZ 2118 and 2119. Nowadays, the GF 618 instrument cluster on Kalina, based on LEDs, is very popular; it has a built-in route diagnostic computer.
A panel that was installed at the factory can quickly become boring. In order not to purchase an alternative, but very expensive panel with a built-in computer, you can make inexpensive tuning with the existing one. The easiest way is to install an overlay on the instrument panel, which can be easily purchased using the services of online stores.
Using the instrument panel, the driver can monitor the vehicle’s condition, driving characteristics and other functions and processes that affect the safety of movement. Also, with the help of indicators, the car owner will be able to operate it correctly. Next, a description of the indicators on the instrument panel will be given to make it easier for a novice driver to understand.
Electrical diagram of the rear wiring harness Kalina 2
1, 2 – rear wiring harness blocks to the instrument panel wiring harness blocks; 3 – right side direction indicator; 4 – left side direction indicator; 5 – hand brake sensor; 6 – rear wiring harness block to the tailgate wiring harness contacts; 7 – interior lighting unit; 8 – switch in the driver’s seat belt; 9 – trunk lighting; 10 – electric fuel pump module; 11 – right lamp; 12 – rear wiring harness block to the tailgate wiring harness contacts; 13 – left lamp; 14 – rear wiring harness block to rear left door wiring harness block; 15 – rear wiring harness block to rear right door wiring harness block; 16 – rear wiring harness block to the front right door wiring harness block; 17 – rear wiring harness block to the front left door wiring harness block; 18 – airbag control unit; 19 – rear wiring harness block to the front wiring harness block; 20 – block of the rear wiring harness to the block of the wiring harness of the parking system sensors; 21 – control unit and alarm unit of the safe parking system; 22 – parking system switch; 23 – speaker of the safe parking system; 24 – switch for interior lighting in the driver's door pillar; 25 – interior light switch in the right front door pillar; 26 – switch for the interior lighting in the pillar of the right rear door; 27 – interior light switch in the left rear door pillar; 28 – right seat electric heater switch; 29 – left seat electric heater switch; 30 – electric heater of the right seat; 31 – electric heater of the left seat; 32 – driver’s seat belt pretensioner; 33 – passenger seat belt pretensioner; 34 – central unit of body electronics; 35 – sensor for automatic glass cleaning system (rain sensor); 36 – rain sensor sensitivity regulator; 37 – rear wiring harness block to the instrument panel wiring harness block; 38 – right rear speed sensor; 39 – left rear speed sensor.
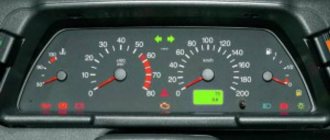
Types of dashboards
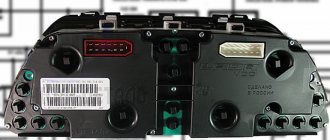
Installation of non-original products on Lada Kalina is not recommended. This is especially true for cars under warranty. If it is necessary to replace the device, it should be selected in accordance with the article number and version/modification of the machine.
| Kalina version | vendor code | Software version | Other characteristics |
| Basic | 1118-3801010-00 | 2,7; 3,0; 4,2; 6,3 | Company- |
| Basic | 1118-3801010-50 | 3,0; 3,8; 3,9; 4,3; 4,4 | GPS system support |
| Sport | 11196-3801010-50 | 3,0; 3,8; 3,9; 4,3; 4,4 | GPS system support |
| Kalina 2, Norma | 2192-3801010-20 | 06, 07, 09, 12, 14 | Availability of Can bus |
| Kalina 2, Lux | 2192-3801010-40 | 06, 07, 09, 12, 14 | Availability of Can bus |
Error codes
Self-diagnosis mode displays certain codes. Due to the simplicity of the design of the diagnostic unit, digital values only indicate the area where the fault occurs. The most popular encodings:
- 2 – there is a short circuit in the on-board network with a critical increase in voltage;
- 3 – open circuit or malfunction of the float in the gas tank;
- 4-5 – error or breakdown of the antifreeze or ambient temperature sensor, respectively;
- 6 – the motor is very overheated;
- 7 – too low oil pressure in the engine boat;
- 8 – the brake system is not working properly;
- 9 – the battery is faulty or severely discharged;
- E – standard error of the firmware data package;
- 0 – no errors – all on-board systems are operational.
Rear door wiring harness diagram Kalina 2
1 – contacts of the tailgate wiring harness to the rear wiring harness block; 2 – block of the wiring harness of the rear additional (tailgate) to the block of the wiring harness of the license plate lights; 3 – gear motor for the electric drive of the tailgate lock; 4 – rear window heating element; 5 – rear window wiper gear motor; 6 – tailgate lock; 7 – contacts of the tailgate wiring harness to the rear wiring harness block 2; 8 – additional brake signal.
Why did it happen so?
Perhaps the automatic requests do not belong to you, but to another user accessing the network from the same IP address as you. You need to enter the characters into the form once, after which we will remember you and be able to distinguish you from other users exiting from this IP. In this case, the page with the captcha will not bother you for quite a long time.
You may have add-ons installed in your browser that can make automatic search requests. In this case, we recommend that you disable them.
It is also possible that your computer is infected with a virus program that is using it to collect information. Maybe you should check your system for viruses.
If you have any problems or would like our support team, please use the feedback form.
The instrument panel serves to inform the driver about all important processes occurring in his car. It is by using the scales, indicators, symbols and lamps located on this device that the person sitting behind the wheel is able to monitor the performance of components and systems. For the shield to function correctly as a single system, it requires regular diagnostics. It consists not only of scanning by connecting electronic reading devices to the computer, but also by visually monitoring the performance of all specified components of the dashboard (lamps, etc.).
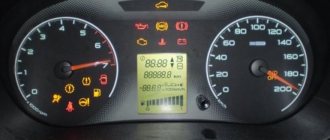
What do the icons on Kalina's dashboard mean?
- 1 – standard tachometer. The dial indicator is divided up to 7000 rpm with a threshold of 500 rpm;
- 2 – Check the engine. A standard lamp found on all modern cars. Indicates a serious engine breakdown and the need for urgent repairs;
- 3/9 – indicators indicate the turn signals are turned on;
- 4 – the oil pressure in the engine has greatly decreased;
- 5 – ABC is faulty and usually goes out when you turn the key;
- 6 – immobilizer operation indicator;
- 7 – the indicator has a simple meaning, it indicates that the motor is overheating;
- 8 – parking brake status indicator;
- 10 – the battery symbol shows the battery charge status;
- 11 – odometer;
- 12 – indicator of the state of the exchange rate stability system;
- 13 – the need to shift to a higher gear is not established in most versions;
- 14 – high beam indicator lamp;
- 15/17 – indicator of normal operation of stern/front fog lights;
- 16 – low beam indicator;
- 18 – daily mileage reset key;
- 19 – standard display;
- 20 – icon indicating that the doors are closed correctly;
- 21 – critical drop in fuel level in the gas tank;
- 22 – an exclamation mark inscribed in the tire profile indicates a punctured wheel;
- 23 – if the lamp goes out after starting the engine, the power steering is working normally;
- 24 – requirement to fasten seat belts;
- 25 – exclamation mark is used only in some vehicle configurations;
- 26 – airbag operation indicator.
The badges are only relevant for hatchback and sedan versions of certain versions. Depending on the year of manufacture and configuration, the symbol designation may differ from the nominal value.
Instructions for dismantling and repair
Dismantling the tidy may be required to perform tuning, replacing backlight bulbs or repair work. You can find out how to remove the instrument panel on a Lada Kalina from the car's operating instructions.
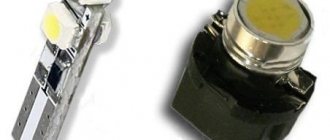
LED instrument lighting
Tools and materials
Before disassembling the Kalina 2 instrument panel, you need to prepare the following materials and tools:
- a set of keys;
- Phillips and flat screwdriver;
- replacement parts and bulbs.
Before carrying out work, turn off the power to the vehicle by removing the negative terminal from the battery.
Removing the Kalina torpedo
Algorithm of actions
The disassembly procedure consists of the following steps:
- Using a Phillips screwdriver, you need to unscrew two self-tapping screws.
- Next, you need to remove the trim from the instrument panel.
- At the next stage, the spring clips are removed from the clutch.
- After unscrewing two screws, you need to slide the panel towards you.
- The latch holding the block must be pryed up using a flat-head screwdriver and turned.
- Next, you need to disconnect the connectors with the wires and you can safely remove the tidy.
- To remove the glass from the instrument panel, unclip the plastic clips.
After dismantling, you can replace faulty parts and lighting tabs. If the LED warning lights on the Lada Kalina have burned out, it is impossible to replace them, since they are soldered in. In this case, you need to change the entire instrument panel of the Lada Kalina 2. The Kalina instrument panel is assembled in the reverse order.
Thus, knowing how to disassemble the panel on Kalina, you can repair it yourself if the backlight or signal lights do not light up.