The three-pin emergency stop and turn signal relay is responsible for turning on and flashing the lights corresponding to the direction of travel of the vehicle. In this article, the reader will learn about where the turn signal relay on the VAZ 2114 and its fuse are located, why the switching device fails, and what problems the car owner encounters in the electrical circuit responsible for the turn signals.
Problems associated with the operation of turn signals on a VAZ 2114: the main reasons
The main reason why the turn signals stop working or do not work correctly is a breakdown of the VAZ 2114 turn signal relay. However, there are situations that should lead one to believe that the problems are caused by problems with other elements.
Eg:
- a burnt out/failure of one or more light bulbs will make itself known by excessively rapid blinking when the turn signal is turned on;
- problems with the switch, contacts or wiring should be looked for if the turn lamps do not work when turned on, and the hazard warning lights function properly;
- oxidation of the wires of the contact group directly in the headlight or on the approaches to it is manifested by unstable operation of the turn signals.
Before you begin repairs, you should identify the real cause and only then begin to eliminate it. It is important to know where the turn relay is located on the VAZ 2114, since replacing this particular device in most cases solves the problem.
Operating principle, design and characteristics of fuses
A protective device of this type consists of a housing, which is usually made of high-strength ceramics or special glass, and a fusible insert made of a conductive metal or alloy.
The body performs several functions:
- a fuse-link is built into it in a special way so that when the rated current of the insert is exceeded, it melts or breaks;
- the working thread is inserted into the chamber to extinguish the electric arc that occurs when the circuit breaks; this chamber is equipped in the housing;
- on the body, in those places and in the form as provided for by the fuse design, there are working contacts through which it must be connected to the general network.
Information about the characteristics of this protective device is printed on the housing. This is the rated current of the fuse link and the rated current of the fuse body at which it breaks.
According to their performance characteristics, these protective elements are divided into:
- fast-acting;
- low voltage;
- designed for medium voltage;
- manufactured for high voltages.
In automotive networks, the first two types are used.
The defining point showing the purpose of a particular protective device with a fuse link is its current characteristics. It is she who speaks about the range in which this element is ready to work.
- To protect electric motors, fuses are installed whose inserts can withstand the rated current and its excess for a sufficiently long time necessary to start the main mechanism and reach its operating range. As a rule, such chargers (protective devices) are marked - g - as devices ready for protection from both overload and short circuit.
- There are protective devices that operate effectively during short circuits and protect all equipment from very high voltage currents. Such chargers are marked - a - for protection only against short circuits.
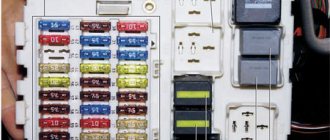
Decoding fuses and relays of block 2114-3722010-18
VAZ-2114, 2115, 2113 cars of the first models with a carburetor have certain differences in the fuse module.
Old style block fuse and relay diagram
Table 2. Decoding of fuses and relays of block 2114-3722010-18
| № | Current, A | Explanation of fuses |
| F9 | 7,5 | Right rear fog lamp |
| F8 | 7,5 | Left rear fog lamp |
| F1 | 10 | Front headlight cleaners at the moment of switching on, wiper contacts, headlight washer switch valve, headlight wiper switch relay contacts |
| F7 | 30 | Front headlight wipers during operation, winding of the relay for turning on the wipers, fuse for the interior heater, windshield washer, gearbox and timing controller for the rear window wiper, valves for turning on the front and rear washer, relay (winding) for turning on the engine cooling system, relay for turning on the rear window heating, glove box lighting, rear window heating control lamp |
| F16 | 15 | Turn signal indicators and activation of hazard warning lights in turn mode, indicator control lamp, reversing lights, gearbox and relay for activation of windshield washers, generator winding (at startup), control lamps for brake fluid, oil pressure, carburetor flap, hand brake. "STOP" display lamp, voltmeter and coolant temperature indicator |
| F3 | 10 | Interior lighting and rear brake light |
| F6 | 30 | Power windows, power windows on/off relay |
| F10 | 7,5 | License plate lights, engine compartment lamp, warning light on the dashboard (exterior lighting), instrument panel lights, cigarette lighter light, heating lever lights |
| F5 | 20 | Relay for turning on the cooling system fan (electric motor), sound signal. |
| F10 | 7,5 | Left front marker light Left rear marker light |
| F11 | 7,5 | Right front headlight, right rear |
| F2 | 10 | Hazard warning lamp, turn signals and hazard warning relay. |
| F4 | 20 | Rear heated glass, heating on, portable socket, cigarette lighter in the cabin |
| F15 | 7,5 | Front right high beam |
| F14 | 7,5 | Front left high beam Light switch |
| F13 | 7,5 | Left low beam |
| F12 | 7,5 | Right low beam |
| № | Relay circuit | |
| K1 | Headlight washers | |
| K2 | Hazard and turn signals | |
| K3 | Windshield wipers | |
| K4 | Monitoring the health of lamps | |
| K5 | Windows | |
| K6 | Sound signal | |
| K7 | Heated rear window | |
| K8 | High beam headlights | |
| K9 | Low beam headlights | |
VAZ-2113 diagram
The VAZ-2113 car was produced in 2004-2013 in the “Norma” and “Lux” configurations. The standard included cars VAZ-21134-20-010 and VAZ-21134-30-010. The luxury ones included VAZ-21134-22-010 and VAZ-21134-32-010; they did not have any special differences compared to the norm, except perhaps the presence of an on-board computer, fog lights and some other minor additions.
Initially, the car was equipped with an eight-valve engine with a volume of 1.6 liters and a power of 79 horsepower. Since 2007, the hatchback began to be equipped with a modernized version of the engine, developing 81 hp. s., and since 2010, a version with a 98-horsepower sixteen-valve engine from Priora has been produced in small series. All cars were equipped with a five-speed gearbox.
The following provides complete and comprehensive information on electrical equipment, including fuse and relay blocks, as well as useful literature on 2113 for independent repair and maintenance, which can be downloaded for free and without registration at the end of the page.
Starter, ignition, rear fog lamp relay
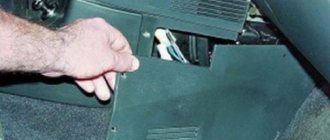
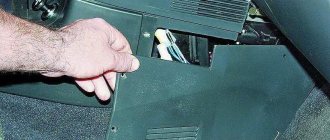
In order to carry out quick checks and repairs, the ignition system relay is installed under the front dashboard of the car, behind the hood release handle. It is located just below the central dashboard. The module is closed with a plastic plug, which must be opened slightly to test for functionality.
Starter, ignition, rear fog lamp relay
Next to the indicated relay, there is a similar one for the rear fog lights and the starter.
The main task of the relay when igniting is to reduce the applied load to the contacts. When the engine starts, the relay turns off some electrical circuits in the vehicle system. The system is used not only in injection, but also in carburetor engines.
In the event of a malfunction or malfunction in the ignition system, it is necessary to monitor the operation of the relay. For this purpose, open the box and carefully remove the desired element. It is attached using contacts to special grooves. The first thing to do is look at the oxidation of the contacts, if necessary, clean them with a soft cloth or treat them with a special liquid.
To check functionality, you need to use a regular multimeter. We connect to incoming connections and check the numbers. If there is no short circuit when current is applied, it means the element is not working. Replacement is carried out in a similar manner. It is necessary to use a standard element with the number of amperes indicated on the housing.
VAZ-2113 wiring harness diagrams
Instrument panel harness
In the photo there is a relay for the rear fog lights (attached next to the mounting block, the fuse is nearby), a button without locking. It works like this: if the low beam and/or front foglights (if any) are on, press and release the button - the closed-circuit light switches turn on. They turn off when the button is pressed again or automatically when the headlights are turned off, so that the driver does not forget to turn them off.
Glove compartment lighting harness
There is a magnet on the lid; when it is far from the sensor with the reed switch, the glove compartment light turns on (the reed switch closes the contacts).
Front harness without fog lights
Air intake box harness
Rear harness VAZ-2113
Diagrams of cars produced in 2011 with an electronic gas pedal (E-GAZ). The injector comes with a large multi-pin block. Ignition switch from Kalina.
Front harness 21134
Front fog lamp relay
Front fog lights are not standard equipment on the model and are equipped depending on the configuration. The relay itself (if there are fog lights) is located in the engine compartment on the left mudguard.
Front fog lamp relay
Important! To access the relay, you must remove the battery! Without performing this manipulation, it will be difficult to remove and check its functionality.
Replacing a faulty element is very simple. You need to take a Phillips screwdriver (with a short handle), unscrew the bolt securing the relay to the car body, and check the element for malfunction. If it fails, we buy a new one and put everything in the reverse order.
Main car fuses.
In cars of the fourteenth family there are separate fuses for the fuel pump, as well as the main fuse for the unit, and naturally, like all desktop models, there is a fuse for the main relay. This is also where all these main relays are located, which include the engine control unit and the fuel pump. They are located at the bottom of the instrument panel on the right side of the passenger's feet. In order for you to get to it, you will need to unscrew with a screwdriver the three screws that secure the small cover of the center panel consoles. As an example, you can look at the photo for the location of this panel.
To make it easier for you to check and work with these circuit breakers and relays, it would be better for you to remove this plate completely and remove it from the panel. It is secured with three nuts on the sides; to remove it you will need a small ratchet with an extension and a 10-mm socket.
Relay,
No. 1 gas pump,
No. 2 which is the main thing.
No. 3 engine cooling screw,
Diagram of internal connections in the installation room. block of an older version.
Where is the VAZ 2114 turn signal relay located?
If you are looking for where the turn signal relay is located on a VAZ 2114, everything is quite simple here. You just need to open the hood of the test car. Next, immediately under the windshield on the driver’s side, look for a dark-colored box (block) inside which there are actually various fuses and relays, and the VAZ 2114 turn relay itself is marked K2. The location is shown in the picture:
Symptoms of a problem
As we have already found out, most cases of malfunction of indicator systems are caused by an electromagnetic device, which is marked K2. However, malfunctions of the system as a whole can be caused by its other elements. For example, if when you turn on the turn signals, the flickering of the light bulbs is excessively rapid, this may indicate one or more burnt out or failed light bulbs. Or, for example, a situation where the hazard warning lights are working properly, but the turn signals do not signal - a possible reason may be related to a faulty switch, contacts or wiring. The reason for unstable operation is often not only the relay itself, but also the oxidation of the contact group of wires, both in the headlight and on the way to it. In other words, if you detect incorrect operation of an intermittent light signal, or its complete absence, do not rush to change the relay, sort out and analyze all the elements that can affect the operation of the system (light bulbs, wiring, switches, contacts).
We are looking for a breakdown with our own hands
Primary diagnostics can be carried out with a test light, but a tester is required to check the condition of the circuit. If you know, then in the resistance measurement mode you can independently “ring” the wiring for a break.
If you clearly hear the relay clicking when you turn on the right/left turn signal, check the resistance of the section of the circuit with the steering column switch. If only the left or right side does not work, the reason is definitely in the switch or in the wiring of the circuit from it to the light bulbs.
If the turn signal relay does not click at all, check the condition of the contacts, the positive wire and ground. If, after turning on the ignition, “+” does not come to the relay, the problem is most likely in the section of the circuit from the mounting block to the relay.
Understeering's shifter
The cause of the malfunction can be either mechanical damage to plastic or contact elements, or the formation of carbon deposits. During operation of the turn signals, the contacts may burn out, which increases the resistance and reduces the current in the circuit. It is typical that in the case of oxides and carbon deposits, the indicator relay may click, but the lamps will not light up.
To repair the steering column switch, you will need to remove it from the steering column and disassemble it. There are many contact pads inside the case, so for trouble-free assembly, remember the location of all moving elements.
Where is it located and how to check the turn signal relay
The turn signal relay is located in the fuse box in the passenger compartment or under the hood. You can find out the exact location from the repair and operation manual of your car. Often on the inside of the mounting block the purpose of the relays and fuses is graphically depicted.
Soldering of elements from the circuit, microcracks in solder joints, failure of the main microcircuit are the most common causes of turn signal failure.
Emergency crew
The hazard warning button imitates the steering column turn switch, but closes both contacts at once (on the right and left sides). The video shows the design and operating principle of a simple system, analogues of which are used not only on VAZ cars.
Either one turn signal (“turn signal”) or two may not work, or all at once, etc., in different combinations.
Causes of turn signal failure
1. One turn signal (front or rear) does not work.
Burnt out light bulb
When a bulb burns out in one or more direction indicators on VAZ 2108, 2109, 21099 vehicles, the remaining ones begin to blink at double frequency. We visually determine where the light bulb has burned out, turning on the direction indicators one by one. We replace the light bulb with a working one.
Light bulb socket oxidized
We turn the light bulb in the socket several times to restore contact.
Wire connections are oxidized or loose
We check the cartridges and blocks of the front turn signals (in the front headlights and on the wings) and the connecting blocks of the rear lights of the car.
The “mass” is missing
All lights and lamps of VAZ 2108, 2109, 21099 cars have a negative wire, so you should check its contact with ground.
Burnt out track in the rear light circuit boards
2. Two rear repeaters or two front repeaters do not work.
The first four reasons
the light bulbs burned out, their sockets oxidized, the contacts in the connecting blocks of the direction indicators oxidized (on the headlight unit and the turn signals on the wings), the ground was lost.
Break in the wires going from the mounting block to the rear lights
— In some cases, at the same time, all direction indicators can be lit with a constant light without blinking. In this case, it is necessary to replace the turn signal breaker relay in the mounting block.
The following queries from newbies very often pop up on the Internet: “why don’t the turn signals work?” – we have an answer to this question. Today we will look at the main faults due to which the turn signals on your car do not work.
Often, repairing turn signals is very simple; the main thing is to find the true cause of the malfunction. First of all, I recommend that you watch a video where they tell you how to determine the malfunction.
Video. Turn signals don't work
Let us recall that in the previous article we looked at it with our own hands. This operation can be performed in a garage; do not forget to prepare a large number of containers for antifreeze or antifreeze.
Basic turn signal malfunctions
Turn signals don't blink
When the turn signals on your car stop flashing, most likely the reason lies in the turn signal relay itself. The cause of the malfunction may be simple water that has flooded it or the contact has been interrupted somewhere. We recommend replacing it.
New mounting block
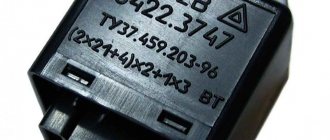
The turn signal relay is an electromagnetic device responsible for turning on and blinking the turn signal lights.
The turn signal relay is located in the mounting block under the hood in a plastic case. This device is marked with the letter K2, or a conventional symbol in the form of a triangle. There is also a fuse that protects the electrical circuit from burnout. It is located in the left lane, second in a row.
Signs of a malfunctioning turn signal relay on a VAZ 2114
To understand what turn signal malfunctions car owners encounter, let’s look at their electrical circuit diagram.
The mounting block where the direction indicator relays on the VAZ 2114 are located is marked with the number 2. A chip with wires is connected to it from the power source. It should be noted that when the engine is turned off, the battery serves as the power source. As soon as the engine and generator start, the latter takes on the role of a source of electricity. In the mounting block, through relays and buses, the electric current is distributed into separate circuits. The turn signal relay is connected:
- With a switch (4), with which the driver turns on the indicator lights when performing the next maneuver;
- With a dashboard (7), on which indicator lights indicate that the turn signals are on or off;
- With ignition switch - positive contact. This is done so that the warning lights do not come on when the ignition is turned off.
- With another lever switch (8). It is with this switch that the driver turns on the turn signals. It is located under the steering column in the form of a small lever;
- Through switches, the relay is connected to signal lamps (1,5,6).
The electrical diagram image will help you find faults in the electrical circuit.
Damage to the electrical circuit of turn signals and emergency lights
Turn signals, like any other component of the car, periodically fail. For example, one of the system lights flashes quickly. The reason lies in a burnt out light bulb. You need to buy a new one and put it in its place.
The turn signal turns off randomly
Knowing where the VAZ 2114 turn relay is located, you can easily fix this problem. Open the relay and fuse box in the engine compartment, remove the relay and check it with a multimeter. Most often, the damage is hidden in this part. You can try to clean the contact legs with sandpaper and insert the relay into place. If the problem is not solved, then change it. The relay cannot be repaired, but is also inexpensive. Therefore, it is necessary to buy a new relay and replace it in the mounting block.
Turn signal lights are dim
The reason should be sought in the mass. The ground outlet is located near the headlights. The front ones should be found on the body under the hood, the rear ones - behind the trunk trim. Cleaning the ground contacts and tightening the nut can improve the brightness of the light.
If the turn signals do not turn on on only one side, there may be a break in the wiring; you need to ring the wires and try to find a break. If there is no break, check the contact pads of the connector. Practice shows that complete failure of turn signals occurs due to a faulty hazard warning button. And this is just understandable. If you look at the electrical diagram, you will notice that wires coming from the relay are connected to the hazard warning button, and the button itself is connected to the dashboard, lever switch, and through these elements to the lamps. So it turns out that a failed button completely disconnects the network. Therefore, in the event of a complete failure of the turn signals, you should first replace the emergency signal button.
How to check
First of all, see if the indication installed on the dashboard continues to work. If it also does not turn on, then reach into the mounting block - the fuse has probably blown.
When the control is functioning and the protective device is in order, then activate the VAZ emergency lights and see how well the lamps in the headlights glow. Moreover, this must be done both in front and behind. Excessive dullness indicates an incorrect rating or poor ground contact.
When the turn signal does not work, you should look at the relay. Make sure that current is flowing to its terminals.
Proceed like this:
- remove the housing of the electromagnetic device;
- connect one tester probe to its positive contact;
- Place the second probe on ground.
Instead of a measuring device, it is permissible to take a light bulb with wires soldered to it. It is not necessary to activate the ignition at all.
If there is no electricity, then most likely:
- the button that starts the emergency lights is broken;
- there is a break in the circuit;
- the fuse responsible for the turn signal has burned out;
- Somewhere the contact is lost.
When current flows, as evidenced by a glowing lamp or tester readings, it is necessary to close the relay contacts directly. If all other elements of the circuit work, then the turn signal should light up. The absence of a positive result indicates the failure of the mentioned device.
Do you need a turn signal?
The traffic rules give a clear answer - yes. The current version of the traffic rules prescribes that every driver who has planned to perform a maneuver in his vehicle is obliged to notify other road users about the action being taken. The logical conclusion is that car owners driving vehicles are required to notify of their actions using a turn signal.
"Important! In order to avoid emergency situations, we strongly do not recommend that you drive with faulty indication or warning systems on roads of any significance.”
How to replace the turn signal relay on a VAZ 2114
A sign that the relay should be changed is a situation where the emergency stop signals and turn signals fail at the same time.
Replacing the device is quite simple. To do this, perform the following steps sequentially:
- The hood opens.
- Under it you should find the mounting block in which the relay is located (on the right directly above the driver's shock absorber strut).
- The mounting block opens (you can remove the protective cover by unlatching the two side latches).
- In order to easily remove the relay marked K2 (turn signal relay) from the mounting block, it is better to use plastic tweezers specially designed for this purpose (it lies in the block itself).
- After this, a new one is installed in place of the failed turn signal relay. It is placed in the seat so that the metal contacts (3 pieces) are inserted into the socket.
- After installing the new relay in the mounting block, you need to check whether the turn signals are working in the desired mode. If everything is in order, you can close the block cover and close the hood.
Types of problems and troubleshooting methods
The turn signal works correctly if the following indicators are met:
- the presence of the ignition on ensures the operating mode;
- moving the steering column switch up and down must be accompanied by turning on the turn signal on the corresponding side;
- The turn signal should flash at a rate of 60 cycles per minute.
Any other turn signal behavior indicates a problem. The most common causes of malfunctions include:
Non-blinking turn signal. The problem requires familiarity with the basic principle of relay operation: the current passing through the lamps leads to heating of the measuring resistor - an element that determines whether a particular lamp needs to be turned on. Consequently, the lamp resistance, different from the nominal one, changes the time the turn signal is turned on: it begins to blink. In this situation, it is recommended to lightly tap the relay (this helps if there is a weak connection or moisture). If you have replaced the relay, but the turn signal does not blink, but is constantly on, then there is poor contact with the fuse block. Replacing a fuse that was found to have a resistance value that does not correspond to the nominal value can also help.
Stopping the operation of one turn signal is incompatible with a relay malfunction (problems of this type cause the operation of both turn signals to malfunction). One of the turn signals may fail due to a burnt-out light bulb (the simplest option) or a faulty wiring or socket. The new tab must not only fit into the turn signal socket, but also correspond to the power indicated on the lamp
If after replacing the light bulb the turn signal still does not start working, you need to pay attention to the socket. If there are traces of oxidation on it, then you should start removing them
Sandpaper or a needle file works well for this. And if the light bulb is in too tight contact with the contacts, then you need to bend them with thin-nose pliers. This must be done as carefully as possible, preventing the contacts from closing, which can lead to another problem - the turn signals working in a checkerboard pattern. The normal state of the cartridge means that the cause of the malfunction lies in the wiring. First you need to make sure that the wire is securely connected to the socket. In this case, it is unacceptable for the wires to be closed to each other or to have a ground short to the metal body of the car. In this case, it is necessary to replace the wires or at least insulate them. If at the same time the hazard lights do not work, then the relay definitely needs to be changed - it is faulty.
Also, the reason for the turn signal not working may be the switch itself. To check it, you need to get to the steering column switch and unmount it. By the way, if a problem occurs in the form of a hazard warning light that does not turn on when there are normally working turn signals, you just need to replace the button responsible for turning on the emergency lights.
A dim turn signal light is a signal to check the suitability of the model and power. If everything is in order, then cleaning the contacts of the light bulbs can correct the situation.
A turn signal relay making a clicking sound is also not normal. The malfunction is hidden in the mounting block, or more precisely, in the relay contacts. Clicking sounds may occur if the contact is oxidized or is too tight. This can also be caused by a defective relay. The problem can be fixed by cleaning the contacts or installing a new relay.
A turn signal that does not work on one side, either front or rear, or in the repeater, indicates that the steering column switch is broken, there is no contact with it, or that the same relay has failed.
The turn signal circuitry is protected by an 8-amp fuse located in the mounting block. If it breaks down, turns will stop working on both the left and right sides of the car.
The light signaling system ensures traffic safety, so the driver should always have at least light bulbs of the required power with him.
How to eliminate other causes of turn signal failure
There are several other malfunctions that lead to incorrect operation of turn signals, namely:
- The turn signal does not turn off automatically when you turn the steering wheel - the switch will need to be replaced;
- the turn signal blinks very quickly - most likely one of the lamps has burned out (you will need to check and, if necessary, replace it with a new one), however, the reason may be oxidation of the tracks inside the mounting block or oxidation of the chip in the rear lights;
- The turn signals burn very dimly - you will need to clear the ground on the turn signals and also check the installed lamps to ensure that their power corresponds to the required indicators;
- the appearance of clicking sounds when the turn signal is turned on - the cause may be a defective relay or in the relay contacts (they may oxidize or simply not fit tightly).
As can be seen from the information above, eliminating any of the causes of failure of the turn signal relay on a VAZ 2114 is not difficult. It is important to do this in a timely manner, then any trip will be safe, both for you and for other road users.
Sources
- https://remontvazov.com/gde-nahoditsya-rele-povorotov-na-vaz-2114
- https://VazNeTaz.ru/predoxraniteli-i-rele-vaz-2114-2115-2113
- https://auto-prof.site/predohraniteli-i-rele-vaz-2114-2115-2113-predohraniteli/
- https://ladaservice.info/vaz-2113-2115/elektrooborudovanie-vaz-2113-2115/rele-povorotov-vaz-2114/
- https://vaz-2114.info/gde-nahoditsya-rele-povorotnikov-na-vaz-2114/
[collapse]
Turn signals don't work
Rear light
In this article we will look at the main reasons why turn signals do not work on such VAZ models as: 2108, 2109,21099, 2113, 2114, 2115. All these models belong to the SAMARA family and have similar electronics. And in general, this article is suitable for all cars, because... The reasons for the malfunction are the same for everyone.
Repairing turn signals in many cases is a simple task. The main thing is to find the cause of the problem.
Turn signals don't blink
If your turn signals do not blink, then most likely the problem is in the turn signal relay. Try knocking on the relay or replacing it; there may be poor contact or water has gotten in there. If, after replacing the relay, the turn signals do not blink, but light up, then the relay has poor contact with the fuse block.
Where is the turn signal relay located?
In the fuse box. See the article Fuses. The relay is marked K2. Also check the fuse marked F2 and its contacts with the block. Perhaps the malfunction also lies in the hazard warning button or in the turn switch
Pay attention to them too, perhaps the contact has oxidized again
The turn signal does not turn on
If your turn signals do not light up, or one turn signal has stopped working, there are several reasons:
- Check the lamp for functionality and replace it if necessary. Replacing the turn signal lamp.
- Check all connection contacts (in the block, in the turn signal, on the switches).
- Check the switches.
- Fuses and relays. Replace, check contacts. If your turn signals and emergency lights do not work at the same time, then the problem 99% lies again in the relay.
Turn signal flashes quickly
If the turn signal blinks quickly, then most likely one of the lamps from all the turn signals has burned out. Check and replace. Also, frequent blinking/blinking of the turn signal may indicate oxidation of the chips on the rear lights or oxidation of the tracks in the Mounting block.
Turn signal relay clicks
Some owners experience constant clicking of their turn signals. The problem lies in the mounting block, namely in the relay contacts. Either they do not fit tightly or they have oxidized. It is also possible that the relay is defective. Try installing the required factory relay.
Turn signal relay diagram
Turn signal relay diagram
The photo shows a diagram of the turn signal relay. The red cross indicates the place where you need to break the circuit for normal operation of the LEDs in the turn signals
If you are interested in the original relay chain, then simply do not pay attention to the red mark
Turn signal closes
See the rear headlight unit. The taillight board is the weak point of our cars. Most likely the problem again lies in the oxide of the tracks. As a result of corrosion, different tracks come into contact and short circuit, as a result of which the fuse then blows.