Hi all. I haven’t written about a car in a magazine for a long time; I haven’t had time to create an entry. Back in the summer, I came to the conclusion that the generator somehow gave little charge, the battery began to fail, replaced the battery, then I came to the Auto League for a relay regulator, where an acquaintance suggested a 3-level regulator instead of the standard one, I read a lot about it on the drive, but it didn’t work I got around to ordering it from the manufacturer’s website, but then it was in stock, so I bought this electric miracle.
According to the instructions supplied with the product, I installed the product by dismantling the original regulator and installing a new one, the procedure is not complicated at all, I performed it without removing the genes, because the place allows.
I installed everything and started trying, I was pleased with the result, without load 14.9-15.1 - at maximum voltage,
A three-level voltage regulator VAZ 2114 is required primarily for operating the vehicle in harsh conditions. Unlike conventional devices of this type, which are installed on generators, these have the ability to adjust the output voltage from minimum to maximum. But let's look at the design and device in more detail. But it’s worth starting with a review of the standard voltage regulator. And this is a device that allows you to stabilize the power supply to the excitation winding.
Possible causes of failure of the regulator relay
Modern relay models have a relatively long service life. But some factors can lead to premature failure of the element, namely:
- Low quality of the part itself.
- The occurrence of a short circuit.
- Mechanical damage to the part.
Popular brands:
Acura ZDX, Audi A7, Citroen C4, Infiniti Q60
The problem may also be caused by water ingress.
On some generator models, replacement of the electronic regulator relay will be necessary if the brushes are worn out. Under normal conditions, the life of the voltage regulator exceeds 60,000 km.
Device
The regulator can be mechanical or electronic. In the second case, this is a classic control system with a pressure sensor and feedback. But a simple mechanical one is no less reliable, and cheaper.
On the subject: How to find out the fuel consumption of a car by mileage (per 100 km)
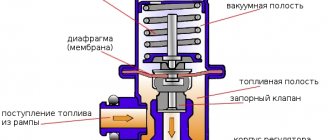
The regulator installed on the ramp consists of:
- two cavities, one contains fuel, the other contains air vacuum from the intake manifold;
- elastic diaphragm separating the cavities;
- spring-loaded control valve connected to a diaphragm;
- housing with return fittings and a vacuum hose from the intake manifold.
Sometimes the RTD contains a mesh filter for coarse purification of passing gasoline. The entire regulator is installed on the ramp and communicates with its internal cavity.
Main symptoms of a malfunction
There are two main “symptoms” of a relay failure. This is an undercharge or overcharge of the battery. Also, a malfunction of a part can be determined by the dim glow of the headlights or by a change in their brightness when the engine speed increases.
If undercharged, the car will start with great difficulty. However, the manifestation of this “symptom” may not be related to the generator. Therefore, first of all, you should make sure that the battery is in good condition.
If the battery is overcharged, there is no doubt that the problem lies precisely in the damaged relay. There are other possible causes of overcharging, but they are extremely rare. Overcharging may cause the battery to boil over. This can be determined by the decrease in the amount of electrolyte in the jars and the appearance of a white coating on the battery.
If you suspect that the battery is overcharged or undercharged, you should diagnose the generator.
Checking with a multimeter without dismantling
You can check the condition of the relay using a multimeter. In this case, the generator is not dismantled. Before starting diagnostics, it is enough to clean the battery terminals (their oxidation can affect the operation of the car and the readings of the measuring device).
The diagnostic procedure is as follows:
- First you need to start the engine and let it warm up for a few minutes.
- Next, you need to connect the multimeter probes to the battery terminals. The device displays a value of 20V.
- After this, the voltage is measured. It should be between 13.2–14V. Such readings are considered normal for most cars.
- Now you need to increase the engine speed (up to 2-2.5 thousand). The voltage should increase by about 0.2V.
- If it exceeds 3,500 rpm, the multimeter should show 14–14.5V, but no more.
Serious deviations in the readings of the device indicate the presence of breakdowns of the relay regulator.
Garage
I had a wonderful motorcycle Zizer 400 -98. And one day this happened: after riding, I drove to a gas station and filled the tank full. It’s already dark outside, I go to the motorcycle, look at it, my eyes are happy, my emotions are overwhelming. I sit down, press the starter and figs - there’s some kind of crackling noise, the starter doesn’t turn. I called my friend, explained the situation, he said he would come. I'm waiting, sir, I arrived in about 10 minutes. We didn’t think long about it, it was too late to get to the garage 1-2 km away, so we decided to try to start it with a pushrod. It started up with a bang from the pushrod, but the headlight does not light up. I drove without a headlight, fortunately my comrade was driving ahead and had his headlight on.
Video for those interested. (you don't have to watch it :))
It was night outside, I didn’t bother to rack my brains, I stomped home with heavy thoughts. The morning is wiser than the evening. The next day I went to the garage to solve the problem. I started dancing from something simple. We diagnose fuses. I checked. They turned out to be all intact.
I took a photo of the fuse box in the garage.
I decided to start the horse again, and oh mystic horror... the starter spun, then silence. Then a neighbor in the garage came, we don’t leave our own people in trouble. The neighbor came not empty-handed, but with a multimeter. I measured the voltage on the battery and it read 10V. Dead acc, such a bastard.
I took this parasite home and put it on charge. It took three hours to charge. brought it to the garage. I installed the acc, and yay - the engine started up BUT the headlight does not light up
Okay, I think I got burned. In general, the battery charge was enough for three engine starts. I put it in the garage to charge, the voltage is low, charging will take a long time. In order not to waste time, I went to inspect the connectors and terminals for melting/oxidation. Everything is clean everywhere - makes me happy!
I flew to the store, bought a new light bulb, inserted it into the socket without putting on the muzzle - it lights up, hurray, hurray, hurray. And then my natural curiosity takes over, let me think, I’ll put the old one on, check for lice, so to speak... /drumroll/, the same thing - it’s burning O_o Profuse sweating and mental circulation began. I asked my neighbor to measure the voltage with the engine running at 4000 rpm, it showed 14V, which means the generator is working and I’m happy. “Perhaps there is a short circuit, a short circuit somewhere? “, I say to my neighbor. He advises checking using the old-fashioned method - we remove one terminal from the aka. We put a light bulb between the terminal and the cable, turn the key to the ON position and the light comes on. “It’s not short,” says the neighbor.
I decided to buy a new battery since there was such a binge. As in the song: walk, walk. Bought. Now it starts normally and the horror of mysticism continues to repeat itself, now the headlight is on, now it is not. Started it - it lights up. Turned it off. Turned it on again and it no longer lights up. After several tests it stopped starting again, rattling noise, sweating, mental disturbances (I already have the last one).
Video to break up so much text:
Now it’s the turn of my dear relay regulator (RR)
The manual has several ways to check PP:
Method 1:
The lamp should not light on more than one terminal. It lit up happily at terminal Y3. My sadness knew no bounds
Go ahead. Method 2:
Here, too, the lamp should not be lit. Again on Y3 it lit up for me. There is no point in continuing further. RR is dead. It is a thankless task to revive, because it is difficult to disassemble and after tearing apart this rubber casing, it is stupid to change the burnt out parts, it is easier to buy a new one.
But we save money and fight for reliability by not following simple paths. It was decided to solder the relays on our own. There is only one BUT - I can solder two wires together, and anyone who sees my “work” will cry. I started looking for friends who could do this. And such a person was found, we agreed on 2000 rubles
While the relay was being manufactured, it was boring and I decided to check the operation of the generator not in an indirect way (at the speed of the operating engine), but according to science. The alternating current was measured on a connector suitable for the RR. On all pairs of contacts (the chip that plugs into the RR) 42-44 volts were knocked out... The great manual assures that ideally it should be 45... people claim that 44 is also cool, and I believe it. We attribute it to the error of the device and the age of the motor . The result: the generator is alive, it’s proven!
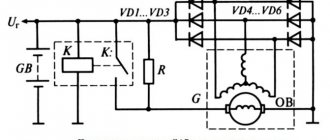
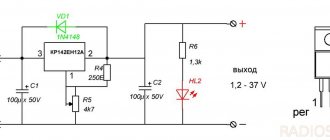
RR scheme
Details:
1) Radiator, the bigger the better 2) 36MT120, 3-phase bridge 36A 1200V - 1 piece 3) ULN2003A PBF DIP16 - 1 piece 4) BZX55C13, zener diode 13V, 0.5W - 1 piece (I will solder 14V for myself) 5) BTA26-600B PBF TO218 - 3 pcs 6) K10-17Bimp. 1000pF NPO, 5% -1 piece 7) S2-23 0.5 W, 5%, 300 Ohm -4 pieces
THE DETAILS ARE JUST LIKE THIS. NO ANALOGUES, SUBSTITUTES, ETC.!!!
In terms of color we are talking about zzr 400 - 1998. On other motorcycles to which this PP will also fit, the color may and most likely will be different!
WHITE wire on the motorcycle “+” BLACK WITH YELLOW STRIPED wire on the motorcycle “-” THREE YELLOW - “phase”. The BROWN wire on the motorcycle is the “key” and can be insulated.
This means there will be five wires from the RR, the positive one naturally connects to the positive one on the motorcycle. Negative from a negative relay on a motorcycle. Three phases from a relay with phases on a motorcycle, the order of connecting the phases does not matter, there is alternating current. Therefore, the phases do not matter which wire is connected to which. It seems like everything is wired...
Materials on RR taken from the site
A week later, the RR is ready, the only thing is that they did not fill this structure with silicone, first check for functionality.
We installed a zener diode at 13v. Now check. At 4000 rpm, the battery charge was 13.3-13.5. Charging is, in theory, normal and not worth worrying about. But I still decided to solder a 14V zener diode so that the charging would be about 13.8-14.2V. The manual echoes everyone who reads it: charging must come
The RR heats up quite strongly, after 4 minutes on the choke (4000 rpm) the hand cannot hold it. After soldering in a 14V zener diode, it will clearly heat up more, and this despite the fact that the size of the radiator is clearly larger than the original. I don’t want to take risks, I’ll do the cooling, take care, as they say...)
Soldered in a 14V zener diode. The lamp is on, everything works. I don’t like the collective farm, I like it to be all right. Usually, when making RRs, people solder wires directly into the device, bypassing the chip (remember the connector on which I measured the voltage from the 42-44V generator). I asked the person to install a connector from the old RR. No sooner said than done.
The person who dismantled the old RR said that there were burnt parts in the 3rd phase (at that time the lamp still came on when checking the RR). It turns out that the discharged battery killed RR, sad thing.
I'm starting to put RR. It will not be possible to stick it in its original place; the radiator dimensions are larger than the stock one. We remove the seat, fortunately we only need to unscrew two bolts. We take a couple of clamps (silicon, it seems) and attach them to the tail. RR must be circuit-based - a mandatory requirement for me.
Now we install cooling. I bought a fan 80 from Zalman. It's a bit big in size, but it cools very quickly. “+” of the fan goes to the brown wire, “-” to the black and yellow one. To prevent the fan from becoming clogged from a sudden power surge, we install a stabilizer “KREN-5” or 8, I don’t remember exactly. It turns out that it was possible to buy a stabilizer immediately in an insulated housing, which I found out about after finishing the work.
That's how it is, guys.
PS: This RR is suitable for different motorcycles. It absolutely fits the Susa RF400, and many other models, I can’t say for sure, but it seems even 600 cc.
How to test a relay with a lamp
On many modern cars, the relay is combined with brushes. In this case, you can check the regulator using an incandescent lamp. The procedure will be as follows:
- To get to the part, you need to unscrew the mounting bolts and remove the terminals. The relay is located at the rear of the generator.
- To check, you need to prepare a 12V light bulb with a socket, wires, a voltmeter, and a power supply (no more than 20V).
- Next you will need to assemble the following circuit.
- After connecting the light bulb, it should light up. At the same time, the voltage gradually increases. When it reaches 14.5V, the light should go out. If this happens later, it means the relay regulator is faulty.
When the voltage decreases, the lamp should light up again.
This test method can also be used for some models of regulators that are not combined with brushes.
How to replace the voltage regulator on a VAZ 2113-VAZ 2115?
Note! The work of replacing this unit can be performed both on a removed generator (It’s even more convenient) and on an installed one (If you decide to remove it, then in this case, study the detailed article on this subject, and it’s called: “Replacing a generator on a car "), but if you do not want to remove anything from the car, then be sure to disconnect the minus terminals from the battery before starting work; how to do this, read the article: “Replacing the battery on a car", in paragraph 1 everything is described in detail!
Removal: To remove the regulator, first you need to disconnect the terminals from the generator and the wire that is still attached to it (The terminals are disconnected by unscrewing the nut that secures them, and the wire is generally disconnected easily, pull it with your hand and it will be disconnected, more details on how to do all this, we indicated in the article to which a link is given just above, this article is called: “Replacing a generator on a VAZ”), as soon as everything unnecessary is disconnected, proceed to removing the cover, to do this, use a screwdriver to remove the seal as shown in the photo 1 and then, using a socket head with a knob, unscrew the three nuts that secure the cover (The nuts are also indicated in photo 1 with arrows) and remove the cover after that, as soon as the cover has been removed, remove the three spring washers from the studs so as not to lose them (see photo 2) and proceed to removing the voltage regulator, it is attached with bolts and the terminal is also connected to it with a screw, so unscrew the screw securing the terminal (see photo 3) and put it aside, then unscrew the two nuts on the sides that secure the regulator (see . photo 4) and completely remove it from the generator and check for serviceability (we already wrote how to check at the beginning of the article).