The water pump is the most important part of the engine cooling system of any car. If this device fails for some reason, catastrophic damage can be caused to the motor, which even major repairs often cannot cope with. The problem is further aggravated by the fact that it is not always possible to immediately notice a pump breakdown. The driver usually begins to suspect something is wrong only when smoke starts coming out from under the hood. But it is still possible to avoid such a development of events.
Causes of water pump failure
The pump in a car can fail for various reasons. Let's list the most common ones:
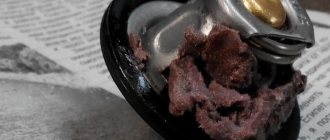
- low quality coolant. Approximately 90% of water pumps in passenger cars break down due to poor antifreeze. Poor quality coolant leads to the formation of tarry deposits, which impede the rotation of the impeller. It can also cause corrosion of the internal parts of the pump. And low-quality antifreeze can cause an increased level of cavitation, when vacuum bubbles formed during rotation of the impeller collapse and literally tear out steel particles from the inner surface of the pump, which leads to rapid destruction of the device;
The inside of the water pump is destroyed due to cavitation - natural wear and tear. Any device can simply exhaust its resource. And the water pump is no exception in this regard. The average service life of a water pump is 200 thousand kilometers. After this, it should be checked without fail and, in case of severe wear, replaced;
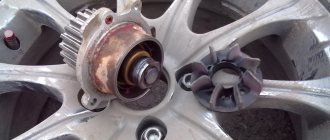
- problems with fasteners. The bolts that secure the pump to the engine housing become loose over time. Since the pulleys are constantly rotating, when the fastening bolts on the pump shaft are loosened, play inevitably occurs, which increases as the mileage progresses. Eventually this will either damage the pump shaft or destroy the center bearing.
The central pulley shaft of the pump has worn out due to constant play.
How to install a bottle pump on a bottom-loading cooler
Installing a pump in a bottom-loading cooler is quite simple:
- The shrink film must be removed.
- Place a 19 liter bottle on the edge of the cooler cabinet and unscrew the cap.
- Insert a water intake tube into the neck.
- Screw the bottle tightly, while closing the siphon lid.
- Place the 19 liter bottle in the cabinet and close the door.
You can connect the cooler to the network only after completing all the previous steps.
You will need to wait a little while for the water to fill the internal tanks. It should be remembered that you cannot connect the power without a bottle of water, as this can lead to damage to the device.
In many regions, tap water, unfortunately, is not drinkable, and bottled water is essential. If the cooler takes up a lot of space or is not affordable for the family budget, then a pump that is simply installed on a 19-liter bottle would be a good alternative. Even children can use this water pump.
Checking the pump's health
It should be noted right away that in order to identify many problems with the water pump, this device will have to be removed from the engine and disassembled. This is the only way to see dirt, corrosion and traces of cavitation.
Water pump impeller heavily damaged by corrosion
But there are a number of signs by which you can determine if the pump is faulty without removing it. Here they are:
- a thin continuous whistle coming from under the engine camshaft pulley. This whistle indicates a faulty bearing.
- coolant leaks, which are visible both on the engine itself and on the asphalt under the car;
- play in the pump, which can be detected by simply holding the pulley and moving the pump up and down with your hand.
Let's look at these faults in more detail.
Pump whistle
The reason for the pump whistling is a partially or completely destroyed ball bearing on the main shaft of the device. Moreover, the pump bearing, as a rule, produces a very high-pitched, piercing whistle, while the whistle of a faulty generator is significantly lower and sometimes turns into a grinding sound. This is affected by the difference in the size of the bearings: the ball bearing on the pump is small, so it whistles very thinly. The generator bearing is twice as large, so the sound comes from it accordingly. So it is almost impossible to confuse the sound of a broken pump and a broken generator.
The central ball bearing of the pump has completely collapsed
The problem is solved by replacing the central bearing of the pump. However, there is one caveat: these bearings are practically not sold separately anywhere. And they can only be purchased in conjunction with a new pump. Therefore, the driver, having heard a characteristic thin whistle coming from under the hood, must be prepared to fork out the cash: a new water pump can cost from 2 to 10 thousand rubles (depending on the make of the car).
This is interesting: Nissan Leaf in Europe will fall in price by 3 thousand euros
Coolant leak
Liquid begins to flow from under the pump in two cases:
- the mounting bolts have become loose;
- The sealing gasket under the pump is damaged.
The first problem can be solved by simply tightening the bolts. But a damaged sealing gasket will have to be replaced. Fortunately, it is easier to find a gasket for a pump on sale than a central bearing (and in especially difficult cases, car enthusiasts even order seals via the Internet, from the Chinese on Aliexpress, for example).
Water pump is leaking due to over-tightening
It should be noted here that even a new gasket can easily be cut by a pump if the mounting bolts are not tightened correctly. The pump is one of those devices where it is very important not to over tighten it. It is necessary to tighten the bolts in a cross pattern: first tighten the upper right, then the lower left, then the upper left, lower left, etc. Only this tightening pattern can guarantee maximum tightness and tightness of the connection.
Finally, we must not forget about sealants. There are situations when neither a new gasket nor the correct tightening pattern helps get rid of a leak. Then there is only one option left: to use a sealant, and its composition must be very resistant to high temperatures.
The sealant is applied to the pump gasket in a very thin layer.
The best option here is a professional sealant from ABRO, which has proven itself on all brands of cars.
ABRO professional sealant, resistant to high temperatures
Coolant leak after replacing heat exchanger
In the vast majority of cases, after replacing the heat exchanger, antifreeze begins to flow not from under the pump, but from under the clamps of the pipe connected to the pump. On most modern cars, pump pipes are made of plastic, and very fragile plastic. Any careless movement when replacing the heat exchanger, if it does not break such a pipe, will at least break the tightness of its connection to the pump. After this, the antifreeze will definitely begin to leak. There are two options to solve this problem:
- if there are no cracks in the pipe, then you can simply tighten its clamps with a flat screwdriver, then let the engine idle for a few minutes, and then check the connection for leaks;
- If the pipe is broken after replacing the heat exchanger, there is only one way out: going to the nearest auto store and replacing it. This part cannot be restored.
The pipes on water pumps are made of very fragile plastic.
Design and purpose of the pump
The principle of operation of the cooling system of any car is to remove excess heat from the heating elements of the engine - combustion chambers, pistons and cylinders. The working fluid is a non-freezing liquid - antifreeze (otherwise - antifreeze), which transfers heat to the main radiator, blown by an air flow.
The secondary function of the cooling system is to warm passengers in winter using a small cabin heater radiator.
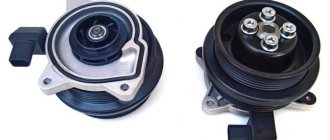
Forced circulation of coolant through the engine channels, pipes and heat exchangers is provided by a water pump. The natural flow of antifreeze inside the system is impossible, so if the pump breaks down, the power unit will inevitably overheat. The consequences are fatal - due to thermal expansion of the pistons, the engine seizes, and the compression rings receive thermal release and become soft wire.
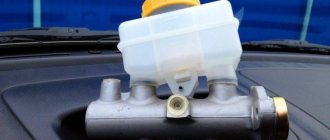
The pipes from the radiator, cabin heater and thermostat converge to the water pump
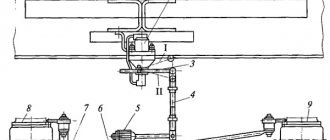
In classic VAZ models, the water pump rotates by a belt drive from the crankshaft. The element is located on the front plane of the motor and is equipped with a conventional pulley designed for a V-belt. The pump mount is designed as follows:
- a light alloy body is screwed to the cylinder block flange using three long M8 bolts;
- a flange is made on the front wall of the housing and a hole is left for the pump impeller with four M8 studs along the edges;
- the pump is put on the indicated studs and secured with 13 mm wrench nuts; between the elements there is a sealing gasket made of cardboard.
The poly-V-ribbed drive belt rotates not only the shaft of the pumping device, but also the generator armature. The described operation scheme is the same for engines with different power systems - carburetor and injection.
The generator rotor and pump impeller are driven by one belt coming from the crankshaft
Pump unit design
The pump body is a square flange cast from aluminum alloy. In the center of the body there is a protruding sleeve, inside of which there are working elements:
- ball bearing;
- pump shaft;
- an oil seal that prevents antifreeze from leaking out over the surface of the roller;
- a locking screw for fixing the bearing race;
- an impeller pressed onto the end of the shaft;
- a round or triangular hub on the opposite end of the shaft, where the driven pulley is attached (with three M6 bolts).
For free rotation of the shaft, a closed-type rolling bearing is installed in the bushing
The principle of operation of the water pump is quite simple: the belt rotates the pulley and shaft, the impeller pumps antifreeze coming from the pipes into the housing. The friction force is compensated by the bearing, and the seal seals the unit.
The first impellers of the VAZ 2106 pumps were made of metal, which is why the heavy part quickly wore out the bearing assembly. Now the impeller is made of durable plastic.
The bushing with the shaft and impeller and the housing are connected using four studs and nuts
Symptoms and causes of malfunction
The weak points of the pump are the bearing and seal. It is these parts that wear out the fastest, causing coolant leakage, play on the shaft and subsequent destruction of the impeller. When large gaps form in the mechanism, the roller begins to dangle and the impeller begins to touch the inner walls of the housing.
Typical water pump failures:
- loss of tightness of the connection between two flanges - the pump and the housing - due to a leaky gasket;
- bearing wear due to lack of lubrication or natural wear;
- oil seal leakage caused by shaft play or cracks in the sealing elements;
- impeller failure, jamming and shaft destruction.
If the bearing jams, the shaft may break into 2 parts
Critical wear of the bearing assembly leads to the following consequences:
- The roller warps greatly, the impeller blades hit the metal walls and break off.
- The balls and separator are ground, large chips jam the shaft, which can cause the latter to break in half. At the moment the pulley is forced to stop, the belt drive begins to slip and squeak. Sometimes the alternator drive belt falls off the pulleys.
- The worst scenario is that the pump impeller breaks through the body itself and instantly releases a large amount of antifreeze out.
The impact of the impeller blades on the housing walls breaks off and the pump becomes inoperable.
The breakdowns described above are hard to miss - the red battery charging indicator flashes on the instrument panel, and the temperature gauge literally goes off scale. There is also a sound accompaniment - metallic knocking and crackling, belt whistling. If you hear such sounds, stop driving immediately and turn off the engine.
Due to my inexperience, I was faced with the third scenario. Without checking the technical condition of the “six”, I went on a long trip. The shaft of the worn coolant pump became loose, the impeller knocked out a piece of the housing and all the antifreeze was thrown out. I had to ask for help - friends brought the required spare parts and a supply of antifreeze. It took 2 hours to replace the water pump along with the housing.
If there is strong play, the pump impeller breaks through the metal wall of the housing
How to identify symptoms of pumping unit wear in the early stages:
- a worn-out bearing emits a distinct hum and later begins to rattle;
- around the pump seat, all surfaces become wet from antifreeze, and the belt often gets wet;
- The play of the roller can be felt by hand if you shake the pump pulley;
- a wet belt can slip and make an unpleasant whistle.
It is unrealistic to detect these signs while driving - the noise of the bearing assembly is hard to hear against the background of a running motor. The best way to diagnose is to open the hood, inspect the front of the engine and wiggle the pulley by hand. At the slightest suspicion, it is recommended to loosen the belt tension by unscrewing the nut on the generator bracket and try the shaft play again . The permissible amplitude of movement is 1 mm.
If the seal is faulty, antifreeze splashes onto all surfaces around the pump.
When the pump's mileage reaches 40-50 thousand km, checks must be performed before each trip. This is how long the current pumps last, the quality of which is much worse than the original spare parts that have been discontinued. If play or leakage is detected, the problem can be solved in two ways - replacing or repairing the pump.
In what cases is it possible to repair the pump?
As a rule, car enthusiasts prefer not to repair the water pump, but to immediately change it. This is due both to the difficulty of finding spare parts for this device and to simple pragmatism: it is easier and faster to change the pump than to bother with its disassembly, assembly and subsequent configuration. It is advisable to repair the pump only when some not very important part such as a cooling pipe or a sealing gasket fails. The pipe can be tightened, and the leaking gasket can be sealed with sealant. In all other cases, replacing the pump remains the most rational option, which will save both the time and nerves of the car enthusiast.
Replacing the cooling pump yourself
A car enthusiast can easily change the water pump on his own. Let us illustrate this process using the example of a Peugeot 307 car. But before that, let’s decide on the tools and consumables. To work we need the following things:
- new water pump;
- open-end wrenches, set;
- socket wrenches and wrench included;
- coolant, 5 liters;
- jack.
The sequence of replacing a pump using the example of a Peugeot 307
- The car is driven into the inspection hole, the wheels are secured with shoes. The front right wheel is lifted with a jack and removed with a socket wrench.
The right front wheel of the Peugeot 307 is jacked up and removed - Through the drain hole under the radiator, the old antifreeze is drained into a substitute container (this can be either a ten-liter bucket or an ordinary basin).
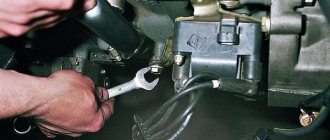
- The next step is to remove the timing belt to gain access to the pump. Next to the camshaft pulley there is a belt retainer and a timing belt tensioner bolt. Using a 10-mm open-end wrench, first loosen the clamp, and then the tensioner bolt.
To loosen the timing belt on a Peugeot 307, you need to loosen the tension roller - Once these bolts are loosened, the timing belt tension will also be released and it can be removed manually.
A loose timing belt on a Peugeot 307 can be removed manually - Access to the pump is available. It is held on by five 12mm bolts, which can be easily unscrewed with a regular open-end wrench.
Access to the Peugeot 307 water pump is open, you can remove it - The pump is removed, a new one is put in its place and the cooling system is assembled in the reverse order.
This is interesting: Winter karting in Russia
Installing an additional pump
The disadvantage of the first front-wheel drive VAZ cars was the poor performance of the interior heater. Until the engine warms up to operating temperature, the cabin is cold. This is due to the design of the small circulation circuit, into which coolant enters in small quantities. The problem is solved by installing an additional electric pump from GAZelle.
An additional electric pump is installed in the stove pipeline
To install an electric pump, you must purchase:
- four-pin relay;
- multi-core wires and a two-pin connector;
- fuse socket;
- hoses and clamps for connection to the cooling system;
- electric pump from a GAZelle car.
The pump is placed on a homemade bracket, screwed to one of the bolts on the mounting flange of the gearbox. The antifreeze is first drained and the thermostat is removed, which will interfere with the installation of an additional pump. This is especially true for the injection model VAZ 21099.
To turn on the pump, a small circuit with a relay is assembled
The insertion is made into the return pipe coming from the cabin heater. In this case, the electric pump will create a vacuum in the heater radiator. To turn on the pump together with the ignition and from a separate button, a simple electrical circuit is assembled. A relay with a fuse is placed in the cabin under the dashboard, and any free button is selected as a switch.
How much does it cost to replace a pump?
Some car enthusiasts do not change the pump themselves, but entrust this task to professionals. It should be noted that the cost of replacing a water pump at a car service depends on both the make of the car and the availability of the device itself. In one case, the replacement may take only 20 minutes. In another, a specialist will need several hours. And during this time he will be forced to disassemble half the car to get to the pump. That is why the cost of replacing a pump can vary widely: from 1 to 6 thousand rubles.
Required Tools
To carry out work on replacing the pump we will need:
- A set of keys.
- Phillips and flathead screwdrivers.
- Any container (antifreeze will be drained into it).
- Silicone sealant.
Do I need to change the coolant when replacing the pump?
In short, yes, when changing the pump, you also need to change the coolant. There are two reasons why you should do this:
- first of all, on the vast majority of cars, changing the pump is simply impossible without completely draining the antifreeze;
- The water pump is very demanding on the purity of the antifreeze. It is for this reason that it is strictly not recommended to refill previously drained coolant. Even if the container into which the antifreeze was poured seems clean.
When replacing the pump, it is necessary to replace the antifreeze in the cooling system, and the antifreeze must be of high quality
It should be noted here that you need to fill the car not only with new, but also with the highest quality coolant. After all, as mentioned above, the vast majority of all problems with pumps are caused by bad antifreeze. It is for this reason that saving on antifreeze is categorically unacceptable, because it may one day cause a major overhaul of the entire engine.
FAQ
Why is antifreeze leaking from the engine?
If a drip is visible where the timing cover meets the block, the pump is most likely the culprit. Also, antifreeze drips may appear due to problems with the seals and clamps of the cooling system hoses.
How long can the pump go?
It is better not to find out this experimentally. If the pump fails, the engine can quickly overheat critically, and this will lead to its breakdown. Repairing a motor after critical overheating is usually expensive.
Which pump to choose when replacing?
It is better to give preference to high-quality original parts. If you are choosing from analogues, you should avoid choosing the cheapest alternatives.
Do I need to change the timing belt along with the pump?
If you changed the entire set 10-20 thousand kilometers ago, then it will not need to be replaced. However, if the belt is mechanically damaged or if the belt is filled with antifreeze, it is better to replace it.
Why does the pump regularly break down?
Most likely it's the antifreeze. It is worth changing it and flushing the system. The problem may also be that the seat for the pump is uneven. We need to investigate this issue and prepare the place if necessary.
Problems that arise after replacing the pump
There are a couple of typical problems that a car owner may encounter when installing a new pump on their car. Let's look at them in more detail.
Noise after pump replacement
Noise after replacing the pump can occur in two cases:
- the pump is screwed on too loosely, so that the pump body beats against the walls of the pump niche;
- the pump turned out to be defective. Unfortunately, this is not uncommon. Pumps from well-known manufacturers are often counterfeited (lately the Chinese have been especially guilty of this). So you should buy such a critical part only in branded stores with the appropriate certificates.
After replacing the pump, the stove stopped heating
There are also two reasons for this malfunction:
- After replacing the pump, too little coolant was added. The solution is obvious: check the antifreeze level, and then add the missing amount;
- For some reason the pump impeller does not rotate. This can happen either due to poor quality of the pump itself or due to poor antifreeze. For example, there are cases when antifreeze poured into a car turned out to be so aggressive that the steel impeller literally dissolved in it. And although the pump shaft rotated, no pressure was created in the cooling system, and antifreeze could not get into the radiator.
Water pump impeller dissolved with too aggressive antiphysis
Repair or replacement
The pump for a UAZ Patriot with a ZMZ 409 engine is usually replaced entirely with a new one, although if you wish, you can try to repair it yourself. There are VN repair kits for many UAZ engines, including the 409 engine. The repair kit includes new:
- bearing
- stuffing box
- impeller
But first you will have to remove the old pump from the engine.
The water pump is also removed when access to other parts of the engine is necessary, for example when replacing the timing belt. In this case, it is still recommended to inspect the pump to identify defects, since the procedure for replacing the pump is quite labor-intensive.
Before removing the pump from the car, you need to prepare the car itself and the necessary tools, you will need:
- open-end wrench 12 (or socket 12);
- hexagon 6;
- 7mm spanner for unscrewing clamps;
- flat blade screwdriver;
- mounting blade.
Dismantling the pump (hydraulic booster removed)
Next, the replacement sequence is as follows:
- The UAZ Patriot car must be put on the handbrake, or chocks must be placed under the wheels. Then the coolant is drained.
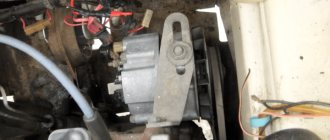
- The power steering pump is removed from the bracket.
- The viscous coupling of the fan drive is dismantled.
- It is necessary to remove the generator and pump drive belt.
- Remove the pulley and pulley deflector by securing the pulley with a screwdriver and removing the 3 screws that secure it.
- It is necessary to unscrew the 3 bolts securing the power steering pump bracket (hydraulic booster) and remove the bracket.
- Loosen the clamps that secure the inlet pipes to the pump.
- Unscrew 2 bolts at the front of the pump and one at the back, then remove the pump from the car.
Regardless of whether you removed the pump to simply check its condition, or to access other engine components, after removal it is necessary in any case to replace the gasket with a new one to avoid coolant leakage. Also, be sure to clean the contact surface with which the gasket comes into contact from any kind of deposits. It is recommended to apply a thin layer of sealant to the gasket.
Some craftsmen install an additional pump; this is necessary if you plan to install a second stove in the interior of an SUV.
Installation of a new pump is carried out in the reverse order of removal.
Source
Driving with a faulty pump
You cannot drive with a faulty pump. If the driver does not want to undertake major repairs of his car (and it is far from a fact that this repair will be successful), then the only way for him to move is to take the faulty car in tow and, without starting the engine, deliver it to the nearest service center or garage for repairs.
A car with a faulty water pump can only be towed
So, the water pump is a very important unit, and it is strictly not recommended to joke with it. Fortunately, on most cars the pump can be replaced with your own hands, and even a novice driver can cope with this task. It may take a beginner more time than a professional. But at the same time he will gain invaluable experience and save money.
Copywriter with five years of experience. (1 vote, average: 5 out of 5)
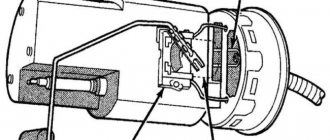
How to assemble a new pump
The pump includes the following elements:
- The main pump, inside of which there is a corrugated chamber with a spring.
- Water intake tube.
- Nose.
- Protective cap.
- Brushes for cleaning pipes.
Equipment may vary from company to company.
The collection process is quite simple:
- Gloves must be worn. They are usually included in the package. If they are not available, then ordinary medical ones will do.
- Secure the spout into the pump until a characteristic click appears.
- Collect the tubes.
- Insert the narrow end of the tube into the base of the pump. To ensure the tightness of the connection, it is necessary to dip the tip of the tube in boiling water before starting the procedure.
After these simple steps, you can install the prepared pump on the bottle.