February 27, 2015 Lada.Online 380 093 25
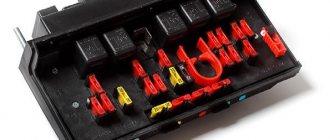
The relay and fuse box is also called the mounting block or black box. If problems are identified in the car related to electrical equipment, first check the fuses and relays. If they burn out, we replace them with the same ones, but first we must determine the cause of the burnout. The article contains a complete description of all Lada Largus mounting blocks.
Where is the fuse and relay box located in Lada Largus?
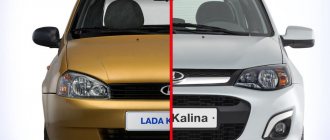
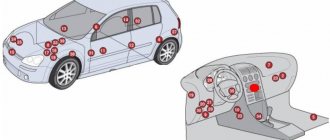
Lada Largus is a Renault Logan station wagon. Therefore, the fuses in it are located identically. This machine uses two fuse and relay boxes:
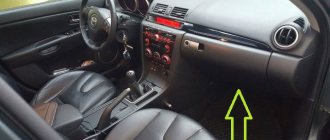
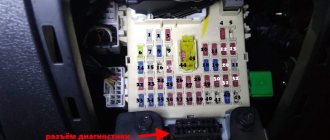
- In the cabin - to protect body electronics circuits. Located on the left side of the dashboard from the end.
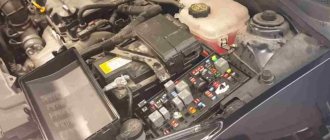
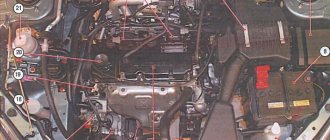
- In the engine compartment - protects the electrical circuits of the engine ECU and ABS. Installed on the left side of the engine compartment next to the battery.
Both blocks are protected by special covers. To gain access to the interior fuse box, you need to open the driver's door and pry the ebb on the cover at the end of the panel with your finger. To remove the cover of the Largus fuse box in the engine compartment, you will need a screwdriver.
How to remove the cigarette lighter VAZ Largus
Replacing the cigarette lighter on a Priora and its backlight lamp
How to easily and simply remove and replace the cigarette lighter assembly on a VAZ 2170 car without removing the floor tunnel...
Cigarette lighter. Replacing the cigarette lighter. Wires and cigarette lighter socket.
If you liked the video, click like and subscribe to our channel and of course share this video, we...
How to remove the cigarette lighter
Using the Opel Corsa D as an example.
installation of an additional cigarette lighter socket on a Renault Duster
installation of an additional cigarette lighter socket on a Renault Duster. The entire installation process, from removing the panel,...
SHOCK. WHAT I FOUND FOR LADA LARGUS ON ALIEXPRESS + COMPETITION
In this video you will find 20 products for Lada Largus that can be bought on Aliexpress (1) Trim...
Replacing a cigarette lighter light bulb on a Renault
Detailed description of replacing the cigarette lighter light bulb in the cabin on a Renault Great knowledge about Renault https://remontiruemrenault.ru/…
How to replace the cigarette lighter on a Priora in 3 minutes
How to quickly and efficiently replace the cigarette lighter on a Priora. The cigarette lighter is burnt out and needs to be replaced with a new one...
How to change the tilt of the seat backs of the middle row of LADA Largus
Make your passengers happy by spending 10 minutes of their time. Become a YouTube Partner https://youpartnerwsp.com/join?9658…
installing a 12v socket in a car with your own hands
installing a 12v socket in a car with your own hands.
Cigarette lighter repair
All fuses are intact, but the cigarette lighter does not work. Cigarette lighter repair. In the video I said that instead of...
How to choose a fuse for Lada Largus
Each fuse in a car has its own rating. The rating is the operating current and it is different for each circuit. For example, if a fuse on a Lada Largus protects the starter circuit and its rating is 40 Amperes, you cannot replace it with a 30 Ampere fuse. It will just burn out.
But protecting the cigarette lighter circuit with a 40 Amp fuse is dangerous for the consumer and the conductors. This could cause the wire insulation to melt, or even cause a fire.
The purpose of the fuse is to save the circuit and protect the consumer from the effects of a short circuit. Indeed, according to the laws of physics, during a short circuit or overload, the current in the circuit exceeds the permissible values.
As soon as it exceeds the trigger value of the fuse-link, it will break the circuit as it heats up and melts. After this, the consumer will stop working.
How to replace a fuse on a Largus from a block
To remove a faulty fuse on a Lada Largus, you need to use special pliers. Automakers leave these under the fuse cover, but they can often be found complete with new inserts.
For those who find tongs an inconvenient tool, you can simply pull out the burnt insert using wire cutters or pliers. A blown fuse cannot be reused. You can simply throw it away, and you need to put a new one in its place.
To replace a burnt insert, you must first find it. There are two ways to do this:
- using a control lamp;
- using special tables;
The first method is the secret of auto electricians. Using a control light with the ignition on, all fuse legs ring in turn. If you come across an insert where one leg rings and the other does not, it will be burnt.
The disadvantages of the method are that not all consumers receive power immediately after the ignition is turned on. The second method is the most correct - using a table describing all the fuses. To do this you need to have it at hand.
Cigarette lighter repair instructions
If the cigarette lighter stops working and you decide to do the repairs yourself, first of all you should dismantle it. The complete procedure for repairing the device is as follows:
- Initially, you should have a new, working copy on hand.
- Remove the negative battery terminal
- Using pliers, carefully remove the cigarette lighter from its socket.
- Lift the device by the edges one by one, without sudden movements, so as not to break the contacts
- When the cigarette lighter is in your hands, pay attention to its contacts, there should be no burning on it
- If a soldered wire is found, solder it
- Install the mechanism into the socket, doing all the steps in reverse order.
Another common problem is that current flows, but the coil does not heat up. In this case, the head must be completely replaced. It is necessary to install new, original spare parts of the device in accordance with their specific brand of car. If the above steps do not bring the desired result, install a new cigarette lighter.
Fuse tables for Lada Largus in the cabin
The table depends on the year of manufacture of the car and the configuration. Over the years, the Largus received a variety of equipment. Therefore, exactly two variants of descriptions will be indicated below.
The first option looks like this:
| Number | Amperage | Chain |
| F1 | 20 | Heated rear window, windshield wiper, steering column wiper switch |
| F2 | 5 | Fuel pump, instrument panel, ECU |
| F3 | 10 | Stop signal |
| F4 | 10 | OBD2 connector, immobilizer, UCH power supply |
| F5 | — | Spare |
| F6 | — | Spare |
| F7 | — | Spare |
| F8 | — | Spare |
| F9 | 10 | Instrument panel, left headlight low beam |
| F10 | 10 | Low beam of the right headlight |
| F11 | 10 | Instrument panel, left high beam headlight |
| F12 | 10 | High beam of the right headlight |
| F13 | 30 | Rear windows |
| F14 | 30 | Front power windows |
| F15 | 10 | ABS control unit, power supply for acceleration and steering angle sensor |
| F16 | 15 | Heated front seats |
| F17 | 15 | Klaxon |
| F18 | 10 | Parking light on the left side |
| F19 | 10 | Side light on the starboard side, instrument panel lights, hazard warning lights, radio, cigarette lighter, central locking button, front door power window switches, license plate light, climate control unit, glove compartment light |
| F20 | 7,5 | Rear PTF |
| F21 | 5 | Heated mirrors |
| F22 | — | Spare |
| F23 | — | Spare |
| F24 | — | Spare |
| F25 | — | Spare |
| F26 | 5 | Passive safety system |
| F27 | 20 | Rear door wiper, audible alarm, TDC sensor, reverse light. |
| F28 | 15 | UCH in energy saving mode |
| F29 | 15 | UCH, diagnostic connector |
| F30 | 20 | UCH |
| F31 | 15 | Front PTF |
| F32 | 30 | Heated rear window |
| F33 | — | Spare |
| F34 | — | Spare |
| F35 | — | Spare |
| F36 | 30 | Electric heater motor |
| F37 | 5 | External mirror drive |
| F38 | 15 | Audio system, cigarette lighter |
| F39 | 10 | Heater motor relay power supply |
Some positions are repeated. This is due to the fact that the wiring in the Lada Largus is based on Renault circuits. It provides two fuses for many circuits: one general, powering a group of other circuits, and the other fuses protect specific circuits. This is required by fire safety.
Over the years, Lada Largus is constantly being refined and modernized. The changes also concern the electrical part, including the fuse box with the addition of another strip with inserts and relays. This is how the second option appeared:
| Number | Amperage | Consumers |
| F1 | 30 | Front windows |
| F2 | — | Spare |
| F3 | — | Spare |
| F4 | — | Spare |
| F5 | — | Spare |
| F6 | — | Spare |
| F7 | — | Spare |
| F8 | 30 | Rear windows |
| F9 | — | Spare |
| F10 | — | Spare |
| F11 | 20 | UCH, power supply for door locking drives |
| F12 | 5 | Immobilizer, brake light |
| F13 | 10 | Driver and passenger lighting, glove compartment lighting |
| F14 | 5 | Rain sensor |
| F15 | 15 | Windscreen and rear window washer, UCH - rear wiper control |
| F16 | — | Spare |
| F17 | — | Spare |
| F18 | 7,5 | Power supply for brake lights |
| F19 | 5 | Engine ECU, UCH, instrument cluster, starter relay, fuel pump control, multimedia power signal |
| F20 | 5 | SRS block |
| F21 | 7,5 | Reversing light, parking sensors |
| F22 | 5 | Power supply Gate Way control unit |
| F23 | 5 | Power supply for parking sensors, windshield heating relay, rear window and mirror heating relay control |
| F24 | 15 | UCH and delayed supply of fuses F12, F13, F14, F36 |
| F25 | 5 | ERA-GLONASS unit, power supply to Gate Way unit |
| F26 | 15 | UCH - direction indicators |
| F27 | — | Spare |
| F28 | 15 | Klaxon |
| F29 | — | Spare |
| F30 | — | Spare |
| F31 | 5 | Dashboard |
| F32 | 7,5 | UCH, Stereo, heater fan relay control, climate control unit |
| F33 | 15 | Cigarette lighter for driver and rear passengers |
| F34 | 20 | OBD2 connector, Audio system |
| F35 | 5 | Heated mirrors |
| F36 | 5 | UCH, tailgate lock control via remote control |
| F37 | 5 | Exterior mirror drive |
| F38 | — | Spare |
| F39 | 30 | Windshield cleaner |
| F40 | 40 | Heater fan |
| F41 | 5 | UCH - DRL, rear position lights, low beam of the left headlight unit and high beam of the right headlight unit, front PTF |
| F42 | 25 | Rear seat cigarette lighter |
| F43 | 15 | UCH - second power |
| F44 | 15 | Trunk socket |
| F45 | 10 | Heated steering wheel and control buttons located on the steering wheel |
| F46 | 25 | UCH - auxiliary power |
| F47 | 25 | UCH - DRL, right headlight low beam, left headlight high beam, front side lights, license plate lights, interior lights and rear PTF |
| F48 | 30 | Electronic additional functions unit UCH |
| F49 | 30 | Starter |
Relay designations:
| K1 | Heater fan |
| K2 | Relay powering 12V sockets and additional electronics unit |
| K3 | Heated rear window and mirrors |
| K4 | Rear window locking |
In Largus of the first production, the relay for heating the rear window and exterior mirrors is located in the cabin under the mounting block to the left of the steering column at the bottom of the panel.
Description of relays and fuses in the engine compartment
There are several options for this mounting block. It depends on the year of manufacture of the car and the engine used. It is known that the following engines were installed in Lada Largus:
- K4M (Renault);
- K7M (Renault);
- VAZ-21129 (Lada);
- VAZ-11189 (Lada);
Depending on the motor, the purpose and contents of the mounting block may vary.
Mounting block with K4M and K7M motor:
| Number | Amperage | Protected circuit |
| F1 | 15 | — |
| F2 | 5 | Constant “plus” injection ECU, engine control unit relay |
| F3 | 25 | Fuel pump and ignition coil circuit, ECU main relay |
| F4 | 30 | Cooling Fan Relay Power Circuit |
| F5 | 40 | A/C and low speed fan clutch relay, high speed fan (for vehicles with air conditioning) |
| F6 | 25 | ABS |
| F7 | 50 | |
| F8 | 60 | Power supply for the ignition switch, steering column light control switch, power supply for consumers operating when the ignition is turned on |
| F9 | 60 | Interior fuse box power supply |
Relay designations:
| Number | Description |
| K1 | High speed fan relay |
| K2 | A/C compressor clutch |
| K3 | Low fan speed |
| K4 | Fuel pump and coil power |
| K5 | Engine ECU main relay |
| K6 | — |
| K7 | PTF relay |
| K8 | Heater fan |
Mounting block with VAZ-21129 engine:
| Number | Amperage | Protected Circuits |
| F43 | 25 | Gas equipment control unit (for cars with gas equipment) |
| F44 | 25 | ABS control unit |
| F45 | 50 | |
| F46 | 60 | Ignition switch, general on-board network protection |
| F47 | 60 | Interior fuse box power supply |
| F51 | 25 | Power supply for fuel pump, engine ECU, cooling fan, air conditioning compressor clutch, ignition coils, oxygen sensor, canister purge valve, injection system injectors, camshaft position sensor |
| F52 | 40 | Cooling fan and air conditioning compressor clutch |
Relay Description:
| Number | Designation |
| R1 | HBO control system |
| R2 | Heater fan |
| R3 | Front PTF |
| R4 | Gasoline pump |
| R5 | Engine ECU |
| R6 | High speed cooling fan |
| R7 | Air conditioner clutches |
| R8 | Cooling Fan Speed Low |
What causes fuses to blow in Largus
The fuse link on Largus never fails without reason. For the fuse to trip, the current in the circuit must rise above the insert rating. There are two types of faults that cause this:
- overload:
- short circuits;
Overloads occur when a large number of consumers are connected to one fuse. For example, a splitter is inserted into the cigarette lighter, to which additional equipment is connected. The current in the circuit increases, the conductors heat up and the fuse blows.
To prevent this from happening, you need to install an insert with a 5 Ampere rating higher. But you should not increase the rating by more than 5 Amps to avoid overheating of the insulation and its melting.
Short circuits of the Lada Largus occur as a result of contact of the supply “plus” with the “minus” or the car body. This happens due to errors during the installation of additional equipment, malfunctions of control units, or simple chafing of the wiring in the protective corrugations due to dirt.
You should not change the insert if it burns out immediately after installation. Most likely, there is a short circuit in the circuit that needs to be found.
Installing a cigarette lighter with illumination MANOVER or be careful - POSSIBLE "short circuit".
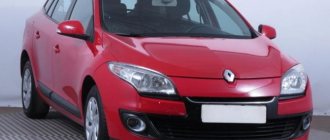
When I first saw the Lada Largus, I immediately decided for myself: I will have it.
A story about how a 10-minute replacement of a standard cigarette lighter with a MANOVER illuminated cigarette lighter smoothly turned into a short circuit, the loss of two 15A fuses, complete disassembly of the tunnel lining, and creative work with a file.
Unexpectedly and inexpensively, I got this cigarette lighter with backlight MANOVER MR3312702.
And this is a contact that is missing in the standard cigarette lighter. Actually, like the yellow glass itself and the block with the light bulb. )
Let's start replacing the standard cigarette lighter with this one, without dismantling the tunnel lining.
We take out the “pipka”. And inside the cigarette lighter we see these symmetrical slots. Using a thin screwdriver, press inward and turn slightly clockwise and counterclockwise to pull out the central metal sleeve with the connector.
We disconnect the connector from the cigarette lighter and tie a wire to it. For what. It will come in handy later. Next, take out the black plastic rim. (The photo turned out bad, and there was no point in uploading it.) To get it out, I stuck my index finger inside and pulled it out on my finger. )
Now I'm starting to install a new illuminated cigarette lighter! Let's take it apart. The cigarette lighter is separate, the illuminated bezel is separate. That's what the delay was for. We pass the wire through the rim.
And install it in its normal place!
And now the wire pulls the connector out. This is much more convenient than having to pick it out with something later.
We connect the connector to the cigarette lighter.
And we insert it inside. To your place.
I turn on the dimensions, the backlight works (it’s not visible in the photo, but it glows, it’s a little dim, but it still glows).