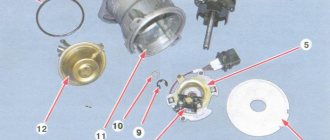
1 – label. 2 – factory hole. 3 – additional holes.
If, when adjusting the valve timing, it is necessary to rotate the camshaft(s) in the direction of its rotation (clockwise), then the sprocket(s) must be installed on one of the additional holes with a positive offset, located to the right of the factory hole, if - against clockwise, then install the sprocket(s) on one of the holes with a minus offset, located to the left of the factory hole. The selection of a hole on the sprocket with the required displacement value is made depending on the deviation of the angular position of the cam from the nominal value. When installing the sprocket on the additional hole, the factory timing mark 1 on the sprocket will not coincide with the top plane of the cylinder head.
Photos of protractors and settings
As an example, consider adjusting the valve timing with the template arrow reading 23° for the intake cam and 16° for the exhaust cam. These angles exceed the nominal values for the intake and exhaust cams by 3°, which is greater than the ±2° tolerance. With these readings of the angular position of the cams and taking into account that when the engine is running, the camshafts rotate clockwise, observing from the side of the crankshaft pulley, the opening of the intake and exhaust valves will begin to occur somewhat ahead of the factory values of the valve timing. To adjust the phases, in this case, it is necessary to turn the camshafts counterclockwise and, when installing the sprockets, use an additional hole with a minus angular offset, with an offset value of 2 ° 30 ° (the first hole located to the left of the factory hole). Then continue the work in the following sequence:
Source
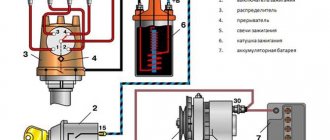
Engine timing marks 405-406-409
This article describes in detail all the timing marks located on the 405-406-409 engine.
It is explained how to set timing marks on these engines. How to set engine timing marks accompanied by photographs Timing marks are certain marks on engine parts that have different appearances and configurations. They are designed for precise installation of the ignition and gas distribution system, correct and accurate installation of engine shafts.
The marks are fixed on the front parts of the engine so that they are not erased during operation. These can be: risks, tides of different configurations, points, holes, pins, slots, and so on. Marks are applied to two adjacent parts of the unit.
Timing marks 405, 406, 409 of the engine are located outside and inside.
There are two timing marks located outside the power unit.
First timing mark
installed on the front cover of the cylinder block. It looks like a tide, in the form of a line.
Second timing mark
406, 405, 409 of the engine is located on the cardan damper pulley. It represents a deep groove on its rim.
When these two marks are combined, the piston of the first cylinder rises to its highest dead center. If this does not happen, then you must continue to rotate the cardan clockwise until the piston reaches TDC. This moment is a test.
In this case, the first cams of both camshafts should face in different directions:
If the tops of the cams are located inward, then turn the driveshaft one more turn.
Accurate alignment of the piston of the first pot at TDC can be done using a dial indicator, which is mounted in the spark plug hole of the first pot.
If there is no indicator, then you can use a long rod or a long screwdriver.
Source
Initial disassembly stage
Next you need to perform a few more manipulations, they can be quite complicated. But before you set the timing marks on the ZMZ-406, you need to perform these steps:
- Remove the front apron and radiator grille. In the event that work is carried out on Gazelle Business, it is necessary to unscrew the fasteners on the sides and in the center.
- Remove all pipes by loosening the fastening clamps.
- If equipped with hydraulic power steering, remove the pump drive belt.
- Remove the drive belt for the generator and liquid pump. Before doing this, you need to loosen its tension.
- Remove the valve cover by unscrewing all the mounting bolts. Be sure to fold them separately so as not to lose them during assembly. Be sure to keep the lid in a clean place - no foreign elements should come into contact with its inner surface.
- Unscrew the fastenings of the fan impeller drive clutch.
- Remove the impeller and clutch.
- Remove the liquid pump.
- Disconnect and remove the sensor on the crankshaft.
- Remove the crankshaft pulley and pan.
Preparatory work will take more time than replacing the chain and installing timing marks ZMZ-406. Photos of them are given in the article.
Mark on the crankshaft pulley ZMZ 406 which tooth
Hello All Dear Friends. I'll tell you how to set the timing phases of ZMZ 405,406,409 using split stars. The stars are sold together with the timing kit or can be purchased separately. The price is quite reasonable, and the benefits from them are enormous. Even in field conditions, you can carry out any manipulations with the timing belt. I’ll tell you using the example of ZMZ 405 euros 3. First of all, remove the valve cover.
Carrying out the assembly
Before you begin assembly, you need to set the phases correctly. To do this, you will need to perform the following manipulations:
- Rotate the crankshaft until the first notch is in the upper position.
- Make sure that the piston is at top dead center in the first cylinder.
- Install the damper, but do not rush to tighten its mounting bolts.
- Lubricate the bottom of the chain with clean engine oil.
- Place the chain on the crankshaft and driven gears.
- The crankshaft gear pin should fit into the hole in the countershaft.
- Make sure that the mark on the gear matches the one on the motor block. The part of the chain that is located next to the damper should be tensioned.
- Now you can tighten the bolts securing the gear to the intermediate shaft. Be sure to install the locking plates.
Be sure to use a torque wrench when making repairs. The maximum bolt tightening force is 22/2.5 N*m.
Be sure to bend the locking plate to prevent the bolts from coming out. Then you need to press the hydraulic tensioner lever and check the alignment of the marks on the engine block and the gear. After this, you need to tighten all the damper mounting bolts and lubricate the upper part of the chain drive.
How to set top dead center TDC.
First you need to set the top dead center, the so-called TDC. To do this, use a ratchet and a 24mm socket to rotate the crankshaft clockwise (it cannot be rotated counterclockwise). We saw a place on the crankshaft pulley where two teeth were missing.
We count 15 teeth counterclockwise. The fifteenth tooth should coincide with the mark on the pulley damper (if it has not been turned or moved). We combine this tooth with the ebb on the front timing chain cover. If the radiator is not removed, the ebb on the cover is difficult to see. I recommend ots
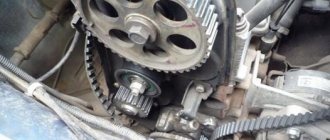
Where is the chain located
Getting to the timing chain is not so easy. A complete disassembly of the engine will be required. And this is a serious process. If the car owner does not understand the design of the timing belt, it is recommended to contact a service center. Let's take a look at the timing belt layout.
The belt itself is installed on the crankshaft and camshaft. When the pulley rotates, the rotation is then transmitted to the camshafts. And the tension is adjusted thanks to a damper inside the unit.
Similar article 126 VAZ engine bends the valve or not
If the operation of the damper is disrupted, the device is faulty, then the belt can jump from one to three or four teeth. The operation of the engine will be unstable, and wear on the unit will increase with every kilometer.
We set the timing phases.
Next we set the timing phases. Let's look at the camshafts. They should be turned with their fists in different directions. If they look at each other, then we make one more revolution of the crankshaft.
Next, loosen the bolts securing the camshaft stars. To set the phases I use this protractor.
My camshafts are different. Intake 240, outlet 252 and each has its own template. We install a protractor behind the first cam of the exhaust camshaft. Using the key, we turn the square on the camshaft body until the template arrow is at the 19 mark. In the same way, we set the intake mark to 20. A deviation of plus or minus two degrees is allowed. But the more accurately you set it, the better the dynamic performance of the engine will be. Next, tighten the bolts securing the camshaft stars to a torque of 4.6 ... 7.4 kgf.m.
If you changed the hydraulic chain tensioner, then after recharging it and installing it in place, make two turns of the crankshaft so that the chain takes the correct tensioned position. And only after that set the timing phases.
Source
After removing the drive
After you have removed the chain and taken it out, you need to wash it. It is best to use gasoline for this. After getting rid of contaminants, you need to conduct a visual inspection. If it is stretched by more than 1-2 cm, it is better to install a new one. This increase in length is more than enough to disrupt the valve timing.
You also need to pay attention to:
- Condition of the bushings - if there is wear, cracks or burrs, it is necessary to replace them.
- Gears – if there are mechanical damages or chips, then they also need to be replaced.
- Chain stabilizers - at the slightest damage, install new elements.
- Tensioner sprockets - it is necessary that they rotate freely; chips and damage are unacceptable.
If a major overhaul of the ZMZ-406 engine is being carried out, the timing marks must be installed. This will ensure the normal operation of all systems, increase the life of the motor and its power.
Mark on the crankshaft pulley ZMZ 406 which tooth
Hello! Today we’ll talk about how to set marks on the ZMZ 406 engine and modifications. In what cases are tags needed? The engine of the ZMZ family is equipped with hydraulic compensators and ignition coils, which means that there is no need to adjust the valves and ignition, and in this case we do not need ZMZ timing marks, there is only one thing left, this is the timing system, and in this case we change the entire set, or only the camshaft sprockets, I recommend installing split stars, it is more convenient and easier to set the phases. There are quite a lot of ways to set a mark; first you need to understand the condition of your engine and crankshaft pulley. Let's start with each method in order, so it will be more convenient to check these methods and not mix everything into a mess.
Placing a mark on the pulley
If we only change the camshaft sprockets, then we do not disassemble the bottom and set the lower mark of the crankshaft along the pulley; there is a shoulder on the front cover, and there is a mark on the pulley. We combine as in the photo.
Damper check
This method is only suitable if you have a normal pulley and the damper has not yet been turned. How can we check that the damper is not turned and that we are aligning the marks correctly? We count 15 teeth and align the mark on the front cover between the 15th and 16th teeth. Look at the photo:
And so we combined the mark at the bottom and now move on to the top part, installing the ZMZ timing marks on the camshaft sprockets. As we know, stars can be simple and cut.
Setting marks on camshaft sprockets
Setting marks on simple camshaft sprockets: In practice, in 95% of cases it was necessary to drill the sprockets along the jig and set the marks correctly so that the mark (small poke) on the sprocket coincided with the cylinder head. Look at the photo:
The task becomes easier when you have split sprockets and now you don’t need to align the marks and drill, you just need to set the camshaft correctly. If we are facing the engine, then we need to set 19 degrees on the right camshaft, and 20 degrees on the left. Look at the photo:
After setting the camshaft degrees, tighten and install the chain tensioner, crank the engine and check the marks again, if everything matches, safely assemble the engine and enjoy the ride.
Crankshaft star mark
When we change the entire timing belt set, pay attention to the lower sprocket; there is a mark on it; when installing, align this mark with the mark on the engine. Look at the photo:
Setting the wash mark
The intermediate star is also set according to the mark, but as practice shows, it does not play any role and it is not clear why it is needed there. The most important thing is to align the bottom and top marks.
We have high-quality split camshaft sprockets and timing kits CLICK ON THE PICTURE
We are always ready to advise and help, contact number: 8-963-054-52-27
Source
Typical faults
Common breakdowns of the ZMZ 406 engine are:
- overheating of the ZMZ motor. Overheating is caused by a faulty thermostat. A clogged heat exchanger can also cause the motor to overheat, since the oil cannot circulate normally through the system and cool the working mechanisms inside the structure;
- increased consumption of ZMZ lubricant. Oil rings and valve seals are worn out. It happens that the cap of the labyrinth oil deflector leaks. You will need to dismantle it and coat it with sealant;
- dying ignition coils create dips in traction. A common problem with ZMZ engines;
- the unit is tripping. It's a matter of spark plugs and coils.
Listed above are common malfunctions of the ZMZ engine in general. Let's see what kind of breakdowns happen.
CHECKING AND ADJUSTING VALVE DISTRIBUTION PHASES OF ZMZ ENGINES
The article was prepared for publication by M. Ukhanov (aka miha, STTeam, Rostov)
During operation, as well as due to errors in the manufacture of parts for the gas distribution mechanism drive (GRM) or due to improperly carried out repairs of the timing drive, a significant deviation of the valve timing from the specified values is possible. At the same time, it is known that the correct valve timing is one of the most important factors affecting the power, torque and economic performance of the engine. Therefore, when the traction properties of the engine decrease, the operating fuel consumption increases and the engine becomes unstable, it becomes necessary to check and, if necessary, correctly set the valve timing.
Checking and adjusting the valve timing can be done on an engine installed in a vehicle. To control the valve timing it is necessary:
Attention! Rotating the crankshaft counterclockwise is not permitted.
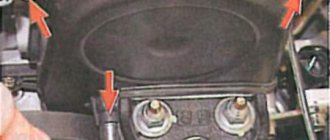
In this case, the camshaft cams of the 1st cylinder and the marks on the camshaft sprockets should be located according to the diagram:
1 – mark on the asterisk. 2 – upper plane of the cylinder head
If the tops of the cams and marks are located inward, then it is necessary to turn the crankshaft one more revolution. Precise installation of the piston of the 1st cylinder at TDC can be carried out using a dial indicator, which is installed and secured in the spark plug hole of the 1st cylinder.
A – checking the angular position of the intake camshaft. B – checking the angular position of the exhaust camshaft. 1 – cam of the intake valve of the first cylinder. 2 – cam template. 3 – protractor. 4 – cam of the exhaust valve of the first cylinder. 5 – cylinder head. 6 – hydraulic pusher.
Similarly, check the angular position of the first cam of the exhaust camshaft - view “B”.
The template arrow should point to the protractor mark 19 ° ± 2 °; when measuring, the driving branch of the chain in the area of the middle damper (between the camshaft sprocket and the intermediate shaft drive sprocket) should be tensioned and held in this state by turning the exhaust camshaft counterclockwise with a wrench to “27” for the tetrahedron on the shaft body. In this case, turning the intermediate and crankshafts is not allowed. With these values of the angular position of the first camshaft cams, the best technical and economic performance of the engine is achieved.
If deviations in the angular position of the camshaft cams exceed the permissible ± 2 °, adjustment of the valve timing is required.
To do this, you need to perform the following work on the engine:
| CAMSHAFT SPROCKET WITH ADDITIONAL HOLES: 1 – label. 2 – factory hole. 3 – additional holes. If, when adjusting the valve timing, it is necessary to rotate the camshaft(s) in the direction of its rotation (clockwise), then the sprocket(s) must be installed on one of the additional holes with a positive offset, located to the right of the factory hole, if - against clockwise, then install the sprocket(s) on one of the holes with a minus offset, located to the left of the factory hole. The selection of a hole on the sprocket with the required displacement value is made depending on the deviation of the angular position of the cam from the nominal value. When installing the sprocket on the additional hole, the factory timing mark 1 on the sprocket will not coincide with the top plane of the cylinder head. Photos of protractors and settings As an example, consider adjusting the valve timing with the template arrow reading 23° for the intake cam and 16° for the exhaust cam. These angles exceed the nominal values for the intake and exhaust cams by 3°, which is greater than the ±2° tolerance. With these readings of the angular position of the cams and taking into account that when the engine is running, the camshafts rotate clockwise, observing from the side of the crankshaft pulley, the opening of the intake and exhaust valves will begin to occur somewhat ahead of the factory values of the valve timing. To adjust the phases, in this case, it is necessary to turn the camshafts counterclockwise and, when installing the sprockets, use an additional hole with a minus angular offset, with an offset value of 2 ° 30 ° (the first hole located to the left of the factory hole). Then continue the work in the following sequence: Source |
Design Features
Before installing timing marks on the ZMZ-406, you need to consider the features of this engine.
There are a total of four phases in which the gas distribution system operates:
- Inlet of the fuel mixture into the combustion chamber.
- Compression stroke.
- The piston stroke is moving from top dead center down.
- Exhaust gas release.
To ensure maximum efficiency and prevent damage to the valves, an actuator must be used. On ZMZ-406 and similar motors a metal chain is used.
But the camshafts and crankshafts must be installed according to the marks - this ensures the synchronized operation of all mechanisms. The gas distribution mechanism allows the valves to open and close the holes in a timely manner, supplying the fuel mixture and emitting combustion products into the atmosphere.
Question answer
When I install this kit myself, I give a guarantee from 3 months to six months without mileage limitation, depending on the remaining condition of the engine. Of course, when it comes to our vast homeland, such guarantees would be stupid on my part. But I hope this reflects to customers the approximate reliability of the kit.
Is it possible or not to purchase part of this kit?
Maybe. For example, a client wants to re-rivet Mercedes chains, install different sprockets or tensioners. In this case, the price of the kit is calculated individually and of course there can be no guarantees on my part.
Do the components in this set change or not?
As I said above, for me personally, a similar approach from other manufacturers irritates and causes misunderstanding. Therefore, the main components of this set are unchanged. During the year of sales, compared to the initial photo, I only changed the chain tensioners. By replacing the tensioners with a wear indicator in the kits with regular ones without an indicator (from the same manufacturer). This was due to common sense logic: why do we need a wear indicator on the new “zero” double-row chains? Which may be needed after several years of operation. And the pricing of the kit is also an important thing.
Source