Lada Vesta 2022 - 2022, 2022 2022 is a sedan or station wagon. The SV Cross modification, presented as a new generation crossover, also began to be produced. Regardless of the model type, the installer and fuses of the Lada Vesta remain the same. They differ slightly in the type of configuration.
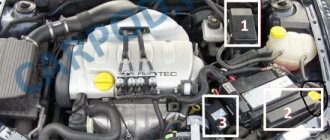
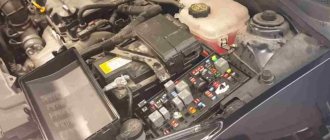
The machine contains 2 blocks of fusible protective elements and the same number with a relay. One of them can be found inside the car, and the second in the engine compartment. The selection of fuses in them differs depending on the role being protected by the electrical circuit. A detailed diagram and its explanation can be seen below.
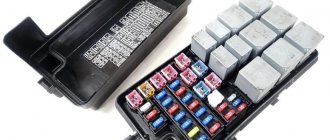
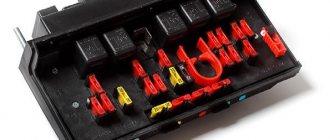
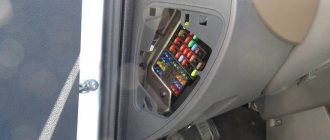
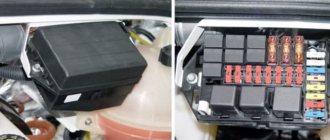
Block in the cabin
The 2017-2018 Vesta modification contains the largest number of fuses and relays. Most of them are responsible for the safe operation of electrical circuits of devices inside the cabin, as well as those that control the vehicle’s electronics. A comfortable ride and driving safety depend on them.
You can find this block to the left of the dashboard, just below the level of the steering wheel. The lid is indicated by special plastic clips. Below it is a diagram describing its contents.
Review of Manufacturer Prices
| Name/article | Price in rubles |
| Housing cover Lada Vesta 8450007436 | From 300 |
| Jcase | From 180 / piece |
| Mini | From 140 / piece |
| EMM-T4 231A03142 (Renault) | From 170 / piece |
| PF895652A2 (Japan) | From 220 / piece |
*price indicated as of March 28, 2019.
Conclusion
Installing new power modules requires careful attention on the part of the technician. It is unacceptable to violate the current range. The exact data for each of the fuses is indicated in the operating instructions for the technical device. If difficulties arise, contact service station specialists for help.
Vesta fuse box diagram
The set of elements depends on the location of the installer.
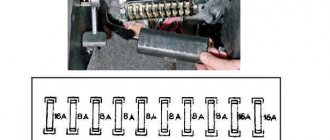
Under the hood.
| Fuse | Power, A | What protects |
| F60 | 70 | EURU – electric power steering |
| F61 | 30 | Heated rear window |
| F62 | 40 | ESP |
| F63 | 15 | Air conditioner clutch |
| F65 | 25 | ESP |
| F66 | 5 | AMT Controller - Transmission |
| F68 | 70 | Likewise |
| F69 | 15 | Controlling the A/C clutch relay and relay box |
| F70 | 60 | K30S |
| F71 | 60 | battery |
| F72 | 60/70 | battery |
| F73 | 10 | Sound signal |
| F74 | 5 | Reversing light switch |
| F75 | 60 | Heated windshield |
| F76 | 10 | Alarm horn relay |
| F78 | 10 | Power supply for oxygen sensors, purge valve |
| Adsorber, timing valve | ||
| F79 | 40 | Cooling Fan Relay/Relay Box |
| F80 | 5 | Heated windshield relay coil |
Relay
| Number | Power | What is he responsible for? |
| K21 | 30 | Heated windshield 1 |
| K22 | 30 | Heated windshield 2 |
| K23 | 30 | Starter |
| K24 | 20 | Sound signal |
| K25 | 20 | Alarm sound |
| K27 | 20 | Main relay KSUD |
| K28 | 20 | Air conditioning compressor clutch |
| K29 | 40 | Cooling Fan |
In the cabin.
| Circuit breakers | Power, A | What protects |
| F1 | 15 | Steering column switch right, washer |
| F2 | 30/5 | left steering column switch, non-lux/lux |
| F3 | 10 | Left high beam (non-luxury version) |
| F4 | 30/5 | not luxury/luxury |
| F5 | 15 | Seat heating |
| F6 | 7,5 | Right dimensions |
| F7 | 10 | Left dimensions |
| F8 | 5 | Rear fog lights |
| F9 | Z | Right turn signal in the mirror |
| F10 | 5 | AMT robotic gearbox selector |
| F11 | 10 | Low beam on the left (in non-luxury configuration) |
| F12 | 15 | BCM Controller (Turn Signals) |
| F13 | 10 | BCM controller (self-powered) |
| F14 | 10 | Turning off the brake pedal |
| F15 | 5 | Power supply for rain and light sensor, headlight range control |
| F16 | 5 | Turning off the brake pedal |
| F17 | 5 | Lighting for the glove compartment, trunk, sills |
| F18 | 3 | Left turn signal in the mirror |
| F19 | 10 | Low beam on the right (in non-luxury configuration) |
| F20 | 5 | Heated exterior mirrors |
| F21 | 15 | BU SNPB |
| F22 | 5 | instrument cluster |
| F23 | 5 | instrument cluster |
| F24 | 5 | ERA GLONASS, radio |
| F25 | 5 | ESP9.1 controller |
| F26 | 15 | Power supply to fuel pump module |
| F27 | 5 | Power supply for parking sensors |
| F28 | 5 | EURU controller (electric power steering) |
| F29 | 10 | Power supply for trailer lighting |
| F30 | 5 | ERA GLONASS controller |
| F31 | 5 | ERA GLONASS controller |
| F32 | 10 | K15M Bus Power (Engine Compartment) |
| F33 | 5 | Window control |
| F34 | 5 | Power supply for steering angle sensor, steering wheel button block |
| F35 | 5 | Driver's door switch block |
| F36 | 15 | Radio, diagnostic connector |
| F37 | 7,5 | Right stop lamp |
| F38 | 7,5 | Left stop lamp |
| F39 | 10 | Daytime running lights in non-luxury configuration |
| F40 | 10 | High beam (non-luxury version) |
| F41 | 20 | 12V socket (power supply for additional devices), cigarette lighter fuse for Lada Vesta |
| F42 | 20 | BCM controller (VTR bus power supply) |
| F43 | 20 | BCM Controller (Door Locks) |
| F44 | 30 | Window lifters |
| F45 | 30 | Cabin heating fan |
| F46 | 30 | windshield wiper (switch power) |
| F47 | 25 | EMM controller (PDS, lBS, lGO) |
| F48 | 30 | EMM controller (windshield wiper) |
| F49 | 25 | EMM controller (PTF, ZPTO, license plate) |
| F50 | 25 | EMM controller (lDS, PBS, PGO) |
Relay under the dashboard.
| Number | Power, A | What is he responsible for? |
| K1 | 70/50 | Power supply for lighting/seat heating (in luxury configuration) |
| K2 | 30 | Reserve |
| K3 | 30 | Heated rear window |
| K4 | 30 | Front windows |
| K5 | 40 | Interior heater fan |
| K6 | 30 | Rear window lift |
| K7 | 20 | Fuel pump module |
| K8 | 20 | ACC (12V socket power supply) |
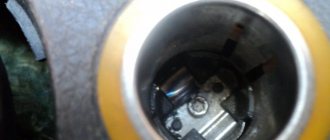
Cigarette lighter fuse for Lada Vesta
The cartridge cigarette lighter insert of the FJ1720A Jcase type with a height of 16 mm is numbered F41 and is designed for 20 A. In some versions, its number is F50 in the interior unit. You can learn more about the element from the video:
Vesta radio fuse
The insert number 41 of the interior unit is responsible for the tape recorder. Its power is 20 Amps.
Vesta signal relay and fuse: where is it located?
The horn protection is number 73 and is located in the engine compartment. Power - 10 A.
Vesta starter fuse and relay
The additional one is under the hood and is designated as K23.
Gasoline pump
The 26 x 15 Ampere fuse in the cabin unit is responsible.
Fuses and light relays
There are 2 inserts for low beam lighting, the right and left ones are F11 and F19. They are located inside and the power of each is 10 A.
PTF fuse
The 5 A relay F8, which can be found in the cabin unit, is responsible for protecting the fog lights. The connection occurs via a pulse relay.
Trunk lighting
The fuse is F8, with a power of 5 A. It can be found in the interior block.
Number plate illumination
Answers F49 at 25 Amps.
Button backlight
There is no separate fuse for this task.
Glove compartment lighting
Fuse F8 for the interior unit is intended. Power - 5 Amperes.
Heated seats: where is it located?
The protection of this electrical circuit is controlled by 15 A fuse F5.
Heater fuse
F45 30 A internally.
DRL
Fuse F39 is designed for 10 A.
Heated glass
Two fuses are responsible: F61 for heating the rear, and F75 for the front. Both are rated at 30 A and are located under the hood.
Wiper relay
Located in the central body electronics unit or additional installer (luxury equipment). You can often notice a relay by the fact that it clicks. To get rid of clicks, the block is often covered with soundproofing material.
Generator voltage regulator relay
Article number 120a 8450006900 on Vesta is 1 pin single-contact. It can be used to connect a DVR. The price of such a device is approximately 20 thousand rubles.
Cooling Fan
The relay is located under the hood, where it is designated K29. There is also a fuse responsible for it, number F79 with a power of 40 A.
parking lights
Fuses F6 and F7 in the passenger compartment are responsible for protecting the electrical circuits of the right and left dimensions. In the first case, the power is 7.5 A, and in the second - 10 A.
Generator
There are 2 elements with catalog numbers F71 and F72. Both are 60A.
Running lights
The same fuse is responsible for their protection as for the DRLs.
ABS
There is no separate fuse.
Cruise control
Absent.
Reverse
Absent.
Charging relay
The Valeo generator installed on Vesta is additionally installed.
Main relay
Located under the hood and designated as K27.
Windshield washer
The motor fuse is designated F1 and is rated at 15 A. Its place is in the interior unit.
Airbags
The fuse is not included in the factory configuration.
Relay holder block 314 for Lada Vesta
Responsible for the starter and has 4 contacts.
Reviews
| № | Positive |
| 1. | Georgy Nikolaevich , 42 years old (drive2.ru): the car has been three years old since purchase, I haven’t made any investments, only scheduled maintenance. The fuses are all standard, nothing has been changed. |
| 2. | Mikhail , 48 years old (prom.ua): in two years I replaced two power modules once. I didn’t contact the service, I limited myself to my experience and skills. |
| 3. | Sasha , 38 years old (autotoday.com): There are no complaints about the standard power modules yet, the car is only a year old, but I heard that you can install a unit from Renault Duster, Logan of the second generation. |
| 4. | Kirill , 45 years old (rozetka.ua): mileage 75,000 km, only recently replaced five power modules with new ones. I believe that a resource of 75,000 km is more than enough for domestic transport. Of course, there is still a long way to go to reach foreign brands, but this is progress. |
| 5. | Petrovich , 44 years old, (avtoflit.com): I bought the car second-hand, good condition, five years old. I didn’t do anything to the power system, the units are operating normally. |
| 6. | Nikolaevich , 45 years old, (autotoday.com): I am satisfied with the quality of manufacturing and assembly of the Lada Vesta, no comments. I fix minor damage myself. |
| 7. | Vasilievich , 41 years old, (drive2.ru): the car is four years old, only recently replaced three relays - breakers in the engine compartment. Good build quality Lada. |
| Negative | |
| 8. | Nikiforovich , 49 years old (prom.ua): problems with the power system began after buying the car. I repeatedly contacted the service station due to burnt-out power modules. The problem is still not resolved. |
| 9. | Nikolai Semenovich , 46 years old, (avtoflit.com): I do not recommend standard fuse blocks for the Lada Vesta. If possible, replace with new ones from Renault Duster, Logan of the second generation. |
| 10. | Vyacheslav Petrovich , 47 years old, (drive2.ru): the car is new, but the weak points are inherited from previous generations. |
| 11. | Stanislav Vasilyevich , 39 years old, (autotoday.com): after two years of operation, the car began to crumble in the literal sense of the word. The build quality is still raw and needs improvement. |
Related link:
Cruise control on a Lada Vesta car
Tips for motorists
Most modern cars have not been equipped with a cigarette lighter as such for a long time. It was replaced by a device called a 12v power socket, leaving only the name of the cigarette lighter. Likewise, the Lada Vesta has a similar connector on board, into which car owners connect various devices. And if previously everything was limited to charging the phone or powering the DVR, now drivers and their passengers plug several devices into the outlet at once, putting a lot of strain on the wiring. Let's talk about what causes the cigarette lighter to fail and how to deal with it yourself.
Features of the air conditioning system
Turning on the air conditioner is possible only when the power unit is running, but the outside air temperature should not be lower than 5 ° C, and the fan must be turned on (regardless of the speed). In this case, at least one of the air deflectors, indicated in the diagram by numbers 5 and 6, must be opened. Otherwise, the evaporator may freeze and the air supply may stop. In addition, drops of condensation may appear under the machine.
To avoid catching a cold, it is strongly recommended not to direct the flow of cold air onto the body. And if the air humidity is high, you should not direct the air at the windshield, as this can cause fogging.
As for the operation of the air conditioning system, its operation increases fuel consumption, because the operation of the air conditioner drive requires part of the engine power. In addition, when driving with a trailer or traveling in mountainous areas, the air conditioner can turn itself off to prevent overheating of the power unit.
To turn off the Lada Vesta air conditioner, just press key 18 and the system will stop working and the icon will go out.
Both Vesta and Xray, as well as other AvtoVAZ models, are equipped with air conditioning or climate control, depending on the configuration. Many people confuse these concepts, or for some they are the same thing. But the truth is a little different than some people think.
Air conditioning is a system capable of supplying cold air to a car. The structure of the air conditioner: compressor, radiator with freon, temperature sensor.
Climate control is a whole system for controlling the air temperature in the cabin. In addition to the fact that it can cool the temperature (a conventional air conditioner), it can also maintain a constantly set temperature by regulating air flows, the speed of the stove fan, and the direction of air flows.
In other words, an air conditioner is a refrigerator that can only cool, while climate control is a whole system that can constantly maintain a set temperature.
The difference between Vesta and Xray from other AvtoVAZ models lies in a different control unit for the heater, air conditioning and air ducts.
On the Lada Vesta, climate control is installed only in the Luxury configuration.
A little about the nuances of Vesta’s climate system:
- The central air duct nozzles have a small “operating range” of inclination
- The temperature is adjusted in increments of 1 degree, and not 0.5 degrees, as on foreign cars (i.e. you won’t be able to set the temperature to 19.5)
- You can hear the operation of the compressor, the moment it turns on/off.
In general, the climate control on the Lada Vesta works well and does not cause any problems.
Wiring problems
If the above steps do not fix the problem, then the problem is in the car’s electrical wiring. To make sure of this, use a tester to “check” the contacts. There should be constant voltage at the red wire terminal, and at the blue terminal when the car's side lights are turned on. If there is no power, you should look for an open circuit in the car's common wiring circuit.
As you can see, a power outlet failure can be due to several reasons. In 90% of cases, the “culprit” is overloading the socket with a large number of connected devices or appliances with significant energy consumption. For example, powerful automobile compressors or current converters can easily blow a fuse. Therefore, try not to use power strips and powerful appliances, so that one day you do not encounter an outlet failure.
Share this article with your friends:
Removing the front bumper
Considering the massiveness and aesthetic component of this element in the exterior, dismantling the front bumper should be done carefully and strictly according to the instructions. First of all, you need to disconnect and remove the battery from under the hood
Then, using a “10” head, unscrew the 2 bolts securing the air filter unit, which also hold the upper part of the bumper
First of all, you need to disconnect and remove the battery from under the hood. Then, using a “10” head, unscrew the 2 bolts securing the air filter unit, which also hold the upper part of the bumper.
The registration numbers are removed, under which there are 2 screws securing the bumper to the central beam. Using an L-shaped TORX “20” key, unscrew these 2 screws and 2 of the same self-tapping screws that attach the bumper to the wings in the wheel arches.
Then, using an L-shaped TORX “30”, unscrew 4 screws securing the lower part of the bumper, and TORX-20 – 2 more screws securing them to the side panels on each side.
After this, the bumper is pulled forward, alternately on each side of the wheel arches, until its latches come out of the mounting sockets.
The bumper remains hanging on the top four TORX-30 key bolts, of which the central one (opposite the hood lock bracket) is unscrewed last, while keeping the bumper from falling, after which the accessory is completely disconnected from the car.
It is advisable to use this situation to simultaneously clean the radiator from insects and debris.
Removing and installing the cigarette lighter
Before starting each repair procedure, it is necessary to stop the car and remove the negative from the battery. You will have to change the part from the glove compartment:
- Remove its cover. Using a knife, bend the two clamps away from the socket.
- In the “hole” behind the glove compartment lid, feel for the cigarette lighter housing. Using a flat-head screwdriver, carefully, so as not to damage the wire connections, bend the plastic fastener. Unclip the latch with the same screwdriver. At the same time, hold the cigarette lighter block from the passenger compartment with your left hand and bend the lower clamp.
- Remove the socket from the hole.
- Disconnect the wiring harness.
- Connect the new part to the network, secure it with fasteners.