If the owner of a car loves music, then he will need high-quality car acoustics. The interior of a passenger car is a small closed volume, which makes high-quality sound reproduction difficult. Listening to music tracks is affected by the noise from a running engine. A negative factor when installing speakers in car doors is also the vibration of metal surfaces, so when installing the speaker system yourself, you need to follow useful recommendations.
What speakers are best to put in the front doors?
Speakers are placed in different places inside the car. To provide sound for the first row of seats, speakers are installed in the front doors. Depending on the technical capabilities and design of the car, the speakers in the front doors can be coaxial or component. Coaxial acoustics are two or three loudspeakers that are mounted in the center of one of them. The main one is a 6.5-inch low-frequency or wide-range loudspeaker, on which there is a mid-range driver and a tweeter for reproducing high frequencies. The decision on which 16 speakers to install in the front doors is often determined by the make and design of the car.
The coaxial audio system has good playback quality and is compact. The dimensions of the acoustics are determined by the dimensions of the main speaker. What is important for the car owner is the relatively low price of the design and ease of installation. Due to the fact that all acoustic devices are arranged in one place, it is impossible to set the relative position of the dynamic heads to obtain effective sound.
Component acoustics, designed for installation in the front doors of a car, consists of several dynamic heads, each of which is mounted in its own place. The entire reproduced audio range is divided into several bands, so component speakers are connected to a low-frequency amplifier through crossover filters or crossovers. The number of loudspeakers must be at least two, and high-quality sound reproduction devices require connecting acoustics with 4-5 loudspeakers per channel. This configuration increases the power and sound quality, the cost of the system and the complexity of installation.
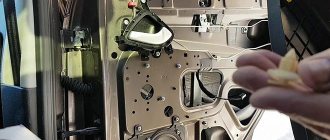
Door damping
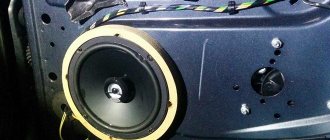
The steel door wall has an uneven surface. Therefore, different parts of it resonate differently. This difference affects low notes and is one of the reasons why the sound deteriorates. The combination of soft and hard damping materials helps not only reduce resonance, but also get rid of dullness in the sound.
Door vibration suppression circuit
If you knock on a door, the sound is clear in some areas, but dull in others.
Where the sound is clear, install hard material, and where the sound is dull, install soft material. To do this, before installing the acoustics, you need to soundproof the car doors. If we dampen the steel wall well, the internal elements of the door will still resonate, echoing the dynamics. If the resonance of the internal structure of the door turns out to be significant, then the door itself will behave like a loudspeaker, and then we will have one loudspeaker built into another, of huge size, but with a quiet sound.
In this case, there will be no accurate musical scene or imagery, and the sound quality will deteriorate. Therefore, damping the inside of the door has a positive effect.
You should know that if you overdo it with sound absorption, it will negatively affect the sound . The efficiency of the speakers will decrease and the sound will lose its dimension. To eliminate standing waves inside doors, use sponge acoustic materials.
Stick one sheet of acoustic material 30x40 cm behind the speaker, and the second sheet as far from it as possible. It is better to take a material that does not absorb water, since there is moisture inside the door. For a large car, take thicker material, for a small car, thinner. There shouldn't be a lot of it.
What speakers should I put in the front doors?
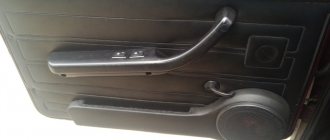
The main criteria when choosing acoustic systems for passenger car doors are the technical parameters and the manufacturer. In some cases, a coaxial system from a reputable manufacturer will provide higher sound quality than a low-quality multi-component system. Which speakers to install in the front doors depends on their design. Electrodynamic heads of large diameter are usually not used for this purpose. The optimal size of acoustic emitters for installation in doors is 6.5 inches in diameter. This will allow you to get a loud sound for a car interior and good reproduction of low frequencies.
Installing a speaker in a door is not a difficult task, except in cases where the dimensions of the speaker do not allow it to be installed in the seat. The issue is resolved by using a special podium. A component speaker system is often placed in the podium, but the design of the car interior will be slightly disrupted. Often, lovers of good music in the car interior use loudspeakers with a diameter of twenty centimeters or eight inches. Such large car door speakers provide high-quality reproduction of mids and low frequencies, but the dimensions of these speakers are a serious obstacle when installing them in a car door.
Installation of acoustics
This is perhaps the most important, complex and time-consuming stage of building an audio system.
First you need to learn another axiom:
90% of the sound of an acoustic system depends on the correct selection of its installation and configuration, and only 10% depends on the speaker design itself.
Another myth - a misconception among beginners:
My speakers are cheap speakers and there is no point in me bothering with a proper installation.
When installing acoustics, you need to pay the closest attention and approach the process as carefully, thoughtfully and meticulously as possible, regardless of the price of your equipment. Otherwise, regardless of your maneuvers, inevitably, you will simply receive different versions of the disgusting sound. When installing sound, there are aesthetic aspects that depend entirely on your desire to bother with the installation, and technical aspects that need to be taken care of in any case.
Tweeters
The high frequency range is very easily damped by obstacles and reflected from them. You can conduct a simple experiment by covering the tweeters with your hand or some hard, flat surface. Therefore, the HF must be placed closer to the level of the head in front of the listener so that there are no obstacles between the ears and the HF. It’s also not a good idea to lift the tweeters up to the ceiling. This will simply break up the sound.
This is precisely why coaxial speakers installed in the legs will never sing normally, even if their owners tear their vests, proving that the sound is excellent, that everything suits them and that they don’t go to competitions.
The corners of the door mirrors or the side pillars of the windshield are excellent places to install tweeters. Everything is simple here.
Much more questions arise about the orientation of the HF in the cabin. Where should the HF be directed correctly? There is no clear answer to this question.
Someone is pointing both high frequencies at the driver.
Someone is pointing the HF at the opposite listener. (yours for the passenger, passenger’s for you)
Someone is directing the HF to the center of the cabin between the front seats.
Someone sets the HF to reflect from glass.
All these options have a right to life, but which one will sing best in your car, with your high frequencies and for your ears is best determined experimentally.
Take double-sided tape and rehang the HF in different ways every two days. This is a great way to evaluate each method and choose yours. The only thing I can recommend is to ride with each option for a day or two. Sometimes the initial wiretapping creates a misconception.
Another important point to pay attention to:
The stiffer and more durable your tweeters are mounted, the better they will sing.
Accordingly, you should not leave the option you like on the tape. Install the tweeters on their standard mounts, following the rule stated above.
Middles
In a three-way system, it is also best to install the center closer to the listener’s head, on the panel or in the corners of the mirrors. The direction, as in the case of HF, is best determined experimentally.
Separately, you need to pay attention that diffuser centers, like any other speakers, require their own specific volume for proper operation, for which they will work. Recommendations for volume sizes can be easily found in the instructions and on the Internet. But here again there is room for experimentation. I recommend playing with different volumes and listening to the middle parts in them. Volume can significantly affect the sound of the midrange, both for the better and for the worse. And of course, no one bothers you to play with the filler in this volume. It will also have a noticeable effect on the sound.
Well, in this case, of course, the rigidity of the installation and the tightness of the speaker fit into the volume are very important. It is very important that the sound of the rear part of the center does not escape through the slots of the seat and does not extinguish the sound of the front part of the diffuser in antiphase. This phenomenon is called speaker shorting. The phenomenon is not fatal, but can significantly spoil the sound.
Midbass
The vast majority of midbass speakers of component and coaxial acoustics require free-air design.
The diffuser hangers of free air speakers are designed to hold the diffuser even at maximum power without outside help. Such speakers need a volume in which the air will not have a noticeable effect on the operation of the speaker. That is, ordinary midbass will feel great when installed in the door.
They don’t need any box and are even contraindicated. A free air speaker placed in a small volume will lose bass depth and begin to hum unpleasantly with music.
However, simply screwing the speaker to the hardware is certainly not enough for the midbass speaker to work properly. It is extremely important to Mead that his front part of the diffuser is as isolated as possible from the rear part. It is very important to eliminate all holes in the door near the speaker installation location.
In addition, the midbass already has sufficient travel and energy when the diffuser is displaced, which means that when installing you need to be guided by the following rules.
Midbass in the door should be installed:
- as hard as possible;
- as deaf as possible;
- as tightly as possible.
This means that vibration insulation of doors is simply necessary, and there is clearly no point in being modest with noise.
But at the same time, it is worth paying attention to the ease of repairing the door to the Shumka ambassador, and also make sure that the ventilation holes in the door remain open. They won't affect the sound, but they might cause rust. Very often, to give additional rigidity to the seat, plywood spacer rings are used, which are securely attached to the metal of the door, and the speaker is already attached to them.
A midbass mounted on a plastic door trim will NEVER work properly.
In addition, spacer rings can be used to optimally tighten the midbass in a two-way system. This will help avoid dips in the midrange. When installing the rings, it is important to pay attention to their tightness so that the sound passes through them into the volume of the door, and does not go under the casing.
If the door trims are equipped with podiums for mid-bass speakers, then it is best to adjust the spacer rings in such a way that the speakers in these podiums, through the trims, are attached rigidly and hermetically to the rings.
It remains to be mentioned that when connecting the terminals to the door speakers, you need to lubricate the connected terminals with lithol or cyatim. Moisture and condensation often collect in doors. The car speakers themselves are protected from such phenomena, but the terminals are very susceptible to oxidation. The lubricant will repel moisture and save you from the problems of rotting contacts.
Rear acoustics
Coaxial rear speakers are also acoustics for free air design. Therefore, for its normal operation, the entire volume of the trunk is required. Well, in the same way, here you need to be guided by the same three rules and make the shelf for acoustics as rigid, deaf and airtight as possible.
In a standard cardboard shelf, in a shelf made of thin plywood and in a shelf with holes in the trunk, the acoustics will NEVER work properly!
The shelf will have to be made of thick plywood, made airtight and attached not to the standard plastic ears, but to metal as rigidly as possible.
Regarding the rear, it is also worth mentioning a very common mistake of many beginners:
It makes no sense to install rear and sub at the same time!
What's the point of putting a subwoofer in the trunk and then covering it with a shelf of pancakes? Firstly, you will strangle the sub, secondly, it will thresh the pancakes, interfering with them and exceeding their speed, and thirdly, in the cabin you will hear not the sub itself, but the muttering of the pancakes from it at the frequency of their own resonance.
In general, you need to think about why they put a rear at all and whether you need it in your case
You shouldn’t put the rear just because everyone you know does it and because there are regular places for the rear.
The rear is installed either in professional 5.1 multimedia systems for watching DVD video, or if you are planning an initial system of the category “just for something to drone”, in which the front is very weak, and it needs to be at least somehow supported in the midbass area.
Don’t listen to stories from rear owners who say that with the rear the sound is richer, bassier and more voluminous. This just means that the person’s front is poorly established, and he does not cope with his functions normally.
In a competent two-channel stereo system, the rear is basically not needed!
And here, at the same time, we need to dispel the myth that beginners simply adore. We are talking about standard audio systems in cars.
The main argument of these people:
“I have a staff and it has a rear! The staff was made by engineers, and they knew what they were doing"
Personally, I don’t understand where people get the idea that professional sound technicians worked on the standard system of their car, and the company’s goal was to make a car with impeccable sound?
Of course this is not true. When developing a standard car audio system, designers are primarily guided by considerations of efficiency, harmony of the interior and interior design of the car as a whole. And this approach is completely justified. Why, say, should a buyer of a budget car overpay hundreds of thousands of rubles for a professional system that he may not need at all.
A similar myth is spread by newbies - owners of cars equipped with “branded” audio systems with a bunch of speakers. The myth is essentially the same, with the only difference being that it’s a stock unit and this is a BRANDED audio system.
They are partly right and of course there is a difference. Branded systems play very, very well. They are quite capable of satisfying the sound needs of most non-fussy drivers. However, the cost of overpaying for such a system is simply monstrous. Such systems usually play for much less than they cost, and the equipment itself often has nothing in common with a high-profile company other than nameplates on the grilles.
Such systems are designed not so much to provide high-quality sound, but to add prestige to the car itself and its owner.
I repeat, they play very well, but you shouldn’t idolize them.
With your own hands, you can assemble a much better system yourself and it will cost much less. Another thing is that the owner of a top-end car will never do this))
In general, it is worth deciding on the rear before it is purchased and installed, and not after!
Regarding the installation of any acoustics, it remains to clarify a couple more rules:
The acoustics are installed on the most level seat possible! Any crookedness or unevenness when tightening can kill the speaker. If your podium is crooked, don't pull the speaker as hard as you can. You are simply deforming the basket.
When installing speakers, pull the screws or bolts diagonally, but do not immediately tighten them tightly. Press diagonally against all the mounting holes provided in the speaker, and only then tighten the fasteners completely.
I strongly recommend that you drill holes for the screws in advance so that when installing the speaker, the screws go tightly but firmly. Very often, when beginners begin to force the screws, the screwdriver slips and breaks through the speaker. This point needs to be given close attention. Hold the screwdriver with your finger and never rush. This will protect the iron from destruction and you from additional expenses.
Passive crossovers
Crossovers must be installed as close to the acoustics as possible!
It is very important!
Long wires from crossovers to speakers can significantly affect the tuning of the crossovers.
Well, it is highly advisable to install them not inside the door, but under the trim or in the kick panels of the cabin. Crossovers extremely do not like temperature changes and moisture.
We sorted out the technical aspects of installing the acoustics. Now we can talk a little about aesthetics.
A lot of questions arise about how to beautifully design podiums for frontal speakers, and at this stage many are afraid of experiments, believing in absentia that they will not be able to beautifully decorate the speakers in a car on their own. For this, of course, you can turn to professionals in the installation studio. Or you can try your hand and make podiums in a way that does not require special skills and professionalism. All you need is patience and a little free time.
Let's talk about the nuances of working with glass mat and resins.
The first and probably the most important advice in this matter: Take your time! This is not a quick task and is very painstaking. If you don’t want to waste a few evenings on a boring, monotonous activity, then it’s better not to start at all. If you rush, you risk getting a terrible craft instead of aesthetic podiums.
To make podiums for the first time, it is best to use stocking technology, glass mat and epoxy resin.
For the first time it is better to use epoxy rather than polyester. Polyester dries very quickly. This is its main advantage. The downside is the strong, pungent, unpleasant smell. Epoxy will allow you to quickly correct any mistakes or mistakes during the long-term hardening process. And the absence of smell will allow you to make podiums right at home, or on the balcony, devoting 30-40 minutes a day to the process, say, after work.
I’ll show you how to work with these materials using the example of those podiums that I first made for high frequencies and mids. This example is noteworthy in that I cannot boast of the straightness of my hands in such types of work, which means that literally anyone can achieve such podiums.
So, let's go.
Using wood bits, we cut out 2 rings from 10-piece plywood and file them so that the speaker fits tightly into the ring.
At the hardware store, we buy 10 pieces of self-tapping screws of various lengths and 60 nuts for 8. Using them, we set the rings in the desired position and at the desired angle. I used this method because the rings are very thin, less than a centimeter.
We set the rings at different angles and listen to the optimal direction of the speakers.
For tweeters, we file down the plastic linings of the stands and instantly glue in the crystal of the HF clip at different angles, determining the optimal direction until we finally decide.
In the corners of the mirrors we drill 2 holes inside the future podium and in the iron of the door for fastening the center podiums with two screws to help with the standard clips.
The biggest nuance of the podiums was that the elastic band of the door opening overlaps the corner of the decor by about one and a half centimeters when closing. This means that the podium of the middles should not start from the edge of the corner, but with an indentation of a centimeter. We mark with a marker the strip from which the podium will begin.
Before starting the main work, using coarse sandpaper, we roughen the contact surfaces of the stockings so that the resin there will better adhere to the plastic.
We select stockings or stretch material to make the shape of the podium, try on how it will look, and make sure that the stocking stretches enough to provide the desired shape of the podium without wrinkles. On the back side of the podiums we collect the excess stocking with clothespins and tape.
In the place where there should be an indentation of the podium under the elastic band, I pressed it directly through the stocking and smeared the entire strip with the crystal. Gradually pressing each section, I ensured that the stocking was securely glued to the entire surface of the indentation.
I also applied superglue to the place where the stocking was pulled along the ring of the podium. Just in case, so that later after cutting the hole there will be no problems.
When the glue set and dried, I mixed a little epoxy and coated the future podiums with a thin layer.
After 6 hours, when the epoxy began to set, I applied two more layers to the stockings and left them to dry for a day.
After the resin has dried, cut holes inside the rings. By this time the stockings had become hard, but not stone-like. In general, nothing more is needed. Through the holes in the rings, I laid a small layer of glass mat fibers from the inside along all the walls and impregnated them with epoxy.
When the glass mat is impregnated, it becomes pliable and is quite easy to lay on the walls. Make sure that the epoxy flows into every corner of the podium from the inside. If this is not done, then shells and soft areas of the podium will remain, which will collapse under light pressure. At the same time, you should not stuff the glass mat too tightly, so as not to deform the shape of the stocking. Under its tension, the stocking, as a rule, gives an aesthetically optimal shape. You shouldn't spoil it. It is also advisable to apply several layers of epoxy to the base of the podium inside.
This will give additional rigidity to the entire structure.
After the first layer has dried, you can lay another one in a similar way. Only this time you can still apply a thin layer of epoxy once and on top of the podium.
If you need to give some shape to the outside, then lay the required amount of glass mat or fiberglass on top in the right places and impregnate it with resin. Separately, you need to take into account: when sanding glass mat, your hands itch terribly. Like after glass wool. It is better to protect them with gloves. And when laying layers inside, make sure that there is enough space left in the podium for the speaker. It is quite difficult to sand out the inside.
When the second layer dried, the result was unattractive, at first glance, blanks that can already be put in order. We cut off the remains of the stockings, remove drops of resin and drips inside the high-frequency podiums with a file, bringing the back side of the base to its original state.
Now we stock up on various waterproof sandpapers and begin to sand the podium from drops and unevenness. This is the longest process. The sandpaper must be soaked in water periodically. It sands better this way, and the sandpaper doesn’t get clogged, and we don’t breathe resin dust, which obviously doesn’t improve our health.
In the process, all the shells and jambs formed during the formation of the base of the podium will be opened.
At this stage of sanding, you need to give the podium the required shape, remove all excess drops and drips, identify and mark all dents, cavities and places on the podium that need to be given additional shape.
Now we fill the sink with any fiberglass putty or putty on plastic in excess and add larger layers where an additional form is needed. The convenience of working with putties is that they set very quickly. Literally 5-7 minutes after applying the putty, you can slowly sand it off.
You can repeat this process until you either get bored or remove all the jambs from the podium.
As you can see, during sanding the podium becomes spotty and this makes it difficult to see small irregularities. A thin developing layer of primer on plastic will help to cope with this:
When the primer dries, any remaining unevenness will become visible. We mark the unevenness, remove the layer of soil, degrease these places and work again with putty and sandpaper. Then we prime these places again and look at the result until we are completely satisfied with the result. For the middle ones that I installed, it is recommended to dampen the podium from the inside with soft material.
Moreover, my podiums turned out to be a little less than optimal in volume. I dampened the inner surface of the podium with a pattern from a terry towel. The dragon planted the material on glue.
Now we prime all the podiums completely and at the finish, to give a texture similar to the texture of plastic, apply a thin layer of anti-gravel paint.
By adjusting the distance from the nozzle to the surface, you can achieve different paint textures. I recommend practicing on any piece of cardboard or plywood before applying the anti-gravel coating.
If you apply anti-gravel in the cold, I advise you to keep the can in a warm place so that it warms up. Otherwise, the can will spit and spoil the texture in every possible way.
As a result, we get quite aesthetic, and most importantly, quite reliable and durable podiums.
I repeat, I highly recommend not to be afraid, but to try this method. There is nothing complicated here at all, and the process strongly welcomes a creative approach. The option described above is not strict instructions at all, but simply an example of the technology. What to attach, how to display and what to sand with are questions of your ingenuity and only your ingenuity.
The front was installed, and our work came close to the biggest topic of acoustics.
Installing speakers in the front doors
To decide which speakers are best to install in the front doors, you must first select sound-reproducing equipment, since the parameters of the speaker system depend on the characteristics of the low-frequency amplifier. The main parameters of the amplifier are power, distortion factor and number of channels. Which speakers are best to choose and install in the front doors. Good speakers are now being produced that are recommended for use in the front doors of a car. Their diameter does not exceed 7 inches, and they have good bass reproduction quality. Electrodynamic heads with a diameter of 13-15 centimeters are often used for rear audio. If the car doors do not allow the installation of larger diameter systems, then they can also be used as the main front emitters. Only low frequency reproduction will be limited.
External acoustic screen
pros
- Using the external option, we can give the screen a unique design.
- The screen size can be increased. By attaching the speaker well to the large screen, we can dampen the resonance of the speaker frame. This will help make the sound clearer.
- The acoustic screen can be installed at an angle, which will help provide better localization of sound images.
Minuses
- Manufacturing becomes more complicated, requiring a lot of time and material.
- If we work without knowledge, then insufficient speaker back pressure can lead to significant sound degradation or cause damage to the speaker.
How to properly install speakers in the front doors of a car
Installing multiple speakers in a door requires special work. They are difficult to perform at home, so many car owners turn to service centers. They know well how to properly install speakers in the front doors. It is difficult to install component speakers yourself, so contacting a car service center will be justified.
If you need to replace your “original” speaker systems with other models, and remaking the standard seat is impossible or undesirable, then it is recommended to use oval speakers 13 x 18 cm, which reproduce low frequencies well. If you plan to install sound emitters with a diameter of 10 cm, you need to know that they will not provide sufficient reproduction of low frequencies and the car’s speaker system will have to be supplemented with additional bass support.
Choosing an audio system
First you need to determine the dimensions of the speakers that will be installed in the standard holes prepared for them when assembling the car. All speaker systems that are offered to customers have several standard sizes. Speakers installed in cars by manufacturing companies sometimes have overall dimensions that occupy a middle position between the proposed standards. But it's not scary. In order to switch to selected speakers with a certain standard of overall dimensions, it is necessary to prepare podiums for them, replacing the former standard plastic ones with those chosen by the car owner.
Car speakers for front doors
Installing speakers in the front doors often involves the use of podiums, which allow powerful speakers to be placed in the front of the cabin for high-quality sound reproduction. Here a lot depends on the choice of speakers. Which ones to choose and how to install speakers in the front doors is a difficult task for a non-specialist. Small acoustic heads cost much less than large devices, but those who need high-quality sound should not buy them.
Manufacturers of compact speaker systems advertise small-diameter drivers that reproduce low frequencies well. This is true, but when installing small-sized speakers, other characteristics will be noticeably reduced. The timbre will be dry and flat, and the tonal balance will be disrupted.
How to choose the best car speakers
The choice of speakers directly depends on the musical preferences of the car owner. However, there are a number of criteria that are considered before purchasing these devices.
The main parameter is the type of acoustics:
- broadband;
- coaxial;
- component.
Wideband acoustics consists of one speaker. It plays music in all frequencies (low, mid, high). This option is suitable for listening to the radio or soft music. Speakers of this type are the most affordable, which is why automakers build them into their cars. It is recommended to buy such a speaker only if the car has no speakers at all. Whereas replacing it with a standard one, as a rule, does not make sense.
The next type is coaxial acoustics. This type of speaker is considered advanced. Instead of one speaker, there are several at once, located inside one housing. A separate speaker reproduces a separate frequency range. This makes the reproduced sound larger and increases its purity.
Component speakers, like coaxial ones, have the same set of speakers. But they are located in separate buildings. Because of this, the sound is rich and detailed. Today, component speakers are the most advanced, but they also have a corresponding price.
When you have decided on the type of acoustics, move on to the remaining criteria:
- Rated and peak power. Nominal power is the power at which the speaker operates for a long time without sound distortion. Peak power refers to the peak sound level produced by the speaker. At the same time, the speaker only works for a short time.
- Number of lanes. “Bandwidth” refers to the range width and number of speakers used in acoustics to separate sounds into frequencies. Without touching on theory, the principle of choice is simple: the more bands, the cleaner and more detailed the speakers sound.
- Frequency range. This parameter determines the frequencies at which sounds are reproduced by the speakers. In simple models, the frequency range is from 50 to 20,000 Hz. If sound quality comes first for a car owner, then the range should be at least 30-35000 Hz. The wider the range, the better the acoustics sound at its boundaries.
How to properly install speakers in doors
What speakers are best to put in car doors. To answer this question, it is best to consult a specialist. Information can be found on car owner forums, where you can learn about the most successful speaker models and receive practical recommendations and advice on installing speakers in the front doors. Sound insulation of the front doors of the car will be important when performing this work. You can get high-quality sound reproduction in a car if the following conditions are met:
- Vibration insulation of the internal and external surfaces of the door
- Providing a closed volume inside the door space
- Rigid mounting of the speaker on the door surface
- Installation of door sound insulation
In this case, you need to take care of the door trim and preserve the interior design of the car. Only a professional who has the necessary tools and auxiliary materials at hand can install speakers into the front doors without any problems.
Dimensions of standard car speakers
Round speakers (see photo) are one of the most popular speakers, built under metal mesh in the dashboard, in panels under the dashboard, in the doors, and also on the sides of the rear panel. 16.5 cm is the most popular speaker size.
Oval speakers (see photo) - mounted in mounting panels or on the side on the rear shelf, as well as in doors. 15x23 cm is the most common speaker size.
What speakers to put in car doors
There are many speakers of different prices and quality in the car audio markets, but among them there are models that occupy leading positions in the ranking. To install speakers in the front doors, you will need high-quality dynamic heads that, despite the noise in the cabin, provide high-quality sound reproduction. These speakers include the following models:
- Fokal 165 AC
- Hertz MPX165.3
- Morel Tempo Coax 6
These are coaxial two-channel speaker systems. The dynamic heads of these manufacturers are characterized by a smooth amplitude-frequency response, high sensitivity and good output power. The high-frequency head is mounted on a rotating hinge, which allows you to adjust the reproduction of high frequencies.
Professional rear acoustics in Lada Granta
Acoustic shelf in Lada Granta
If the owner of a Lada Granta is a true connoisseur of sound, then the above methods for installing an audio system will not be enough for him. Therefore, we will present another method that involves installing professional acoustics in this car. To begin, prepare the necessary materials and equipment:
- Coaxial acoustics, preferably 6x9 from Pioneer. As for the rated power, 120 W will be enough.
- An acoustic shelf that you can make yourself, or you can buy ready-made.
- Kit for connecting a 4-channel amplifier, preferably from Supra.
- One roll of Splen.
As an amplifier, it is advisable to choose, again from Pioneer, a 2-channel option. As for the 4-channel option, this will be superfluous. The 2-channel amplifier exactly matches the selected acoustics.
Note. The kit for connecting a 2-channel amplifier can be used as for a 4-channel amplifier. The wires in this case are of higher quality and better.
The actual installation process itself:
- We dismantle the old shelf. We press out holes in the new one using hydraulics and cover it with two sheets of vibrating mat, and on top with a roll of Splen.
- We make podiums for the shelf to match the size of the speakers.
- We install everything in place.
This concludes the process of installing acoustics in the Lada Granta. The instructions will help you do everything correctly and will prevent you from making mistakes if you also use photo and video materials in the process. The price in this case will be very low if you do everything yourself.
What speakers to put in car doors
While two-way speakers satisfy most car enthusiasts, those who love good music require better speakers. A good model for any car would be the three-way coaxial speaker system PioneerTS-1339. The compact size allows you to install the speakers in the doors of any car. Users note the high sound quality and reliability of the design. The Pioneer coaxial speaker system provides a power of 40 watts, which at its peak reaches 200 watts, and such an increase in power has almost no effect on the sound.
The sensitivity of the dynamic heads at 91 dB allows the speakers to be connected to any low-frequency amplifier. Users note that an additional amplifier is not required for normal operation of the acoustics, since the Pioneer 1339 works well with standard equipment. The complete acoustics of a car can consist of four similar speakers, with two working as front speakers and two as rear speakers.
Internal acoustic screen
Advantages
- The screen installed under the door facing material does not interfere with its original appearance.
- If the screen is not visible, then it will be easier to make it, since you do not need to worry about the beauty of the design.
- The speakers are located entirely inside the door, do not create additional interference and will work more reliably.
Flaws
- If the loudspeaker is hidden under the casing, then in itself it looks unsightly.
- Since you can't increase the size of the screen, it will be light and there won't be enough punch in the bass.
- It is difficult to change the angle of the speaker, the sound may lose the uniformity of frequency balance, and at the same time the localization of musical images is disrupted.