Hello again))) Thank you to everyone who responded for the tips about light bulbs... In gratitude for this, I’ll tell you in pictures how to connect an active antenna, using the Bosch antenna as an example. First of all, as described in the instructions, we choose where to install the antenna, in a corner, like mine, or across the entire width of the windshield.
The kit includes an alcohol wipe, open its packaging and degrease the installation site
The large package contains a napkin, the small package contains contact lubricant.
There is a triangle drawn on the package to help us position the antenna on the glass, cut it out. We fix the mounting disk in its grooves, remove the protective film from the disk, and glue the disk onto the glass where the antenna is installed.
Smooth the disc and remove the triangle. Then you need to glue the so-called limit strips. Using them you will subsequently find your bearings on where to sculpt the antenna whiskers.
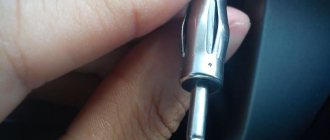
After installing the mustache, these ribbons are removed. We put the antenna mustache on the disk pin, having first peeled off a small section of the protective film. We attach it and gradually pull out the protective film from under the antenna antenna and glue it to the windshield. We do not throw away the protective film. Then we glue the next whisker along the boundary strips, being careful not to stick the antenna on them.
Since I installed the antenna in a corner, the mass had to be fixed to the screw of the sun visor. We unscrew the visor, through the hole in the ceiling trim, thread the protective film from the antenna, tie the ground cable to it, and run the cable under the ceiling trim.
We fix the mass on the body.
Then, with a confident jerk))) we remove the pillar lining, and lay the cable in the free grooves on the washer fluid hose clamps.
We wrap the cable with electrical tape to make it tighter. In order to lay the cable well, you need to remove the glove compartment (although you can do it this way, but I needed to put the USB in there) and in this very place I found out that I do not have a glove compartment, but a glove box, and with cooling or heating... In general, depending on your luck.
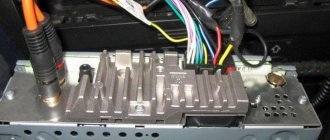
Unscrew the screws securing the glove compartment and remove it. We lay the cable. The most interesting thing is the cable for powering the antenna amplifier. It must be connected to the radio block. To a special 12 volt cable. This wire is available in all (non-standard) radios and is called the control antenna cable. As a rule, it has a standard blue color.
and I'm also trying to quit smoking. Clutch, transmission, Monte Carlo... although not outside the window, but definitely in the soul))) I wish you all happiness and goodness;)))
Modern cars are equipped with high-quality audio systems. Listening to news or music programs while driving has become a habit for many drivers. But sometimes unexpected failures occur, and instead of music and useful information, unpleasant squeaks and extraneous noises are heard from the speakers. To prevent such situations from appearing again, it is worth taking the time to select and correctly connect the car antenna.
How to choose an antenna for a radio?
First of all, the car antenna must provide radio signal reception at distances from transmitting stations. If the car owner travels only within the city, then active (internal) antennas guarantee a good signal. They are characterized by their small size and ease of installation. In addition, they are reliably protected from various vagaries of weather. The disadvantage of this type is their weak sensitivity, which does not provide good enough signal quality away from the city.
When you move more than 50 km from the transmitting station, you will notice that the connection begins to disappear. Therefore, if you are planning long trips, then in this case you should pay attention to external (passive) antennas. These devices are connected to the radio and operate without electrical power. The disadvantages of outdoor radio antennas are their large dimensions and lack of protection from the influence of the external environment. However, they are highly sensitive and are able to receive even fairly weak radio signals.
Where to install the antenna?
When choosing a car radio antenna, you must first select the location for its installation. Active antennas are designed for installation inside a car. Therefore, they are often attached in the window opening or near it. Also, the internal model can be installed on the windshield or on the rear parcel shelf. When mounting it on glass, you need to make sure that it does not block your view. In addition, it is desirable that the device does not interfere with the passenger sitting next to it.
The external radio antenna must be installed on the highest part of the vehicle. This is necessary in order to ensure high-quality and stable radio signal reception. A common option for installing this type of radio antenna is the roof of a car. However, it can also be attached to the fender of a car. It is not recommended to install the device on a bumper, as strong signal interference may occur.
How radio antennas are distinguished by type of amplification
Depending on the type of amplification, antennas can be active or passive. The difference in their work is expressed as follows:
- passive antennas catch an existing signal;
- active ones not only receive the signal, but also enhance its quality.
It is worth noting that active antennas are preferable when traveling outside the city, as they allow you to listen to the radio, watch TV or use a navigator without any restrictions.
Operating ranges of antennas for cars
The stores offer a large variety of models of all types of antennas. In order not to make a mistake and buy a truly reliable car antenna, you need to choose devices with the following operating ranges:
- radio broadcasting (FM and AM frequencies from 70 to 108 MHz);
- television (DVB-T frequencies not exceeding 900 MHz);
- navigation (GPS frequencies about 400 MHz);
- radio communications (CB frequencies about 27 MHz).
There is an opinion that an external car antenna receives signals better than the internal one. However, internal antennas are much cheaper, hence their not the best quality. But when used within the city, they are quite capable of providing the driver with adequate signal quality.
What you need to know to choose the right connector
When choosing an antenna, you should pay attention to its connector. Most likely, the antenna connector will fit all car radio models without any problems, but it’s better to be on the safe side. At the time of purchase, you can ask the seller to connect the antenna to your car radio and check if he can do it.
It is important to make sure before purchasing a car antenna that its connector will fit into the socket of your radio.
It is necessary that the connector of the new antenna be fixed in some way. Reliable fixation will avoid disconnection during sudden shocks and vibrations while driving.
What kind of service is this?
The quality of signal reception largely depends on the choice of the type of car antenna, its installation location, and compliance with connection rules. Antennas are classified:
- radio, television antennas, communication antennas;
- passive and active;
- external and internal.
Some car models (now extremely rare) use retractable antennas. In most cases, car enthusiasts purchase a standard kit for installing an antenna: the antenna module itself, fasteners, a high-frequency shielded signal cable, and a connector. To properly install the antenna, you need to choose the right installation location, connect the high-frequency cable in strict accordance with the instructions, and make a reliable connection to the signal receiver.
Qualified installation of antenna on a car
ensures its trouble-free operation and flawless operation of the receivers. The work is carried out in a place convenient for the client, where he calls the specialist by phone. This service involves performing a number of operations:
- Preparing the product and vehicle for installation of the device.
- Install the antenna in strict accordance with the instructions.
- Laying the cable and connecting the product to the receiver and, if necessary, to the on-board network.
- Checking the device's functionality.
The process of installing a car antenna depends on its type: internal or external, as well as the design features of the vehicle. Our technicians have the necessary skills in installing and switching both types of devices from domestic and foreign manufacturers.
Installation and connection of the internal active antenna
Products of this kind are popular among car enthusiasts and are characterized by fairly high sensitivity. When installing indoor active antennas, the technician performs the following steps:
- Inspects the product and the vehicle and agrees with the customer on the location of installation on the windshield.
- Marks and prepares the surface for antenna installation.
- Sticks the device and lays the cable to the receiver.
- Connects the device and checks its operation.
Advantages and disadvantages
DIY external car radio antenna can be installed under each car body. Such mechanisms do not have problems with installation height to receive an FM signal. Another advantage of a home device is better signal reception quality compared to factory mechanisms. If necessary, the user can turn it into a GPS antenna.
Disadvantages may include the fact that a home antenna may be questioned by a national trucking inspection. Wires from the receiving mechanism can ruin the interior of the living room. In some cases, drilling into the body may be necessary to install this device.
Keep in mind
The type of antenna you choose depends on the nature of your travel. If the car is used within urban and suburban areas, it is better to choose a passive whip antenna of medium length, which works well in conditions of reliable reception. When traveling long distances or working in settlements remote from large cities, choose an active antenna. It has a built-in signal amplifier. Typically, such antennas are designed for interior design to prevent moisture from entering the antenna amplifier. However, when entering a city or crossing power lines, such an antenna may become “clogged” with external interference.
Particular attention should be paid to the antenna installation location:
- If there is a standard antenna mounting location (usually in the front part of the roof), it is better to install the antenna in the existing screw connector, this will simplify the work;
- If there is no standard connector, it is recommended to install the antenna as close as possible to the central axis of the car;
- You should pay attention to the placement of the sunroof on the car roof; the antenna wires should not interfere with moving mechanisms;
- The signal will be maximum with the shortest high-frequency cable; it is not recommended to install the antenna in the rear of the car.
The most common reason for replacing the antenna is the purchase of a new radio or installation of another receiving device. In this case, to ensure the highest quality reception, it is necessary to resort to the services of a specialist.
The active antenna has a built-in power amplifier and needs to be connected to a power source. Therefore, it is a little more difficult to install than usual. But if the car is often used outside the city, where the signal from radio stations is weak, then it is irreplaceable. How to connect an active antenna to a car radio?
How to listen to music via iPhone in the car
For iPhone, all the described methods are valid. New is the use of the CarPlay function. It is activated when you connect your smartphone wired or via Bluetooth. In the latter case, hold down the voice control button on the steering wheel so that the car system and the iPhone can connect.
We hope you have received comprehensive information on how to listen to music via your phone in the car. Have a nice trip!
With the development of the mobile Internet and the expansion of its coverage area, the idea increasingly comes to throw all the disks and flash drives out of the car and listen to music directly from the Internet.
Maybe you have had this idea for a long time, and some of you probably already listen to your favorite music in some way. Please have your say in the comments on this matter.
So, let’s say that terrestrial radio is tired of its advertising and chatter, and we are too lazy to burn flash drives and we want to switch to Internet radio stations and music. Although if “Europe+” and “Russian Radio” are satisfied on FM airwaves, then you don’t have to read any further.
What should you listen to? In fact, the choice is huge. Starting from FM radio stations that will never be on the air in our city (Radio Jazz, Relax FM, ...) to thematic and conversational ones in any language. They say that there are about 70,000 Internet radio stations for any listener. In addition, for audiophiles there are stations with a high flow of 320k and even in lossless format. This way you get a CD quality music stream. There is also Yandex. Music, Google. Music, Apple. Music and your music on VKontakte, etc., where tracks will be automatically selected based on your preferences. And all this without advertising!
How much internet traffic is needed? Of course, mobile Internet consumption immediately increases. An hour of listening takes about 60 MB on a 128k MP3 stream. You can listen to stations in AAC 32k format, then it takes 15 MB. However, now mobile operators provide a solid Internet package in addition to the basic tariff, and if you still have it at the end of the month, you can spend it on radio.
How to quickly connect? The first thing that comes to mind is to take a smartphone and, installing a free player on it, start listening. Share your feedback with those who have done just that. This solution does not require any investment, but there are the same disadvantages: the phone runs out quickly, it is difficult to use it as a navigator or talk on it. Every time you get into the car, you need to do something to start playing: connect to the charger, start the player, connect with wires, etc. How does this happen for you, are there any difficulties?
The second option is to take an old “dead” tablet or smart phone with Android and place it in the car forever, connecting the charger to the cigarette lighter. True, the battery in it won’t last long in winter, but we don’t mind. This option requires another SIM card for the Internet. But this is not a problem: on some tariff plans you can link an additional card to the main one for free and it will use the Internet from your phone.
We connect the phone to the radio. The easiest way to connect is to connect to the radio via bluetooth. In this case, all sound from the smartphone goes through the radio, including telephone conversations. It is undoubtedly convenient to have handsfree in the car, but sometimes you are not alone in the car. The second simple connection option is to connect the smartphone's headphone output wire to the AUX input of the radio (if the latter is available). When there is absolutely nothing in the radio, except for FM radio and a CD changer, they came up with the same solution. This is a bluetooth FM transmitter. The phone connects to the adapter via Bluetooth, and the adapter broadcasts sound at the FM frequency. The sound quality deteriorates.
Choosing a location
Active antennas have a compact design and are attached using a special adhesive mounting pad or double-sided tape. Therefore, you can choose any installation location inside the cabin. Most often, preference is given to the windshield near the front passenger seat. This is due to its location near the radio and convenient installation of cables into the car's trim.
Placing on the roof has an advantage in signal reception, but is more difficult. Oxidation of metal parts and deterioration in reception quality are also possible.
When choosing a place where the antenna will be installed, you should adhere to the following rules:
- Cables should not be routed near sources of interference.
- They must be carefully hidden under the car's skin so as not to create discomfort during driving or breakage due to negligence.
Skoda Octavia 2009, 210 l. With. - accessories
Cars for sale
Skoda Octavia, 2002
Skoda Octavia, 2000
Skoda Octavia, 2008
Skoda Octavia, 2001
Antenna amplifier power supply
Modern models are connected via the receiver connector directly to the car radio. With this connection, a radio signal is supplied from the active antenna. In the reverse order, the required voltage of 12 volts is supplied to the amplifier through the other pair.
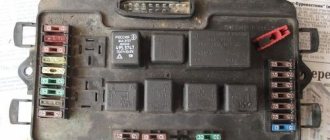
On models where such a connection is not provided, the antenna amplifier must be connected to the power supply independently in two versions:
- Power connection via fuse box.
- Independent connection to power via the car radio.
Best models
There are practically no popular models among amplifiers. Such devices are installed extremely rarely, since a modern multimedia system allows you to play music from various media. When determining a popular model, the following points are taken into account:
- Device cost. A proposal of domestic origin costs 1000 rubles. Do not forget that the price determines the basic properties of the device.
- Length of service life. Installing an amplifier involves changing the receiver connection circuit. Therefore, you should connect a device that can last for several years.
- Reliability. The device must operate under various operating conditions: voltage changes, temperatures, humidity and other situations.
- Signal level. This indicator can vary over a wide range.
There are models of domestic and foreign origin on sale. Models of foreign origin are more popular; domestic ones are several times cheaper.
Triad 304
A domestic car antenna amplifier called “Triad 304” costs 650 rubles. There are various reviews on the Internet, many of them negative. The positive points are the following:
- Low price.
- Good build quality.
- It is possible to turn off the device if the signal is strong.
- Optimal functionality.
Such an amplifier does not last for a long period. Therefore, they often give preference to other models from foreign manufacturers.
Prology TFB-100
An antenna amplifier of foreign origin is more popular due to its attractive performance characteristics. The Prology tfb-100 model has the following features:
- The device can simultaneously operate with several antennas.
- High-quality signal amplification is carried out in the digital and analog range.
Step-by-step instructions for installation inside the cabin
Installation depends on the configuration of the selected model, but the general principles are practically no different. All features will be additionally indicated by the manufacturer.
- Degrease the antenna installation area with an alcohol wipe or other product.
- We place the triangle included with the device at the installation site, which facilitates correct positioning of the antenna.
- In the phases of the triangle, install the mounting disk and remove the triangle.
- Glue orientation strips that will help you correctly position the receiving parts of the antenna.
- The signal receiving antennae are installed on the pin of the mounting disk by gradually peeling off the film and fixing it in accordance with the reference stripes, after which they can be immediately removed.
- To lay the cable, remove the side trim of the car.
- We secure the wires using zip ties to the car's standard wiring or to the glass washer hose.
- For the convenience of further installation, it is necessary to dismantle the glove compartment of the car.
- We remove the radio from the socket to gain access to the connectors and wires.
- The blue power wire from the ISO connector connects to the power wire of the antenna amplifier.
- We connect the wire responsible for sending the signal to the corresponding connector on the rear panel of the head unit.
- The quality of work performed and signal reception are checked.
- All wires are neatly placed in the landing window of the radio.
- The radio is installed in place and fixed.
- The glove compartment and the removed lining are mounted back.
adapter, plug, for car radio, car antenna, cable
No car audio system with radio is complete without an antenna. There are different types of antennas (external and internal, active and passive).
Types and purpose
We decided to install an active internal antenna on the windshield of the car. This type of antenna is easy to install, requires no maintenance, does not wear out, and does not create aerodynamic drag. Another advantage of such an antenna is that it does not attract the attention of car thieves, since it is not easy to remove from the car. With all its positive qualities, however, it should be noted that its sensitivity varies depending on the orientation of the car relative to the radio transmitter.
According to the installation method, such an antenna is disposable. On its body and stands (“beaters”) there is a sticky layer that ensures the antenna elements are attached to the glass. Once these elements are removed, they cannot be reattached to the glass.
In addition to the antenna itself, the kit includes detailed installation instructions, as well as materials, tools and templates to make installation easy and reduce work and time. There are two types of antenna housing and “beater” for mounting on the windshield. In the first case, the antenna housing is mounted in the middle, at the top of the glass (behind the rear view mirror), and both antenna pins are glued to both sides of the mirror along the top edge of the glass. In the latter case, the antenna housing is mounted in the upper right corner of the windshield, and the “beaters” are glued along the upper and side edges of the windshield.
The book describes the second option for installing the antenna. The antenna must be installed in the upper corner of the windshield and on the side edges of the antenna.
... and degrease with a cloth dampened with a cleaning agent, then wipe with a dry cloth.
The glass surface is now prepared for gluing the housing and antenna mast mounting plate. To glue the plate, we will use the thick paper template included in the kit. The template has slots that allow the plate to be inserted in only one position.
How to choose
Insert the pin and tabs into the slots in the template.
Remove the protective sticker from the smooth side of the plate and press the template plate onto the glass so that the two corners of the template touch the corresponding sides of the edges of the glass.
Remove the template from the plate.
How to connect
To ensure that the antenna “whiskers” adhere to the glass at the same level as its edges, the antenna mounting kit includes a set of spacer templates (pieces of white adhesive tape).
- The templates are glued to the glass perpendicular to its edge.
- The antenna pole is a piece of wire to which a contact ear is soldered on one side. The cable and contact lug are laid on a transparent plastic tape with a layer of adhesive. The adhesive layer is covered with a white protective film, which must be removed before gluing the mustache. After removing the foil, place the contact tip on the housing mounting plate shaft.
- Along the edges of the spacers, carefully glue the “whiskers” to the glass (for clarity, the protective film is not removed).
- After gluing the “whisk” to the antenna, smooth it out with the special spatula included in the kit. To accommodate the antenna cables, remove the right sun visor.
- While pulling the rod toward you, thread the grounding loop through the hole in the rod and pull it out.
Remove the front roof pillar cover. Pull the cables through the roof sheathing and out from under the roof sheathing. Install the antenna housing onto the mounting plate.
Step-by-step installation instructions on the roof
If the supplied cable is not long enough, an additional one will be required. The cable must be braided and have a resistance of 75 ohms.
- At the installation site, it is necessary to drill two holes: one with a diameter for mounting the antenna and one with a diameter of 5 mm for an auxiliary one.
- The metal at the installation site is cleaned from the inside of the cabin.
- To avoid corrosion, the installation site is treated with mastic on the inside of the cabin and sealants on the outside.
- For installation, it is necessary to make an insulator (spacer) from copper and fluoroplastic washers to which the cable is soldered.
- The junction of the insulator and the cable must be sealed.
- We install the antenna on the roof and tighten the insulator nut from the inside of the cabin.
- We lay the cable from the antenna to the radio under the car trim.
- We connect the antenna to the radio and check the signal quality. Watch the video on installing the antenna
AutoNews / Reviews / Tests
How to Connect an Antenna to a Pioneer Radio
Connecting a Pioneer radio
Now Pioneer car radios can confidently be called the most needed in our country. connect the sarmatt DVR to how to connect a mirror recorder. The black wire can be connected to how to connect how to connect an amplifier to a radio. Pioneer, how to connect the antenna to can be connected to an mp3 radio. After purchasing the device, every car owner wants to find out how to connect Pioneer radio
, but it’s best to do it yourself. So let's get started!
How to connect a Pioneer radio - methods
It should be noted that connecting the Pioneer radio
can be done in 2 ways:
- Introduction of a standard ISO connector.
- Connecting a radio without standard connectors.
You need to be aware that if you implement the second method of installing the radio, the warranty on the device will no longer be valid, and there is a high possibility of making a mistake when connecting the wires. But, in almost all cases, there is simply no other way out. How to connect ASIC to nicehash setup and connections. How to connect a car radio at home to a computer. For example, this option is the only one in this case if your car does not have a corresponding connector for connecting a radio.
Even if you use an ISO connector, you need to do everything very carefully and make sure in advance that the terminal wiring on this connector is made correctly.
see also
- The radio hisses in the car
- How to find a car alarm key fob
- How to avoid getting stuck in the snow while driving
- How to remove license plates from a car
- How to get a car from an impound lot
- How to get a title for a car
- When turning the car, clicking noises are heard in the drive
The car crunches when turning- How a car is sold under a purchase and sale agreement
- What does the sticker on a car mean?
What to do if you lost your car keys with a chip
Installing an active bosch car antenna
Guys, I apologize for the incomplete video. How to connect a DVR to the Internet via a router. How to connect an antenna on a car radio. Radio tape recorders have a special wire, usually blue and white.
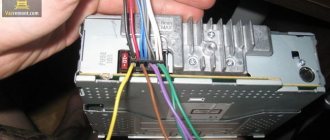
The standard connection diagram for a Pioneer car radio provides for the following wire markings:
- The thick yellow wire is the connection to the car battery. How to connect the antenna to the radio? How to connect several video cards for which the computer does not see anthony for recording. It should be noted that this wire must be connected only through a fuse.
- The red thick wire is connected to the same battery, but through the car’s ignition switch. How to connect ASIC to nicehash? Tips for proper ASIC mining on the nicehash service. This is necessary so that the device functions only when the ignition is on. Some car owners prefer to connect the red and yellow wires, but this risks the car battery being discharged at a completely unexpected moment. Connecting an antenna to a radio often causes some problems for car owners, which you can avoid by reading the article on how to connect an antenna to a radio. How to connect the DVR to the Internet. How to connect how to log into the registrar. Due to the use of this method of connecting the Pioneer , in case of prolonged parking it will be necessary to disconnect the housing terminal from the battery.
- The thick black wire is the connection to the car body or the negative terminal of the battery.
- The white-blue wire is responsible for powering the active subwoofer, antenna or amplifier. After turning on the radio, 12V voltage appears on the wire.
Options
After connecting the antenna to the radio, you only need to search for the frequencies of radio stations or television channels that are recorded in the memory of the head unit. The tincture needs to be created only when using radio stations operating in the CB spectrum. The receiving equipment is mounted on the roof of the vehicle or cabin using a magnet or nut, ensuring efficient signal reception. Placing the antenna on the wing or inside the bumper reduces the signal reception distance by 1.5-2 times.
For adjustment, an indicator device is used that measures the ratio of received and reflected signals. The work is carried out in specialized centers that have similar equipment at their disposal. Self-adjustment is allowed, taking into account the advice contained in the instruction manual for the indicator device.
Source: autotuning.expert
Connecting a Pioneer radio - speaker wires
- Right front speaker - the gray wire goes to the “plus” of the speaker, and the gray-black wire goes to the “minus”.
- Left front speaker - connect the white wire to the “plus” of the speaker, and the white-black wire to the “minus”.
- Right rear speaker - the purple wire goes to the “” column, and the purple-black wire goes to its “-”.
- Left rear speaker - connect the green wire to the “plus” of the speaker, and the green-black wire to the “minus”.
The connection procedure is complete, you just need to connect the battery and enjoy the operation of your new Pioneer radio.