The entire electronic system of the French car Renault Megane III is reliably protected using small devices - fuses. If even one element fails, the coordinated functioning of the entire vehicle may be disrupted.
If malfunctions of any electrical equipment of the machine begin to be noticed, this directly indicates the need to thoroughly check the functionality of the safety unit.
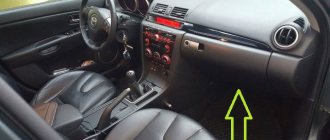
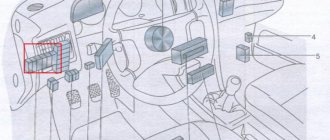
Fuses and relays in the interior of Renault Megane 3
The main mounting block in the car interior is located on the driver's side at the bottom of the control panel.
Fuse box diagram in the interior of Renault Megane 3
Description
| F1 | reserve |
| F2 | reserve |
| F3 | 10A cigarette lighter fuse Renault Megane 3 |
| F4 | 10A rear socket |
| F5 | 10A socket in luggage compartment |
| F6 | 10A audio system |
| F7 | 5A electric heated exterior mirrors |
| F8 | 10A windshield washer, door open alarm |
| F9 | 30A automatic parking brake |
| F10 | 10A instrument panel |
| F11 | 25A electric seat, steering column switches |
| F12 | 20A electric heated passenger seat |
| F13 | reserve |
| F14 | 25A electric window lifter for the front passenger door |
| F15 | 5A brake light switch, brake pedal position sensor, ABS/ESP control unit |
| F16 | 25A power window right rear door |
| F17 | 25A electric window lifter of the left rear door |
| F18 | 10A glove compartment lamp, left luggage compartment lamp, door lamps, sun visor mirror lamps, rain sensor |
| F19 | 10A clock, outside temperature indicator, seat belt warning light, audio system connector |
| F20 | 5A climate control unit |
| F21 | 3A mirror illumination lamps in sun visors |
| F22 | 3A interior lamps, rain and light sensor |
| F23 | 20A trailer connector |
| F24 | 15A UCH |
| F25 | 3A interior rear view mirror |
| F26 | 10A navigation system, CD changer, audio system |
| F27 | 20A audio system, parking brake control unit |
| F28 | reserve |
| F29 | reserve |
| F30 | 15A UCH, direction indicators |
| F31 | 10A UCH |
| F32 | 30A power window driver's door |
| F33 | 25A UCH, central locking |
| F34 | 30A Passenger's door multiplex network control unit |
| F35 | 15A clock, outside temperature indicator, telephone display |
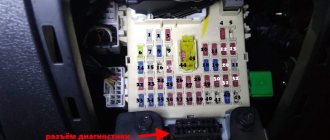
| F36 | 15A diagnostic connector, horn relay, alarm control unit, siren |
| F37 | 10A brake signals, electrical control unit |
| F38 | 30A automatic parking brake |
| F39 | 30A convertible roof ECU |
| F40 | 40A electric air conditioning fan |
| F41 | 25A electric sunroof |
| F42 | 40A heated rear window |
- RA 70A - power relay (+battery) with shutdown delay (without turning off power at startup)
- RB 70A - power relay (+battery) with shutdown delay (with power off at startup)
- RC 40C - rear window heating relay
- RD 20A - horn relay
Internal electronics
The unit located in the cabin is responsible for this part of the electronic systems. Its location is in a small niche near the driver’s left foot, which is protected from mechanical damage by a small plastic cover that closes with several latches.
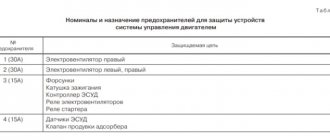
Judging by the diagram, there are fuses here that are responsible for all the internal electronics of the car, which does not affect the operation of the engine, gearbox and ignition system. In total, Megan's cabin contains 19 fusible elements with specific current strengths equal to 10, 15, 25 and 30 amperes, depending on the purpose of each system and its power.
So, judging by the diagram, at number 2 there is a fuse element with a current of 25 amperes. It is responsible for the operation of the standard brake light, which is located on the rear window. Above it, at number 3, there is a fuse for the mechanism of the electromechanical unit of all doors from the passenger compartment.
In addition, it is worth paying attention to cell 6. It is worth checking the condition of the fusible element located in it if both direction indicators fail. By the way, for this it is advisable to stock up on a 15A fuse. In socket 19 you should look for a cell corresponding to the cigarette lighter. For the socket located in the cabin, a 15-amp element is required, which is installed in the same way as the others.
Just above the cigarette lighter, in slot 18, there is a fuse for the additional power socket located at the feet of the rear passengers. By analogy with the driver's connector, a fuse element with a current strength of 15 amperes protects this system from overload.
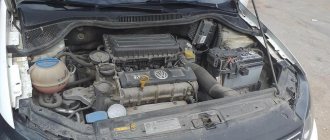
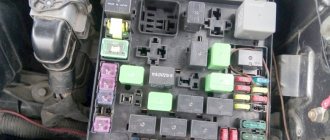
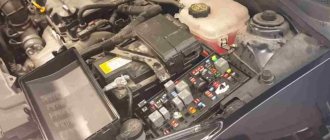
Fuses and relays under the hood of Renault Megane 3
The main unit in the engine compartment is the protection and switching unit, located on the left side near the pillar and fender of the car.
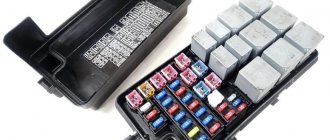
Diagram of the fuse and relay box under the hood of Renault Megane 3
Description
- 10A - Side light (right headlight, right rear light, headlights), license plate lights, cigarette lighter illumination, power window switch illumination, audio system, navigation system control unit, multimedia system keyboards
- 10A - Side light (left block headlight, left rear light), left light on the tailgate
- 15A - Headlight washer pump
- 20A - Fog lights
- 10A - High beam (left headlight)
- 10A - High beam (right headlight)
- 15A - Diagnostic connector, rear window heating relay, automatic transmission mode selector, electric headlight adjustment, gas-discharge lamp control unit, auxiliary heater control unit, speed limiter, automatic parking brake, automatic parking system control unit, interior dimming mirror
- 30A - ABS, ESP control unit
- 30A - Front wiper
- 10A - Airbag control unit
- 20A - Not used
- 7.5A - transmission ECU
- 25A - Engine control system
- 15A - Oxygen concentration sensors - heating
- 20A - transmission ECU
- 5A - Brake signals, electrical control unit, electric power steering
- 10A - Automatic transmission operating mode sensor, electric headlight leveler, reverse light relay
- 15A - Electrical equipment control unit
- 30A - Starter
- - Not used
- 20A - Fuel module, ignition coils, LPG power system ECU
- 10A - Electromagnetic clutch of the air conditioning compressor
- 5A - injection computer
- 20A - Low beam (left headlight), electric corrector
- 20A - Low beam (right headlight), electric corrector
- - Not used
Important! Fuses 24, 25 and 26 on the protection unit may not be removed.
Video “Replacing Renault Megane 2 fuses”
Watch a video from user Rustam Abdullin about replacing engine compartment fuses in a Renault Megane car.
Do you have any questions? Specialists and readers of the AUTODVIG website will help you ask a question
Was this article helpful?
Thank you for your opinion!
The article was useful. Please share the information with your friends.
Yes (60.00%)
No (40.00%)
X
Please write what is wrong and leave recommendations on the article
Cancel reply
Rate this article: ( 10 votes, average: 4.60 out of 5)
Discuss the article:
Block No. 2 in the engine compartment of Renault Megane 3
The mounting block is located under the protection and switching block.
Diagram of the fuse and relay box under the hood of Renault Megane 3
Description
- A - Not used
- B - Fuel heater relay
- C - Reverse light relay
- D - Not used
- F1 - 80A submersible heater control unit
- F2 - 70A preheater
- F3 - Not used
- F4 - 80A submersible heater control unit
- F5 - 60A / 40A electric fan relay
- F6 - 20A Fuel heater
- F7 - Not used
- F8 - 30A electric fan relay
- F9 - Not used
Process description
Replacing a low beam bulb on a Renault Megane is a fairly simple task if you know what to do. It is enough to do this work once - and subsequently you will be able to do it in literally 10-15 minutes. (See also the article LED fog lights on the VAZ 2110: features.)
Preparation
Everything is very simple and clear here:
- It is better to carry out all operations in the garage, since it is convenient to work there and everything you need is at hand. But in extreme cases, you can do everything on the street right next to the house, the main thing is that there is no precipitation.
- Place the machine on a level surface, do not forget to put it in gear or apply the handbrake to prevent it from rolling away.
- The hood opens and the battery terminal is removed. Any instructions for repairing electrical equipment instructs you to do this first, so make it a rule to remove the terminal to prevent problems from arising.
Main stage
Replacing the low beam lamp on Megan 3 is done as follows:
- Next, you should pull out a special metal retainer, which is also located on top and serves to prevent the headlight from falling out, even if the bolts are lost due to vibration. You need to pull it up to release it, everything is very simple and easy.
- Now you can pull the headlight forward; to do this, carefully pull it out; there is no need to disconnect the connectors with the car’s wires, their length is enough to get the unit and turn it over for free access to the rear of the housing.
- Next, you need to remove the plug, which protects the internal elements from dirt and moisture. If it is damaged or cracked, it is better to purchase a new element, since a leaky plug will cause fogging of the headlights and corrosion of metal elements.
- Under the cover you will see the place where the lamp is attached; first of all, you need to disconnect the block of wires so that they do not interfere with your further work.
- Then you need to release a special latch, which tightly presses the base to the reflector and prevents the light bulb from moving during vibration and shaking. Everything is very simple here: grab the upper part of the clamp and slide it from under the hook to the right, the clamp is released, and you can easily remove the light bulb.
- Disassembly is complete, and now you can install a new light source, carefully remove it from the packaging so as not to touch the glass bulb, and insert it into place, there are protrusions on the base, so you can’t go wrong with the correct position.
Assembly is carried out in reverse order. As you can see, doing everything yourself will not be difficult, because you do not need to remove the bumper and disassemble the engine compartment.
Blocks near the battery
Near the battery there are 2 additional blocks.
Diagram of the battery disconnect unit (in Fig. 1)
Description
- F1 - 190A Starter
- F2 - 50A interior fuse and relay box
- F3 - 80A fuse and relay box (control and switching unit) in the engine compartment 1, fuse and relay box in the passenger compartment
- F4 - 300A/190A Engine Compartment 2 Fuse/Relay Box/Generator
- F5 - 80A electric power steering
- F6 - 35A electronic engine control unit (ECU) / fuse and relay box (control and switching unit) in the engine compartment 1
- F7 - 5A fuse and relay block (control and switching unit) in the engine compartment 1
Diagram of a high power fuse block (in Fig. 2)
Description
- 70A - additional interior heater
- 80A - fuse and relay box in the passenger compartment
- 80A - fuse and relay box in the passenger compartment
- 80A - fuse and relay box (control and switching unit) in the engine compartment 1, fuse and relay box in the passenger compartment
- 30A - additional heater
- 50A - ABS ECU with ESP
Important! An electric fan relay for the engine cooling system may be located next to the electric fan.
Guides
In the second row of seats there is a separate outlet for the climate control system and a 12 V socket. The trunk of the car is not of outstanding size, but it cannot be classified as average in the class.
The loading area can be increased by folding the backrests of the rear sofa, resulting in an almost flat surface. The line of Megane III power units opens with the 1.5-liter dCi, which has several modifications with varying degrees of boost 85, and hp. This is followed by 1.9 liter diesel engines with a higher status.
Conclusion
You can replace a light bulb in literally 5 minutes, so if you are not happy with the light, buy a better option and enjoy good visibility at night. The video in this article will show the whole process clearly.
The standard on-board fuses of Renault Megane 3rd generation are located in convenient places, which is pleasant when servicing or replacing. In the petrol and diesel versions, the arrangement of the elements is slightly different. Station wagon or hatchback bodies are similar in structure and fuse design.
On Megane and Scenic, fuse links and relays are designed to protect power lines and on-board equipment.
Instructions for replacing lamps yourself
Unlike the 2nd generation Megan, where to change the lamps you had to remove the wheel and change the lamps through a hatch, or remove the battery and try to reach it with your hand, in the third generation everything is much simpler. We will need to remove the headlight, but this will all take a couple of minutes.
So, we take out the special metal mount from the headlight as shown in the figure.
Use it to unscrew the bolt securing the headlight to the body.
Next, pull the headlight towards you, but not completely, but so that it is easy to reach the low beam cover.
We press out the two metal spring clips and remove the cover.
Remove the block from the lamp and squeeze out the mustache. We take out the old lamp and install a new one
During the installation of the low beam lamp, it is prohibited to touch its bulb. If you touched the flask with your fingers, you should wipe it with an alcohol-containing cloth.
Which low beam lamp to choose
Manufacturers offer a fairly large selection of lamps, both conventional and lamps with increased brightness +30, +130%, lamps with xenon effect (white glow), as well as lamps with an extended service life. If you want your lamps to last as long as possible, you should buy Philips Long Life or Osram Ultra life lamps, these are extended life lamps that are factory installed by the manufacturer.
- PHILIPS H7-12-55 +30% Vision P-12972PR Vision
- OSRAM H7-12-55 O-64210
- PHILIPS H7-12-55 LONGLIFE ECO VISION P-12972LLECOC1 with extended service life
- BOSCH H7-12-55 Pure Light 1987302071
- KOITO H7-12- 55 W Other Brand 0701
- NARVA H7-12-55 N-48328
All of the above lamps are suitable for installation in Megane 3 headlights for low beam.