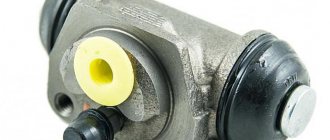
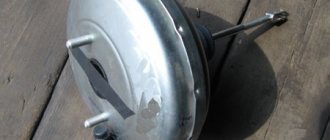
Main brake cylinder VAZ 2110
The GTZ is the main part of the brake system; when you press the brake pedal, it distributes the brake fluid through the lines to the calipers and creates the necessary pressure to compress the brake pads.
Below are signs that indicate the need to replace the brake master cylinder.
Signs of a malfunction of the GTZ:
- Traces of brake fluid leaking through the O-rings are noticeable;
- The force on the brake pedal disappears and when you press the pedal, the car does not brake;
- The pedal does not engage due to the jamming of the GTZ rod;
With these signs, it is not recommended to delay replacing the gas turbine engine.
Principle of operation
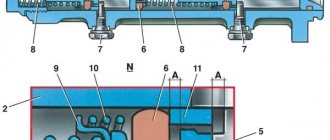
The brake fluid coming from the main one under pressure acts on both pistons in the working cylinder, which, in turn, compress or expand the brake pads, which leads to braking. The front brake circuit is disc, while the rear brake circuit in many cars is drum type.
- Front calipers.
- Pipe supplying hydraulic fluid to the front wheels.
- Rear pipeline.
- Rear wheel rollers.
- Tank.
- Main roller
- One of the pistons.
- Stock.
- Pedal.
Consequences of brake fluid leakage from the GTZ
When brake fluid leaks from the master cylinder, brake fluid can get onto various parts of the car. As you know, TZ is quite chemically active and often damages other parts of the car.
For example, when liquid leaks, it can fall on the vacuum booster membrane, which will soon lead to its rupture and, as a result, air leakage from the receiver, and of course, replacement of the vacuum booster itself.
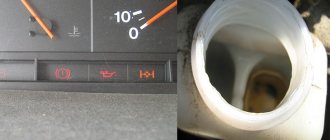
VUT membrane rupture
Also, when brake fluid leaks, it gets into part of the engine compartment, behind the steering rack, and causes great damage to the paintwork.
Which cylinder is best to buy for replacement?
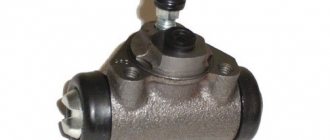
Rear brake cylinder from Kraft.
If you definitely decide for yourself that you will not go to a service station for repairs, then the spare part necessary for repairs will need to be purchased at a car store. Since spare parts for domestic cars are inexpensive, there will be no problems when purchasing.
When purchasing, you can buy both the original, which has the article number 21050-3502040-00 , and a “non-original” from another company. Unlike spare parts for foreign cars, where the original spare part is always better, the situation with spare parts for VAZ is the opposite. It often happens that non-original spare parts turn out to be of higher quality than the original.
Replacement without bleeding the brake system
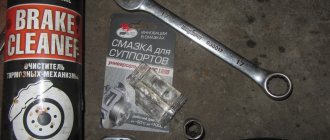
Below are instructions that allow you to replace the GTZ without bleeding the brake system and without a large loss of brake fluid. To carry out repairs, you need to prepare the necessary tools and DOT-4 brake fluid.
When replacing, it is necessary to dismantle the brake fluid reservoir from the old GTZ; when dismantling it, breakdowns of the tank occur; it is recommended that when replacing the GTZ, you also purchase a new TJ reservoir.
Required tool:
- Ratchet with extension and 17mm socket;
- Open-end wrench 10mm;
- Syringe;
- Phillips screwdriver;
Step-by-step instruction
- Remove the hood seal and unscrew the interior heater insulation with a Phillips screwdriver;
- We unscrew the cap of the brake fluid reservoir and use a syringe to pump out the brake fluid into a previously prepared container;
- Using a 10mm wrench, unscrew the fittings of the TJ tubes;
- Using a ratchet with a 17mm head, unscrew the 2 nuts securing the GTZ to the vacuum booster and pull the GTZ towards you;
- We remove the tank from the GTZ (if you haven’t bought a new one). We install the reservoir on the new GTZ, lubricating the rubber seals with brake fluid;
- We install the new GTZ on the vacuum booster and fix it;
- We insert the brake fluid fittings into the GTZ, but do not tighten them;
- Fill the TJ tank up to half;
- We wait for brake fluid to flow out of the holes into which the brake pipe fittings are screwed;
- Then we twist and tighten the fittings of the TJ tubes;
- Add brake fluid between the MIN and MAX marks and close the cap;
The replacement process is complete. With this replacement, bleeding the brake system is not required.
We hope our article was useful to you.
Device
The design of the front caliper and the rear brake cylinder of a VAZ car differ in the appearance of the body and main parts. The disc brake device consists of the following main parts:
1 - Piston. 2 - Boot. 3 - Sealing collar. 4 - Caliper body. 6 - Air fitting. 7 - Springs that press the pads. 12 - Pads.
The drum brake uses the following parts:
2 - Bleeding fitting. 3, 11 - Anther. 4, 10 - Piston. 6, 9 — Piston seal. 7 - Housing.
Auto repair school - Do-it-yourself car repair
Jun 28, 2016 VAZ 2101, VAZ 2102, VAZ 2105, VAZ 2106, VAZ 2107, Zhiguli, Classic by admin
How do you know if the front wheel brake cylinders ? Nothing could be simpler! First, you need to lift the wheel with a jack and spin it several times in any direction. If the wheel turns with difficulty and “slows down,” then this is a sure sign of faulty brake cylinders . the brake pads using a large screwdriver or mounting spatula . If the brake cylinders of the front wheels of a VAZ-2101, VAZ-2102, VAZ-2104, VAZ-2105, VAZ-2106, VAZ-2107 are faulty, then you will be able to separate the pads with great difficulty or not at all. So, it's time to think about what might be needed to replace the front brake cylinders .
And it is recommended to replace them as quickly as possible, since jammed brake cylinders not only worsen the effectiveness of the brakes, but also increase the wear of the front brake pads and reduce the service life of the front hub bearings .
Now, let's get ready to go to a car store or car market. Shopping list: brake cylinders for the front wheels (see photo 1) (two pieces per side - left outer and inner, right outer and inner), clamps and springs (photo 2), it would not be superfluous to buy brake pipes (since old ones are often , “refuse” to unscrew and simply break) and copper sealing washers (under the bolt securing the brake hose to the caliper) (photo 3). Well, and, of course, don’t forget about the bottle... who thought what?)), and I about brake fluid.
Let's move on to the tool that we need to replace the front wheel brake cylinders on a VAZ-2101, VAZ-21011, VAZ-2102, VAZ-2103, VAZ-2104, VAZ-2105, VAZ-2106, VAZ-2107 : mounting blade, a thin wrench (for knocking out the fingers from the guide brake pads), an awl, a spanner wrench “17”, a socket wrench “14”, pliers, a soft metal hammer (aluminum, bronze or copper), a clamp for the brake hose (photo 4). And also, for unscrewing and installation you may need special wrenches for brake pipes (photo 5).
After serious preparation for work, we move on to the process of replacing the front wheel brake cylinders with:
Loosen the wheel bolts, hang the wheel and remove it. Using a spatula (if it is not available, use a large screwdriver) we spread the brake pads (photo 6). Use pliers to remove the cotter pins (photo 7).
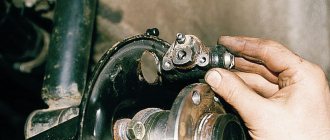
We use a hammer to knock out the guide pins from the eyes of the brake cylinders (photo 8), hold the clamping brackets and remove the pads (in principle, the caliper can be removed with the pads together, but for me, for example, this is more convenient, and the choice is yours). We clamp the brake hose (photo 9).
Using a 14mm socket wrench, unscrew the brake hose (photo 10).
And with a spanner or socket wrench set to “17” we unscrew the two caliper mounting bolts (photos 11 and 12).
We clamp the removed caliper in a vice, unscrew the brake pipe (photo 13) and seat the old clamps (photo 14).
After this, using a simple hammer (you don’t have to spare the old cylinders), we knock the brake cylinders out of their seats (photo 15).
We clean the cylinder seats in the caliper from dirt and rust (photo 16).
We take a new brake cylinder and insert a spring and a retainer into it (photo 17) and, using a “soft” hammer or drift, carefully place the cylinder on the caliper seats (photos 18 and 19).
Install the brake pipe (photo 20).
That's it, the brake cylinders have been replaced . Assembly is carried out in reverse order. Do not forget that when installing the brake hose, it is necessary to replace the old sealing washers with new ones and “bleed” the brakes.
When using an article or photographs, an active direct hyperlink to the website www.avtorem.info is required!
Did you like the article? Share it on your page!
Malfunctions and ways to check them
It is possible that you may need to replace the vacuum booster on your VAZ 2110. The cause may be various malfunctions, the characteristic symptoms of which are as follows:
- When you press the brake pedal, a hissing noise occurs, and at the same time, the engine speed often increases;
- The car starts to shake;
- Spark plugs stop working efficiently;
- Fuel consumption increases noticeably.
You yourself understand perfectly well that if the vacuum brake booster hisses on a VAZ 2110, there is nothing good about it. Therefore, it is necessary to take appropriate action. This applies to all malfunctions that may occur.
Before replacing the vacuum booster on a VAZ 2110, it should be checked.
This procedure is performed as follows:
- As with normal bleeding of brakes, with the engine not running, press the gas pedal several times;
- After 5 or 6 presses, keep the pedal in the down position, resting it on the floor, and start the engine;
- After starting, the pedal itself will move forward a little.
This situation is typical only for a working vacuum amplifier. Therefore, if a vacuum has not formed, check the connections and the hose for leaks, plus examine the condition of the check valve. Often the reason lies in the destruction or deformation of rubber components, which can be easily replaced.
There is also a high probability of damage to the diaphragm, on which a hole is formed over time. You can purchase the diaphragm with a repair kit, the cost of which is no more than 500 rubles.
Replacement
To replace an element, you need to understand the main issue - how to remove the vacuum booster from a VAZ 2110. Directly replacing the old element with a new one will not be difficult, just like the reassembly process.
Therefore, we will tell you about the main thing - dismantling the amplifier. Let's start with the fact that the procedure is not complicated, but it requires accuracy and sequence of steps. If you follow the recommendations, the work will take little time and will not take much effort.
- Disconnect the block with wires, which includes brake fluid level sensors in its design.
- Hold the booster check valve with one hand and carefully disconnect the hose with the other. It is advisable to disconnect the hose with a strong hand, since this will require a lot of force.
- Remove the two bolts connecting the booster and master cylinder.
- Carefully remove the cylinder from the amplifier.
- There is no point in disconnecting the brake lines.
- Give access to the dashboard, which will allow you to unscrew the nuts holding the brake pedal bracket. There should be 4 of them.
- It is recommended to dismantle the bracket and amplifier through the engine compartment, since there is enough free space for such manipulations.
- Remove the pin lock plate. To do this, pry the finger with a screwdriver and squeeze it out.
- Now you can easily disable the brake pedal and booster.
- To disconnect the amplifier and bracket, you will have to unscrew the two nuts on the mount.
- A new one is installed in place of the dismantled old vacuum amplifier, and the reassembly procedure is performed in strict sequence of the dismantling process.
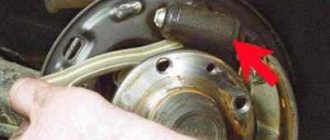
Replacing a faulty brake cylinder
The replacement scheme in the VAZ family is almost the same for cylinders of both circuits with minor differences.
Initially, you need to prepare the necessary keys and plugs suitable for the size of the pipes. After removing the wheel and unscrewing the pipes, we put plugs on them to prevent fluid leakage. Having unscrewed the corresponding nuts, we dismantle the old cylinder and put a new one in its place, reassembling it in the reverse order. If, after replacement, wheel assembly is hindered by pads that are too far apart, you can file the ends of the pads, just don’t overdo it, as this may affect the operation of the handbrake.
After any manipulations with the brake system, it must be bled according to the diagram.
Robot principle
The operating principle of this part is very simple. When you press the brake pedal, you push a rod, which in turn moves a piston inside the turbocharger. The piston forces brake fluid from the cylinder into tubes that lead to the wheels. There, the fluid presses on the pads through the brake piston and, due to friction, the car stops. In this simple scheme, a lot depends on the GTZ; it must be completely sealed, the brake fluid must not leak anywhere. The piston should not jam. All this must be carefully monitored so that at the most inopportune moment at high speed you are not left without brakes.
Basically, most cars have two-circuit main brakes. The first circuit goes to one pair of wheels, and the second to the second pair. If the car is rear-wheel drive, then the first circuit is responsible for the front wheels, and the second for the rear wheels. On front-wheel drive cars, everything works differently. The first circuit includes the right rear and left front, and the second circuit contains the left rear and right front. When one of the circuits fails, the second remains in working condition. If the tube of one of the circuits breaks, you need to rivet it so that all the liquid does not leak out of the tank.
Diagnostics
The following signs will tell the motorist that repair of the brake wheel cylinder is approaching:
- Uneven operation of the wheels when braking, which can result in the car skidding. This is a sign of a stuck piston, which can cause the use of low-quality fluid or air entering the system.
- The indicator light is triggered when the fluid in the tank is critically low, or this is detected during a visual inspection, which indicates a possible leak of hydraulic fluid from worn cuffs or leaky pipes.
- The pedal is pressed with great effort, this can happen for all the reasons described above.
A stuck piston and a stiff pedal are not yet indicators for repairing and replacing working cylinders. You should pay attention to the thickness of the pads; if their wear has reached its maximum, this can cause the pistons to jam, since they practically do not work.
Initially, completely replacing the hydraulic fluid or bleeding the brake system may also help correct these problems. If these actions do not lead to a positive result, it is necessary to repair the working brake cylinder; fortunately, there is a repair kit for the working brake cylinder on sale, the set of which, depending on the make of the car, includes: cuffs, piston, boot and other components.
Some signs of its malfunction
The driver should be alert to the following comments in the operation of the brake system:
- Liquid leakage from the tank;
- The brake pedal sinks when pressed;
- The appearance of air in the car brake system;
The manifestation of at least one of these signs should cause an immediate response from the driver to eliminate it.
Restoring the performance of the GTZ is impossible without removing it, so it will have to be removed from the car.