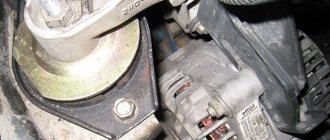
Replacement of rear brake cylinders
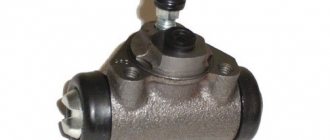
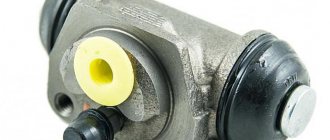
The best rear brake cylinders on the VAZ 2110 can work for a long time. An example of a defective product would be a brake cylinder in which the pistons extend out of the cylinder only a few millimeters, which is not enough to move the brake pads apart.
The quality of the brake fluid also plays a role in the service life of the brake cylinders. The instructions indicate that the rear brake cylinders are removed with the brake drum removed.
Advice: It is advisable that the replacement of the rear brake cylinders of the VAZ 2110 be carried out simultaneously on both brakes. Wear of one of the elements indicates that the second one will soon fail.
And the price of the work will be reduced by disassembling the car once.
- The machine is installed on an inspection pit or a lift.
- The front wheels are fixed.
- The rear ones are removed.
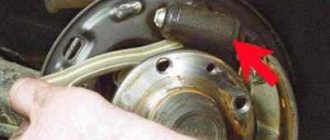
- Using a rubber hammer, the brake disc is pulled out of its place.
- Carefully remove the end of the upper tension spring, position 7 in the first photo.
- Previously, it was connected to the brake pad.
- The handbrake handle is raised all the way. In this case, the brake pads move apart and are removed without much effort.
- The brake pipe is unscrewed from the cylinder.
- The rear brake cylinder is removed.
Removing the rear brake cylinder of a VAZ 2110
- If necessary, the rear brake cylinder of the VAZ 2110 is replaced with a new one.
- Assembly of the unit is performed in reverse order.
- The job ends with bleeding the brakes.
Tip: Replacing the brake cylinder on a VAZ 2110 car is carried out in strict sequence - both dismantling and installing spare parts. The main condition is serviceability and tightness in the hydraulic system.
How the rear brake cylinder is replaced on a VAZ 2110 car can be seen in the video.
Repair of rear brake cylinders of VAZ 2110
There are times when, to save money, it is enough to replace worn parts of an assembly. In this case, after removal from the vehicle, the rear brake cylinder is disassembled.
Dismantling the rear brake cylinder of a VAZ 2110
- Remove the protective caps, pos. 10 in the picture above.
- Pistons are pressed out of the cylinder body along with parts to automatically regulate the gap formed between the drum and the brake pads.
- After installing the piston pos. 9, turn it onto a special device and remove the thrust screw, pos. 3.
- Remove the sealing ring pos. 8 and support cup pos. 7 with crackers pos. 5 and spring pos. 6 from the screw.
- The thrust ring pos. is disconnected. 4 and a stop screw.
After disassembling the unit, the parts are checked for faults:
- The working surfaces of the pistons, cylinder and thrust rings must be smooth, without scratches or roughness. Otherwise, fluid leakage and premature wear of pistons and seals may occur.
- Defects on the mirror surface can be eliminated by grinding or lapping.
Tip: Care must be taken not to increase the internal diameter of the cylinder.
- The thrust screw, springs, support cup and crackers are visually checked. If they are damaged, parts are replaced.
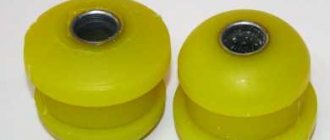
- Seals pos. 8 are replaced with new ones.
- If necessary, change the protective caps pos. 10.
- The structure is assembled in the reverse order.
In this case, you need to take into account:
- All parts are generously lubricated with brake fluid.
- The thrust screws must be tightened to a torque of 3.9 – 6.9 Nm.
- The slot located on the thrust rings is directed vertically upward, the deviation should not be more than 30 degrees. This ensures that all air is removed from the drive mechanism when bleeding the brake.
- Using the device, the pistons are pressed into the cylinder body.
- After assembly, the movement in the housing of each piston is checked, which should be from 1.25 millimeters to 1.65 millimeters.
- Protective caps are installed.
- Timely repair or replacement of rear brake cylinders is a guarantee of road safety.
Didn't find the information you are looking for? on our forum.
We recommend reading:
Shell Helix engine oil for Priora
How to change pads on a VAZ 2112
The oil pressure light on a VAZ 2114 does not come on when the ignition is on, how to repair it
Injector for VAZ
VAZ 11113 Oka carburetor device
How to remove the immobilizer on a VAZ 2114
Adjusting valves on VAZ 21213
The reverse gear on the VAZ 2114 falls out, the speed does not engage, causes of the malfunction
The main malfunctions of the front brakes of the VAZ 2110
| CAUSE OF BREAKDOWN | WAY TO ELIMINATE THEM |
| |
| Front brake pads worn out | Change pads on one axle |
| Air has entered the hydraulic brake actuator | Air is removed |
| |
| Leakage of brake fluid in the hydraulic brake drive | Liquid is poured into the reservoir to the upper mark, and an assistant presses the brake pedal. The brake caliper, brake cylinder, hoses, tubes, fittings and metering valves are inspected. Leak locations are determined. Faulty parts are repaired or replaced. |
| In the hydraulic drive system, the brand of brake fluid does not correspond to the recommended one | The system is flushed and refilled with new fluid. |
| |
| Pads are stuck on the disc or mounting parts due to dirt or corrosion | Elements are cleared |
| |
| Fluid leak in the brake hydraulic drive | Liquid is poured into the reservoir to the upper mark, and an assistant presses the brake pedal. The brake caliper, brake cylinder, hoses, tubes, fittings and metering valves are inspected. Leak locations are determined. Faulty parts are repaired or replaced. |
| |
| Brake cylinder pistons stick or seize | Repairing or replacing calipers or brake cylinders |
| |
| The caliper thrust plate bolts are loosening | The bolts need to be tightened. |
| A different type of brake disc is installed, the friction properties of the disc are lost | A disk of the appropriate type is installed. |
| Caliper brackets become loose | The bolts are tightened. |
| |
| Air has entered the hydraulic brake actuator | Remove air. |
| The pads are deformed | Elements change on one axis |
| Break-in of pads and discs is disrupted | The mating parts are polished. |
| |
| Brake cylinder pistons are stuck | Repair or replacement of front brake cylinders of VAZ 2110 |
| Hoses, tubes and fittings are bent or clogged | The line is purged with compressed air. All damaged parts are replaced with new ones |
| The brake fluid becomes contaminated with oil, which causes the cuffs to swell and, as a result, jam them in the cylinder | All cuffs are replaced, the system is flushed with DOT 3 fluid or similar, with the same equivalent |
Replacing front brake pads on a VAZ-2112
Please note that the pads are changed only in pairs, meaning on both front wheels, otherwise the system will not work correctly and the wheels will seize at different times, and this is no good
Brake disc assembly with caliper
The replacement process itself can take about an hour for the first time, and then it’s like clockwork. First of all, it is worth taking safety measures - remove the negative terminal from the battery (if the car has a wear sensor), fix the car on a level area and place wheel chocks under the diagonally opposite rear wheel.
After this, you can tear off the fasteners, hang the body on a jack and remove the wheel. It’s better to play it safe and install a stand, it’s more reliable.
- The wheel has been removed and placed under the ball, now you can remove the brake hose from the bracket and disconnect the wear sensor terminal.
The wheel is removed, you can start working
Removing the stopper on the caliper
Removing old pads
Checking the condition of the brake disc
Installation of brake pads
We press the brake piston using a lever
- You won’t be able to install new pads just like that, the piston of the working cylinder will not release. Therefore, it needs to be drowned, and for this you can use any lever (if you have experience), a clamp or a special puller, although almost everyone gets by with a simple clamp.
- When the new kit is installed and the bolts are tightened, you must remember to roll the stopper.
Inserting new brake pads
Finalization
Many, believing that the brakes are bad and repairs do not help them, decide on significant alterations and tuning. For example, tuning the brake system of a VAZ 2110 may include replacing the rear drum mechanisms with disc ones.
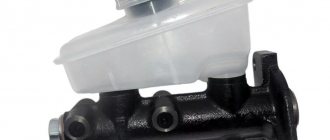
It is especially important to know here that braking of the rear wheels should be softer and occur a little later than the front wheels to prevent skidding. Another possible tuning idea is to replace the vacuum booster and the brake master cylinder
Instead of standard ones, they are installed from Lada Priora. This usually helps, first of all, in that vibration is not felt and the pedal works with optimal force.
Another possible tuning idea is to replace the vacuum booster and the brake master cylinder. Instead of standard ones, they are installed from Lada Priora. This usually helps, first of all, in that vibration is not felt and the pedal works with optimal force.
And do not forget - after each intervention in the brakes, they need to be pumped.
Sources
- vazweb.ru/desyatka/tormoza/tormoznaya-sistema.html
- vaz.today/0-5-tormoznaya-sistema-remont-osobennosti
- luxvaz.ru/vaz-2110/45-tormoznaya-sistema.html
The process of replacing the rear brake cylinder of a VAZ 2110
Once you have diagnosed the problem, proceed with the replacement. At the same time, learn that it is better to install new cylinders on two wheels at the same time.
The sequence of actions for replacing the brake cylinder is as follows:
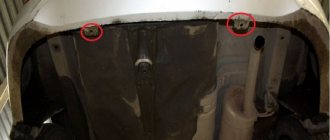
1. Place the car on the pit (you can use a lift or find an overpass nearby). The main thing is that there is full access to the bottom.
2. Secure the front wheels (install locking shoes).
3. Remove the rear wheels.
4. Using a hammer with a rubber base, “knock out” and then remove the brake drum.
5. Remove the edge of the upper lag spring from the brake pad.
6. Raise the handbrake all the way to the top. Thanks to this simple manipulation, the brake pads are moved apart and removed much easier.
5. Unscrew the brake pipe from the cylinder.
6. Remove the brake cylinder itself from the rear support disk.
7. Assess the condition of the old node. Replace it if necessary.
8. Reassemble everything in reverse order.
9. Bleed the brake system.
Please note that all work on removing the brake cylinder and replacing it must be carried out in strict order
Particular attention should be paid to subsequent tightness of the system and high-quality bleeding of the brakes
Cylinder removal video
Repair of brake caliper VAZ 2110
When the piston jams in the brake cylinder, one of the wheels of the VAZ 2110 can turn very difficult. In this case, you need to drive into a pit or overpass and check the main components of the brake system. If, after another check on a pit or lift, you find that brake fluid is leaking from the caliper, then you should take care of it immediately. You have two ways out of this situation: restoring and repairing the brake caliper or replacing it. The brake cylinder may need to be replaced directly.
Replacement of TZ
The first thing you should think about when changing brake fluid is your own safety. The fact is that the hydraulic composition includes chemical components that have a high degree of toxicity. If brake fluid gets on your skin, chemical burns will be inevitable.
Plus, the liquid poses a potential danger to wiring, since it corrodes its protective casings without any problems. If it was not possible to avoid contact with car parts, immediately try to wipe the liquid off with rags. There is no need to rinse with water. If skin burns occur, wash with water and go to hospital immediately.
Let's hope that there will be no problems with your safety issues and that you will work carefully. And to work you will need a set of tools:
- Spanners;
- Durable rubber hose;
- Any transparent container with a volume of 3 liters or more.
Well, now you can proceed directly to the procedure for replacing the brake fluid on your VAZ 2110.
- Unscrew the brake fluid reservoir cap. It is located on the left on the domestic “ten”.
- Place the cap on a clean rag as there may be particles of brake fluid on it. Be sure to wear gloves.
- Drain the fluid from the hydraulic cylinders located behind. This is due to the distribution pattern of brake fluid throughout the vehicle. The front wheels are connected first, so if the car is in a normal position, the fuel fluid will not drain from the rear cylinders.
- For convenience, lift the rear wheels with a jack and turn off the locking regulator, that is, the sorcerer in the people. A screwdriver is inserted between the sorcerer's piston and the plate, which will not allow the element to move.
- Clean off any dirt that has accumulated on the hydraulic cylinder valves at the rear and remove the cap from one of them. It is made of rubber.
- This will release the fitting onto which the pre-prepared hose is attached. It is recommended to use a transparent rubber hose, as this will allow you to monitor the drainage of the liquid.
- The other end of the hose is placed in a transparent container.
- Have someone in your garage do the bleeding while you hold the brake fluid container.
- Bleeding is done by sharply pressing the brake pedal. The pedal should be pressed all the way about 6 times in a row. After 6 presses, the pedal rests on the floor and is held.
- Now unscrew the cylinder air valve half a turn. Due to this, the liquid will begin to be squeezed out of the container and enter the container through the hose.
- As soon as the entire circuit is cleared of brake fluid, the brake pedal itself will fall to the lower position.
- Wait until the liquid has completely drained, then be sure to tighten the outlet valve.
- A similar process is repeated on the second rear wheel, after which the front wheels are pumped out.
- The procedure for draining the hydraulic solution from the front wheels is similar to working with the rear wheels. At the same time, check the condition of the hydraulic cylinders. They may need repairs.
- Determining the serviceability of a hydraulic cylinder is not difficult. If the working stroke of the rod is smooth, there are no distortions or sudden jumps, then everything works well and replacement is not needed.
- If there are problems with the hydraulic cylinder, the easiest way is to replace them with new ones. But it can be repaired. Act according to the situation.
- Filling with new hydraulic solution is carried out by pumping each wheel separately.
- Once you have filled and bled all 4 wheels, be sure to fill the brake fluid reservoir to the maximum level. For this purpose, the corresponding MAX symbol is marked on the body.
- The last step is to check the functionality of the new brake fluid inside the system. If the replacement of the hydraulic solution was carried out correctly and without disturbances, the braking force will be distributed evenly, the pedal will clearly respond to pressing without delay and without increased sensitivity.
- If the pads do not respond to braking at the same time, you will simply skid when you press the brake pedal. Therefore, this should not be allowed under any circumstances.
Replacing brake fluid on a domestic VAZ 2110 car is not difficult, even without the help of specialized service stations.
For a successful DIY procedure, you will need:
- Compliance with personal safety rules;
- Availability of an assistant;
- High-quality brake fluid;
- Actions according to the instructions and operating instructions for the VAZ 2110.
Put all this together, and you can easily change the hydraulic fluid in your car's brake system yourself.
Loading …
Braking system design
The most important component of the VAZ 2110 brake system circuit is a vacuum booster and a dual-circuit regulator. The latter is responsible for creating pressure in the rear brake devices.
The brake drive is equipped with a piping system, which is divided into two circuits, brake devices and hoses. They allow the front and rear wheels to brake.
To activate the braking system, a special pedal is located inside the passenger compartment at the driver’s feet. In the VAZ 2110 car it is located in the middle. The main elements of the hydraulic drive are:
- Vacuum booster. Its design helps create pressure directed towards the master cylinder piston.
- Pressure regulator drive. Through it, the brake fluid is directed to the rear devices of the braking system.
- Directly the brake pressure regulator of the VAZ 2110. Its function is to be responsible for the pressure force. The unit reduces or increases this indicator, depending on the load on the rear axle of the car.
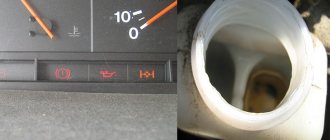
- Master cylinder with reservoir and pistons. On the filler neck of this tank there is a sensor that monitors the emergency level of brake fluid.
- Front wheel brake mechanism. Its design includes cylinders, pads and a disc, plus a special alarm that warns of wear or malfunction of the lining.
- Rear wheel brake mechanism. Here the system is not disk, but drum. At least, this is the design the factory envisages. Some VAZ 2110 owners believe that drum mechanisms are not reliable and efficient enough, and therefore install disk devices in their place.
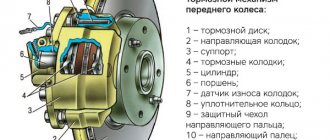
Main elements of the front brake system
- Brake disc – position 1 in the photo.
- Caliper, pos. 3.
- Brake pads – 4.
- Cylinder – 5.
- Piston – 6.
For the front wheel, the brake mechanism has automatic adjustment of the gap between the disc and pads, with a pad wear indicator and a floating caliper. The bracket includes the front brake cylinder of the VAZ 2110 and the caliper; they are secured to each other with bolts. The piston is installed in the cylinder cavity with an o-ring. The optimal clearance between the brake disc and pads is maintained due to the elasticity of the installed ring. How to change the brake cylinder of a device with your own hands is suggested in the article.
Front wheel brake
Rice. 6-20. Pressure regulator performance test diagram: Pi
— pressure at the inlets to chambers A and D (see Fig. 6-18) of the pressure regulator, MPa (kg/cm 2 );
Pr
—pressure at the outlet of chamber B, MPa (kg/cm2);
Re
is the pressure at the outlet of the chamber C, MPa (kg/cm2);
1 - nominal pressure value Pr;
2 - upper limit of pressure
Pr;
3 - lower limit of pressure
Pr;
4 - the pressure
of the Re
manometer Mg) should fit into the shaded area (Fig. 6-20).
The readings of pressure gauges Мз and Мг (see Fig. 6-19) should not differ by more than 0.4 MPa (4 kgf/cm2) in the pressure range from 0 to 10 MPa (from 0 to 100 kgf/cm2) at regulator inputs.
Front wheel brake
Withdrawal. Raise the front of the car, place it on stands and remove the wheel. Unscrew the pipeline fitting and disconnect the flexible hose from the line; Plug the holes in the hose and tube to prevent brake fluid from leaking. Remove the hose from the guide bracket.
After unscrewing the two bolts that secure the shoe guide to the steering knuckle, remove the guide assembly with the caliper and working cylinder.
Installation of the brake mechanism is carried out in the reverse order of removal. After installation, restore the brake fluid level in the reservoir and bleed the hydraulic drive system to remove air.
Rice. 6-21. Unscrewing the cylinder mounting bolt:
1 — cylinder mounting bolts; 2 - cylinder, 3 - bolts holding the cylinder to the caliper
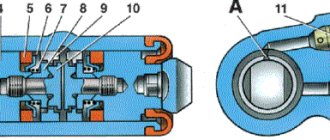
Rice. 6-22. Front wheel brake parts:
1 — wheel cylinder; 2 — fitting for bleeding the brake drive; 3 - sealing ring; 4 - piston; 5 — protective cap; 6 — retaining ring; 7 — caliper; 8 — pad guide; 9 — brake pads; 10 — protective cover; 11 — guide pin; 12 — guide pin fastening bolt; 13 — brake hose; 14 — bolt securing the cylinder to the caliper
Disassembly and assembly
Disassembly. Disconnect the hose from wheel cylinder 2 (Fig. 6-21). Unlock and unscrew bolts 1 securing the wheel cylinder to the guide pins, holding the guide pin by the edge with a wrench. Remove guide 8 (Fig. 6-22) of the pads and pins. Remove the brake pads 9.
Do not unscrew bolts 3 (see Fig. 6-21) connecting the caliper and cylinder, except when replacing the caliper or cylinder.
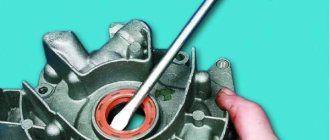
Remove the retaining ring 6 (see Fig. 6-22) and the protective cap 5 from the cylinder and piston. Carefully push a stream of compressed air through the fluid inlet to push the piston out of the cylinder. To avoid damaging the piston on the surface of the caliper when pushing it out, install a wooden pad under the piston (Fig. 6-23).
Unscrew the bleeder fitting from the cylinder body and carefully inspect the working surface of the cylinder. There should be no scoring, damage or corrosion.
Assemble the brake mechanism in the reverse order of disassembly. In this case, it is recommended to replace O-ring 3 (see Fig. 6-22) and cap 5 with new ones. Lubricate the cylinder mirror, piston 4 and the sealing ring with brake fluid, and apply graphite grease to the surface of the piston, install the piston in the cylinder and, without removing any remaining lubricant, put on the protective cap 5 so that its edges fit into the groove of the piston and cylinder,
then install retaining ring 6. Lubricate the guide fingers with UNIOL-1 grease (1.5 g for each finger). Tighten the bolts securing the caliper and cylinder to the pins to the torques specified in Appendix 1, then lock them. Before tightening the bolts, apply sealant to them to prevent corrosion of the threaded part of the connection. After assembling and installing the brake mechanism, restore the fluid level in the reservoir and bleed the hydraulic drive system.
Checking the technical condition of parts
Clean all parts and carefully check their condition for signs of wear, damage or corrosion.
Pay special attention to the surface of the piston and cylinder. If they are worn, damaged or severely corroded, replace the cylinder and piston. Remove corrosion from the cylinder body with a wire brush
Remove corrosion from the cylinder body with a wire brush.
Check the guide pins 11 (see Fig. 6-22) and their covers 10. Make sure that the pins are free of corrosion and
Rice. 6-23. Pushing the piston out of the cylinder
How to repair a brake caliper
For repair you will need:
- Jack and wheel wrench.
- A set of keys, a clamp and a couple of screwdrivers.
- Rags and degreaser.
- Repair kit for caliper repair, high-temperature grease for calipers.
- Liter of brake fluid
- New copper washers for brake hoses
- Drill or screwdriver, set of brushes.
First, let's jack up the car and remove the wheel, and then we will need to remove the caliper and disassemble it. Details of the process in the photo.
To remove the caliper, you need to press in the piston, open the lid of the brake fluid reservoir to make the process easier, then insert a large screwdriver between the caliper and the pads, after which you need to pull the screwdriver towards you.
When the pads are released, unscrew the two bolts at the top and bottom of the caliper guides.
Remove the retaining ring from the caliper boot.
Then remove the boot. Since I did it myself at the service center, I had a compressor with which I pressed out the piston.
I advise you to place a rag in the caliper and then carefully, smoothly and slowly press the brake pedal. After the piston came out to clamp the brake hose so that a lot of fluid did not escape, I used a clamp for this purpose.
We unscrew the brake hose from the caliper and carry the caliper in a vice.
We fix the caliper in a vice.
Use a screwdriver to pry the o-ring off the cylinder and remove it.
Since caliper repair is a unit repair, and quality repair of a unit is 70 percent clean, I decided to clean it of dirt. To do this, I took a set of drill brushes and a screwdriver. You can also use brake cleaner.
We clean the caliper carefully, do not under any circumstances clean the working surface of the cylinder!
After cleaning, wash all parts in degreaser and dry.
Next, install a new piston seal.
Lubricate everything with a special lubricant or paste. (Or just brake fluid).
And carefully insert the piston, aligning it with both hands and pressing it in.
Do not hammer the piston with a hammer or anything else. There is a high probability of damaging the seal and all the work will be in vain.
And the boot retaining ring.
We install the caliper in place and bleed the brakes.
For a logical conclusion, I put a rubber ring from the nozzle on the grease fitting so that the threads do not become clogged with dirt.
Source
Why is the rear brake mechanism acting up?
The hydraulic drive built into the VAZ-2110 combines in its internal design a booster and a dual-circuit pressure controller designed to control the rear brakes. If the rear cylinder is not working correctly, problems can provoke and create an emergency situation at any time when the vehicle is moving along the roadway. To prevent this from happening, the part should be repaired in a timely manner.
There is nothing surprising in replacing an old type of rear brake cylinder (RBC) with a new one; nothing lasts forever. Auto parts stores offer car enthusiasts the opportunity to purchase parts from the best manufacturers that will last a long time and guarantee safety on the road.
How to extend the service life of a new fuel pump
Before installing the part, you need to know the rules that will further extend the service life of the part:
- Choose the best products in the store, created by experienced manufacturers you can trust. By saving on brakes, you won't end up cheap.
- Pay attention to marriage. A defective product is characterized by the pistons coming out of the cylinder structure by a couple of millimeters. However, this is quite enough to cause another breakdown and replacement of the part.
- Buy good brake fluid.
- Ideally, you need to change not one cylinder, but two at once. As practice shows, if one element of the system has already failed, the second one will not be long in coming either.
Main causes of malfunction
The VAZ 2110 caliper is structurally an element that holds the brake pads and is responsible for the degree of their pressure on the brake discs. It is also responsible for uniform wear of the brake pads and guarantees the driver reliable braking in extreme situations.
Thus, the importance of the caliper in the operation of the car is difficult to overestimate
If by this time you have a completely reasonable question, what can happen to the caliper on a VAZ 2110 (2112), we will be happy to answer you. The main cause of malfunctions is “acidification” of the moving elements, coating them with an oxide film, clogging due to the destruction of protective boots or the use of improper lubricant, namely:
- acidification of the main piston mechanism;
- acidification of guides.
Piston mechanism and caliper guides VAZ 2110
A clear sign of problems that the caliper can cause on VAZ cars is uneven wear of the brake pads and an increased braking distance. In this case, the VAZ pads must be changed, and the caliper mechanism itself must be subjected to comprehensive diagnostics:
- check the condition of the piston, its degree of freedom, the presence of moisture, metal oxide, oxide formations and build-ups, the condition of the protective boots;
- Similarly, check the condition of the guides, make sure that there are no uncharacteristic scuffs, abrasions or deformations of the rod on the surface.
We must also not forget about regularly replacing the brake fluid in the system. This should be done approximately every 40 thousand km. mileage of VAZ-2110.
Since brake fluid is hygroscopic, it easily absorbs moisture, thereby oxidizing the piston mechanism and causing it to fail. The piston stroke becomes difficult and uneven wear of the brake pads and wheel wedge occurs.
VAZ-2110 caliper maintenance and repairs
It is mandatory to service the VAZ caliper after each replacement of brake pads, as well as in the event of a forced inspection due to its malfunction, for which it is first necessary to check the condition of all rubber elements, shock absorbers and anthers. It is also imperative to replace the grease for the caliper guides. You need a good synthetic based silicone lubricant that can withstand high temperatures.
To remove the piston from its seat, it is necessary to create the appropriate force using an air compressor (pistons are repaired one at a time, the stroke of the second is blocked, for example, by a wooden block). With the same success, when removing the product from the car, you can press the brake pedal without disconnecting the VAZ 2112 caliper from the brake hose. It is advisable to use a rubber adapter in order to absorb the sharp impact of the freely moving piston and its “shot”.
VAZ 2110 caliper repair
The piston is pushed back using a special clamp. In this case, the boot should be bent to compensate for excess air pressure. The hole for the piston and for the guides are cleaned and washed with carburetor cleaning fluid, all gaskets, boots and seats are also thoroughly lubricated.
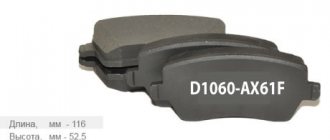
Required spare parts
Just 10 years ago, old pads were not replaced; they were glued on, linings were changed, or they were riveted. Today on the market you can easily purchase the entire mechanism. To replace, you need to prepare new pads. Experts believe that it is better to install replacement factory parts, article number 2110-3501080-60 (TIIR-260), 21100350180082 or 2110-3501080. There are other opinions. Some motorists believe that pads from well-known brands provide the best braking parameters on the VAZ 2110, 2111, 2112. These are parts from brands such as Brembo, ABS, Ferodo, TRW, Bosch, Optimal or Delphi.