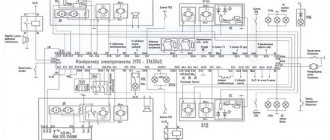
1 — block headlight; 2 — windshield wiper gear motor; 3 - generator; 4 - battery; 5 - starter; 6 — sound signal; 7 — hood open sensor; 8 — power window switch for the right front door; 9 — motor-reducer for window lifter of the right front door; 10 — electric pump for windshield washer; 11 — connecting blocks of wires for connecting the right (front) speaker of the audio system; 12 — electric drive for locking the lock of the right front door with an open door sensor; 13 — ambient air temperature sensor; 14 — connecting block of the wiring harness for connection to the engine control system harness; 15 — electric drive for locking the left front door lock (with an open door sensor and a central locking switch); 16 — sensor of insufficient brake fluid level; 17 — connecting blocks of wires for connecting the left (front) speaker of the audio system; 18 — right front door power window switch (installed on the driver’s door); 19 — left front door power window switch; 20 — central locking switch; 21 — motor-reducer for window lifter of the right front door; 22 — remote control unit; 23 — immobilizer control unit (APS-6); 24 — mounting block; 25 — instrument panel; 26 — right side turn signal; 27 — glove box lighting lamp; 28 — switch for the glove compartment lighting lamp; 29 — brake signal switch; 30 — ignition switch (lock); 31 — lighting control unit; 32 — steering column switches; 33 — left side direction indicator; 34 — connecting blocks of wires for connecting the left (rear) speaker of the audio system; 35 — electric drive for locking the left (rear) door with an open door sensor; 36 — electric heater fan; 37 — additional heater resistor; 38 — heater switch; 39 — alarm switch; 40 — reverse lock solenoid switch; 41 — rear window heating switch; 42 — connecting blocks of wires for connecting the right (rear) speaker of the audio system; 43 — electric drive for locking the right rear door lock (with a door open sensor); 44 — fuel module of the engine control system; 45 — reverse light switch; 46 — parking brake warning lamp switch; 47 — cigarette lighter; 48 — reverse lock solenoid; 49 — connecting blocks of wires for connecting the head unit of the audio system; 50 — backlight lamps on the trim of the center console of the instrument panel; 51 — electric power steering control unit; 52 — interior lamp; 53 — rear light; 54 — block for connecting the electric drive for locking the trunk lid lock*; 55 — luggage compartment lid open sensor; 56 — license plate lights; 57 — additional brake light; 58 — rear window heating element; 59 — luggage compartment lighting lamp.
1,2,3,4 — blocks of the instrument panel wiring harness to the blocks of the rear wiring harness; 5,6 — blocks of the instrument panel wiring harness to the blocks of the front wiring harness; 7 — block of the instrument panel wiring harness to the block of the wiring harness 8 — block of the instrument panel wiring harness to the block of the front wiring harness; 9 — lighting control module; 10 — ignition switch; 11 — on-board computer mode switch; 12 — windshield wiper switch; 13 — sound signal switch; 14 — light signaling switch; 15 — instrument cluster; 16 — evaporator temperature sensor; 17 — interior air temperature sensor; 18 — air conditioner switch; 19 — controller of the automatic climate control system; 20 — heater damper gearmotor; 21 — rear window heating switch; 22 — alarm switch; 23 — brake signal switch; 24 — cigarette lighter; 25 — electric amplifier control unit; 26,27 — blocks of the instrument panel wiring harness to the radio; 28 — backlight lamp for the heater control panel; 29 — illuminator; 30 — mounting block: 31 — heater electric motor switch; 32 — heater electric motor; 33 — additional resistance of the heater electric motor; 34 — lampshade lighting of the glove box; 35 — glove box lighting switch; 36 — control unit of the APS-6 automobile anti-theft system; 37 — driver airbag module; 38 — passenger airbag module; 39.40 — blocks of the instrument panel wiring harness to the blocks of the ignition system wiring harness. KZ - additional starter relay; K4 - additional relay; K5 - relay-interrupter for direction indicators and hazard warning lights; K6 - windshield wiper relay; K7 - headlight high beam relay; K8 - sound signal relay; K9 - relay for turning on fog lights; K10 — relay for turning on the heated rear window; K11 — electric seat heating relay; K12 - air conditioning compressor clutch activation relay;
Instrument panel wiring harness - 11186-3724030-20.
Reasons for poor performance
Glass distortion. Often the reason for poor performance is not the window lifting mechanism itself, but a violation of the position of the glass relative to its guides. This can happen either due to the bracket fastening being unscrewed, or the damp rubber fixing the glass in the holder has ceased to perform its functions. This option occurs much less frequently. Contamination of the guide rubbers. The glass moves inside the grooves formed by the rubber bands. These grooves tend to become clogged with dirt. It, like an abrasive, increases the friction force, which creates resistance to glass movement. The window lift mechanism is dirty. During operation, drivers do not realize that maintenance is also necessary inside the doors. This is especially true for the cable mechanism. Over the years, not only does contamination occur, but also the lubricant of the mechanism and cables dry out, which increases the friction force. The front left window regulator fails faster due to more frequent use. The next reason is wear of the plastic teeth of the mechanism drive. In this case, when you press the control button, you can hear the electric motor running, but the glass does not move. Broken cables. This occurs due to attempts to open frozen windows. With repeated loads exceeding the rated ones, the cables begin to delaminate and gradually fail.
Electrical reasons can be reduced to either a short circuit or loss of contact in the VAZ-2114 power window circuit.
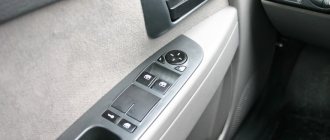
- Pinout of the VAZ 2114 window lifter button
Diagnostics
You can diagnose problems without a special lift, but this requires hanging the suspected wheel. The use of high-quality bearings allows the car to have no play in the hub, or it can be insignificant (with certain wear, but not yet in critical condition).
After hanging the wheel, you need to forcefully try to shake it in different directions. A serviceable bearing will not give any play or it will be almost unnoticeable. A faulty one can have strong rolling, even without the use of force.
In this case, only replacing the wheel bearing in the field will help. Adjustment and any types of straightening will no longer be effective.
Also interesting: How to find out the color of a car
We check the quality of work
As you can see, this work is not at all difficult, it can be done independently, saving a lot of money on a car service, which will charge you a tidy sum for it.
In addition, since we had to remove the door trim, we can also carry out sound insulation, which in the Lada Kalina is also not at the highest level.
At the end, a small bonus on how to make the power windows work without the ignition.
We're sorry, but the requests coming from your IP address appear to be automated. For this reason, we are forced to temporarily block access to the site.
To continue, please enter the characters from the image in the input field and click "Submit".
Kalina ESP buttons on VAZ 2110
There are two types of Kalinovsky ESP buttons: low-current (multiplex) and power. To install low-current ESP buttons, you will need to install an electrical package control unit/electrical package controller (2170-3763040). This will also allow you to close the doors and windows of the car with the key (the control is built into the key), there will be a two-stage door opening, and the ability to control electric mirrors and door locks from the power window unit. In the case of ESP power buttons, everything is much simpler, no additional control units are required. You just need to connect the buttons correctly.
Remember the main thing: power buttons are produced by Avar, and multiplex buttons are produced by Itelma.
Installation of the Kalina window lifter unit on a VAZ 2110
- motor in driver's door
By the way, it is not at all necessary to pull thick wires through the door if you install a glass closer (for example, beta10, which has thin low-current inputs).
Photo source: Key words:
Steps from “Norma” to “Lux”. Part 1. — Lada Kalina Sedan, 1.6 l., 2006 on DRIVE2
Good day, FRIENDS.
It all started when I broke the passenger rear view mirror. And since I never liked them, this is an excellent reason for Tuning))
I chose mirrors from Granta Liftback, with electric drive, heating, and collars.
Mirrors.
To connect the electric drive I decided to use the ESP control unit from Kalina Lux
ESP control unit
I know that there are extra hemorrhoids, and that it could have been done simpler. BUT! I want to do everything well, as close to standard as possible! Well, rear windows are planned in the near future! But as it turned out, this block communicates with the comfort block via one wire, which is not supported by the comfort block from Norma. I decided to replace the standard block with a block from Lux. They have different connectors, which means you will have to redistribute the contacts. After reading the Internet I found these diagrams.
Comfort Block Diagram Standards
Full size
Luxury Comfort Block Diagram
XP1 1st - ? — New — To the ESP engine of the front-right door. 2nd - ? — New — +/- on all doors. 3rd - Yellow - from pin 14 - To the motors for closing all doors (to all doors). 4th - Orange-Black - New - to the ESP engine of the rear-right door. - No need for a while. 5th - Red-Blue - from the 17th contact - opening the passenger doors. 6th - Black - from the 6th contact - To Ground. 7th - ? — New — to the ESP engine of the rear-left door. - No need for a while. 8th - Blue - from pin 24 - Control of starboard turn signals. 9th - Red - from pin 23 - to terminal 30 (+12V?) 10th - Reserved 11th - ? — New — +/- in the driver’s and rear left door and trunk. 12th - Black - wire from pin 6 - To Ground. 13th - Green-black - New - connect the ESP of the front-left door to the engine. 14th - Blue-Black - from the 16th contact - Control of the left side turn signals. 15th - Red - from pin 23 - to terminal 30 (+12V?)
XP2 1st - Pink-Red - from pin 19 - to the trunk opening motor. 2nd - Reserve 3rd - ? — New — To the power window button of the Rear-Right door. - No need for a while. 4th - White-Black - from pin 25 - Trunk opening limit switch. 5th - ? — New — Passenger mirror up and down. 6th - Red-black - from pin 18 - Opening the driver's door. 7th - Brown-Red - from the 11th contact - Front right door limit switch. 8th - ? — New — Illuminated power window buttons. 9th - ? — New — Passenger mirror left and right. 10th - Red-Blue - from the 15th contact - K-Lin bus. 11th - ? — New — ESP button for the front-right door. 12th - ? — New — ESP button for the rear-left door. - No need for a while. 13th - Gray - from the 5th contact - Heated rear window. 14th - Reserve 15th - Reserve 16th - White-Red - from the 10th contact - Opening the rear doors. 17th - Reserve 18th - Black and White - from the 9th contact - Opening the hood. 19th - Reserve 20th - to the siren - No need.
XP3 - Not used
Attention Questions: - Has anyone ever engaged in such masturbation? Or am I the first to decide on this? — In the diagrams there is a reference to Terminal 30, does anyone know what kind of terminal this is? I'm guessing it's a constant +12V, am I right? — The normal unit is connected to terminal 71 of the ECM/terminal 18 of the APS, but the Lux unit does not seem to be connected to the controller at all, or am I missing something? — The normal unit was connected to the instrument cluster (Terminal 8), but the Lux unit is not connected to the combination at all, do I need to connect it and where? — The standard unit has an output for the rear window heating relay, but the luxury unit does not, will it work? Or how is control implemented in Lux? — If anyone can help with the color palette in the lux connector, I would be grateful
Restoring Heated Strips
So, the rear window heating does not work, what to do and where to start the repair. The first thing you need to do is get a high-quality repair kit for restoring electrical filaments. You can purchase it at any auto store or car market at a very reasonable price, but not less than three hundred rubles. Kits that are too cheap have low quality materials and simply may not solve the problem.
Vehicle Maintenance
It is recommended to replace any parts in the car only with original ones. Compliance with this requirement will eliminate subsequent unscheduled repairs. If Kalina's power window button requires servicing, then first you will need to find the necessary tools.
Using 2 small flathead screwdrivers, you need to remove the block from the grooves. Direct replacement is carried out without sudden movements, so as not to break fragile elements. As soon as it becomes possible to get to the wiring, you need to get rid of the plug with equal care. This can be done with little physical effort. A latch is used to disconnect the second plug.
After the glass power supply is removed, it must be inspected. The presence of any mechanical damage indicates the need for mandatory replacement. Even in-depth repairs will not help restore its functionality. Before installing a new unit, another check must be carried out. Its relevance increases when it comes to replacing a relay.
After removing the faulty part, you should manually check all connecting fasteners and wires. Traces of charring or damage are a sign that the Kalina power window button most likely needs to be replaced. If this is not done, then the need for repeated repairs will arise within 2-3 months. This is due to the increased load on the Lada window regulator.
Installation of a working unit occurs strictly in the reverse order. First, carefully connect the wires and 2 plugs. If the window lift button has been manipulated in any way, the reliability of its fixation must be checked manually. If a visual inspection does not reveal any problems, then the Kalina window lifter button is placed in its place.
Once all the wires are connected, the unit is secured using the provided latches. The repair is completed by checking the efficiency of the system.
You need to pay attention to the smoothness of the ride and the absence of the slightest delays. In the future, if the window regulator on Kalina does not work, you can fix the problem yourself
tweet
back Brake pads Lada Kalina
Forward Windshield wiper trapezoid Lada Kalina
Tags control unit, repair, window lifter, maintenance
odessit April 07, 2014
From one edge, preferably from the back, carefully pry it up in the middle with a flat-head screwdriver and pull it out a little upwards. The rest you will see how simple it is. Just don't try too hard.
Just not in the back, there is a special hard shelf, but in the front, there are spring-like latches. Use a flat-head screwdriver to pry, not even pry, but insert, between the panel and the block and try to move the screwdriver a little back, press these antennae, and at the same time pull the block up.
It’s from behind that it pulls out for me.
Here are the photos - the real one and the 3D model. The tapering part is the front, there are springs-tendrils, the wide part is the back, there is a rigid shelf, the door panel goes into it.
Please come in
or Register
to see hidden text
Damn, the photo didn't upload, but you can see it from the model. With some effort, you can pull it out through the butt. But through in front is more correct.
Window control unit Kalina
Sometimes, during the run-in phase of the car, the power window control unit begins to malfunction; Kalina is no exception in this case. Often such a block simply refuses to move the rear or front windows in space. There are many reasons for this. The most common are assembly defects and operating errors. In any of these cases, you can independently diagnose Kalina's power windows.
Analysis of the current situation
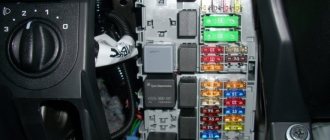
Drivers with basic skills in working with tools will understand what needs to be done if the power window on a Kalina does not work. First you need to check the installed fuse and relay in the mounting block. The diagram supplied with the official vehicle operating instructions designates the indicated elements as F2 (25 A) and K2, respectively. If the problem could not be detected, then the inspection is transferred to the terminals of the electric motor of the Lada Kalina.
To do this, you need to carefully remove the door trim. A multimeter or a 12 V test lamp will help you find out the exact voltage level. If the terminals show no voltage, you need to check the most likely culprits of a possible malfunction. In the first place is the window lift button, followed by wiring and connectors.
The absence of noticeable signs of malfunction here requires checking the power window control unit
It is important to make one reservation: for a vehicle presented in the luxury configuration, it is necessary to inspect the central body electronics unit (CBEC). The fault diagnosis procedure ends with a conclusion about the passage of current to the electric motor or its absence
If there is current, but no movement of the Kalina windows is observed, a possible cause should be looked for in the areas described below:
- glass distortion;
- glass clamp;
- the window lift cable is torn or frayed;
- wear of the glass drive motor shield;
- drive motor shield retraction;
Further actions are based on the nature of the identified malfunction. In the worst case scenario, replacing a broken or worn part will take 70 minutes. It all depends on the experience of the car owner and the actual breakdown. For example, removing and installing a new relay will take about an hour.
Vehicle Maintenance
It is recommended to replace any parts in the car only with original ones. Compliance with this requirement will eliminate subsequent unscheduled repairs. If Kalina's power window button requires servicing, then first you will need to find the necessary tools.
Using 2 small flathead screwdrivers, you need to remove the block from the grooves. Direct replacement is carried out without sudden movements, so as not to break fragile elements. As soon as it becomes possible to get to the wiring, you need to get rid of the plug with equal care. This can be done with little physical effort. A latch is used to disconnect the second plug.
After the glass power supply is removed, it must be inspected. The presence of any mechanical damage indicates the need for mandatory replacement. Even in-depth repairs will not help restore its functionality. Before installing a new unit, another check must be carried out. Its relevance increases when it comes to replacing a relay.
After removing the faulty part, you should manually check all connecting fasteners and wires. Traces of charring or damage are a sign that the Kalina power window button most likely needs to be replaced. If this is not done, then the need for repeated repairs will arise within 2-3 months. This is due to the increased load on the Lada window regulator.
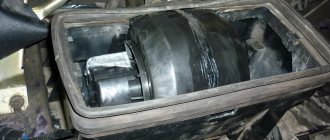
How to check if the window lift motor is working
Kalina. There are cases when the owners of these cars are faced with the problem of non-working power windows. There are quite a few reasons for this defect: a fuse and relay could burn out, a wire could break, a failure in the device’s control unit, or mechanical failure in the mechanism itself.
VAZ 2110. After the necessary checks of the electrical circuit section, making sure that the VAZ 2110 mechanism has stopped working, then the problem may be in it.
It can be fixed as follows: remove the motor, pull out the rotor. Then you need to clean the carbon deposits using sandpaper.
The second problem can be caused by a mechanical effect, which occurs as follows: a buzzing sound after the window has been opened and it remains in place. This problem occurs due to gears. In this case, it needs to be changed, just select the same part.
If you start to close a window and it starts jumping or jerking, it could be warped or debris could get in there. In this case, the parts must be lubricated, and then the adjustable mechanism must be adjusted.
VAZ 2114. There are few reasons for the power window not working on the VAZ 2114:
- Contact connections have oxidized.
- One or more controls are broken.
- Power failure.
In most cases, parts can be repaired, but in extremely difficult situations, all that remains is to replace them with a new device.
Priora. If there is no voltage, then:
- This may be a breakdown of the power window control unit.
- The problem is in the connection of the wires.
- CBKE failure.
Source
"Kalina" and replacement of the window regulator
First you need to purchase a gearbox. Now they are sold in the same housing with the motor. Then the sheathing is done. Experts do not recommend performing this operation outdoors on a frosty day in winter, since the Kalina’s casing is secured to soft plastic pistons. If a fastener element falls off, you will have to glue it. Then you should unscrew the screws and other fasteners that hold the internal opening handle. The wiring harness and the speakers are disconnected.
The next step is to unscrew the glass itself, which is held in the guides. You need to unscrew the four bolts with a 10mm wrench. As a result, the glass will drop to the bottom. You should also remove the curtain that is attached to the bottom of the glass unit. The window regulator itself is secured with 4 nuts on the left and 4 on the right on the guides. The gear motor is also held in place by three nuts.
The block is dismantled through technological holes. This is a carriage and two guides. The gearbox control cable is passed through the latter. There are rings on the cable in two places, attached to the carriages.
The gearbox consists of two parts connected by studs. If the latter are unscrewed, the motor will fall apart into two parts. One contains a motor with a gear. The other part is a drum with special grooves.
After replacing the gearbox, you need to reassemble everything in the reverse order and you can enjoy the reanimated mechanism. The gear motor is inexpensive and replacing it is quite simple.
Before assembly, you must carefully inspect and lubricate the cable. If after this the driver's window lifter does not work on the Kalina car, then it is recommended to check the amplifier tube. In order for the glass to go down completely, the rubber bumpers are shortened.
Technological process of repair step by step
First, we determine where the chain breaks on the threads. Often these are easy to identify; they are visible to the naked eye. Usually this is mechanical damage in the form of scratches, abrasions and large torn parts.
Then we study the instructions for using the repair kit: methods for applying the conductive agent and the time until it completely dries. The next step is to prepare the surface of the damaged area for restoration. To do this, just wipe it with a rag soaked in an alcohol solution to remove dirt and degrease it.
After this, you should stick strips of adhesive tape on both sides of the thread in the area of \u200b\u200bthe break.
Design and types of window lifters
Kalina front window lift
Window regulators are a device designed to raise or lower car windows.
At the moment, there are a huge number of options for these devices, but the design, despite the differences in component parts for different models, is similar, it includes:
- grooves that hold the glass by the side edges
- so-called “rails” that ensure the movement of glass
- Seal and damper, glass movement limiters in the up and down direction.
A window regulator of any design consists of two main elements:
- drive unit
- lifting mechanism - transmitting vibrations of the drive movement to the glass, and thereby ensuring its movement.
The drive is divided into two types:
- Mechanical, known to us from Soviet cars, where in order to lower or raise the window, you need to turn the window lifter handle.
- Electric, typical of modern cars, where to move the glass you just need to press the window button. The electric drive consists of a reversible electric motor with a worm-type gearbox.
In addition, window regulators differ depending on the mechanism of glass movement:
Each option has its pros and cons and technical features. All these device options have one thing in common: one day they fail; this problem especially often occurs in a model that is so popular today as the Lada Kalina.
There can be dozens of reasons why power windows malfunction, but the most common are the following:
- The commutator brushes of the electric motor, which is responsible for the glass movement process, freeze. This happens, as a rule, due to overheating of fragile graphite brushes, unstable to sudden temperature fluctuations, and this factor starts a chain reaction: overheating of the brushes begins to melt the nest, which is made of plastic in all Kalinas, and not of the best quality. For this reason, the brushes lose mobility, and the device can only be brought into working condition using a hammer. At the initial stage of the breakdown, it is enough to give a good knock or two on the door trim, but after a couple of weeks, this method stops working, and then you will have to disassemble the window regulator to repair it.
- Another cause of failure, typical of the Lada Kalina, as well as many other VAZ models, is the ill-conceived electrical circuit. The contacts cannot withstand the load placed on them, there is no unloading relay, which is why all the window regulators fail at once, and then it is necessary to repair not only the window regulators themselves, but also the remote control.
When it is impossible or too problematic to repair the device, it is more advisable to replace it with a new one. The following options are suitable for the Lada Kalina:
- electric window lifter Garnet VAZ – 530 rub.
- electric window regulator Ningbo – RUB 1,699
- electric window lift AUTO-GEO – RUB 3,300.
Of course, the price is directly related to quality, but if the budget is limited, then the domestic option is not bad.
Now let's talk about how to install window regulators yourself.
Advertisements on NN.RU - Auto
Lengthen Gas 331043, 331063 Valdai-farmer for installation of a body 5.1/6.5 m. The chassis is lengthened by increasing the wheel size.
A specialized company for the conversion of trucks produces extensions for man man, iveco and iveco truck tractors.
Conversion of a cargo-passenger gazelle, an all-metal gazelle, an autoline into a cargo gasel 3302 gas 33023 gazelle-farmer includes c.
We sell KAMAZ injection pump (All types) BOSCH injection pump for KAMAZ 1 year warranty Bosch Euro-3 injection pump 1 0402698817 (electr.) EURO-3 - 134,200 rub. 2. Price: 131,000 rub.
The weather this weekend will not be very pleasant: summer warmth has not yet returned to our region. But neither are cold temperatures with heavy rains.
Imagine, you wake up in the morning, open the curtains, bright sunlight bursts into your apartment, and outside the window is a stunningly beautiful landscape.
An accident occurred in the Moskovsky district of Nizhny Novgorod: a girl was swinging her friend, but the swing suddenly fell. As a result.
Today, Nizhny Novgorod fast food lovers have a real holiday: a new worldwide outlet has opened on the renovated Nizhne-Volzhskaya embankment.
Reasons for failure
The window regulator consists of mechanics and electrics, and therefore the reasons must be sought in these parts. Let's look at where the problem may lie:
- A fuse has blown or a relay has broken.
The relay can be replaced with a jumper as in the photo. But remember that this is a temporary option, be sure to change the relay in case of breakdown
There is a breakdown in the wires or the chip has come off.
Tap to the left of the button, then try pressing the button. If it works, then the contact between the wire and the button is to blame.
Problems with the power window control unit. Mechanical failure within the part itself.
All these reasons can lead to the fact that one or both window regulators may not work.
Troubleshooting Methods
So, when the window regulator stops working, it is necessary to find and eliminate the cause. Let's look at the whole process and steps step by step:
The first thing you need to pay attention to is the fuse. In the block it is marked as F5
You need to take it out and look. If it burns out, it should be replaced with the same one with the appropriate marking. If the fuse is intact, then the problem is in the power supply and you need to look for the problem of a broken wire. We take out the fuse and use a tester to check whether there is voltage in the on-board circuit. To do this, you need to insert the probes into the sockets and see if there is power supply. If not, then you should check the wires, relays, and control unit.
DIY heating repair
I remember distant times when this was practically impossible! Now technology has come so far - you can buy a rear window repair kit just to restore these narrow strips. I suspect that there is some kind of metallized composition or paint - but it is called conductive glue.
This glue can withstand temperatures from – 60 to + 100 degrees Celsius. This is exactly what we need to buy. The only thing I want to tell you is - don’t take the cheapest composition, now in my opinion it’s about 150 - 200 rubles, take a little more expensive one, about 300 - 400 rubles, such compositions work much longer.
Electrical faults
The first and most difficult problem with the operation of window regulators is that the brushes get stuck in the commutator of the electric motor, which drives the window raising/lowering mechanism. This happens because during operation of the electric motor the graphite brushes overheat, and the plastic socket in which they are installed melts due to high temperatures. This leads to the fact that the brushes simply stick to the plastic socket. Since AvtoVAZ does not want to give up plastic and replace the socket with a metal one, the car owners themselves will have to modify this design.
Under the influence of high temperatures, when the brushes stick to the walls of the plastic nest, they lose their mobility. When the parts are already slightly worn, they do not reach the collector plates. The spring cannot move the stuck brushes from their place and does not press them against the commutator. This malfunction can only be eliminated with the help of mechanical intervention. According to the owners, (“Kalina”) consists of dismantling the door trim and disassembling the motor itself.
Video “How to change a joint venture with an electric motor on Kalina”
Detailed instructions for completing this task are presented below (the author of the video is In Sandro’s garage).
The question of why the window regulator does not work is often asked by Lada Kalina owners on specialized forums and service stations. There are many reasons for this phenomenon, due to the low reliability of the design. In some cases, the part can be repaired, but in others, all that remains is to remove the non-working window regulator and replace it with a new device. What can cause the mechanism to fail? How to make a replacement? Let's look at these points in detail.
Causes of malfunction
The main reasons why the window regulator does not work on Lada Kalina cars include:
- Stuck electric motor brushes. Such a malfunction is possible in case of overheating of the brushes, which do not tolerate sudden temperature changes. As a result of such a negative impact, the plastic socket melts, as well as loss of brush mobility. At the first sign of a problem, knock on the plastic door trim. If you delay this, then you won’t be able to correct the situation with little effort—you’ll have to interfere with the design of the product.
- The reason that the window regulator does not work is often the lack of thought through the electrical circuit of the mechanism. The weak link in the chain is the contacts, which cannot withstand the currents passing through them. As a result, the power windows of the Lada Kalina fail due to the lack of a unloading relay. This means that if the mechanism breaks down, repairs to the power windows and control panel may be required.
Practice shows that in most cases, it is not possible to repair the unit, or considerable effort must be made to do so. That's why the best solution is to install new window regulators.
How to remove a window regulator and install a new part
Start work on dismantling the faulty mechanism from the front doors, but to remove the window regulator, free the door from the trim.
To complete the task, do the following:
- Raise the glass to the top point and secure it with tape. It does not matter which window lifter the work will be carried out on - the sequence of work will be the same on any front door.
- Take a ten-size wrench and unscrew the pair of bolts that hold the glass in place. Also unscrew the lock handle screw from the inside.
- Disconnect the electric motor and wiring from the electric motor supply circuit.
- Unscrew the eleven nuts on the mechanism, after which you can remove the window regulator.
Video: Replacing the electric window and motor on the Lada Kalina and Grant
If the video does not show, refresh the page or style=”color:#CC3333″>click here
When performing work on the rear doors, the procedure will be almost identical. Do the following:
- Raise the glass to the top position and secure it according to the principle discussed above.
- Using an eight-socket wrench, unscrew the three nuts that hold the assembly in place.
- Take a ten key, unscrew a couple of screws and three more nuts.
- Remove the assembly through the hole formed at the bottom of the door.
- Remove the rear door window regulator of the Lada Kalina and inspect it.
- If the problem can be corrected without replacement, have the device repaired. If the breakdown is fatal, for example, the window lift motor or gear is broken, then installation of a new mechanism is required.
If the window regulator does not work, start by determining the cause of the breakdown, and then decide on the urgency of repairing the mechanism. If the malfunction is serious, the only solution is to remove the Lada Kalina window regulator for restoration work or a complete replacement.
Ways to solve problems with central locking Niva Chevrolet
Before starting work, it is recommended to evaluate your repair skills and experience with electrical wiring in a car. Special equipment may be required, and at a minimum, a tester is required to diagnose electrical circuits. Troubleshooting always starts from simple to complex.
Fuse failure
The fuse is the first thing every car owner should check if the central locking stops working. The symptom will be the failure of all doors to close with the button at the same time. It's easy to check - just open the mounting block and replace it with a serviceable one of the same rating.
Most often, the cause of its burnout is a short circuit or overload in the circuit. In the mounting block of cars manufactured before 2009, it is designated F6; on cars after 2010, it is located under the number F10.
Priora window lift diagram
Priora window lift diagram, connection features
Despite the fact that the window lifters are controlled in the same way as on previous models, the design of the Priora's window lifters is somewhat different. There is no power window unit on the Priora. The power windows are controlled by the electrical package controller. This was done for ease of control of electric windows.
To completely open and close the glass, you no longer need to hold down the key, but simply press it briefly. If you hold the button for a while, the window lifter will work until the button is released. The buttons in this case do not switch the circuit, as on previous models, but are a kind of sensors for the electronic unit.
Connecting the driver's door power windows is somewhat different from the connection in the passenger doors. This is due to the use of an all control module in the driver's door.
When you turn on any button on the block, a corresponding signal is generated from it, which is transmitted to the electrical package control controller via the wire connecting pin 5 of the driver's door block with pin 5 of block 3 of the double-glazed window control unit.
When troubleshooting without using diagnostic equipment, you can check the integrity or short to ground of the wire through which the signal passes and the presence of power on the driver's door module unit.
In addition to the use of electronic units in the Priora window lifter circuit, there is a feature of supplying power to the electric drive. One of the wires is multifunctional and is involved in supplying power to the heating and mirror control, as well as to the door lock solenoid.
Therefore, this wire can have either a plus or a minus, depending on which consumer is turned on. The value is controlled by the electrical package controller. On the right and left sides of the wire, pins 4 and 6 are connected separately to connector X1, respectively.
This property can be used to troubleshoot a circuit.
Priora power window diagram troubleshooting
How to find a fault in the Priora power window diagram if the passenger door power windows do not work? A malfunction of the power windows of all doors is unlikely and the reason for this will most likely be a malfunction of the electronic control unit for the power accessories.
A malfunction of the electric lifter in one of the doors is a very common breakdown, especially on early cars. And it is again associated with a malfunction of the unit, and in particular the burnout of the microcircuits that control the operation of the electric drive. The reason was a flaw in the circuit design by the manufacturer.
For the same reason, the window lifts could work jerkily. Subsequently, the block manufacturer corrected the defect, but failure of the block is still the main malfunction at the moment.
It is best to start troubleshooting by checking the functionality of the door lock on which the lift does not work. If the lock also does not work, then you need to check the presence of power or negative on the wire from the glass unit control unit, connector X1, pin 4 or 6, depending on which side you are looking for the fault.
To do this, connect the test lamp to the car body and turn on the power window in one direction or the other. Then connect the test lamp to the positive wire and repeat the operation. It is also worth checking conclusions 1, 5, 11, 13.
If the control lamp lights up in all cases, then the control unit is working properly and most likely there is a broken wire on the door or a malfunction of the electric drive. To check, you need to remove the door trim and connect a test lamp between the wires going to the electric drive.
If the foot lights up when you turn on the lift, then the electric drive is faulty, otherwise the wire is broken. If the unit malfunctions, it is necessary to find out the cause. This could be not only a manufacturing defect, but also a short circuit between the wires or to the housing.
Part of the wiring, connection of Euro-3 class ECUs
The car is available in two versions. However, the Euro 3 version is in great demand. Pinout of the control unit Kalina model BOSCH M7.9.7, M 73 with 81 contacts:
- 1 – for the 16 valve version – ignition coil 2 combustion chambers, in the 8 valve version. not used;
- 2 – for 8 valves is responsible for 2-3 clamping coils. In 16th grade. only for 3 boilers;
- 3 – grounding to the body from a short circuit;
- 4 – not applicable for 8 valves (empty). On a more powerful version, it is responsible for cylinder 4;
- 5 – for 16 kl, supplies power to 1 kat. Clamp For anlaog, he is responsible for blocks 1 and 4;
- 6-7 – Injector driver No. 2, 3;
- 8 – electronic signal for indicating engine speed;
- 9 – not used;
- 10 – gasoline consumption indicator;
- 11 – empty;
- 12-13 – from the battery to the ignition;
- 14 – main relay – current supply;
- 15 – DPKV input response;
- 16 – reception from the TPS sensor;
- 17 – similar element – grounding on the car body;
- 18 – response from DK 1;
- 19 – knock sensor input;
- 20 – land DD No. 2;
- 21-26 – not used;
- 27 – drive of the first nozzle;
- 28 – heater DK2;
- 29 – power output of the control unit for coolant fan No. 2;
- 30 – free;
- 31 – lamp performance – check the engine;
- 32 – TPS controller;
- 33 – power supply to the mass air flow sensor;
- 34 – receiving an impulse from the DPKV;
- 35, 36 – ground of the corresponding sensors;
- 37 – impulse transmission channel from the mass air flow sensor;
- 38 – empty;
- 39 – power output of antifreeze temperature sensor;
- 40 – DTVV – signal reception;
- 41-43 – not used;
- 42 – receiving an impulse from the DNRD;
- 44 – per main module;
- 45 – for phase distribution sensors;
- 46 – adsorber valve, control part;
- 47 – voltage for injector No. 4;
- 48 – heater circuit DK1;
- 49, 52, 54, 56, 58, 60, 62 – empty;
- 50 – extra Starter relay;
- 51, 53 – taps to the ground;
- 55 – pulse receiving line from DC2;
- 57 – calibration of short circuit to ground;
- 59 – speed sensor sensor;
- 61 – on the body;
- 63 – from the main control relay;
- 64-67 – XX calibrators;
- 68 – control of cooling system fan No. 1;
- 69-70 – power lines for the fuel pump and air conditioning relays, respectively;
- 71 – K-Line;
- 72-74 – not used;
- 75 – request on. Air conditioning systems inside the cabin;
- 76 – impulse to activate the power steering unit;
- 77-78 – empty;
- 79 – input from DF;
- 80 – body weight;
- 81 – empty.