For normal installation of speakers in the standard places of the Skoda Octavia A5, it is necessary to make wooden spacer rings under the speakers. To get to the speakers, you need to remove the door trim.
Basically, plywood of different thicknesses is used to make spacers, for example: 16mm, 18mm, 21mm, etc. Wood dampens vibration a little and makes the acoustics sound softer.
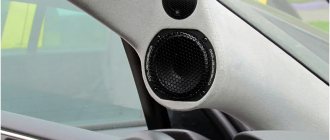
HF rings for Octavia A5
There are two options for installing non-standard speakers in the standard places of the front door, these are 6.5″ and 8″.
For an 8″ (20 cm) speaker, you can make a podium with a thickness of approximately 50 mm, an outer diameter of 210 mm and an internal diameter of 180 mm, for example, you can cut three rings from plywood with a thickness of 16 mm or 18 mm (the total thickness will be 48 mm and 54 mm), as in the photo:
For 6.5″ (16.5 cm) a slightly different design is required. One ring with an outer diameter of 210 - an inner one of 160 mm, and two rings: an outer one of 180 and an inner one of 150 mm (mounting diameter of the speaker is 16.5 cm), three rings of 16 mm each - the total thickness of the rings is 48 mm:
The rings are coated with glue and connected with self-tapping screws!
Spacer rings for midrange in the rear door of Skoda Octavia a5
The best option to improve the sound is to soundproof the doors and embed a 16-inch midrange speaker into the rear doors; for this we make a podium approximately 50 mm high. You can also take a sheet of plywood 16 mm or 18 mm thick and cut three identical rings with a jigsaw, with dimensions: outer diameter = 180 mm, inner = 150 mm (under).
Article rating:
Professional acousticians consider the main tasks of manufacturing spacer rings for non-standard speakers to be as close as possible to the diffuser to the protective mesh (grill) and to securely attach the tweeter or midbass to the internal frame of the door cavity or side pillar. In this case, the additional device should not degrade the acoustic characteristics of the speaker. A simple design of spacer rings is available for DIY, but professionals consider the rings to be only one stage in a complex speaker sound installation. When moving the speaker from its original location, a number of additional works are required, one of which will be the manufacture and installation of a spacer ring. The use of gaskets from standard speakers is excluded, since for budget models they are made of cardboard or low-quality plastic and do not differ in durability and acoustic qualities.
DIY speaker rings
Today, most modern vehicles come with standard speakers. However, lovers of loud music in cars are often not satisfied with their sound, so they buy larger speakers. In this case, a different kind of problem arises - how to install large-sized equipment in the cabin so that, on the one hand, it does not disturb passengers, and on the other hand, to create truly clear sound?
One of the common ways to solve the problem is to make podiums for speakers. They can not only improve sound quality, but also take the performance of the speaker system to a whole new level.
A DIY acoustic shelf allows you to mount speakers of different sizes and shapes
How to make spacer rings for speakers
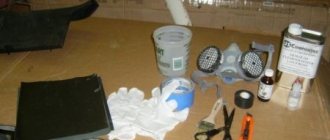
You will need : plywood, drill, jigsaw, sealant, varnish.
The thickness, width and other dimensions of spacers for columns are calculated individually in each case, so there are no universal sizes of spacers. The diagrams presented above can act as a template, which will be modified locally.
The total thickness of the spacer is determined individually. Approximately, for a speaker mounting depth of 52 cm, spacer rings 16 mm thick should be suitable.
Procedure:
- Determine the outer and inner diameter of the rings (using a sample or speaker).
- Cut out the spacer slides with a jigsaw, having previously drilled holes for installing the jigsaw blade.
- Fasten all parts of the spacer (if they are composite) using glue or self-tapping screws.
- Try on the door spacers and modify them if necessary. Make sure that the spacers fit tightly to the surface, nothing interferes with the correct positioning of the speaker, and the door trim is installed without problems (modify locally).
- Coat the rings with several layers of varnish.
When installing spacers, make sure that it and the speaker are secured as tightly as possible (stick vibration isolator strips under the ring), this will eliminate the occurrence of vibrations and rattling. Seal all cracks using caulk. It is recommended to combine the installation of spacers with sound insulation of doors.
Algorithm of actions
- First you need to remove the door trim (details in this article).
- We take measurements and estimate certain dimensions. The most convenient way is to pre-make a layout from cardboard.
- Based on the layout, we figure it out on the spot and see if the column fits into the door niche. We are trying to understand whether the glove compartment can open with this column, since the column may interfere with it.
- We cut out spacers, if necessary; below we will consider options for columns for which it is not necessary to make spacers.
- We cut out a decorative plug for the column on the door trim.
Tags: spacer rings, router
Comments 98
Please tell me which in your opinion is better, kicx or ural? In terms of speakers. Thank you very much)
Read more: Parking near the bus stop
I understand which is better.))) But comparing my two options, which is better?
Well, as if Kicks and Urals are different... At least you wrote the models))) But I’ll tell you - listen and find out what’s best for you!
Kicx pd-5.2 and Ural ak47s comp.
You have to listen and then choose!))
Well, as if Kicks and Urals are different... At least you wrote the models))) But I’ll tell you - listen and find out what’s best for you!
There is an option to take either one or the other, I can’t choose (I already had Kicks like that. Not bad. They say that crossovers are an extra overpayment of money. You can get by with Conders, right?
I'm not your advisor here. I had neither one nor the other.
I tried everything and settled on the same device!
I tried to do it using something like a real radius bar (I drilled holes). I didn't really like it. It's more convenient with this thing.
Yes, any radius can be adjusted. I also made a sleeve and a pin on which I put this device. Otherwise the self-tapping screw will quickly gouge everything! I cut about 50 rings - the flight was normal. Instead of laminate, I used 1 plywood and fixed the knitting needles into the original plank of the router.
You need to make the base out of something solid, then it won’t gouge with a self-tapping screw. But even with a bushing the option is not bad!
If you have a cutter and don’t make a ruler, you can’t find a piece of plexiglass...
As you may have noticed, I made myself a ruler.
My friend, we made spacers in the Nissan Sunny in exactly the same way)) A convenient topic for a cutter!))
I wanted to share an idea on how to cut straight rings without a radius bar, but in the end I took it and made a radius bar)))))
Threat Respect for the idea!
Thank you! But this is not quite a radius bar. This one has an attachment to the base of the router and many, many holes for different diameters.
What you are talking about is just a type of radius bars. Moreover, it’s not the most convenient;)
But it is the cheapest and easiest to manufacture.
Nene, I’m talking about the inconvenience of branded strips that are screwed on and have holes
Understood. I've never worked with one like this.
But it is the cheapest and easiest to manufacture.
Read more: Fines based on VIN code traffic police website
I myself use one similar to yours, only welded (a friend cooked it). Very comfortably!
You will need : plywood, drill, jigsaw, sealant, varnish.
The thickness, width and other dimensions of spacers for columns are calculated individually in each case, so there are no universal sizes of spacers. The diagrams presented above can act as a template, which will be modified locally.
The total thickness of the spacer is determined individually. Approximately, for a speaker mounting depth of 52 cm, spacer rings 16 mm thick should be suitable.
Procedure:
- Determine the outer and inner diameter of the rings (using a sample or speaker).
- Cut out the spacer slides with a jigsaw, having previously drilled holes for installing the jigsaw blade.
- Fasten all parts of the spacer (if they are composite) using glue or self-tapping screws.
- Try on the door spacers and modify them if necessary. Make sure that the spacers fit tightly to the surface, nothing interferes with the correct positioning of the speaker, and the door trim is installed without problems (modify locally).
- Coat the rings with several layers of varnish.
When installing spacers, make sure that it and the speaker are secured as tightly as possible (stick vibration isolator strips under the ring), this will eliminate the occurrence of vibrations and rattling. Seal all cracks using caulk. It is recommended to combine the installation of spacers with sound insulation of doors.
Let us remind you that new speakers are not the only popular accessory for Lada Priora.
Cost of services
Making simple rings 1 hour 600–1600 rub. Production of complex rings 2-3 hours 1600–2600 rub. Making rings for tweeters 1 hour 800–1200 rub. Manufacturing of supporting elements for midrange and tweeter speakers 2–4 h 1000–1500 rub. Making rings for a subwoofer (wood) 1 hour 400–800 rub. Making rings for a subwoofer (metal) 1 hour 800–1200 rub.
Installation of rings on self-tapping screws / bolts 0 / 50–100 rub.
Installation is free when installing acoustics. If you need to install rings on already installed acoustics, then check out the cost of services in the following price section for services for disassembling and assembling interior elements.
Disassembly and assembly of interior elements
— door trim 30 min 600–1200 rub. — ceiling covering 1–5 h 2000–6000 rub. — rear sofa 30 min 600–1500 rub. — sidewalls (plastic) 30 min 600–1500 rub. — rear shelf 30 min 600–1500 rub. — rack covers 10 min 300–600 rub. — front seats 20 min 500–1200 rub. — checkpoint tunnel 1 hour 1000–3000 rub. — carpet 4 hours 3000–7000 rub. — dashboard (partially) 1–3 hours 2000–5000 rub. — dashboard (completely) 5 hours 5000–9000 rub.
Manufacturing another structure for acoustics
Our other services
Fault diagnostics 0 / 500–1500 rub. Selection of audio system components 5 min – 1 hour free Adjustment of acoustics (during installation) free Audio preparation from an hour from 1000 rubles. Installation (installation) of coaxial acoustics 2–4 hours from 1400 rub. Installation (installation) of broadband acoustics 2–4 hours from 1600 rub. Installation (installation) of component acoustics 2–6 hours from RUB 3,500. Installation (installation) of tweeters 1–4 hours from 1000 rub. Installation (installation) of subwoofers 1–4 hours from 500 rub. Installation (installation) of radio tape recorders from 15 minutes from 500 rubles. Organization of linear RCA outputs from an hour from 1000 rubles. Installation of a sound amplifier from an hour from 1000 rubles. Installation (installation) of a CD/DVD/MD changer 2 hours from 2500 rub. Installation (installation) of the processor with configuration 4–6 hours 1500–4000 rub. Installation (installation) of antennas from 30 minutes from 800 rub.
What should a podium look like?
As follows from the above, the podium for the midrange or midbass is not a simple decorative element, but a necessary component of the audio system that affects the sound quality. To effectively perform its task—damping unnecessary vibrations—the podium must be heavy. The heavier the better.
In order for a part to be heavy, it must be made of the appropriate material. But in practice, plywood is most often used, since it is easy to process at home.
Did you know that archaeologists discovered the first archaeological artifact made from a material reminiscent of modern plywood in the territory of Ancient Egypt. The plywood casket dates back to the 15th-16th centuries BC. e.
Plywood is a relatively light material. To increase weight, podiums are made as large as possible. Of course, taking into account the features of the car interior.
Installation of 16 cm speakers using spacers
A spacer is, in this case, a wooden product that follows the shape of the column. It is made in the form of a ring; the material used is usually fiberboard, MDF board or plywood. But even in this case, you may need to cut the metal of the door, which in my opinion is a little blasphemous in relation to the car.
Spacer made of two rings, MDF material
- The inner diameter of the ring is measured so that the speaker is freely attached to it, and for the best sound, they try to ensure that the speaker fits as tightly as possible to the ring.
- The outer diameter should be such that the column is attached tightly to the ring, and, if possible, fits behind the upholstery so that the metal of the door does not have to be cut.
The video below shows the installation of a 16 cm speaker system in the front doors of a Lada Priora. The principle is the same.
Video
Preparatory work before installing speakers in the front doors Grants
Before the installation of 16 speakers in Grantu begins, it is worth noting the need to enhance the wave dispersion effect. Thus, it is necessary to glue an additional layer of Bitoplast 10 on top of Vizomat MP-2. This kind of action is not mandatory, but will reduce the reflection of sound directly from the door itself.
It is also worth noting the use of Bitoplast 10, and not foam rubber. The fundamental difference between these materials is the different degrees of water absorption. Foam rubber absorbs water like a sponge, resulting in corrosion inside the door.
As for the additional materials that were mentioned at the very beginning, it is at this stage that it is necessary to install the spacer on the door. You can buy it at any car audio store. As for the possibility of making spacers (rings) yourself?
What advantages do podiums provide?
Before you start assembling a podium for speakers with your own hands for a car, it will not be superfluous to find out why they are made in the first place and what they provide.
Acoustic podiums objectively have a number of advantages. Someone simply mounts a speaker, which is quite powerful and of high quality, but decides not to use the podium. Although the sound quality will be much weaker than with an additional design.
It is also worth adding that there are no particular problems with installation. Here you definitely won’t have to cut out the metal elements of the door. But the noise will probably disappear, low-frequency sounds will increase, and the sound will become more transparent. Of course, if the driver is not a music lover and the main thing for him is that there is simply music, all these modifications will turn out to be superfluous and unnecessary. But those who understand car audio and love to enjoy music understand perfectly well that there is no place without a podium.
The podium also becomes a constructive solution that allows you to install speakers or loudspeakers of substantial size, for which the car does not have standard seats.
Regarding what else podiums can provide, it is worth emphasizing several points:
- creates a voluminous and most pleasant, high-quality sound;
- the design improves the appearance of the car if you choose the right materials and colors;
- with the help of a podium you can emphasize the beauty of branded and expensive speakers;
- the same podium easily hides external defects in acoustics;
- Various materials are suitable for manufacturing, among which the favorites are wood, carbon fiber and fiberglass;
- When finishing, you can use various coatings, including genuine leather, Alcantara, or regular carpet.
Cutting Tips
Selecting a tool
When starting to work with sheet materials, many craftsmen only have an idea of how to cut in a straight line. Therefore, the question of how to cut an even circle from plywood can confuse many. And indeed, a regular or circular saw cannot cope with the task. Figure cutting is most often done using the following tools:
Hand jigsaw
- Hand jigsaw. The simplest device used for sawing. With the help of a jigsaw, even the most delicate work can be done with your own hands, but for thick material or long cuts it is practically not suitable.
- Jigsaws. There are two types of devices you can use here:
- regular, with a vertical file;
- artistic, in which the role of the cutting element is performed by a steel blade.
Ordinary jigsaws will come in handy when working with thick plywood, for example, when making a bed with your own hands. But if you are looking for a way to cut letters out of plywood or make other complex elements (for example, parts of a children's construction set), then it is best to use a model with a band saw. Model for artistic cutting
Advice! Naturally, for each type of jigsaw there are several types of files and blades. The correct choice of cutting element is a necessary condition for high quality of the product.
- In addition to jigsaws, you can use a furniture router for curved cutting. Despite how difficult it is to operate, it is many times superior to most models of plywood saws in terms of the quality of the holes it makes. Using a router, you can make a wonderful rocking chair from sheets of plywood with your own hands.
Also, do not forget about available devices, but we will talk about their use in the appropriate section.
Tips for cutting plywood
Cutting from plywood has several nuances that the master needs to take into account:
- Firstly, you can only cut on dry material. High humidity leads to an increase in the resistance of plywood, therefore, with excessive force, either the veneer will begin to delaminate or the file will break.
- You need to change the saw or cutting blade immediately after the first signs that the teeth have become dull appear.
- If we are cutting from plywood using a jigsaw, then to obtain cleaner edges, the main cutting lines should be placed along the grain of the veneer. But with hand files it is easier to work across the grain: there will be slightly more chips, but there is less risk of the file getting pinched or moving away from the intended line.
File for rough work: the edges of the product will need to be filed
Advice! When transferring designs for cutting from plywood onto the workpiece, try to place the template in such a way that the elements to be removed fall on areas with defects: knots, chips, stains, etc.
What is the best way to strengthen the walls of plastic spacers?
- Log in to reply to this topic
#1 OFFLINE ltd500
- From: Moscow
I understand that it sounds crazy, but there are reasons for this and this is a temporary solution, and I ask you not to throw poop. And I know it's better to replace it with something else
There are plastic spacers for the speakers in the front doors and they are of complex shape. For making them from wood or aluminum, they want some inhumane money, which I would rather spend on the speakers themselves
In principle, they are quite rigid, two-layer. But I understand that it is not enough and most likely they will rattle, so it occurred to me to strengthen their structure with a bay between the layers, something.
Machining a cylindrical hole
As a result of these actions, a cylindrical hole is formed suitable for installing speakers. Before installation is carried out, it is worth noting the need to paste the resulting cylindrical hole with Vizomat 10, as was the case at the stage of pasting the outer side of the wooden ring.
An aspect of gluing a cylindrical hole is the pursuit of two goals, among which are:
• protection of the column and its contacts from water (it can get on the column when the glass is completely lowered);
• creating a trumpet effect.
To achieve these results, Vizomat 10 is cut into thick strips, resulting in the Vizomat being several mm shorter than the cylindrical hole and not touching the completely lowered glass.
The density of the entire structure plays an important role. To achieve the optimal density, you can cover the circumference of a wooden ring with Bitoplast, as a result of which the mounted column will be pressed as much as possible against the homemade ring.
We install 16 cm speakers in the Lada Granta, and also cover their circumference with Bitoplast. This pasting is carried out in order to maintain the intensity of the sound, since air will not escape under the door trim.
At this point, the installation of speakers in the front doors of Granta is completed, and all that remains is to assemble the door. After such installation, the weight of the doors increases slightly and, accordingly, the protrusion from the installed column increases slightly.
Modern fashion for car audio
Today, most modern vehicles come with standard speakers. However, lovers of loud music in cars are often not satisfied with their sound, so they buy larger speakers. In this case, a different kind of problem arises - how to install large-sized equipment in the cabin so that, on the one hand, it does not disturb passengers, and on the other hand, to create truly clear sound?
One of the common ways to solve the problem is to make podiums for speakers. They can not only improve sound quality, but also take the performance of the speaker system to a whole new level.
A DIY acoustic shelf allows you to mount speakers of different sizes and shapes
Making a platform for a column
- Measure the size of the speaker for the radio. And also take measurements of the protective mesh.
- Draw a ring on the cardboard, taking into account the fact that the internal diameter corresponds to the diameter of the place where the column will be planted. And the outer diameter of the ring is equal to the diameter of the protective mesh. To get it right, you need to add 6 mm to the annular diameter. For a decorative ring.
- Transfer the cardboard model onto a sheet of plywood and trace it. It is better to take plywood of at least 8 mm.
- Cut out all the details - shapes. It is better to glue the decorative ring to the base and attach it with small nails.
Details for the podium
Shape cutting technologies
Jigsaw
As we noted above, a jigsaw will come in handy if we are looking for how to cut a word out of plywood or make other parts of complex shapes:
- We transfer pre-printed drawings or templates onto the workpiece using carbon paper.
Figured carving with a jigsaw: photo of the finished product
- If the structure has through sections, we make starting holes with a thin drill.
- Insert a file or jigsaw blade into the hole. Secure the free end of the file with a fastening screw or clamp.
- We make a cut along the intended line, pressing the workpiece to the workbench. The saw moves either automatically (for electric jigsaws) or manually.
After all the arc elements have been sawn, we remove unnecessary areas and process the finished part with a file or sandpaper.
Finished hole