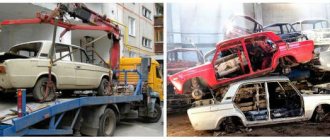
Body parts of VAZ 2107
Body parts of the VAZ 2107 are of welded and hinged type. The first ones are connected using welding points and additionally reinforced with an arc. Attachment parts can be connected using bolts. On the VAZ 2107, body parts conventionally belong to three zones of the car: the front, middle and rear. Let's find out what their purpose is, how they affect the geometry of the body, its aerodynamics and whether they can be modernized.
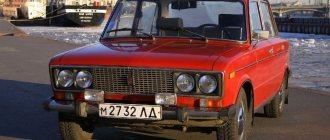
General view
ATTENTION! A completely simple way to reduce fuel consumption has been found! Don't believe me? An auto mechanic with 15 years of experience also didn’t believe it until he tried it. And now he saves 35,000 rubles a year on gasoline! Read more"
The exterior of the “Seven” generally copies other VAZ models, called “classics”. On the other hand, some parts and components of the frame are not the same. They simply will not fit the general exterior due to the fact that they differ in basic parameters.
Body parts of VAZ 2107
Let's start with the front. This area of the car includes these components: the hood, the apron with the front bumper (they are considered more decorative elements) and the fenders.
As for the middle part of the car, this includes the roof of the VAZ 2107, sills, and doors.
Finally, the rear of the car includes the fenders, boot lid and rear apron.
All main body elements are made of stamped steel, additional ones are made of plastic. If minor damage occurs, they can be easily straightened and, if necessary, replaced with new ones without much difficulty.
Note. With the exception of the “tail”, all elements of the “Seven” body are connected by welding.
Comparatively, the “seven” looks more modern than other “classic” models. It is for this reason that the car remained on the production line, although the designers did not make any significant changes.
The car interior is equipped with 4 seats. The front seats are made in the form of an independent adjustable design. As for the rear ones, they have no adjustment. The interior lining is plastic, the roof is covered with leatherette.
The interior of the “Seven” is structurally excellently protected from frontal and rear impacts, but a side collision with another car can lead to catastrophic consequences.
Distinctive features of the “Seven” body
The body of the “seven” has a lot of advantages over the frame structure of cars. First of all, this has to do with reduced weight by 40-45 percent and lower production costs. The assembly itself also does not involve any particular difficulties: a cold-rolled steel sheet is used, usually 08KP, with the ability to draw and good weldability, as well as paintability.
Distinctive features of the VAZ 2107 body
The parts that are most susceptible to corrosion (underbody and its elements) are made from a special sheet of steel. Thus, in the VAZ 2107 of the last years of production, the number of galvanized parts exceeds in weight more than half of the entire body.
The most expensive part of any car is the body. Its production alone requires about half a ton of sheet metal (not cheap) and many other expensive materials.
As a result, the body has special requirements that it must meet:
- Have visibility in accordance with modern standards;
- Have a shape that is optimal in terms of aerodynamics and functionality;
- Seats must be securely fastened;
- Changes to the front and rear parts of the body should be within normal limits in case of unexpected accidents;
- The interior, engine and luggage compartments must have sufficient volume for a sedan;
- Compliance with all standards of painting, manufacturing, etc.;
- And finally, good maintainability.
Hood
Part of the body of the “seven”, covering the engine compartment. This is the main purpose of the body element: to protect the “heart” of the car from the influence of the external environment and protect it from prying eyes. The hood also has another purpose, albeit a secondary one:
- The aerodynamics of the car to some extent depend on the hood;
- The hood improves air flow to the engine. The air flows directionally and better through special air intakes and additional type of slots made in the hood;
- The hood is able to absorb the hum and slight shaking that the internal combustion engine produces during operation. This is especially noticeable at high speeds.
VAZ 2107 body parts
The connection to the body of the VAZ 2107 is carried out with hinges and bolts. The hood itself consists of 2 panels connected to each other by edge rolling followed by welding. All seams and joints are carefully sealed with mastic.
Note. The hood on the VAZ 2107 can be adjusted. For this purpose, enlarged holes are provided in the hood hinges.
The price of a hood individually, as a rule, does not exceed 2.5 thousand rubles.
At the factory production stage, the inside of the hood is covered with soundproofing material. As a rule, on the “seven” it is a polymer.
One of the modernization methods: installing a deflector
Body parts for VAZ 2107
The hoods of modern cars provide special protection for the windshield and the front of the car. It is called a deflector or simply a “fly swatter”. For the “seven”, the deflector can be purchased separately and installed with your own hands.
The deflector is able to protect the hood well from the adhesion of midges when the car is moving. Because of this, it is popularly called a “fly swatter.” This protection is especially important when driving at high speed.
But this, of course, is not the only function of the deflector. Upgrading the hood in this way can improve the aerodynamic performance of the car and protect the paintwork of the main part from damage. In particular, this applies to the following points:
- The flow of oncoming air after installing the “fly swatter” will go over the windshield, leaving the last element clean. The most important thing is that the wind will no longer interfere with forward movement so much, since most of it will go up;
- The hood itself will be protected from chips and scratches that previously occurred from small stones and grains of sand in the oncoming traffic.
You can easily install the part with your own hands on basic type fasteners, that is, metal plates. The latter, as you know, come with holes and are attached on one side to the deflector, and on the other to ready-made mounts on the hood of the “seven”. See the photo for a standard fastening with a self-tapping screw.
Deflector mounting
The hood of the VAZ 2107 has the following dimensions in mm: 950x70x1420. It weighs about 14 kg. It has one of the important meanings in the geometry of the entire body, although it is a hinged element.
Identification data
The VAZ 2107 car, like any other car, has specific passport data, the liver of which is indicated in the table located under the hood on the air box.
The plate contains information about the vehicle model, engine number and body number, weight data and spare parts number. Above it is the vehicle identification number - VIN.
— The first 3 letters are responsible for the manufacturer’s code;
— 6 subsequent digits are the decoding of the car model;
— A letter or number of the Latin alphabet indicates the year of manufacture of the VAZ 2107 model;
— The last 7 digits are the required body number.
You will find the exact same number in the trunk.
Facing panel (apron) and front bumper
The facing panel or front apron on the “seven” plays more of a decorative role. But besides giving a stylish appearance, an apron also provides many benefits. In particular, thanks to it, during rain, water does not fly directly onto the windshield, but is cut off by this element.
The apron is located directly under the bumper and is a flexible shield that also serves to prevent damage to the front of the car from splashes from under the wheels.
VAZ 2107 body parts
This structural element of the body has special holes for the front bumper brackets and the radiator grille (the latter is attached to it). The apron, due to its “extreme” location (bottom and front), becomes vulnerable to impacts and corrosion. Connected to the body by spot welding.
The design of the "seven" apron must be thought out carefully and correspond to the shape and geometry of the entire car body, otherwise it will simply vomit at high speed. In addition, non-compliance with geometry and design will lead to increased fuel consumption at high speed.
Tuning the apron
The price for a front apron for a VAZ 2107 individually starts from 600 rubles. The part may be of different workmanship, have a different color and different design features.
Front aprons, sold as a separate element of body decor, come with special mounts to the bumper. As for the original Semerovo ones, they are welded, as mentioned above, to the car body.
The rear apron is also required and must have special fastening plates that ensure its immovable condition and prevent it from coming off on the road.
Front bumper
Front bumper tuning
The bumper is not only designed to retain the energy of a frontal impact first, but also plays a significant role in the exterior design of the Seven. In other words, this is a beam located in front and protects the body from damage in minor collisions.
Thanks to modern synthetic-based materials, bumpers have become much lighter and more beautiful than they were before. Thus, elegant bumpers with bent edges also serve as spoilers, increasing the downforce of the car.
Rear bumper VAZ 2107
The front and rear bumpers on the VAZ 2107 are made of plastic or thin metal and have chrome trim. They are mounted using special brackets.
The front bumper is equipped with a platform for attaching a license plate and for this reason is 5 cm wider than the rear one.
Today, the owner of the “Seven” is offered three options for bumpers for the VAZ 2107: plastic, plastic with chrome lining, and with brackets for fastening. The price starts from 600 rubles.
Front bumper tuning
Modernizing the front bumper of the “Seven”, first of all, means improving the appearance. To be honest, the factory bumpers of the VAZ 2107 family look, to put it mildly, fake. They do not carry any visual, or even more importantly, high-quality functionality.
The implementation of the idea of tuning the bumper on a VAZ 2107 (the rear one is also possible) consists in strengthening it with a metal profile of an L-shaped section. In addition, to give a more aesthetic appearance, the part moves slightly from the body.
You need to work with the bumpers removed. Here's what to do:
- Place the pre-prepared reinforcing corner to the bumper and mark the mounting holes, and then drill them in the profile;
- The lower part of the profile bends forward. This creates a fastener for the lower bumper bolt;
- First, the amplifier is attached to the body, then the bumper is attached to it.
As a result, we get a massive bumper that is not afraid of light and medium impacts and looks much more impressive in appearance than the factory one.
Light bumpers for VAZ
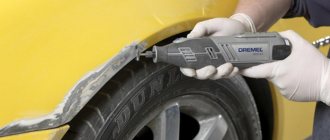
Minor body repairs
Dents, scratches, holes
The front and rear body is reliably protected by a high-quality metal bumper, and therefore almost all minor damage, as a rule, occurs on the side of the wings or doors.
Helpful advice! To carry out the work, you will need to have: automotive putty with a hardener, a primer, 2-3 spatulas of different sizes and hardness, paint thinner, sandpaper of various grain sizes, and, of course, paint and varnish that matches those that were used to paint your car . It’s better to prepare everything in advance; some paint colors can take a long time to find, and all this time you’ll have to deal with an unsightly spot of putty.
Typically, all damage can be divided into several types:
- Scratches. Perhaps the most common “disease” of bodies, especially in big cities or among outdoor enthusiasts. As a rule, they disturb the exclusively aesthetic appearance, however, deep scratches and chips of paint can lead to the appearance of rust , which is much more difficult to get rid of - diligent cleaning with sandpaper is required, in especially advanced cases it can even come down to partial replacement of the element.
- Small dents. Usually - an unsuccessfully opened door or a careless maneuver in the garage. The defect is also more unpleasant to the eye than it somehow affects the general condition of the body.
- Large dents. A minor accident, a part from a shelf that was accidentally dropped onto the hood, a blow from an aggressive pedestrian whose road was blocked by your parked car - all of this ultimately results in a large dent. Usually the paint in such places chips, and therefore defects of this kind need to be eliminated as quickly as possible.
- Breakdowns, cracks. Often occur in areas of large dents. They require immediate elimination, because violate the integrity of the body. The lower parts are especially dangerous - water and dirt will get into them, and if the hole is not sealed in time, you will have to fork out a lot more. Most often in such cases, the damaged part of the body is replaced.
It is very easy to remove small dents and scratches - just clean the intended work area from contamination. If the dent is quite deep, we get to the back side of the body wall and, using a mallet and a wooden spacer, try to level the surface as much as possible with neat and precise blows. The remaining minor defects can be “refined” using a small, light hammer. The hole can be carefully “bent” and filled; in rare cases, it is necessary to weld a small piece of metal from the inside and then treat it with anti-corrosion compounds. When the surface has become more or less even, we proceed to the next stage. Using coarse sandpaper, carefully sand the damaged area. The dimensions of the treated area should be slightly larger than the damaged area. Using a soft, lint-free rag soaked in solvent, carefully clean the cleaned area, removing any remaining paint, old putty, and grease. Now you can apply the first, rough layer of putty. Even for those who are doing this for the first time, it will only take a couple of minutes and a few movements to understand how to do it correctly. The number of layers is made based on the size and depth of the dent.
Helpful advice! The layer thickness should be within 0.5-2mm; deviations up or down will seriously reduce the final quality and durability of the “patch”.
Each layer should dry naturally, and if you don’t want to spend the whole day in the garage, you should level out the dent very carefully at the initial stage. As a result of the work, the resulting “patch” should be about half a millimeter above the level of the paint layer. We wait for the last layer to dry and resolutely take up fine-grained sandpaper. Carefully, so as not to damage the paintwork, we level the fresh putty and “deepen” the work area a little.
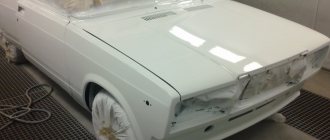
This is what the primary result looks like. All that's left to do is paint it the color you want.
It is very simple to evaluate the result - from a distance of a meter or two, the car body, except for the color, should not differ in any way from its appearance before the damage was sustained. The main thing in the sanding process is not to overdo it, otherwise you will have to reach for the spatula again.
Primer and painting
The next stage is primer. Using a brush or roller, apply the primer in an even, thin layer directly onto the putty. Before application, we strongly recommend blowing off fine dust from the body. We give about 10-20 minutes for the working area to dry and proceed to the penultimate stage - painting. The applied layers should be thin and uniform, and drips and the appearance of unevenness should be avoided by all means. If this is the first painting process in your life, practice on an unnecessary piece of plastic or iron, and if you come across a garage door, you can slightly refresh its interior. The paint should also dry on its own. Now there are many quick-drying compositions on sale, their price is slightly higher than that of traditional paint, but the time saved is usually worth it. The final stage is opening with varnish. Applying a varnish coating is practically no different from painting, with the exception of one detail - if the paint drip could still be “smoothed out” with the next layer and made almost invisible, the varnish will not forgive this. Therefore, before carrying out the final stage of work, it is also worth practicing by covering at least a small patch of anything that comes to hand with a thin layer of varnish. The repair is completed, we leave everything to dry, and in a place where there is no dust and hair, and in the morning we can safely go by car - almost any varnish dries completely overnight and is comparable in strength and resistance to damage to the factory one.
Wings
The front fenders on the VAZ 2107 are a separate body element with an arched cutout for the wheel. They are fastened by welding, although on most modern cars the fixation is carried out using plastic or metal fastening elements.
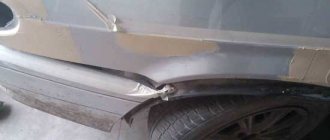
Damaged wing of VAZ 2107
The main task of the wing is to protect against dirt and stones from under the wheels getting into the interior through the open glass when the vehicle is moving. The front wings are located along the engine compartment.
In addition to these functions, the wing plays an important role in the aerodynamics of the vehicle. It is not for nothing that designers working in factories and factories of famous automakers constantly subject this body element to restyling. They try to give the wings the most streamlined shape in order to reduce the rate of counter resistance or CRL.
The rear fender is also attached to the body by welding, just like the front fender. Fixation is carried out to the side of the body, the rear panel and to the floor of the fuel tank (right). To strengthen the wing, amplifiers are standardly installed on the part from the inside. The right wing is equipped with a filler flap for the fuel tank.
Instructions for replacing the front and rear wings on the "seven"
The front wing, due to its location, is often exposed to external influences and is soon damaged. Find out how to replace it yourself. Here's what to do:
- Remove the hood, bumper and other body parts that impede access from the car;
- Identify by eye the spots of spot welding. They are located in the following areas: at the installation site of the headlight, near the engine compartment on the gutter and in the door connection area;
- Take a drill and cut off the welding spots.
Advice. If the drill does not “take” welding, you can use the welding method of tearing off points.
Let's continue:
- Using a chisel with a sharp end, disconnect the points connecting the part to the front of the car, the bottom and the pillar;
- Remove the wing;
- Using a grinder or the same chisel, knock off the remaining parts on the body.
The new wing is installed like this: first it is secured with a clamp and welded in spots, temporarily. The clamp is removed, compliance with the gaps is checked, and only then the part is finally welded to the body.
Wing diagram
With some differences, the wing is castled from the rear:
- First, the trim in the trunk is removed, in the cabin the rear seats are dismantled;
- The wing is cut off with a grinder. In this case, it is recommended to deviate from the factory seam by 1 cm;
- Use strong pliers to grab the remaining metal on the body and remove it;
- Carefully inspect the arch and, if necessary, repair it, with mandatory primer treatment;
- The new wing is installed like the front one.
After welding work, be sure to grind the seams with a grinder and cover them with materials with high protective properties. It is advisable to coat the inside of the wings with anticorrosive.
The cost of a wing usually starts at 850 rubles.
Video on how to repair an apron and replace a wing
Professional enhancement
Now about the professional way to strengthen the body. This implies an increase in weld seams. As a rule, on the conveyor, body parts of the “Seven” are connected using point technology. This makes the body weak and not durable enough. From the same spacers, it may not withstand and fall apart.
By welding additional metal-type plates and reinforcements into insufficiently rigid areas of the body, the overall reinforcement can be significantly influenced.
Front end reinforcement
It is advisable to boil the front end first. You can buy a TV consisting of 2 parts and weld them together carefully. Lay the welds, install the front engine support bracket, add a gusset, install strong crabs.
Front reinforcement
It also makes sense to weld the seams of the side members. From the inside, steel linings will have to be installed on the side members to further strengthen them.
You can make a window outside the spar, and then insert a piece of channel and boil it. Or simply cover the entire spar with metal cladding.
Spar reinforcement
Be sure to strengthen the cups. The seams are boiled, a plate is placed on top of the cup, which significantly strengthens the part, preventing it from tearing when driving over bumps. Both front and rear cups are upgraded.
Cup and its reinforcement
The suspension mounting elements are strengthened. The seams of the slopes are boiled and a gusset is added.
Such professional modernization gives the same significant effect as installing a subframe. Only in this case the weight of the car does not increase and ground clearance is not lost. It is more convenient to carry out this work from the pit.
Reinforcement of the rear body
Now about how to strengthen the back
Particular attention here should be paid, of course, to the beam. This is what should be strengthened first.
In principle, the fastening itself does not raise any doubts about its strength, but welding with the body leaves much to be desired.
We do the following:
- We climb into the salon, where we find this same triangle;
- Cut it out by indenting 5 mm inward;
- Drill out the studs;
- We make an additional steel triangle from 2 mm iron;
- We weld it into the body;
Triangle attachment
We make holes in it for the bolts, on which we place the beam.
Now you don't have to worry about secure fastening. The beam sits firmly, is held on by bolts that can be removed if necessary and replaced. The connection with the car floor is significant, the triangle is reinforced.
As you can see, it is not necessary to contact professional services regarding body strengthening, where the price of the work may seriously surprise you. The instructions presented above, video review and photo materials will give a clear understanding of doing the work yourself. Be patient and careful and you will definitely succeed!
Roof
It is part of the metal body - the basis of the body. The task of the roof is not only to protect the interior from above, closing it, but also to absorb impact energy in an emergency. On the VAZ 2107, the roof is reinforced with cross members that act as stiffeners.
Roof VAZ 2107
The roof of the “seven” is directly related to the overall geometry of the body. After an impact or accident, it is imperative to check whether the roof has “slipped.” To do this, the dimensions of the door diagonals are measured as follows: from the bottom of the rear corner to the top corner of the front. In addition, for things to be more convincing, the diagonal of the roof itself is measured.
The cost of the roof, as a separate element of the body, starts from 3 thousand rubles. Dimensions, mm: 1290x100x1550. Weight – 15.6 kg.
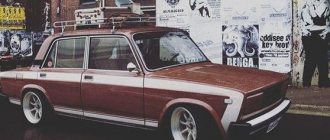
Stylish tuning VAZ-2107 from Poland
European tuners, especially from the countries of the former USSR, also sometimes get nostalgic by tuning inexpensive Soviet cars. But how cool they do it! Look at this brutal, borderline military-style tuning of our “Seven” and tell us to our faces that you wouldn’t give a lot to ride it.
The project immediately captivates with its appearance due to the combination of a matte military olive body color with deep black wheel rims and a VFTS body kit.
And the use of a V8 engine, an ascetic-sporty interior with a safety cage, a huge hydraulic handbrake handle, a sports steering wheel, and a lowered suspension speaks about the drift orientation of the tuning of this VAZ-2107. Fortunately, this is a rear-wheel drive car. It turned out to be a real “combat classic”.
Thresholds
The main purpose of the thresholds is to protect the vulnerable sides of the car body. For this reason, thresholds are often susceptible to damage. In addition, when getting in or out of the car, passengers and the driver periodically come into contact with them, scratching the elements with their shoes. As a result, the paintwork comes off from them, which causes corrosion and rotting.
Hole in the threshold
On the “seven”, the classic replacement or repair of a threshold begins with adjusting the door hinges. If this is not done, then it will not be possible to replace the threshold correctly due to the gap.
After this, the following is done:
- The doors are removable;
- The threshold is cut off (first the outer part, then the amplifier);
Threshold amplifier
- The new amplifier is welded through the holes on it, as in the photo below;
Do-it-yourself threshold installation
- A new threshold is set.
The price for a set of thresholds for VAZ 2107 starts from 200 rubles. The thickness is usually 2-3 mm.
The remaining body parts of the VAZ 2107, such as doors and trunk lid, also have a significant place in the design of the body and its geometry.
Each of the body elements of the “seven” has its own ID number, casting pattern and thickness. So, for the roof - 0.9 mm, and for the rear wheel arches - 1 mm.
What can be changed in the “Six”
If you have a Six, tuning can be done in various ways - it all depends on how much money, effort and time you are willing to spend on it. One of the simplest and most accessible means is airbrushing - many people do tuning of the VAZ 2106 using a creative approach and brighter colors.
Tuning a VAZ 2106 is done by changing the design of the car's hood, installing a new plastic body kit, and choosing alternative optics instead of standard ones.
There are very interesting and unusual solutions in this regard.
Tuning a VAZ 2106 car
The upholstery of a car can completely copy that of a limousine - for this, some owners choose velor or velvet.
The dashboard is designed in the same spirit - it looks unusual and vintage. It even has a small TV with a kinescope built into it. The sound system speakers are located above the driver.
We talked above about how optics can be improved - in the video you can see how it looks on the “Six”
Do-it-yourself tuning of VAZ-2170 Lada Priora
Standard linear/geometric dimensions of the VAZ 2106 body
| Dimensions of front/rear door openings diagonally, mm | 1273/983 (plus/minus 2 mm) |
| Distance between the posts (from the centers of the upper hinge links to the opposite pillars of the openings in the center of the door lock latches) front/rear, mm | 889/819 (plus/minus 2 mm) |
| Distance between central pillars without upholstery (measured at 270 mm from the bottom of the opening), mm | 1397 (plus/minus 2 mm) |
| Dimensions of window openings (wind/rear), mm | 1375/1322 (plus/minus 4 mm) |
| Diagonal dimensions for the hood opening, mm | 1594 (plus/minus 3 mm) |
| Diagonal dimensions for trunk lid, mm | 1446 (plus/minus 4 mm) |
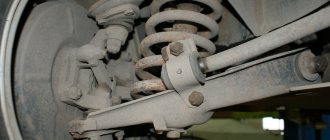
Tuning the suspension of the VAZ 2107
The main goal of tuning the front and rear suspensions is to increase their rigidity.
Rear suspension tuning
To increase the rigidity of the rear suspension, springs, rubber bumpers, silent blocks, and shock absorbers are changed.
Particular attention is paid to springs. When increasing rigidity and power, they should retain the outer diameter of the original
Springs from the VAZ 2121 or VAZ 2102 meet these requirements (they are two turns longer, so they need to be shortened). You can select and install springs from foreign cars, but it will be quite expensive.
When tuning the rear suspension, shock absorbers, springs, silent blocks are changed, and for sports competitions, additional stabilizers are installed to increase the car's stability when cornering.
Selecting new shock absorbers is not difficult, but they must also meet the required characteristics. Sometimes, to give the car stability when cornering, additional stabilizers are installed on the rear suspension.
Front suspension tuning
Most often, in the process of tuning the front suspension on the VAZ 2107, gas-oil shock absorbers are installed. They have greater rigidity and reliability than conventional oil ones, and have an increased service life. Also a good option for tuning the suspension are shock absorbers with a fixed rod, which are stiffer than their counterparts with a fixed body. Silent blocks are usually replaced with polyurethane ones, designed for increased loads. And finally, the bump stops should also be replaced with more reliable and powerful ones.
To increase vehicle stability when cornering, an additional stabilizer is installed
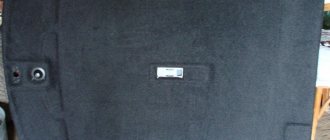
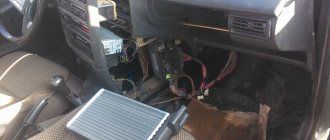
Logbook VAZ 21074 (2006)
Hi all! So, let’s finish with the bottom; before all the work, I jacked up the car and washed it with a mini pressure washer with chemicals. In general, the factory plastisol coating is still in place, but is already cracked in places and there are small chips with rust.
In the back, where there are niches for the spare tire and the gas tank, not everything is so rosy; under the previous owner, the rear was involved in an accident. At the very least, the wing and tailgate were replaced, although, judging by the tacks from welding, it seems even both. On the right, where the gas tank is basically intact, there are only a couple of “extra” holes.
On the left, where the spare tire is, corrosion has noticeably taken its toll, you can see the wheel through the gap, and the “skirt” is well caught (more on that next time). I had already processed the inside of the niche for the spare tire a year earlier.
Since there was no time left for repairs, I decided to leave these places for next year; I may have to weld another patch or even completely cut out and change the wheel well.
First of all, I decided to paint over the burn marks by welding - there are four of them: two in front and two in the back near the jacks, one more in the rear left wheel arch.
I cleaned everything with a grinder with a petal wheel,
I degreased it and, since the metal was clean, painted it according to the scheme: epoxy primer - insulating primer - rust paint, although ordinary enamel would have been suitable, but I had a can of green paint lying around.
After complete drying, instead of anti-gravel and plastisol, I coated these places with a hybrid sealant, which was used in the anti-corrosion test: it resembles a thick paste, has good adhesion, let’s see how it behaves on the bottom.
Well, in addition I went over it with bitumen mastic from a spray can.
At the rear left, the threshold had rotted outward at the place where the jack was welded, so it was only possible to weld it from the inside of the cabin, but there was no way to get through from the outside unless you cut off the jack itself. Therefore, I decided not to touch it for now, and also paint it, maybe I can cover it with something later so that the dirt doesn’t get into the threshold.
Since touching up every chip on the bottom is a futile exercise, and everything is covered in microcracks, I decided to treat it with fully heated gun lard, in theory it should soak the whole thing.
I’ll say right away that it’s a rather dirty task, and since the lard hardens quickly, it’s better to warm the bottom with a hairdryer or heat gun, but they weren’t available. I think it’s normal, it should spread.
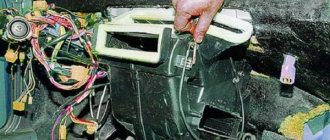
Then I removed the rear fender liner and also processed the arch. Oddly enough, the butyl tape with aluminum tape that was glued two years earlier to the hole in the threshold did not come off, so I did not remove them.
Here, too, the rust began to take its toll; I didn’t paint it, I just removed the loose rust and also coated it with pushsal.
A wheel rubbed a hole in the fender liner - I degreased it and sealed it with the remaining piece of vibra from the gluing.
Well, to prevent dirt from getting clogged again in the cavities of the bottom reinforcements, I inserted rubber plugs from the “8” with a diameter of 3 cm into the holes, they fit perfectly.
I moved the spars last year, so I didn’t process them.
I will write separately about the “skirt” and body work.
So, let's do the math:
- Pushsalo 1kg - 50rub
- Brush - 40 rub.
- Paint, sealant - 200 rub.
- Bottom plugs 2108-5112090 2 pcs. — 30r
Total: 320r
Subscribe! Good luck on the roads!