And now you’ve finally bought your first car, you’re stuck in a traffic jam and slowly realize that you’re not the only one and a good half of car enthusiasts still own a “ten.” After a while, you begin to see cars of exactly the same color, with exactly the same rims as yours.
What to do? There is no money for a new car yet, but you have hands that can make a “candy” out of a car. And how to do it? The answer is obvious: tuning. It was this word that firmly entered the domestic lexicon back in the last century, when non-standard parts for production cars began to appear. Tuning implies modification of the engine, interior and exterior from small details to the point of unrecognizability of the brand of your car.
This article will discuss such a process as tuning the interior of a VAZ 2110 car.
Replacement of VAZ-2110 seats
As a rule, the seats are the first place tuning begins. , to put it mildly, do not create a feeling of comfort. And if you are also a fan of fast driving, then you definitely need sports seats. Seat tuning options:
- The most budget option is to remove and modify the installed seats. You can completely remove the trim, replace the inserts, order a new cover from a sewing workshop and install updated “seats”.
- The second option is to install new seats to replace the old ones. At the moment, there are many non-original replacements for factory seats. An even better option would be to buy seats from some damaged foreign car that is being sold for spare parts - but in this case, you will most likely have to redo the fastenings.
Among other things, you can install electric drives and heated seats, which will certainly increase driving comfort.
Door upholstery and ceiling update for VAZ 2110
Do-it-yourself tuning of the VAZ 2110 interior also involves updating the ceiling and replacing the door trim. Be sure to take care of the design before starting such work - come up with a color scheme and draw new elements on paper to avoid awkward laughter from the passengers in your car.
Reupholstering the ceiling is a rather labor-intensive and costly process, so car owners are increasingly choosing the painting option. For this option, you will need to purchase paint in cans, degrease the ceiling and apply a new color. Be careful not to let the paint get on other interior elements. After this, it is necessary to ventilate the car for several days, so this procedure is best performed in the warm season.
As for the door upholstery, painting is not enough - you need to remove all the decorative inserts and cover them with fabric of the color you specified in the design project.
Why does rust appear? Preventive measures
The first line of VAZ-2110 sedans was released in 1995. The problem with these cars was the paint peeling off near the windshield. At the next stage, the rust spread to other body elements. Given the scale of the problem, AvtoVAZ changed its paint application technology. Despite the innovative approach to painting, the problem of rust could not be eliminated. The table shows the main causes of corrosion, as well as current preventive measures.
When applying anti-corrosion substances to the surface of the body, the sills and cavities of the side members must be treated especially carefully.
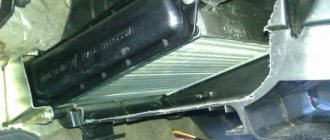
Soundproofing VAZ 2110
When replacing door trim, combine this process with the installation of noise-insulating pads. To do this, you will need to buy a special material, colloquially called “Shumka”, and carefully glue it to the inside of the door. It is best to glue it to the metal part of the doors - this, in addition to sound insulation, will help retain heat in the car.
If you want to make high-quality sound insulation, then you will need to disassemble almost the entire interior of the car. This will make it possible to glue the space under the seats and mats, the places where wires and pipes exit from the passenger compartment, the place where the gearshift lever exits, etc. If you do not use a subwoofer and do not transport large cargo, then you can soundproof the trunk of your Lada. Tuning the interior of a VAZ 2110 at home allows you to make sound insulation so high that passengers will be surprised at the absolute silence while they are in the cabin of your “ten”.
Operating modes
You can configure the heater operation manually or automatically. That is, you can set the temperature sensor according to your wishes, for example, at 22°C. If everything is in order, then the manufacturers promise that the deviations will be no more than 2°C, after which the relay will turn on the heating again, and after reaching the specified parameters, turn it off. But if failures occur, then after checking the functionality, it is quite possible that the sensor or relay will need to be replaced.
You can set the automatic mode. For this there is a special screw, the so-called tuning screw. It is advisable to make adjustments with the windows and doors closed. The fan handle should be in position “A”, and set the temperature at your discretion.
Take a test thermometer to the salon. If after 15 minutes the temperature does not correspond to the specified parameters, then you need to remove the controller from the socket and turn its adjustment screw. Clockwise to increase the temperature, counterclockwise to decrease it. If this does not help, then the sensor needs to be replaced.
SAUO block without panel
In addition, you may need to install a new control unit, or even tuning the entire heating system.
Other accessories for tuning VAZ 2110
In the list of pleasant little things that can complement the interior of your car, you can find many parts sold in every car store:
- The pedal covers are a nice and inexpensive addition. In addition to appearance, they add comfort when pressing the pedals.
- Dashboard – You can replace the priors or move them outside the dashboard. Many tuning enthusiasts completely replace it with the dashboard from other cars.
- Torpedo. To modify the entire front panel with your own hands, you need to be a sculptor. Therefore, the only option in this case would be to buy a tuned dashboard and paint it in a different color to match your design.
- Acoustics. This is a topic worthy of special attention - acoustics do not add comfort or appearance. Acoustics add sound!
- Steering wheel. A non-original steering wheel on a VAZ-2110 is a fairly common occurrence. There are a lot of options for this product on the shelves of auto stores.
The above accessories are not all that can be used in such a matter as tuning the interior of a VAZ 2110 with your own hands. Photos and videos on the pages of online stores of car accessories can acquaint you in more detail with all the options for interior modifications - look and choose.
Eleventh model
Tuning a car with your own hands also gives interesting results - here the owner with his imagination also has a lot of space to make adjustments. We start with the simplest and most accessible means, for example, airbrushing - sometimes even just with its help you can completely change the appearance of the car.
However, there is an even simpler and cheaper way - this is covering the car or its individual parts with vinyl film. Today you can easily purchase vinyl in a variety of finishes - gloss, matte, carbon, protective, etc. Pasting with film is carried out without any particular difficulties - the main thing here is to understand the principle and adhere to the technology.
From such a film you can also create applications of an aesthetic or advertising nature.
Tuning VAZ 2111 using film
Improving the trunk is necessary not only to improve the exterior, but also to improve performance.
Alternative optics mean a lot - they are needed not only to make the car look impressive on the road. By installing new headlights, you provide yourself with adequate illumination of the road at night and thereby reduce the risk of a dangerous situation on the road.
In the cabin, install a new sports steering wheel - this will increase driving comfort and increase the level of aesthetic pleasure.
The instrument panel can be covered with film - this will make it look much nicer.
Illuminated seat belts and locks
You should pay attention to the possibility of changing the car interior by installing backlighting for the seat belt, handles and locks. Such changes are not only attractive, but quite useful - you can simply find a belt, handle or lock in the dark. In our case, we use a red backlight.
It is quite attractive at the right time and gives the interior a sporty look. In order to carry out the modernization in question, you should purchase some elements:
- Resistors and drivers.
- Wires, the length of which is 1 meter.
- LEDs in the amount of 4 pieces.
- Thermal gun and insulating material.
These consumables can be purchased at a fairly low price.
The job of creating the backlight consists of doing the following:
1. Tuning the VAZ 2110 interior begins with dismantling work. The seat belt buckle can be disassembled by unscrewing the bolt. Please note that there is no need to dismantle the seats. The structure is disassembled by slightly expanding the body using a knife or thin steel plate or screwdriver. 2. After completing the dismantling work, the LEDs should be attached. Fixation is carried out using special glue. In this case, the cable is also fastened using the method in question. 3. We check that these elements do not interfere with the functioning of the belt. Otherwise, modifications will need to be made. 4. If nothing interferes, then you can reassemble the structure in the reverse order. 5. In order to significantly increase the service life of diodes, you need to use resistors when connecting. 6. Quite a lot of problems are caused by wiring connections. It extends under the seat, then into the tunnel. 7. The diodes are connected depending on the needs.
The above points should be taken into account when considering how to change the interior by installing lighting. Tuning the interior of a VAZ 2110, carried out by installing LEDs, does not take much time.
| Engine | 1.6 l, 8kl (Euro-2) | 1.6 l, 16cl (Euro-2) | 1.6 l, 16cl (Euro-3) |
| Load capacity, kg | 475 | 475 | 475 |
| Luggage compartment volume, dm3 | 450 | 450 | 450 |
| Permissible total weight of a towed trailer with brakes, kg | 1000 | 1000 | 1000 |
| Permissible total weight of a towed trailer without brakes, kg | 500 | 500 | 500 |
Installation of steering wheel from Vesta
Another quite popular way to change a car is to install a non-standard steering wheel, for example, from Vesta. The approximate cost of the design option that was obtained after analysis is 7,500 rubles.
At first glance, the changes in question are quite simple to implement. However, it is not. The fact is that the diameter matches, but the spline pitch does not match. That is why it is practically impossible to do without more thorough revision. Please note that the bushing located on the steering wheel is made of a fairly soft alloy. However, the steering shaft is made using stronger steel. In this case, a simpler solution is to press the steering wheel onto the steering shaft - the softer bushing is deformed, and the steering column can withstand the force exerted.
The work procedure is as follows:
1. To begin with, set the steering wheel to a level position. In this case, you should make sure that most of the splines match. This point will significantly simplify the pressing procedure. 2. After several blows, the softer alloy is applied and the steering wheel is mounted on the steering shaft. 3. The next step is to screw the steering wheel using a nut. The clamp is held with a wrench. 4. After this, you should remove the steering wheel back. In the place of the splines that do not match, there will be notches. They should be partially cut down using a file. 5. After carrying out such work, you should put the steering wheel on the steering shaft again, after which, if necessary, the procedure is repeated.
Work should be carried out until the steering wheel is firmly attached to the shaft. The metal can be removed quite easily, as it is soft. The whole procedure will take a little time.
What is the thickness of the metal on VAZ cars?
Passive safety
Passive safety (the property of reducing the severity of an accident) is ensured by: high strength of the body, which prevents its deformation in accidents; seat belts; adjustable head restraints that prevent injury to a person’s neck from a rear impact; safety steering wheel; safety glasses; wide doors, creating the possibility of exiting the car that has suffered an accident; fire-resistant materials.
In passive safety, attention is paid to car windows, including the windshield. During an impact, the windshield must remain solid, for which special technology is used in its manufacture
Side windows also have special requirements - they must break, but not leave fragments with sharp edges that can cause significant harm to health.
The car body must be designed so that in the event of an accident its structure remains intact. In case of an accident, the pedals should not go into the cabin, and the same with the steering wheel, so as not to injure the driver’s chest. After a collision, doors should open easily, door locks should not jam so that victims can be reached. Even if the car is completely destroyed, the power structure must remain intact; the passive safety of the car depends on this.
When creating a new car, passive safety is laid down not only for passengers and the driver, but also for pedestrians. When hitting the latter, the car should not seriously injure them, but rather reduce the consequences of the collision. For this purpose, “kanguryatniks” and powerful steel pipes in front of the car are prohibited. The hood of the car is made with special pyrotrons, which lift it when it hits a pedestrian. The car bumper is also made from special materials that would not injure pedestrians.
Active safety
Active body safety (the ability to prevent accidents) is ensured by: good visibility in all weather conditions; protecting the driver's eyes from glare from sunlight and headlights; good visibility of control instruments, comfortable fit, good thermal insulation of the body; creating an appropriate microclimate inside the cabin.
Active safety includes all kinds of electronic assistants that make driving easier. These include the ABS system, which prevents wheels from locking on slippery roads; exchange rate stability system, which prevents the car from skidding; auto braking systems, as well as EBD, BAS systems and many others.
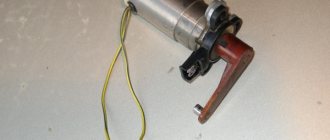
Installation of electronic seats
Another way to carry out interior modernization work is to install electrically adjustable seats. You can install the electric mechanism yourself quite quickly, the procedure will not lead to large financial costs. The work can be carried out for all VAZ cars with front-wheel drive.
The modernization work looks like this:
- First you need to select the necessary parts. To change the seats, you will need a power window, a 10A fuse, buttons for adjusting the position of the backrest and a sufficient number of wires to transfer voltage from the source to the installed motor.
- You can tune the interior of a VAZ 2110 yourself: first, we disassemble the window regulator: gearbox, iron disk - these elements are necessary in order to rotate the entire mechanism being created.
- The design should be slightly changed, for which a hole measuring 14 by 10 millimeters is created.
- Next, we install the entire structure on the seat. In this case, the metal part of the mechanism should be directed towards the seat. The metal part is modified by creating a 13 mm hole in it. The metal bolt that is initially present must be removed.
- In order to eliminate the possibility of damage to the mechanism, it is worth protecting it with a special casing. It can be made from plastic.
- The buttons can be placed in any most convenient place. As a rule, the button block is moved to the central dashboard near the seats. The choice of location for the block of buttons should be taken seriously, since if they are poorly positioned, a lot of inconvenience will be created.
The above work requires the skills to connect the energy consumer to its sources. Be sure to include a fuse in the circuit, which will eliminate the possibility of the motor burning out.
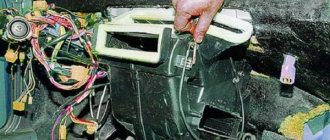
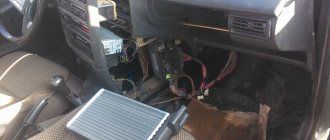
Panel device
A lot of car interior lighting is located in the dashboard. The process of replacing it is one of the most difficult. To carry out work on the dashboard, you must:
- To carry out work with electrical wiring, you should be safe and disconnect the negative terminal from the battery.
- The steering column covers are decorative. They need to be separated from the dashboard.
- The car steering wheel is removed. The horn plate remains unchanged.
- The switches that are located under the steering wheel must be separated from the vehicle.
- When disconnecting them, you will need to disconnect the wires and their connection element.
- The headlight range control has a regulator (a specific position switch). It needs to be dismantled.
- The next step is to unscrew the nut, which is located under this regulator.
- The mounting block is opened.
- This opens access to the location of the fuses (they can blow out, and therefore it is necessary to check their serviceability) and the relay block. It may be enough to replace them. Here you need to unscrew the screw securing the bracket. It is located on the left side.
- The wiring block is disconnected from the ignition system. It is also necessary to unscrew the screw that secures the bracket.
- The tips, two in number, are disconnected from the brake signal switch.
- The console trim has two screws. You need to remove them from the car.
- The console bracket is released.
- The screw securing the instrument panel and air duct must be unscrewed.
- The panel wire mount is disconnected from the rest of the power supply system.
- The immobilizer sensor must be disconnected, namely its wires.
- Similar actions occur on the right side of the panel.
- The nut securing the bracket is removed.
- The wires coming from the cigarette lighter are disconnected.
- The same operation must be done with the fog lamp wires.
- The glove box has a bolt at the top. It must be removed from the connector.
- Both screws of the lower fastening of the instrument panel are unscrewed.
- The seal is removed from the front left pillar.
- Plastic holders are dismantled.
- The same technology is applied to the right pillar.
- The ventilation grilles are removed.
- There are two bolts underneath that need to be unscrewed and removed.
- The dashboard extends slightly, about 10 centimeters, into the interior.
- Once the instrument panel remains in the cabin, you need to disconnect the remaining wires near the left door pillar and next to the steering column.
After completing these steps, you can safely begin replacing sensors, backlights and other components of the dashboard. The assembly process occurs in the opposite order of disassembly. The corresponding video and photo will help you do everything right with your own hands. Of course, if you do everything as the instructions require. Parts, light bulbs, fuses, etc. can be purchased at a special store. The price for them is not too high. You may have to spend time selecting parts. Their diversity can lead to a lot of different situations. Sometimes, parts simply do not fit a particular mechanism. The best option would be to use an old part as an example.
Wireless charger
Modern business class cars have many useful options, for example, wireless charging of a mobile device. Many people have phones that are charged from a special unit. You can make a similar base yourself in the car in question. Let's consider all the features of such a modification.
Wireless power supply occurs via the QI channel. This standard can be used to transmit energy over a distance of up to 4 centimeters. The technology involves transferring energy between two induction coils.
A fairly popular option for installing wireless charging is to embed the unit into a tunnel. In this case, the mobile phone will be charged almost constantly, and the phone can be picked up during a call quite quickly.
In order to tune the interior of a VAZ 2110, you will need the following parts:
1. A charging module that transmits current according to the standard in question. 2. A converter that can lower the voltage from 12 V to 5 V. 3. A heat gun that will be used to mount the power supply.
Please note that the charger model is powered from a 5 V network. That is why the connection should be made through a converter. You can create a special niche for the charging module, which will eliminate the possibility of the phone slipping while turning. The mobile phone power base is attached to the base using thermoplastic. In order to monitor charging, you can display the LED in a visible place.
In a similar way, you can create a special unit to power a mobile phone. You can also purchase special holders that are designed for charging a cell phone in a car. However, their use is quite inconvenient.
VAZ 2109: remodeling the interior on your own
- 1 Pros of remodeling
- 2 Material 2.1 Alcantara 2.1.1 Advantages and disadvantages
2.2 Leather 2.3 Velor 2.4 Carpet 2.5 Vinyl 3 Upholstery and its technology
- 3.1 Sequence of operation 3.1.1 Covers
3.1.2 Doors 3.1.3 Armrests 3.1.4 Ceiling 4 Detailed algorithm for reupholstering the ceiling with carpet
VAZ 2109 interior modification VAZ 2109 interior modification - this will be discussed in our article. As a rule, tuning or alteration of the interior of a VAZ car is done due to individual needs. The interior trim of the VAZ 2109 is often changed. You will learn about this and much more from our publication.
Installing additional keys
Please note that additional control units may be required when installing additional accessories. It is possible to install keys on the central panel. This can be done quickly and easily.
The procedure for performing the work is as follows:
1. The front panel is disassembled. 2. Excess plastic is cut off. 3. The edges of the frame are processed to a minimum size. 4. To place the keys, you should create a special base made of plastic. 5. In order for the structure to be sufficiently rigid, stiffening ribs should be created. 6. Buttons can be taken from any car. It is worth noting that, if necessary, you can make the buttons backlit as an indication. 7. If necessary, you can repaint the color of the key to match the interior design.
The result of the above changes is a significant increase in the functionality of the car interior. The keys can be responsible for various additional functions. If necessary, you can create a niche for a multimedia system, which will be responsible for many functions in the car: playing music, watching videos, navigation, and so on. You can purchase various multimedia systems, the cost of which varies from several tens to hundreds of dollars. If necessary, you can modify the front panel almost beyond recognition.
In conclusion, we note that before carrying out work you should always create a work plan. It will eliminate the possibility of problems and errors during tuning.