The owner of a car comes to the conclusion that he needs painting in two cases. In the first case, he decides to carry out this operation when the deterioration of the old varnish and paint coating has reached its maximum extent. In the second case, the VAZ 2106 is painted by a car enthusiast during body repairs.
Paint selection
First of all, you need to choose a paint, and here various options are possible. VAZ 2106 cars are most often painted with acrylic or metallic paint. The choice of paint can be influenced by the result of a simple test. To carry it out, wipe an inconspicuous part of the body with a small piece of cloth soaked in a solvent. The appearance of paint on this rag indicates that acrylic paint was used to paint the car. If a piece of material remains clean, then the top layer is varnish. The technology for applying acrylic paint is quite simple. Many car enthusiasts prefer this variety when painting their car.
Why you shouldn’t delay restoring paintwork
Technical service technicians recommend checking the condition of the car’s paintwork at least once every two weeks and inspecting visible parts of the body every day when getting behind the wheel. Any damage to the outer layer must be repaired immediately, regardless of whether the varnish on the paint has peeled off or significant deformation has appeared after mechanical damage. Let's look at why it is necessary to restore the paintwork layer quickly:
- If the varnish has peeled off, in addition to an unaesthetic appearance, the defect threatens complete peeling of the transparent coating due to penetrating air and moisture.
- Moisture penetrates through a crack in the paintwork within 24 days, which is the main cause of corrosion.
- Unrestored microcracks lead to paint peeling, dirt gets clogged into them, moisture penetrates; if the anti-corrosion coating is damaged, then the repair will require a complete repainting of the car body.
Preliminary work to prepare the car for painting
Directly painting a car with your own hands takes 1/10 of the time spent on the entire operation, and the remaining 9/10 is occupied by preparatory work for painting. They represent the following sequence of actions:
- The first step is to clean the car from dirt, dust and grease stains using detergents and white spirit. Gasoline and solvents should not be used for this purpose.
- Then you need to remove from the body all parts that may interfere with painting. To do this, both bumpers, all headlights, the radiator grille, all devices for outdoor lighting, and antennas are removed.
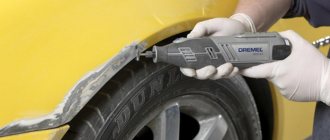
- The next step is to clean up surface defects on the body. In good lighting, dents, chips, and scratches on the car's surface are identified and marked. Using a chisel and sandpaper, clean the marked areas to the metal surface. After completing the operation, remove dust again using a piece of cloth soaked in white spirit.
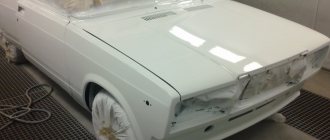
- Next, the surface is primed with a two-component acrylic primer, and all defects are puttied with polyester putty and primed again.
- We sand the primer with sandpaper and move on to painting.
Painting with acrylic paint
Painting can be done by hand. When performing this, three layers of paint are applied. The first layer is the thinnest and is the basis for the next one; the third layer is slightly diluted and applied not as thoroughly as the previous ones. Varnishing will improve its quality and give greater depth of color. To successfully complete the work, you need to wait until the surface is completely dry and sand it with fine-grained sandpaper. When painting a car yourself, apply the paint using a sprayer.
The main concern when performing work is protective measures against dust ingress. For this purpose, use paper or medical tape.
Reverse hammer device
There are several options for the reverse hammer structure:
- vacuum;
- with pneumatic pulling mechanism;
- devices with multiple weights;
- models with an adhesive base or replaceable nozzles.
The first of the presented types has a unique advantage over similar devices. The vacuum suction cup allows you to carry out repair work without damaging the paintwork. Depending on the power of the vacuum reverse hammer, it is possible to pull out small and medium-sized damage on various parts of the body. However, when working, it is necessary to follow a special technology: pulling should be done from the edge of the damage to its center. Otherwise, a dangerous stress for the metal arises, which can lead to fracture or unpredictable deformation.
Pneumatic reverse hammers are convenient because they require reduced effort when performing work. Another area where this tool is indispensable is work under the hood, including removing stuck parts.
A homemade reverse hammer can be built from the simplest components:
- a metal rod of suitable thickness and about half a meter long;
- steel washers of the appropriate diameter for installing stops;
- weights to increase impact force;
- rubber handle (can be replaced with any other convenient material);
- a hook or a metal plate with a holder - depending on the design of the intended hammer.
The condition of all components determines whether grinding and cleaning of metal parts will be necessary. To do this, you can use sandpaper or a metal grinding disc, and special compounds can also be useful. The design features will determine whether a welding machine is needed or only a thread cutting device is required. However, most often it is impossible to do without welding, since it is better to secure the lock washers to the rod of the reverse hammer using a reliable seam.
Metallic paint
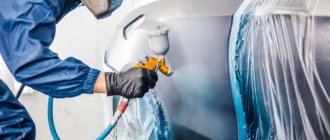
Metallic painting technology has its own characteristics, which consist in the fact that a layer of varnish is applied to the main paint coating. The name of the paint is due to the fact that aluminum powder is added to the varnish. Thanks to its presence, the effect of polished metal occurs. At the same time, the varnish clearly reveals all the flaws made during the preparation process, which indicates the need to carefully carry out all preparatory operations. The surface is varnished in 2-3 layers using the same paint gun. Wash it thoroughly before use.
Airbrushing VAZ 2106
Airbrushing is one of the ways to paint a car. Airbrush is a method of applying various images to the body of a car. Made by a talented artist, they turn the car into a true work of art. The unique designs allow it to stand out from the crowd of similar VAZ 2106 cars, making it original and unique. In addition, it makes no sense to steal such a car, since it will be quickly found.
Airbrushing performed on a VAZ six is no different from standard painting work, except for one thing. The difference is that the preparation is done with greater care and diligence. Of all the methods of obtaining a pattern, preference should be given to the method of applying it using an airbrush. It is a small spray bottle for drawing thin, clear lines. The design is obtained by applying at least five layers of paint, and each layer is dried at high temperature.
Methods
It is important for the master to know all the methods of painting under camouflage. There are two main methods
Stencil
– the design is applied using special stencils. The drawing turns out quite beautiful. But at the same time, it is even and does not always cope with its camouflage task.
Manual
– the drawing is done using a brush. This camouflage is the most successful. It turns out to achieve a perfectly blurred texture.
The second method of application is the most difficult to produce. It is used to create hunting camouflages. Other species are created a little less frequently using this method. For digital protective painting, it is best to use the stencil painting method.
When and where to paint?
The most optimal time is summer. It’s better for the paint to go on and dry at just such a time. In winter, you will need a warm, dry room for painting. The box must be well ventilated.
Be sure to eliminate all possible sources of dust. Otherwise, the coating will not be effective.
Preparing the car for painting
With prolonged use, any car loses its attractive appearance, shines less and is no longer as pleasing to the eye of its owner. Atmospheric factors and mechanical stress damage the paint layer, so there is a need to renew it.
Repainting a car is quite difficult. But if you take this responsibly and prepare well, the result will exceed all the owner’s expectations.
The painting process consists of the following steps:
1. Preparation.
There are two options for painting a car - completely and partially. Accordingly, the level of preparation should be different. Here you can learn in detail how to perform local painting to hide scratches and chips on the car body.
At this stage you should purchase the necessary tools:
• Abrasives – for removing paint and cleaning surfaces; • Spatulas – for applying the base; • Spray gun (paint gun) – spraying paint onto the car body; • Compressor – pumps air into the spray gun.
It is better to choose a room for painting that is spacious and well ventilated. It is worth making sure that it is dry, warm and clean. If the first two factors affect the drying time of the paint, then cleanliness is a condition for the quality of the result.
2. Identification of problem areas on the body.
Before painting, you need to meticulously inspect the car and objectively assess its condition. Which places need to be prepared especially carefully, where is it better to paint and what kind of work will be needed in each case.
Let us remember that in the previous article we talked about the capabilities of parking sensors with a rear view camera. Read more on our website.
3. Carrying out welding work.
It is possible that some damage will have to be welded, this applies to rusted areas, deep cracks and chips. If necessary, special metal “patches” are applied.
4. Cleaning the body with abrasives.
A special abrasive wheel is applied to the grinder, which levels the surface of the body. Welding areas are treated with special care.
5. Applying putty.
A universal type of putty suitable for applying minor damage to areas. For more serious scratches, putty with large fragments is used, which is applied in two layers. The strength and flexibility of the spatulas will create a smooth surface and save application time. Therefore, it is better to choose names that are more expensive, but suitable.
6. Surface grinding.
Leveling is done with a soft abrasive wheel to prepare the body for priming and painting.
7. Body priming.
A base coat should be applied underneath the paint; it prevents the paint from spreading and ensures even distribution.
8. Direct staining.
The paint must be applied carefully, in even layers, to avoid smudges, covering areas that cannot be painted.
Choosing a compressor and a spray gun is the key to correctly and beautifully painting your car. Therefore, it is better to buy a compressor that is more productive, at least 1.5 times higher than the consumption of the spray gun. You also need to know the values of its volume. For example, a volume of 100 liters. – this is a continuity of 15-20 minutes of painting. The larger it is, the faster the process occurs.
The spray gun is also used for priming, the quality of which depends on the size of its nozzle. Values from 1.3 to 1.5 mm are the best option, but if there is a large amount of work to be done, nozzles with a diameter of 1.6 - 2.5 mm are suitable.
It is important to know that before you start painting, you need to try the paint on a special surface, adjust the intensity of application and adapt to holding the tool.
Video. How to prepare a car for painting
What will you need?
To learn how to airbrush on walls, you will need the following tools:
- An airbrush is a gun with an adjustable paint supply. Simple models are equipped with only one button. In more complex modifications, this button also controls the air. With this tool you can easily change the intensity of surface coloring. The size of the nozzle is of great importance for the quality of the image: to work out small details, a diameter of up to 0.3 mm is required, for the design of large paintings - 0.5 mm and above.
- Compressor (pumps air under pressure to spray paint). There are several types of compressors, the simplest is the membrane one, but it is quite noisy. For large volumes of work, a silent oil-piston apparatus is often used. Additionally, you may need a compressed air receiver.
- Elastic hose for connecting the airbrush to the compressor.
- Set of paints.
- Containers for mixing paints.
- Additional tools: pencils, crayons, adjustment brushes, masking tape and cotton swabs.
- A stencil made of cardboard or other material.
Characteristics and painting of the VAZ 2106 body
The well-known VAZ “Six” car is famous for having a relatively comfortable interior and good load-carrying capacity. This combination of convenience for passengers and economic value makes it an indispensable assistant. Available and inexpensive spare parts create conditions for its maintainability and significantly expand the possibilities for restoring this VAZ vehicle. But, unfortunately, the body of this car is highly susceptible to corrosion, which, in turn, gives rise to serious difficulties and entails considerable costs.
Body characteristics
The body features of a particular VAZ car are inextricably linked with its design, after studying which we will be able to give a correct assessment and draw conclusions. Let's analyze some important qualities:
Everything is learned by comparison, so we will compare the characteristics of this model with similar qualities of other VAZ models.
Strength
It is known that the classic body has high strength. If we compare modern foreign cars and the VAZ 2106, the steel thickness of the second is an order of magnitude greater. Comparison of the consequences of the accident can serve as visual evidence. The body of the foreign car remains the most deformed after the collision. In addition to thick steel, the body of the classic VAZ is difficult to deform due to its angular shape, since bending creates additional rigidity. For example, try bending a sheet of metal profile and a regular, straight sheet of the same metal. It is clear that the second sheet will require less force. If we compare the 2106 with front-wheel drive VAZ models, the latter will lose in strength.
steel grade
The body of the classic VAZ is made of low-carbon steel 08. It bends well and takes any shape. The composition of this steel allows the widespread use of welding for its installation. One of the characteristics of this steel is corrosion resistance. However, in comparison with modern foreign cars, the classic body rusts faster.
Aerodynamics
Unfortunately, the VAZ six has nothing to boast about here. Even the naked eye can see obvious flaws. Aerodynamic drag is measured by a coefficient of 0.546, which is significantly inferior to similar indicators of other VAZ models, not taking into account SUVs. The design of the classic 2106 body makes this VAZ car with very steeply positioned windows, creating significant resistance to movement.
The body of the 2106 is much stronger than front-wheel drive and especially modern foreign cars, but it is also much inferior to them in aerodynamics.
However, the VAZ 2106 can develop good speed due to its rather powerful engine. Still, this car is more suitable for business needs.
Body painting
Body repair of domestic cars is common. For this reason, many specialized auto repair shops have appeared that can perform work of varying degrees of complexity, naturally, for a certain fee.
But you can restore your VAZ yourself without resorting to services and saving a significant amount of money. To do this, you need to have the appropriate knowledge and skills, which can be acquired on the Internet or from a familiar bodybuilder.
The second, of course, is better, because you can gain not only theoretical knowledge, but also practical skills.
Restoring the paintwork is one of the types of body repairs for 2106. Good quality paint is the key to a beautiful and healthy car. The chemical composition of car paints determines their properties, such as:
- Curing time;
- Presence or absence of gloss;
- Variety of colors;
- Viscosity;
- Adhesion;
- Drying temperature.
Drying time
The period of time required for the solvent to evaporate from the entire thickness of the paint layer and the surface to acquire nominal hardness is called the drying time or polymerization time. There is nothing wrong with prolonged drying if the body is painted in a well-closed, airtight place, where dust does not stick. Of course, such conditions are necessary for any type of paint. The only thing is that the duration of their maintenance is different. Alkyd enamels dry quickly. However, this leads to the formation of a thin film on the surface and prevents the paint underneath this layer from drying, i.e. the surface looks dry, but in fact, the layer has not acquired the desired hardness. The best option for painting the body is acrylic enamel. In terms of drying time, it doesn't dry too quickly or dry too slowly.
Gloss
Some enamels, after curing, do not look very nice on the car body. Imagine that your VAZ is painted with matte enamel. Due to the lack of gloss on the enamel surface, there is a need to apply varnish over the paint layer. This phenomenon can occur in alkyd enamels; of course, not all of them are matte, there are also glossy ones. Acrylic enamel will give your 2106 a shiny appearance.
Color spectrum
The chemical composition of melamine alkyd enamel allows you to maximize the range of colors and shades.
Moreover, you can get beautiful iridescent colors, looking at them from different angles, you will see different colors. True, one layer will not be enough here; you will have to apply several layers.
Viscosity
To obtain very small droplets when spraying, a low viscosity is required. In other words, the paint must be liquid. Melamine alkyd and alkyd enamels are quite liquid.
Adhesion
The ability to firmly adhere (stick) to the metal surface of the body is called adhesion. All three types of enamels (alkyd, acrylic, melamine alkyd) have approximately the same adhesion. The only thing is that acrylic has more of this ability.
Drying (curing) temperature
Melamine alkyd enamel has the highest temperature required for drying. It reaches 150 degrees. This condition greatly limits its use at home.
Painting process
Before applying paint and varnish coatings, the body must be cleaned to bare metal. If there is corrosion and you can’t get rid of it with sandpaper, then use a rust converter. The name speaks for itself. This substance converts rust into a solid substance, a kind of metal free of corrosion. Also, be sure to ensure that the metal is completely dry and free of grease. Otherwise, swelling will appear on this part of the body. Then ensure good sealing of the room in which painting will be done. It is necessary to observe the temperature regime and a certain humidity so that the coating of your VAZ 2106 is of high quality and durable. Apply the paint using a respirator and gloves that protect your hands from contact with the enamel. It is also necessary to provide a convenient position for the part of the body to be painted. If you place or place it on a dusty surface, then the place of contact with it will be covered with adhering dust or sand. It is also necessary to protect nearby objects from paint, so as not to remove paint from them in the future. Of course, if these items are not scary to launch, then you don’t have to close them. You also need to pay attention to the undried old paint on the object in contact with the body part. It is risky to use such items when painting your VAZ 2106, as this will lead to mixing of paints, and the appearance of the body area will be very ignoble. Do not touch the surface until the enamel has dried.
The paint on the body that has not completely dried is still soft and after you handle it with your hands, traces will remain that will play a negative role when applying the next layer.
It is best to apply the enamel to the body with a spray gun under high pressure created by a compressor. The use of aerosols is advisable in the absence of a good compressor. The enamel in cans becomes less atomized as it is used up. This is caused by a decrease in pressure in the can. The most effective distance from which to spray is considered to be 25–30 cm. The spray gun should be positioned at an angle of approximately 70–80 degrees, moving it at a uniform speed. It is unacceptable to apply an excessive amount of paint, such that a smudge appears. It is imperative to wait until each layer dries, thereby ensuring the necessary hardness of the body coating. If necessary, apply varnish to the enamel. And of course, you should wait until the surface of the body is completely dry. Otherwise, there is a possibility that the paint layer will move relative to the surface of the body when force is applied to it. Such displacement is accompanied by damage to the integrity of the coating and, therefore, corrosion protection will not be provided. A well-painted body will give you pleasure and make the operation of your VAZ 2106 durable.
Change your appearance
Body painting
This is a type of tuning that will instantly completely transform your car. Painting the VAZ 2106 in mother-of-pearl color looks especially impressive. You can choose shades similar to it. This procedure alone can turn your old man into a newfangled handsome man!
In addition to painting, the body is decorated with numerous stickers. Pictures on the body give the appearance of the car a fashionable retro touch and a special style. But not everyone likes this type of “decoration”.
Headlights
These are the eyes of the car. If you want to give your six a beautiful look, you can’t do without modifying them. Tuning headlights for a VAZ 2106 is the main element of external tuning. Often it is the headlights that are remembered first in a car's design. It’s not for nothing that BMW pays so much attention to them. And although our beloved six is as different from BMW as China, this design element can still be significantly improved.
If you want to change something with a minimal investment of money and time, you can get by with cheap overlays and reflectors. Replace conventional light bulbs with halogen ones. There are many colors of light available in the market.
If you still have money and time, then you can install advanced headlight models. To do this, you will have to modify the body configuration and make changes to the fastening system.
Radiator grille
Another spectacular way to transform the “face” of your car is by tuning the radiator grille of the VAZ 2106. With its help you can add character. Your six can become sweet and beautiful, or it can acquire brutal, masculine features. There are many different models on the market with modified shapes and colors.
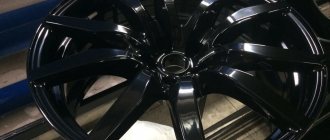
Alloy wheels
For a VAZ 2106 car, tuning it yourself is very easy. Sometimes all you need to do is simply install alloy wheels to completely transform the appearance of a classic. There is no point in making big changes to the appearance of the car if it will have classic iron wheels. Molding can add more style and improve dynamic performance. Casting is lighter than iron, so the wheel load on the suspension is reduced. Such disks cool faster. Thanks to the integrated ventilation holes, the brake system components can be better cooled.
If you use low-profile tires, you can install wheels with a larger diameter. This will improve the maneuverability of the Zhiguli. In addition to casting, there are also forged and light alloy models.
Muffler
The standard version can be easily replaced with a direct-flow muffler, which has two outlet pipes with a beautiful chrome design. It would seem like a small thing. But it’s in the details that real beauty lies! Moreover, this modification alone increases engine power by 15 percent. And the noise of the exhaust system will be significantly reduced.
Body kits (skirts, VAZ 2106 bumpers, spoilers)
The original bumpers and other body kits don’t look very good on the six. If you put a five-star bumper on a VAZ 2106, tuning will be inexpensive. He looks much nicer. And the traffic police won’t have any questions.
But if you want to give your car a daring racing look, you will have to fork out for a more expensive VAZ 2106 bumper tuning: buy sports models. But remember that problems may arise during a technical inspection.
Hood
On the standard hood of the VAZ 2106 there are two holes that are designed to supply air to the heater fan. In stores you can find different types of air intake designs for the 2106. Tuning the hood with this design element will add a touch of completeness to the design of your six.
Spoilers
The main purpose of a spoiler is to change the direction of air flow, making the car more stable at high speed. Thanks to the spoiler, the car is pressed against the road, which increases friction and therefore improves dynamic characteristics. But most VAZ 2106 owners love this product for another reason - it looks very beautiful.
There are hundreds of different modifications, having different shapes and materials of manufacture. The most beautiful and durable ones are made of aluminum. The cheapest ones are made of plastic. The most common are rear spoilers. But there are other models designed for front and side installation.
How to paint a car yourself | Topic started by: Pacy
Car painting at home.
When many car owners find out how much it costs to repaint a car at specialized stations, they often decide to carry out this procedure themselves. But painting a car with your own hands differs from manipulations carried out by professionals. It is not enough to simply “drench” the car with paint and wait for it to dry completely. It is necessary to apply special technologies, conduct training, use special equipment, and what can we say about work experience and skills! However, those who want to paint a car themselves can get to work, but only after reading our article, in which we will try to reveal the main aspects of this procedure.
Car painting lessons at home.
If you don’t know how to repaint a car and where to start, then first of all you should wash the car. A clean car makes it easier to see all body defects. In addition to corrosion processes, while driving, the body and bottom are “polished” with grains of sand, stones and other small abrasives.
Painting a car yourself involves carrying out preparatory work. The procedure itself can be partial, targeted or major, depending on the damage to the body. We are talking about major car painting, i.e. about a radical change in color scheme.
How to paint a car yourself Be patient: directly painting a car at home will take only 10% of the time, the remaining 90% comes from preparation. So, we remove locks, seals, and moldings that may interfere with painting. If you leave them and seal them with masking tape, the moisture accumulated under these elements will cause irreparable damage to the car in the future. The car body is cleaned, puttied, and primed. We remove the old paintwork; areas of corrosion must be carefully treated. You may need straightening or welding before painting.
Using materials from one manufacturer. It is very common for certain types of materials to be rejected if they are produced by different companies. The paint coating applied to such an unstable layer will not last long.
Car painting technology involves five main stages of preparation:
Car wash. We use shampoos to remove dirt. We carry out initial preparation. We degrease the surface of the body, remove bitumen stains and grease. We eliminate corrosion pockets and remove old paint using abrasive grinding. Aluminum dioxide and silicon carbide serve as abrasives. Sanding paper should be used taking into account that the difference in “number” should not exceed 100 units. The surface is sequentially processed in five steps. If these provisions are violated and the wrong “number” of paper is used, the material will undergo subsidence. If this is not immediately noticeable, then after a while stripes will appear on the body.
We carry out primary and secondary priming, which will create an anti-corrosion coating on the body. The soil dries in about 2-4 hours. In specialized boxes there is infrared drying, which reduces the soil drying process to 10-15 minutes. The next final stage is the application of varnish and enamel.
Marat (Marcianus) How to paint a car correctly.
After the preparatory work has been carried out, the question of further work is not how to paint the car yourself, but how to paint the car CORRECTLY. Decide on the material. Car coatings are available in two types. If you want to paint your car matte, use simple single-coat paints. If you want your car to sparkle in the sun, you can use two-layer coatings with a metallic or even mother-of-pearl effect.
It is more difficult if you are doing partial painting. Only specialists at the service station can select the paint of the required tone. To prevent paint stains or “patches” from appearing on the body, you can fork out the cash and entrust the color selection to professionals.
Car painting technology involves applying three layers of paint. The total coating thickness should not exceed 70-120 microns. The easiest way to apply paint is by spraying. But it is necessary to protect those elements that are not painted. You can use tape, paper, or a band-aid in some places.
It is allowed to cover such areas of the body with compounds made from water, chalk, dextrin and glycerin. But make sure that the composition does not get on the areas to be painted. After painting, this composition is easily washed off with plain water.
spray gun for car painting
Marat (Marcianus) spray gun for car painting
Before you pick it up, dilute the paint and stir to the required viscosity. When initially painting, it should be 26s. Open the jar and remove the film from the surface of the paint, mix thoroughly. For 6 kg of enamel, use 4 kg of primer, and 20% of the total mass of the composition should be solvent. The composition is poured into the spray gun for painting a car, and the first layer is applied.
Gun for painting cars For each composition used, be it primer, paint or putty, use separate guns or spray guns. This need arises due to the different levels of viscosity of the compositions; if the diameter of the nozzle is chosen incorrectly, then the enamel or primer will not be sprayed as we expect, but will splash in all directions, leaving an uneven layer of the composition on the surface of the body. The gun for painting a car should be selected according to the diameter of the nozzle. If the viscosity is 18-22 seconds, then choose a gun with a 1.3-1.4 mm nozzle. With a viscosity of 30-35 seconds, the diameter should be no more than 1.6-1.8 mm.
A good spray gun makes it possible to regulate the shape of the torch, the pressure of the air flow, and the amount of liquid. Thus, having one gun, you can use a round torch to paint the windshield pillars, and a wide torch to paint the hood of the car. In this case, paint consumption will be optimal and fog will be minimal.
Marat (Marcianus) that's all
Dmitry (Galadriel) Well, not quite everything is certain. Marat, I’m not a painter, but I think it’s worth mentioning the compressor, the dehumidifier for it (since there is a lot of moisture in the air, which will condense in the receiver and get into the paint, which can lead to unpleasant moments during drying) and of course add about drying paint.
Evgeny (Darren) Greetings everyone! I bring to your attention a new online service - No CASCO (https://www.netkasko.ru), which will help you repair your car efficiently and inexpensively.
Register on the site and post a description of the required repair. After you register and exhibit your car, it becomes available for evaluation to all interested parties. You can view all offers in your personal account.
They can make you two types of offers: repair or purchase. Each proposal will contain detailed information, so you do not have to further clarify the terms of cooperation. In any case, the final decision is yours.
Yury (Unice) Car painter and straightener required. In connection with the opening of a car service in the city of Dnepropetrovsk, the following is required for permanent work: Straightening operator, car painter
- experience; — ability to work with auto tuning; - determination; — decency; - responsibility; - non-conflict; — neatness.
— disassembly/assembly of cars; — repair, soldering of plastic/bumpers; — glass replacement; — installation of tuning; — straightening, preparation for painting, car painting
Having your own clients is welcome. You have work experience, a positive attitude and a desire to work and earn money! Contact us in person or by phone. 0977284131, 0955262590
Stories from our readers
“Fucking basin. "
Hi all! My name is Mikhail, now I’ll tell you a story about how I managed to exchange my two-wheeler for a 2010 Camry. It all started with the fact that I began to be wildly irritated by the breakdowns of the two-wheeler, it seemed like nothing serious was broken, but damn it, there were so many little things that really started to irritate me. This is where the idea arose that it was time to change the car to a foreign car. The choice fell on the melting Camry of the tenth years.
Yes, I had matured morally, but financially I just couldn’t handle it. I’ll say right away that I am against loans and taking a car, especially not a new one, on credit is unreasonable. My salary is 24k a month, so collecting 600-700 thousand is almost impossible for me. I started looking for different ways to make money on the Internet. You can’t imagine how many scams there are, what I haven’t tried: sports betting, network marketing, and even the volcano casino, where I successfully lost about 10 thousand ((The only direction in which it seemed to me that I could make money was currency trading on the stock exchange, they call it Forex. But when I started delving into it, I realized that it was very difficult for me. I continued to dig further and came across binary options. The essence is the same as in Forex, but it’s much easier to understand. I started reading forums, studying trading strategies. I tried it on a demo account, then opened a real account. To be honest, I didn’t manage to start earning money right away, until I understood all the mechanics of options, I lost about 3,000 rubles, but as it turned out, it was a precious experience. Now I earn 5-7 thousand rubles a day. I managed to get the car buy after half a year, but in my opinion this is a good result, and it’s not about the car, my life has changed, I naturally quit my job, I have more free time for myself and my family. You’ll laugh, but I work directly on the phone)) If If you want to change your life like me, then here’s what I advise you to do right now: 1. Register on the site 2. Practice on a Demo account (it’s free). 3. As soon as you get something on the Demo account, top up your REAL ACCOUNT and go to REAL MONEY! I also advise you to download the application to your phone, it’s much more convenient to work from your phone. Download here.
Deformed areas of panels are straightened, as a rule, manually using special tools (metal, plastic, wooden hammers and various mandrels) and devices. Straightening with heating is used for upsetting (pulling) highly stretched surfaces of panels. To prevent sudden swelling and deterioration of mechanical properties, the panels are heated to 600-650°C (cherry-red color). The diameter of the heated spot should be no more than 20-30 mm.
Additionally, you can download the electronic document in PDF format “LADA CAR BODIES, technical requirements for acceptance for repair, repair and release from repair by enterprises of the service and sales network of JSC AvtoVAZ” (Password for the archive: lada2111.ru).
In this guide you can find:
- Dimensions of openings and clearances of mating body parts of VAZ 2110, 2111, 2112 and 21123
- Engine and suspension mounting points on VAZ 2110, 2111, 2112 bodies
- Requirements for the painted surface of a repaired body
- Classification of body distortions
- and much more
By the way, the geometry of the VAZ 2110 and Priora bodies is the same. After restoring the geometry of the body, it must be painted. Read how to do it yourself.
Have you ever used the geometric dimensions of a VAZ body?
Source
Lisichansk, advertisements: work, housing, cars, etc. | Topic author: Margarita
VAZ 2106 1989 The car is in good condition, not damaged, not wrinkled, in its original paint. Engine 1.3 l, gearbox – 4 speed, central locking, all-season tires. Fog lights, clean interior, moderately tinted windows. Music radio tape recorder SONY (discs) + adapter for flash drive. Sale is possible in two options: with deregistration or by proxy. Price 1300 USD + bargaining. The price is reduced for such a car because the battery needs to be changed (it sat in the garage for 1 year without recharging, there are problems with the battery). Otherwise the car is in working order.
You may also like
How to change the rear wing on a VAZ 2107
How to connect a sub to the standard Solaris radio
How to replace the low beam light bulb on a Mitsubishi Outlander
Step-by-step preparation of a car body for painting
For a driver who has been working on his car for a long time, preparing his favorite car for the next painting is a common thing.
It may take a long time to prepare a car, but each part of the job is quite simple. Having learned in theory how to prepare a car body for painting, you can implement your knowledge on your own car, since no special skills are required here. It is important to know the main stages that have already become generally accepted. This article offers a simple description of how to prepare a car for painting on your own. It is worth going through the following points:
- Body inspection and washing;
- Preparing and cleaning the body for further painting;
- Putty;
- Primer.
Imitation of sports cars
Many car enthusiasts apply longitudinal plain wide stripes to the hood and roof of the body, similar to how it looks on racing cars. This is especially true for owners of sports cars and foreign cars with squat bodies and streamlined shapes. From the outside it often looks like a continuation of a double solid line of the road.
In most cases, it looks quite interesting, but this tuning option is more suitable for car enthusiasts whose philosophy of life is freedom, movement, activity, and sport. It is unlikely that the owner of a luxury car or an inveterate conservative will come up with the idea of decorating the car in this way. Although, what the hell is not joking?
Body wash
ATTENTION! A completely simple way to reduce fuel consumption has been found! Don't believe me? An auto mechanic with 15 years of experience also didn’t believe it until he tried it. And now he saves 35,000 rubles a year on gasoline! Read more"
Preparing a car at home for painting always begins with a thorough inspection. Spend some money on a good imported body cleaner.
There is no need to tell you how to wash a car with a sponge, but inspection takes a more important place here; it is recommended to inspect the following “risk zones”:
During inspection, you may come across rotten places in the body that need to be taken very seriously. The problem area is cut out with a grinder, and then a patch is applied to it. You can’t do without a welding machine here either. If rust bubbles are found, press them with a hard object. Surely in these places the corrosion has already reached the inner part of the iron - you need to start welding again. Preparing an old car for the next painting is a long process, because such a veteran of the roads cannot do without rust.
Body cleaning
When the inspection is completed, preparing a clean car for painting proceeds to removing all attached parts (bumper, tuning elements, handles), as well as glass and headlights. Preparing for large-scale painting of a car body involves protecting the windows from paint - they can be sealed with masking tape or simple newspapers.
In order for the paint to adhere well, it is necessary that there are no deep cracks or dents on the body. If they are, then these places need to be straightened. If the driver has high-quality paints in his arsenal, then small dents can be left. Large ones are straightened with special extraction devices, various straightened supports and hammers.
Preparation for high-quality car painting includes cleaning with a sanding machine or simple sandpaper. The body needs to be properly prepared: remove all seams, cracks, chips with your own hands, and also remove the layer of old paint. In those places where, in addition to layers of old paint, there are newly formed rust bubbles, you need to remove everything down to the metal. While you can use sandpaper to remove paint, it is unlikely that you will be able to remove rust correctly with your own hands - you need a grinding machine. It is not recommended to be zealous if the old paint is firmly stuck on the body - you won’t be able to remove it with your own hands, but it is easy to damage the metal.
Preparation for painting must be done carefully, so the old layer can be clouded with sandpaper, and you can do it yourself. Preparation for painting the car surface in this area ends with degreasing with gasoline. If, when preparing the car body for painting, large areas of cracked paint were found, then it would be correct to etch them with a 30% caustic soda solution and then leave them to dry overnight. In the morning, preparing the car body for painting can resume - you just need to give a stream of hot water to these areas.
You cannot apply caustic with your own hands, since the liquid is very aggressive - only with a brush. The welded seams of the body can be prepared for painting using a grinder, since the driver is unlikely to be able to prepare the seams of the car body with his own hands. But cracks, scratches, and dents can be treated with sandpaper yourself. The final touch at this stage of preparing the car body for painting will be sanding with P220-P260 sandpaper.
Putty
Preparation for painting the car proceeds to the next stage.
To make the surface of the car body smooth, it needs to be puttied. You can find different putties for cars on the market, and the methods for applying them also differ. Here, the preparation of the car body is carried out according to the recommendations indicated on the tube of putty, because each manufacturer offers an original product. To do this painting work yourself, use a rectangular piece of sheet rubber, which can be seen instead of mats in some domestic cars or minibuses. Putty is applied to the rubber, and then you need to thoroughly treat the car body yourself - especially problem areas. If the preparation of a problematic car body for painting is carried out with fiberglass putty, then it is better to leave the car to dry for a day, because Without such a procedure, the body putty may sag - you will also have to fix this yourself.
For minor defects, a two-component putty is suitable, which has long been recognized as universal for preparing a car body for painting. Microcracks can be easily eliminated with acrylic putty; it is applied after the primer. When the putty has hardened, it also needs to be sanded with waterproof sandpaper, which should be moistened in water before doing this.
Tools you will need for the job
Today, for work, we will first need a small hard block, and we will also probably need a more rigid large block. It may be needed for rubbing large surfaces. Such a block is especially necessary where a large piece of the part is puttied on the surface in order to create an even plane during work.
And also for work you will need soft sandpaper on foam rubber, for grouting hard-to-reach places where it is much more convenient for it to grout. You will also need Scotch-Brite for the work, also for working under the soil P220-280. And the sandpaper itself is P220.
Primer
So we have reached a point that many car owners for some reason miss.
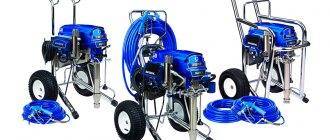
Without it, preparation for painting a car cannot be considered complete. To ensure that the preparation of the car body for painting is not in vain, it must be properly primed. This is done to ensure that the paint lasts reliably for a long time. But such preparation of the car requires a compressor, the operating pressure of which should not be less than 3 atmospheres. You will also need the primer itself and a spray gun. The most popular primer today is acrylic. Its main advantage is the reliable protection of the car body from corrosion. You need to start priming the car body from the places where the putty was applied - then the preparation of the car will be of high quality.
It won’t hurt to go over the primer again with sandpaper. When the primer is finished, you will need to apply the so-called “developing layer”, which will demonstrate all the problem areas on the car body. They will need to be puttied. Then comes the sanding again. It should be until the car body becomes perfectly smooth - this is where the preparation of the car ends.
Forget about fines from cameras! An absolutely legal new product - Traffic Police Camera Jammer, hides your license plates from the cameras that are installed in all cities. More details at the link.
- Absolutely legal (Article 12.2);
- Hides from photo and video recording;
- Suitable for all cars;
- Works through the cigarette lighter connector;
- Does not cause interference to radios and cell phones.
0 0 votes
Article rating