Usually, newbies who have driven (or just started driving) a VAZ 2114 for the first winter season turn to car service centers with this question. The fact is that the car has such an unpleasant feature (here we say hello to the engineers of the Volga Automobile Plant), such as a problem with the operation of the stove. Moreover, for some it appeared in the very first winter after purchasing a new car at a car dealership.
Preparing for replacement
The negative terminal is disconnected from the battery. Then, using a 10mm wrench, unscrew the 16 screws holding the engine splash guard.
Removing the mudguard is not so easy
Next we will drain the antifreeze. Unfortunately, on a VAZ-2114 there is no other way to replace the faucet. And on the 11183 engine, to do this, remove the ignition module with the bracket (three 13mm key screws). The main thing is to open the cap on the expansion tank, disconnecting the sensor connector from it.
First, the antifreeze is drained from the engine, then from the radiator. Using the “13” key, unscrew the cap on the engine, replace the container... Then we do the same with the radiator cap (see photo).
Two drain plugs
Both plugs will need to be tightened.
The rules for choosing antifreeze were discussed earlier. By the way, when draining old antifreeze, do not leave the stove tap closed.
What to check
Before replacing the faucet, you need to make sure that:
- The network is de-energized;
- The car is secured with a handbrake;
- There is no liquid in the cooling system.
Airlock
If the stove on a VAZ 2114 does not heat well, the reason for this is airing in the system. The plug may form after the engine is turned off, when the temperature of the antifreeze drops. It is at this time that air can enter part of the radiator from the expansion tank, which will then “get stuck” in the area of the thermostat. Upon subsequent startup, the system will circulate air instead of coolant, which will cause the engine to overheat and the heater to malfunction. How to get rid of this traffic jam? To do this, motorists loosen the coolant pipe clamp and slowly add antifreeze to the expansion tank to the maximum. By the way, you cannot mix different brands of coolant - the system may foam. Therefore, we add only the brand that was used previously, or use distilled water. The latter method is used in any season, with the exception of winter, since water at subzero temperatures will simply freeze in the tank. The antifreeze itself should be as transparent as possible (factory color does not count), and slightly oily to the touch. If it has not been changed for a long time and has lost these properties and has become cloudy, then it is better to drain it entirely and use a new “anti-freeze”. If the stove does not heat well (including VAZ 2114 1.5), you can get rid of the air lock in another way - simply drive the front of the car up an incline and open the cover of the expansion tank. After waiting 3-5 minutes, the system itself will push out all unnecessary air.
Characteristics and device
The main purpose of this system is to maintain optimal temperature in the cabin during the winter season. In addition to comfort, the stove is needed to prevent the windows, especially the windshield, from sweating. To prevent condensation from forming on it, special nozzles are provided at the top of the panel. However, first things first. Below is a diagram of the interior heating system:
- Water deflector shield.
- Windshield heating nozzle assembled with air ducts.
- Side nozzle designed for heating and ventilation of the interior.
- Central deflector.
- The heater is assembled with an electric motor.
- Interior ventilation nozzle.
- Stove tap seal.
- Rear heater pipe of VAZ-2114.
- Stove supply pipe.
Where is the heating system located? The VAZ-2114 (including the injector) is equipped with it in the cabin. The stove is located in the front panel, which is also called the “torpedo”. Depending on the modification, the heating and ventilation system of the VAZ-2114 is interconnected with an air conditioner and evaporator, or goes without it.
Causes of poor-quality stove operation
Based on the complex structure of the stove, it becomes clear that it may not work correctly for many reasons. A malfunction of at least one of the components and components of the heating system can lead to a malfunction of the stove. In this case, a malfunction may occur due to the driver’s fault, or it may be a consequence of aging or incorrect operation of other vehicle systems.
Problems with the stove can manifest themselves in the following ways:
- Poor interior heating.
- Cold air from the stove.
- Variable temperature of air supplied from the stove.
- Weak flow of hot air from the stove.
- The heater in the car does not turn on.
Knowledge of the structure of the stove itself and possible breakdowns will make it possible to avoid large expenses when repairing a car. Let's look at the most common causes of poor-quality stove operation below.
Fan doesn't work
A fan malfunction can often be one of the problems with heating the interior. The cause of this failure is usually damage to the bearings or graphite brushes, which may require complete fan replacement. Also, the fan may be faulty due to the blown fuse or relay in the electrical power circuit, which is also a reason to contact a car service center.
If the fan makes a whistle during operation, and its rotation speed changes from minimum to maximum and vice versa, then the cause of the problem may be a failure of the fan motor. In such conditions, the radiator may remain hot, but it will not be possible to warm the interior to the desired degree.
Insufficient coolant level
A malfunction of the stove can be caused by a coolant leak, as a result of which heat stops flowing into the cabin radiator in the required volume. This in turn leads to a decrease in the volume of antifreeze in the expansion tank. To fix the problem, you need to find the location of the leak, add antifreeze to the expansion tank, and sometimes it may be necessary to replace the coolant supply valve.
Engine pump faulty
The pump is used to circulate antifreeze and to ensure proper functioning of the stove. If such a pump breaks down, a malfunction may occur in many engine components, including the vehicle interior heating device.
A malfunction of this part can be caused by wear on the inside of the impeller, a broken crankshaft belt, or even jamming of the pump itself. It is better to eliminate this kind of problem by completely replacing the pump, and to avoid such breakdowns, it is recommended to regularly check the hose leading to the pump, and also listen to sounds under the hood.
Blown engine head gasket
The head gasket is designed to connect the block and the car engine head itself, ensuring tightness and preventing coolant and fuel from mixing with each other. Burnout of the gasket in the engine cooling jacket leads to the generation of exhaust gases, which can enter the cooling system through the pipes. In this case, the heat exchanger becomes airy and the efficiency of its operation decreases, the coolant can heat up, and malfunctions are observed in the operation of the stove.
Thermostat malfunction
The thermostat is a device directly involved in the circulation of coolant, so its malfunction will affect the air temperature in the cabin. Since the thermostat can be in an open or closed position, its failure is characterized by jamming in one of these positions.
If the thermostat is stuck in the closed position while driving in city traffic, the temperature of the antifreeze may increase, and subsequently the engine may overheat. When stuck open, the interior temperature will be low when driving in high gears, while the temperature will remain normal at low speeds.
Heater core blockage
The heater radiator can become clogged for various reasons, and this can happen both from the outside and from the inside. For example, the outside of the radiator may become clogged due to dust, leaves, and insects entering through the protective casing. On the inside, clogging occurs due to dirt and deposits that can form in the engine cooling system.
Cabin filter clogged
A heavily contaminated cabin filter is one of the common causes of stove malfunctions. Many drivers treat it quite dismissively and do not replace or throw away the old one for a long time.
It should be remembered that a clogged filter is an obstacle to the flow of heated air into the cabin. In addition, when the filter is clogged, dust and mold spores can enter the cabin and accumulate in the filter itself.
We increase the efficiency of the stove on the 2115 VAZ | Advice for car enthusiasts
For many large car owners, the problem is the efficient operation of the heating stove.
Cases when it produces the necessary heating for the interior and windshield, if you survey car enthusiasts, are very rare. To identify the reasons, you can use the services of a specialist to try or fix everything yourself. First of all, we put a container with a large upper area under the bottom and pour antifreeze into it, after that, and then what, we get to work. The first thing we check is how aligned the outgoing heater nozzles are with the holes on the dashboard. As practice shows, incompatibility will definitely be discovered, which can be the cause of ineffective heating. This factory defect can be eliminated by filing, but to do this it is necessary to remove the dashboard, the stove itself and disconnect the radiator.
The VAZ 2115 radiator is identical to the models installed on other VAZ models. Modifications may differ slightly, but according to the principle of their operation, they are all the same. The presence of turbulators on the radiator improves the rate of heat transfer and ensures heating uniformity of the heat exchanger.
Before disassembling the heater, you need to check the space where the radiator is inserted. Due to the influence of constant high temperatures, very often this space becomes deformed. As a result, there is no necessary tightness, on which the efficient operation of the heater directly depends.
The tightness is easily restored using foam rubber or bitoplast. If there are no other defects, then reassembly can begin. fastenings The places of the dampers are lubricated with lithol, and all connection bodies must be treated with sealant. In some cases, there may be increased noise when the stove operates at high speeds due to the impeller. The problem is eliminated by simply winding a piece of wire around the rim of the blades.
The operation of an inefficient heating stove may be in which a stocking is installed on the fan casing. The main purpose of the casing is to protect against all kinds of debris. The casing can become clogged in a fairly short period of time and in this case there will be no benefit from it.
If the troubleshooting of problems associated with the discrepancy between the holes of the exhaust nozzles and the holes on the dashboard is carried out correctly, then the temperature in the cabin when the heater is running will be significantly lower.
will increase with the temperature inside the car; it is also important to maintain heat in your own garage. Garage roller shutter doors from the Aluminum Systems company will perfectly retain heat in your car’s home.
| ← Purpose of CASCO policy | Culture on the road → |
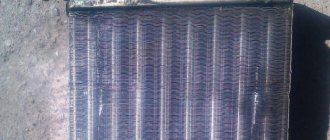
Causes of radiator failure
The need to replace the stove radiator arises in several cases. If the heat exchanger remains cold even when the heat supply is set to maximum, it is highly likely to become clogged. The reason is scale that forms at high temperatures and settles in the radiator tubes or pipes connected to it. The second reason is a burst and depressurized radiator or pipes. When this breakdown occurs, antifreeze begins to flow into the passenger compartment on the passenger side, the mats become wet, and a characteristic unpleasant odor appears in the car.
In both cases, be it a cold heater radiator or an antifreeze leak, this unit will need to be replaced, since it cannot be repaired. Copper heat exchangers can be temporarily soldered, but this will not solve the problem for a long time; the part will still need to be replaced. This must be done as quickly as possible, since driving a car with a damaged heating system is uncomfortable and can be dangerous, since fogged or frozen windows impair visibility.
Radiator tuning
Approximately 30% of uneven heating of the interior is a clogged VAZ 2114 heater radiator. To clean it, you need to perform the following steps:
- 1. Remove the radiator and rinse with strong water pressure. In this case, disconnect the pipes and connect hoses instead. Water must be supplied to the outlet. Then the dirt will be “squeezed out”;
- 2. Use any sewer pipe cleaner for flushing.
Pour it into the system and drain it after 20 minutes. After repeating this procedure three times, complete the rinsing with clean water.
- 3. Attach the pipes in place and fill in antifreeze or antifreeze;
- 4. When installing the radiator, seal it.
It is also important which heater radiator is installed on the VAZ 2114 - aluminum or copper. In the first case, it heats up quickly and also cools down instantly. But it has a larger number of fins and channel width, which gives better heat transfer at idle speed. Minus - cannot be repaired.
Copper heats up more slowly, but also cools down much longer. It has fewer ribs and narrower channels. At idle speed the air flow is cold. But if a leak occurs, it can be easily repaired.
A painted radiator is not suitable for tuning. It has little heat transfer and an unpleasant odor.
Instructions for replacing the cooling system pipes of the VAZ-2114
Step-by-step replacement of cooling system pipes in a VAZ-2114 car looks like this:
- Remove the battery cable that comes out of the negative socket.
- Carefully drain the old coolant, but wait until the engine has cooled completely before doing so. Otherwise, there is a risk of getting burns from the coolant.
- Remove the following components: set aside the upholstery that provides sound insulation, the fan, the trim going to the windshield frame, the facing material.
- Now your goal is to get to the air collector; to do this, unscrew the brackets in the form of springs and the screws responsible for fixing them. A screwdriver is ideal for spring clips; for screws, you need a wrench.
- To loosen the clamps, remove the front housing, and then remove the old hoses from the fittings.
- All that remains is to install new silicone hoses in a specially designated place; it is preferable that the parts are manufactured abroad - they will last longer.
- Reinstall the other components by following the reverse order of this step-by-step instruction.
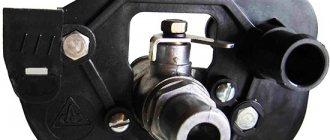
WHICH TAP IS BETTER?
All owners of VAZ 2114, 2115 and other models unanimously claim that the original faucets that are equipped with the stoves of these cars are the most unreliable. The locking mechanism is a rubber membrane. Aluminum housings are susceptible to corrosion and quickly turn sour. True, the price of these parts is low - 80-120 rubles. Apparently, the price is calculated on the fact that the faucets will change every season.
Ceramic faucet is considered the most wear-resistant
But car owners don’t want to crawl under the car every time it gets cold, spoil their shoes with leaking antifreeze, and freeze inside the car. Yes, and this is a troublesome task - replacing the faucet on the VAZ 2114 stove. Therefore, motorists give preference to more reliable models of faucets:
- ceramic, their locking mechanism is made of ceramic plates, and the body is made of high-quality plastic;
- Ball valves, the locking element of which is a ball with holes.
Most VAZ 2114 owners prefer the Yavva ceramic faucet as one of the highest quality and most reliable. Although these models have lower heat transfer than ball models. The latter are susceptible to oxidation, but to a lesser extent than the duralumin models of AvtoVAZ cranes.
heater Modification of VAZ 2108 - 2109
With the onset of the cold season, I have already written a series of mini-articles about tuning VAZ heaters. Let's remember: this is the post “small tuning of the VAZ heater”, the post “heater noise VAZ 2107-2101”. Now it’s the turn of the Actually family...
Samar, what's the problem? Very often there is such a thing that the heater of a VAZ 2109 - 2108 heats up, but not very much, at idle it generally blows cold air... As the speed increases, the situation improves, but not much... Is this a familiar situation? Let's try to figure it out.
There are reasons for low heater performance
Samar such assumptions/reasons:
- An old stove radiator clogged with debris and scale.
- The thermostat is faulty and keeps the temperature below 90 degrees.
- Air traffic jam (unlikely option, but sometimes it happens).
- system in the penetration of heating air, which passes through the cracks.
- The presence of a large amount of debris (mainly insects, leaves) in the heater housing and preventing the passage of free air through the radiator.
- Well, the reason is very banal - low coolant level.
How are these problems solved? The first problem, the formation of associated scale inside the radiator, can be solved by replacing only the radiator. Here, of course, you can offer the option of unsoldering and cleaning the radiator, but from my bitter experience, I will say that this idea is pointless. Thermostat Fault is a synonym for the word “replacement”. We’ll talk about solutions to other people’s problems with the heater next.
Tuning VAZ heater 2108 – 2109
My advice to you before dealing with others is to try and pay attention to the heater radiator when making alterations. Sometimes the radiator is so dirty that there is no talk of passing any kind of coolant. Perhaps it has simply outlived its usefulness and is needed further. replace, what I would like to pay attention to is the pump (coolant pump). An improved and more productive option is Luzar Turbo and TZA Premium. Luzar There are two pumps 21114 for Turbo:
- species-1307010 (LWP 01084), it is equipped with VAZ cars 2108 - 2115, with an engine having an 8-valve cylinder block head.
- The pump 21124-LWP (1307010 01124) is equipped with VAZ cars of the tenth family, Kalina, Priors, with a 16-valve head, which were produced before 2008.
After reading a little about the manufacturer's data, we can answer the question - why is Turbo Luzar better than a regular pump?
- The manufacturer claims that this pump has increased performance, equal to (on average) 12.5%, while the engine does not lose power. And consequently, the higher the speed of coolant flow through the system, the more stable the engine temperature.
- The average engine temperature is also reduced, which has a positive effect on durability.
- indicators improve with the so-called “thermal shock” - stopping the sudden circulation of coolant, this is observed when the speed is dropped.
The difference in the design is the impeller, which is made of stainless steel sheet and equipped with a large number of specially shaped blades.
Another important result in favor of Luzar is that according to tests carried out in the magazine “Behind the Wheel”, it took first place. Reviews are generally positive, you can try installing it.
Work order
Replacing the radiator of a VAZ-2114 stove without removing the dashboard allows you to save time, and this does not require any special skills. Let’s immediately make a reservation that part of the torpedo will still have to be disassembled, but the center console will remain in place, and this is the most labor-intensive part of the operation. At the initial stage of work, the side part of the panel on the passenger side is removed; to do this, use a screwdriver to unscrew the screws securing it.
To drain the coolant, you need to unscrew the bolts of the front protection, which is located under the engine compartment. The antifreeze is drained through a special plug located in the cylinder block; to unscrew it, you will need a 13 mm spanner. To prevent it from spilling on the ground or the garage floor, a container is placed under the car. To increase the rate at which antifreeze flows out, you can open the cap of the expansion tank.
Using a hexagon on the passenger side, the torpedo mount is unscrewed, after which it can be easily bent.
Next, you need to unscrew another fastener, located on the passenger side under the lower part of the center console. After this, the torpedo can be easily raised so that it remains in the same position, a stop of suitable length can be installed under it; a block with a cross-section of 50x50 mm and a length of about 40 cm is enough.
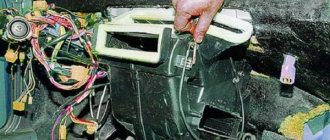
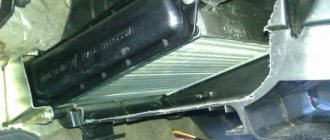
In the opened space you can see the heater radiator, which is attached to three self-tapping screws. They must be unscrewed so that it can be safely removed from the socket. In this case, a problem will arise - another self-tapping screw is hidden behind the plastic body of the torpedo, which needs to be unscrewed. To get to it, it is advisable to drill a small hole in the plastic through which you can insert a screwdriver. To do this, you first need to remove the glove compartment. If you try to move the torpedo, you can break the plastic and then removing the heater radiator on a VAZ-2114 will turn into an expensive procedure.
Next, you can proceed directly to dismantling the heater radiator. To do this, remove the clamps and disconnect the pipes, under which it is better to place a small container or rag, since there is still antifreeze in the system, which will spill directly into the cabin. After this, the radiator is removed from the mounting socket without any effort. It is advisable to examine it to see where the damage was and where the antifreeze is leaking from; corrosion damage appears in this place and streaks are visible, which once again confirms that the stove radiator needs to be replaced.
The new heater core fits into place effortlessly and should not cause any problems. It is secured with self-tapping screws, including through a hole previously drilled in the dashboard. In this case, it is advisable to inspect the faucet, since this is another weak point of the heating system. It should be completely dry and the lever should be easy to turn. The glove compartment is installed in place, the dashboard and the removed side panel are screwed to the mounts.
Before adding coolant, you need to check whether the plug on the cylinder block is tightened so that the coolant does not spill out. Fresh antifreeze is poured into the expansion tank to the level; if during operation the level drops, it will have to be topped up.
To carry out the tests, you need to start the engine and, after waiting until it warms up, turn on the heater. It should heat well in different modes, and the interior should remain dry, without stains of spilling antifreeze with a characteristic odor. At first, it is recommended to periodically look at the floor to make sure that all connections are tight and the new radiator is not defective.
Video: Replacing the heater radiator WITHOUT REMOVING THE TORPEDO
Modernization of the VAZ stove. Simple Simple
way way to modernize the VAZ stove
In principle, the VAZ has a very good stove, it heats everything, but it does have a drawback. The VAZ stove is made in such a way that virtually no air flows into the left pipe on the driver's side window - a winter feature. But in the design of the period this is a significant drawback; you have to use a cloth or open the window, and this is not very convenient in winter. Upgrading the stove will not take up a lot of your time.
The point of installing is to upgrade a regular cooler from a computer into the pipe, which will force air from the stove. For, So, first you need to remove the deflector from the Do. the pipe is very easy.
Modernization Modernization
stove stove vases is carried out as follows:
image the deflector with a screwdriver and take it out. Pry it off.
forward with another screwdriver, pull out the other and the sides forward
Removing the deflector from the housing
The body is held in the torpedo by antennae
We insert the deflator into our hand and take it out of the torpedo without any effort. take Next 50 mm. cooler, it fits the pipe perfectly under the landing pad.
Next, we take measurements along the body center of the deflector and mark its dimensions. Using a hacksaw, we make cuts in the plastic.
We insert the resulting opening into the cooler. If the cooler is just hanging around, glue it down.
If the heater in the car does not work, especially in the cold season, there is a possibility of being left without a means of transportation, as in the cold you can simply freeze inside the car. In severe frosts, it is very difficult to clear the windshield of ice in order to ensure visibility, and with a non-working stove this becomes doubly problematic. You may not even be able to get to a service station.
But more often than not, if the working principle, diagram and design of the VAZ stove are known, 2115 it is possible to solve the problem right on the spot Device.
independent heating system VAZ-2115
The electrical diagram of the VAZ heater is represented by the following elements:
- Electric motor with fan. The hot fan drives air into the car interior and onto the windshield Buttons.
- glass and levers for switching the heat level and air flow rate. The VAZ-2115 has 3 speed options for heat flows, which can be additional.
- adjust the resistances that ensure the desired rotation speed of the stove fan (reducing tungsten turn fuses).
- coils and connection wires.
The diagram of the 2115-VAZ stove, presented below, clearly shows its operation, device and components.
Connection diagram for the VAZ heating system
Promotion: Sale of new 2022 cars - 2019 model year at the Moscow Automobile House
Promotion: Sale of new cars produced in 2019-2018 at the Moscow Automotive Assembly
- House block.
- Ignition.
- Unloading relay Switch.
- ignition of the stove engine.
- Additional resistor.
- stoves Motor.
- Stove control button.
- Heated rear window.
K7 is a relay that turns on the heated rear window.
Heater operation diagram
- Fan.
- blower Windshield flap.
- A damper that distributes air flows to the central and side deflectors; zones that warm the feet of the driver and passenger.
- Damper that controls the radiator.
- stove.
- Airflow to the driver's feet.
- Internal Work.
The stove air duct is based on the following principle
The cooling and heating system works the same on almost all VAZ models. The heater is turned on using a regulator located in the car itself; antifreeze is supplied to the radiator. After it warms up, the temperature reaches more than 80 degrees. After which the fan starts working, which only works in 3 speed modes.
The fan begins to create a directed air flow. It moves from the external heating system into the interior of the car. Using the control flaps, the driver selects heating zones, there are three in total: on the feet, on the windshield, and on the car window.
The key element of a car's heating system is the fan, and if it fails, the heating will fail. Without it, hot air will not flow into the cabin, and to heat the interior space of the VAZ-2115, it will take not a couple of steam, but minutes of hours.
Major electrical breakdowns of the heating system of the VAZ-2115
If no changes occur in the heating system at any switch position, then most likely the motor is out of order (the brushes are worn out) or there is no voltage at the terminals. But also in this case there may be problems with the ignition switch or the mounting block (fuse F4 has blown).
It is important for the operation of a proper car heating system that there is not 3 ohms at the engine ground (installed under the hood).
If the heater works normally at maximum engine speeds, and problems arise only at low speeds, then the cause of the malfunction most likely lies in the switching speed button or additional resistors.
If you turn on the interior heating system and hear noise, but the heater does not blow properly, then this also indicates a malfunction in the engine. Malfunctions may include jamming of the impeller or armature bearings. Malfunctions can be eliminated by replacing components or, if required, by lubricating them. But, as a rule, these actions have a short-lived effect and the problem returns.
Causes of insufficient heat
The ability to understand and feel a car means a lot. Some possible problems noticed in time can be easily eliminated by tuning. What can cause poor heating?
Firstly, the fan is not working. It's three speed. And if the fan does not work at any speed, then it should be replaced. The resistor could also be the culprit. When the fan starts working only at speed 3, replace the additional resistor.
Secondly, the thermostat. When the engine is running, the connecting pipe (thermostat - radiator) remains cold. Otherwise, you need another thermostat.
Thirdly, the filter is clogged. On older VAZ 2114 models there is no such filter. On new ones it is located under the heater casing. If he is the culprit, we need to install another one.
Don't let your filter get into this state.
Also, the cause of poor interior heating can be an air lock, insufficient or absent coolant in the expansion tank, the inability to fully open the heater tap, or a dirty radiator.
Heating system VAZ-2114
The VAZ-2114 interior heater consists of the following elements:
- radiator with pipes;
- supply shut-off valve;
- frame;
- air ducts;
- dampers;
- fan;
- Control block.
Heating of the air supplied to the cabin is carried out by passing the air flow through the honeycombs of a heat exchanger - a radiator, through which coolant heated by the engine circulates.
The VAZ-2114 heater has the ability to shut off the supply of antifreeze to the heater radiator, so the heating system is turned off (for the summer period). The supply is stopped using a tap embedded in the coolant supply pipe to the heater radiator.
The radiator is installed in the heater housing. In addition to housing the component elements of the stove, the housing prevents the dispersion of air flow and directs its movement.
The heater body is connected to air ducts, with the help of which it supplies heated air flow to the areas of the windshield and side windows, to the middle of the cabin, to the feet of the driver and front passenger. To adjust the direction of air flow, deflectors are installed at the ends of the air ducts that supply heat to the side windows and into the middle of the cabin.
The distribution of air flow across zones is ensured by dampers installed in the housing. The design of the VAZ 21-14 stove uses three dampers:
- Stove control damper. It redirects the air flow through the radiator (the stove is operating) or bypassing it (the system is operating in interior ventilation mode).
- Damper for supplying flow to the windshield area.
- Damper for redirecting warm air to the footwell area or to the side windows and into the passenger compartment.
Thanks to the dampers and the heater tap, the driver activates the interior heating system, controls the air flow, choosing which zone it should be supplied to.
The fan included in the heater design creates an air flow. Thanks to the power supply circuit of the fan electric motor being equipped with rheostats, the unit received three operating modes in which the fan rotates at different speeds.
Unlike the heating systems of cars of the classic family - VAZ-2101-2107, the fan in the VAZ-2114 forces air into the heater body, rather than drawing it in, which increases the efficiency of air supply. Therefore, this unit was installed not inside the housing, but on it. Access to the fan has become easier, since on the VAZ-2114 it is located in the engine compartment, in a niche near the engine shield.
When Rework Is Needed
This situation often happens: when trying to reduce the temperature, hot air blows from the torpedo. But from the air ducts located on the sides, a cold flow of air flows onto the windshield. Necessary:
- 1. Remove the side cover of the torpedo on the gas pedal side. Here you will find the throttle cable. It is secured with a clamp. Loosen it and, pulling the cable down, fix the clamp again. Now you need to set the damper control levers. Left - to the right, and right - to the left. The crane control lever itself must be set all the way to the right. At this moment, warm air should come out of the side holes.
- 2. The second stage of tuning is to ensure that outside air passes through the heater. Since one engine is responsible for the operation of the damper and the tap, it is necessary to block its control of the damper. Remove the dashboard cover on the right side and disconnect the temperature control cable from the engine. There are two of them here. Disconnect and tighten the one on the right. At this moment the damper should be in its maximum position. Bend the tensioned cable at the attachment point and cut off the excess length.
REASONS FOR THE LACK OF WARM AIR IN THE VAZ 2114 INTERIOR
If you don’t know how the car works, you might think that the heater is not heating well only because of a malfunction in the heating system, but in practice there are many more reasons. Reasons for the lack of hot air in the car interior:
- The heater radiator is clogged, it may also be of poor quality;
- The heater motor in the cabin does not work;
- The heater tap is faulty, does not open completely or is completely closed. The crane drive cable may be broken (the cable of the VAZ 2114 stove);
- Air lock in the engine cooling system. The air in the system does not allow coolant to circulate normally through all pipes;
- The cylinder head gasket is broken. In this case, the engine on the VAZ 2114 heats up, antifreeze leaves the cooling radiator;
- Insufficient antifreeze level in the radiator. This problem can be solved simply - you just need to add coolant to the required level;
- The heater motor does not work. Here, too, everything is quite simple - if it does not make noise when turned on, then you need to look for the reason for the lack of heating of the interior in it. Although, the wiring going to the motor and the switch itself may be to blame;
- The heater control unit (heater switch block) is faulty. There are options here - warm air does not reach the windshield, does not blow into the legs, and there is no side airflow. The cables on the heater control may be torn (or flown off);
- The water pump (pump) in the engine cooling system does not provide the necessary circulation;
- Thermostat is faulty. The thermostat is required to maintain a certain temperature in the cooling system, but if it is constantly open, then circulation occurs in a large circle and the coolant does not heat up to operating condition.
The second “jamb”: dampers
Another problem with the VAZ 2114 stove is the operation of the dampers. In the car, their position is regulated by three more cables. They also tend to become loose and malfunction over time. An indicator of a violation of their adjustment is the fact that hot air comes only from the central air duct, while cold air goes to the passenger seats and to the front window heater.
Adjustment of these cables is carried out similarly to the cable of the stove faucet. When the slider is moved to the extreme right, the dampers should be fully open.
If you plan to adjust the heater while replacing the radiator, you should also pay attention to the condition of the dampers themselves. If they are not airtight, they should be glued with foam rubber or any other insulation. Any leaks lead to the dilution of the hot air flow with cold air and, as a result, to a deterioration in the operation of the stove.
Modification of the left deflector
The left deflector (driver's) is located farthest from the hot air entry point. As a result, all losses affect him more than anything else. It also happens that there is warm air everywhere except it. Naturally, the driver will not like this much, especially if he usually drives alone in the car.
To improve the heating system and provide the driver's air duct with a sufficient flow of warm air, an additional fan is installed in it.
A computer processor cooling fan is ideal for this purpose (it can be bought at any computer store, it costs about 500 rubles). They come in different sizes and power, choose the right one based on the supply on the market. Or if there is an old computer somewhere in the garage, take it from there - it will do.
The order is:
- Pull out the deflector.
- Prepare a hole for installing the cooler.
- Prepare the wiring. If an additional pump is installed in the system, it is worth installing the power supply through the same switch. You can make a separate switch or, as a last resort, connect it from the ignition. It will turn on automatically when the engine starts.
- It is important to completely seal the remaining holes, otherwise the expected result will not be obtained.
By performing all these manipulations, you can achieve restoration or even significant improvement in the operation of the stove. If your work involves constantly moving around the city by car, these measures are simply mandatory.
Replacing the heater valve VAZ-2114
We drive onto a pit or overpass. We put the car on the handbrake and first gear. Drain the coolant into the prepared container. To do this, first, with the expansion tank cap closed, unscrew the drain plug on the engine cylinder block (if the tank cap is sealed and tightly screwed, then antifreeze will hardly flow). Then, instead of the drain plug, we screw in a hose (from a mixer works well) and open the reservoir cap - the coolant flows neatly into the container with minimal losses and without getting dirty on the engine.
We loosen the clamps of the pipes going to the valve from the engine. From the engine side, use a metal brush to clean the threads of the 2 bolts securing the faucet to the engine compartment bulkhead. Then we conscientiously treat these threads with WD-40 or brake fluid. This is a mandatory condition, failure to comply with which can lead to serious difficulties when unscrewing the nuts. We leave the dirt and rust on the threads to “acidify” and do not tighten the nuts yet.
We remove the pipes. Let's go to the salon. We dismantle the side trim of the torpedo in the middle at the feet on the passenger side. Loosen the clamps of the pipes at the tap. We prepare a rag to collect a small amount of antifreeze that may leak onto the carpet when removing the pipes. Disconnect the pipes. We return under the car. Using a 10mm wrench (socket or socket), unscrew the nuts of the faucet mounting bolts.
In the cabin, pull the faucet towards you. Then we remove the control cable clamp from it, and then disconnect the cable itself. We install the new tap in the reverse order.
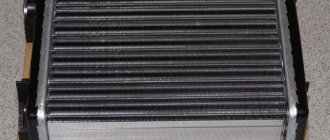
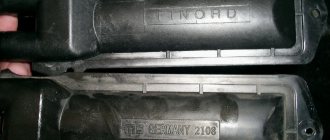
Types of heater radiators installed on VAZ 2114/15
The manufacturer installs its own aluminum radiators on the VAZ 2114/15 with a service life of 3–5 years, after which the radiator is replaced. Selecting a new heat exchanger is quite difficult. There is a wide range of radiators from various manufacturers on the market. Of course, there are fakes.
Heating system radiators for the entire Samar family have catalog numbers 2108–8101060 and 2108–08101060–00 and the same dimensions:
- length - 250 mm;
- width - 158 mm;
- height - 42 mm.
The scheme of their attachment to the body is also identical.
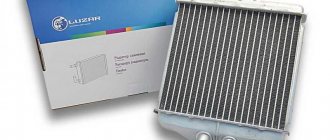
Radiators for the VAZ 2114/15 stove are produced under catalog numbers 2108–8101060 and 2108–08101060–00
The VAZ 2114/15 can be equipped with aluminum and copper radiators, which have their own advantages and disadvantages.
| Aluminum | Copper | |
| Service life, years | 3–4 | 5–7 |
| Heat dissipation, W/mg | 209,3 | 389,6 |
| Maintainability in the event of a leak | Conditionally repairable | Repairable |
| Cost, rub. | 800–1000 | 1600–1800 |
The main advantages of copper products are longer service life, increased heat transfer and maintainability. However, they usually cost almost twice as much as aluminum ones. The technical characteristics of radiators are largely determined by their manufacturer.
Radiators DAAZ
The most popular among VAZ 2114/15 owners are radiators manufactured by Luzar, Hola, Craft, Pekar, etc. They are all in the same price category and have similar performance characteristics.
DAAZ radiators are highly efficient and have a long service life
DAAZ aluminum radiators have improved parameters. They have a service life of 4–7 years and a price of about 1000 rubles. The design features of such radiators include a larger number of lamellas (thin plates), and this significantly increases the heat exchange area. DAAZ radiators are the best option for VAZ 2114/15 owners.
Due to the larger number of lamellas, DAAZ radiators have increased heat transfer
Repair/replacement of resistor
A faulty resistor may be indicated by the fan operating in one mode, when manipulations with the switch do not affect its blowing speed. To replace the resistor, you need to prepare a screwdriver with a Phillips head, fine-grain sandpaper and a multimeter. Algorithm of actions:
- disconnect the negative terminal of the battery;
- unscrew the screws that secure the right console cover;
- Use a screwdriver to unscrew the screws securing the right cover of the center console;
- you will have access to the resistor, from which you need to disconnect all the wiring and evaluate the contacts for burning. If the contact surface is oxidized, use sandpaper to clean it down to metal;
- It may well be that the resistor has lost its functionality precisely due to burning/oxidation of the contacts, so we assemble everything in the reverse order and check whether the fan will work in all normal modes;
- in case of a negative result, again remove the negative terminal, the panel cover and unscrew the screw that secures the resistor to the body;
- We remove the resistor and use a multimeter to measure the resistance at the resistor inputs and at the inputs of both windings. In the latter case, the indicator indicating the working condition of the additional elements is 0.2 Ohm. For the entire resistor, the standard resistance should be 0.8 ohms. If the multimeter readings do not match the specified values, replace the resistor with a new one, and then reassemble in the reverse order.
Sequencing
Drain the coolant by opening the plastic tap next to the generator (at the bottom of the radiator). Remove any remaining liquid using a piece of hose and a funnel. After removing the air ducts, check the condition of the holes with the heater outlets on the panel. If they are not aligned and the misalignment is more than 50%, carefully trim the interior heater. After marking all the connectors with strips of colored tape (colored felt-tip pens), remove the instrument panel. Remove the steering wheel, steering column trim, steering column switches
Carefully dismantle the heater by unscrewing the nuts and removing the wire from ground. Having previously marked, disconnect the heater connectors. With the cable release and radiator hoses removed, remove the heater by removing the 2 fan screws.
Be sure to pay attention to the condition of the rubber washers and thrust bearing
- After unscrewing the 3 bolts, carefully remove the heater core.
Remove the radiator carefully. Residual coolant may leak out.
- Prepare turbulators (plastic spirals to increase heat transfer from the radiator). Spirals should be included at the factory, but are often not.
. You can cut turbulators (swirlers) yourself. Prepare aluminum (copper) plates with a cross section of 6 mm by 1.5 mm. Clamp one edge of the plate with a drill, the opposite edge in a vice and twist it with a spiral.
Check the bottom wall of the heater for deformations, displacements, holes, integrity problems and other defects. Integrity can be determined through the hole for installing the radiator. Carefully disassemble the heater, moving the body halves apart from each other. Use a suitable screwdriver to open the latches and remove the screw under the central nozzle. Sequentially remove the levers that control the flaps. Inspect the inside surface of the heater. Glue the foam rubber if it has peeled off and stick on the bitoplast strips. Bitoplast must be glued so that the body remains as tight as possible when the dampers are moved to the extreme position. Carefully adjust the center flap. Treat all fastening points of the dampers with grease. Before connecting parts of the heater housing, treat the connector surfaces with sealant. Reassemble the rebuilt heater in reverse order. If there is deformation at the bottom ribbed wall and a gap has formed during assembly of the housing, fill it with sealant. There should be no gaps between the radiator and the stove. Strips of regular foam won't do much good. It is better to glue bitoplast strips at the points of contact between the radiator and the heater. Balance the fan impeller, wrapping wire around the fan blades if necessary. Route the wires back through the housing rubber plug. Adjust the damper stroke. All levers should be easily locked in extreme positions
Particular attention should be paid to the levers of the central and main dampers. The adjustment is mainly carried out by selecting the positions of the braid
After adjusting the dampers, work on the heater valve. Structurally, the choice of partial opening/closing of the tap is provided. Determine the position in which the tap will not close completely. Before installation, treat radiator hoses and tubes with sealant. Replace all clamps with new ones. After complete assembly, filling with antifreeze and warming up the engine, tighten the clamps again. Then, before installing the panel, glue foam and bitoplast to the inlet holes of the air ducts, making sufficiently wide holes in them. In some cases, heater maintenance may not be enough to solve all problems. The question arises, how to insulate a VAZ 2114 for the winter so that the car warms up quickly and the temperature in the cabin is as comfortable as possible? If it blows from the doors or heat escapes through technological openings, the problem can be solved by replacing the seals and thermal insulation of the car.
Stove 2115-VAZ. Repair of main components
Reasons for ineffective heating
The efficient operation of the stove in model fifteen cars in most cases leaves much to be desired.
It is a rare case when it is necessary to heat the windshield or To. To eliminate all possible reasons for its ineffectiveness, you can contact a specialist, or you can try to troubleshoot problems yourself, doing all the work necessary with your own hands.
Before troubleshooting, you must drain the antifreeze from the system. After. Once this has cooled, you can begin to inspect the holes for compliance with those located on the dashboard with the exit of the majority of nozzles. In the heater cases, it is shifted forward, which leads to its improper operation. This can be eliminated by filing down the heater mounts. You will have to remove the dashboard, heater, and disconnect the radiator yourself.
heater radiator VAZ 2115
The radiator of the 2115 VAZ is practically no different from the other models in the installed VAZ models, this is clearly visible in the photo. Modifications may differ slightly, but the operating principle is the same for all radiators.
If turbulators are installed on the radiator, due to which the heat rate is improved and the heat exchanger is evenly heated, then the car will warm up much better. Then you need to disassemble the heater, but first you need to check which space the radiator is inserted into.
Very often it becomes deformed due to constant exposure to high temperatures, as a result of which the tightness is lost, on which the high-quality operation of the heater also depends. If necessary, the tightness can be restored by gluing or bitoplast foam rubber.
Having carefully examined everything and found no more defects, you can proceed to the place. assembly, where the dampers are attached, the joints are lubricated, the housings are treated with lithol with sealant. If the stove is turned on at high speeds and is humming because of the impeller, you can balance it by winding a piece of the rim around the wires of the blades. Now you can set a place for everything.
The reason when the stove heats up may be due to the stocking installed on its casing. The purpose of the fan is to protect against debris. Over a fairly short period of time, the short casing becomes clogged, and there is no longer any benefit from it.
VAZ stove fan Often
2115 you can encounter such a problem when the fan starts working only in the third position and does not respond when switching to positions 1 and 2. The main reason for this problem is the failure of the additional resistor, which will need to be large.
To replace the noise of the fan during its operation, especially in the third position of the switch, you can eliminate it by trying to lubricate its bearing. A strong fan hum is a common problem for all VAZ cars, and sometimes this problem can only be solved by replacing it with a more advanced one. model, car enthusiasts, when tuning a VAZ, install 2115 quieter fans from other car brands.
During factory assembly, the stroke of the dampers is not always adjusted. Therefore, when assembling the braid, the position of the cables must be selected so that the levers with which the adjustment is made are installed in the extreme positions of the dampers, this is especially true for the central and main positions.
The damper that blocks the flow of incoming air to the windshield must be installed in the normal “closed” position. On the heater tap, in order to increase the flow of warm liquid, it is necessary to ensure that in the “heat-max” position, its lever rests against the leftmost limiter.
During assembly, the radiator tubes are lubricated with sealant, and the hoses are secured as tightly as possible with clamps. After pouring antifreeze and warming up, the car should once again tighten the clamps, the increased temperatures from which become much softer.
Before directly installing the torpedo, the locations of the receiving nozzle holes should be taped with a film containing biplast. We install the stove in place, but we do not complete the fastening nuts. tighten the installation of the torpedo into place. Having installed the front panel in place, we begin to slowly move the heater until the holes are almost perfectly aligned.
If this cannot be achieved, then you should file down the fastenings of the place so that you can move it in your direction. In this case, the fan heater casing is removed and additional sealant is laid between the body in the cutout and the heater body. The end fastening nuts are tightened until the excess film that may end up in the air ducts is removed. Check the position of the dampers again. We also cut off the interfering foam. If necessary, treat the air ducts and the crack under the radio with sealant.
The work is almost finished, all that remains is to fill in the antifreeze, warm up the car, tighten the clamps again, and visually check for the possibility of leaks. done After work, the temperature in the machine should be comfortable until the temperature rises.