Design of the rear suspension of the VAZ 2107: 1. Lower longitudinal rod; 2. Lower insulating gasket of the suspension spring; 3. Lower support cup of the suspension spring; 4. Compression stroke buffer; 5. Bolt for fastening the upper longitudinal rod; 6. Bracket for fastening the upper longitudinal rod; 7. Suspension spring; 8. Compression stroke buffer support; 9. Upper spring gasket ring; 10. Upper spring insulating gasket; 11. Upper support cup of the suspension spring; 12. Pressure regulator drive lever support; 13. Rubber bushing for the pressure regulator drive lever; 14. Shock absorber mounting stud washer; 15. Rubber bushings for shock absorber eye; 16. Rear shock absorber mounting bracket; 17. Additional compression progress buffer; 18. Spacer washer; 19. Spacer sleeve of the lower longitudinal rod; 20. Rubber bushing of the lower longitudinal rod; 21. Bracket for fastening the lower longitudinal rod; 22. Bracket for fastening the upper longitudinal rod to the bridge beam; 23. Spacer sleeve for transverse and longitudinal rods; 24. Rubber bushing for the upper longitudinal and transverse rods; 25. Rear shock absorber; 26. Bracket for attaching the transverse rod to the body; 27. Brake pressure regulator; 28. Protective cover for pressure regulator; 29. Pressure regulator drive lever axis; 30. Pressure regulator mounting bolts; 31. Pressure regulator drive lever; 32. Clip of the lever support sleeve; 33. Support sleeve; 34. Cross rod; 35. Cross bar mounting bracket support plate
Purpose of the VAZ 2107 suspension
The suspension of the VAZ Seven, like any other car, is necessary for safe and comfortable movement. Its design may seem complicated at first glance, but in reality it is not. The front and rear suspensions are a set of elements whose purpose is to provide an elastic connection between the wheels and the chassis of the car. The main function of the suspension is to reduce shock, vibration and jolts that occur when driving over uneven surfaces, which is inherent in roads with poor quality surfaces. It is worth dwelling on malfunctions, repairs and modernization of the rear suspension in more detail.
Front suspension
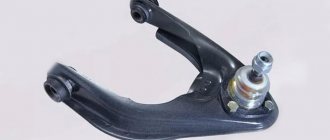
The VAZ 2107 has a double-wishbone independent suspension with an upper and lower wishbone at the front. The first of them is fixed through the mudguard strut, the second - to the front beam connected to the power elements of the body. The upper and lower arms are secured to each other by means of a steering knuckle and ball joints. To rotate the levers, the suspension design includes silent blocks made of rubber and a metal bushing. The softness and smoothness of the suspension is determined by elements such as springs and shock absorbers, and the stability of the car on the road is determined by the anti-roll bar.
The front suspension of the VAZ 2107 bears greater loads than the rear, so its design is made independent
Rear suspension
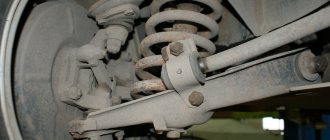
The rear of the car takes up less load than the front, so the suspension has a simpler design - dependent. The wheels of the rear axle of the “seven” have a rigid connection with each other. Such a system today, although outdated, still has positive aspects - high reliability and ease of maintenance.
Installing and adjusting the drive gear
The correct position of the drive gear relative to the driven gear is ensured by selecting the thickness of the adjusting ring installed between the thrust end of the drive gear and the inner ring of the rear bearing. Select the adjusting ring using mandrel A.70184 and fixture A.95690 with indicator. Perform the operations in the following order. Having secured the gearbox housing on the stand, press the outer rings of the front and rear bearings of the drive gear into the crankcase sockets, using mandrels for this: for the front bearing - A.70185, and for the rear - A.70171 (Fig. 3-73).
Rear suspension - description
The rear suspension of the VAZ 2107 is practically no different from the mechanism of other classic Zhiguli cars. The dependent design is simple, but has some features. Its main structural elements are:
- springs;
- telescopic shock absorbers;
- rods;
- beam.
Design of the rear suspension of the VAZ 2107: 1. Lower longitudinal rod; 2. Lower insulating gasket of the suspension spring; 3. Lower support cup of the suspension spring; 4. Compression stroke buffer; 5. Bolt for fastening the upper longitudinal rod; 6. Bracket for fastening the upper longitudinal rod; 7. Suspension spring; 8. Compression stroke buffer support; 9. Upper spring gasket ring; 10. Upper spring insulating gasket; 11. Upper support cup of the suspension spring; 12. Pressure regulator drive lever support; 13. Rubber bushing for the pressure regulator drive lever; 14. Shock absorber mounting stud washer; 15. Rubber bushings for shock absorber eye; 16. Rear shock absorber mounting bracket; 17. Additional compression progress buffer; 18. Spacer washer; 19. Spacer sleeve of the lower longitudinal rod; 20. Rubber bushing of the lower longitudinal rod; 21. Bracket for fastening the lower longitudinal rod; 22. Bracket for fastening the upper longitudinal rod to the bridge beam; 23. Spacer sleeve for transverse and longitudinal rods; 24. Rubber bushing for the upper longitudinal and transverse rods; 25. Rear shock absorber; 26. Bracket for attaching the transverse rod to the body; 27. Brake pressure regulator; 28. Protective cover for pressure regulator; 29. Pressure regulator drive lever axis; 30. Pressure regulator mounting bolts; 31. Pressure regulator drive lever; 32. Clip of the lever support sleeve; 33. Support sleeve; 34. Cross rod; 35. Cross bar mounting bracket support plate
Rear beam
The main structural element of the rear suspension is a beam (stocking) or rear axle, through which the rear wheels are connected to each other. With the help of this unit, not only the suspension elements are fixed, but also the rear axle structure - the gearbox and axle shafts - is assembled together.
The main element of the rear suspension is the stocking
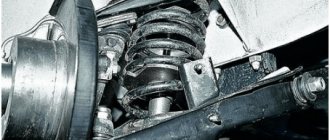
Shock absorbers
The main function performed by suspension shock absorbers is vibration damping, i.e., preventing the car from rocking when driving over uneven surfaces. The presence of such an element and its proper operation directly affects the predictability of the car’s behavior, as well as the comfort of movement and extending the service life of other suspension elements. The upper part of the shock absorber is attached to the power element of the body, and the lower part is attached to the rear axle beam through a bracket and rubber bushings.
Shock absorbers act as elements that dampen vibrations
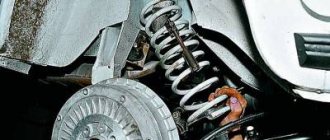
Springs
Another integral element of both rear and front suspension is the spring. In addition to shock absorbers, it also provides a comfortable ride. In addition, the element prevents the vehicle from tipping over when making sharp turns. By design, the spring is made of a steel rod twisted into a spiral. From below, the part is installed in a special bowl of the rear beam through a rubber gasket that prevents squeaks. The spring element on top also rests against the bowl on the body through the gasket.
The spring, in addition to shock absorbers, is responsible for comfortable movement in the car.
Jet thrusts
The rear axle stocking is fixed to the body of the “seven” using reaction rods. The latter are present in the amount of five pieces - four longitudinal and one transverse (Panhard rod). Longitudinal rods prevent and prevent the bridge from moving back and forth, and transverse rods prevent movement when lateral loads appear. The rods are connected to the rear axle beam through rubber bushings.
Reaction rods of the rear axle keep it from longitudinal and lateral displacements
Bumpers
The rear suspension compression buffers are made of rubber, are inserted into the body holes provided for them and are located inside the springs. An additional bumper is installed above the rear beam and secured to the bottom of the car. The purpose of the buffers is to prevent hard impacts when driving on bad roads when the suspension is fully compressed.
Rear suspension bumpers prevent breakdown during heavy sagging
Diagnostics of the mechanism by sound
It is very important to catch the moment when the gearbox just begins to hum. Then there is a chance to save a little on repairs
Usually, when the main pair is exhausted, the howl begins to appear at a speed of 60-80 km/h. If you do not pay attention to it, the hum will spread over a wider range of speeds and will become audible already at 40 km/h. Completely neglected units begin to hum at 20 km/h, and at a speed of 80-100 km/h it is impossible to even talk inside the car.
Experts recognize the following types of humming sounds from the rear axle:
- The howl is heard only when driving “under load”, that is, when the accelerator pedal is pressed. If you release it, the sound disappears.
- Constant hum that only stops when the car stops.
- Crunching sounds. Their frequency depends on the speed of the vehicle.
- "The trolleybus effect." A howl, similar to the noise of an approaching trolleybus, occurs only when the accelerator pedal is released, provided that some speed is turned on. If you coast in the neutral position of the gearbox, the sound becomes much quieter, but does not disappear completely.
A whine under load indicates that wear has appeared on the gear teeth. At the initial stage, good craftsmen sometimes manage to eliminate the malfunction with adjustments, but this does not last long. You should prepare to replace the shank and planetary gear. An incessant whine indicates wear on the shank bearings. If they are not changed in a timely manner, production will appear on the main steam.
Crunching noises are produced by worn differential bearings, and the “trolleybus” appears due to a loose or completely unscrewed nut on the shank. This malfunction is especially dangerous, since if the nut is unscrewed, the teeth of the drive gear can break at any time. Therefore, it must be eliminated immediately, otherwise the broken teeth may jam the entire mechanism.
Malfunctions of the rear suspension of the VAZ 2107
Rear suspension elements do not fail as often as the front ones, but sometimes they also have to be replaced, since even the most reliable parts wear out over time. The breakdown or damage of a particular product is indicated by characteristic signs that allow you to correctly identify the problem and quickly repair the suspension.
Knocks
Knocks in the rear suspension can be of different types and the reasons for their occurrence are also different:
- knocking sound when starting. The malfunction occurs when one of the rear axle reaction rods or the brackets that hold them break. To solve the problem, it is necessary to inspect the suspension, identify the damaged rod and replace it;
- knocking noises while driving. Broken silent blocks of jet rods can knock. Over time, the metal bushing simply begins to dangle in the rubber, and the bridge “walks,” which leads to the appearance of extraneous sounds. The malfunction is treated by replacing the rubber bushings of the rear axle rods;
- knocking noise when the suspension is compressed too hard. This happens when the bump stop is damaged, causing the suspension to “break through.” Therefore, it is necessary to inspect the buffer elements and replace the failed ones.
Video: knocking noises on a Zhiguli when starting off
"Breakthroughs" of the suspension
Such a concept as “breakdown” occurs when the suspension does not cope with its function. There may be several reasons for this:
- rear axle overload. The suspension can often “punch” due to an overloaded rear axle, for example, if the car is heavily loaded. In this case, you need to unload the rear axle;
- breakage or settling of the spring. Despite the fact that the springs are made of durable steel, they still sag over time, especially with frequent transportation of goods. The way out of the situation is to install new or stiffer springs;
- failure of shock absorbers. If the shock absorbers are unable to dampen vibrations, then full operation of the suspension is impossible. The shock-absorbing elements will need to be replaced.
The car is pulled to the side
Sometimes with the suspension of the VAZ “Seven” there are such nuances when the car pulls to the side. Let's list the reasons why this can happen:
- spring breakage or settling. Due to a damaged spring, the car will stand unevenly on the road, which may cause it to move to one side. The spring will need to be replaced;
Damage to the spring may cause the vehicle to pull to one side. - displacement of the rear axle due to wear of the silent blocks of the reaction rods. The appearance of free play in the suspension elements leads to unstable behavior of the car on the road, which indicates the need to replace rubber-metal components.
There can be many more reasons why a car pulls to the side. In addition, a malfunction is possible not only in the suspension, but also in other components, for example, with a flat tire.
Other sounds
Extraneous noises and sounds can come not only from faulty suspension elements, but also from the chassis, which is not always easy to determine with insufficient experience. While driving, a hum from the rear axle gearbox itself may be heard from the rear of the car, which requires adjustment or replacement. In addition to the gearbox, the axle bearings may hum as a result of wear or a small amount of lubricant. When the springs sag, the wheels may touch the plastic wheel arch liners when cornering, if they are installed. They can also simply loosen the wheel bolts if they are loosely tightened, which will lead to extraneous noise. Therefore, each specific case needs to be dealt with separately, where and at what moment this or that sound comes from. Only in this case will it be possible to more accurately diagnose the malfunction.
Replacing the VAZ axle bearing | Handbook of mechanical engineering designer
A hammer, a chisel and very kindly if you have an angle grinder. A metal pipe with an internal diameter of 32 mm and a length of at least 80 cm. A socket head for “32”. 50 - 100 grams of engine or transmission oil, and “working off” will come close. Litol - 24 will come in handy. A gas or gasoline burner, in public, we consider a fire source on which you will have to heat the locking ring. Without the fifth point, there is no way to become, since the locking ring is pressed onto the axle shaft only after heating.
A new locking bushing can be purchased or turned on a lathe from steel. In advance, you should measure the actual diameter of the axle shaft journal. The internal diameter of the manufactured bushing should ensure that the bushing fits with an interference fit of 0.03 - 0.06 mm. We heat the homemade bushing in boiling oil and press it onto the axle shaft with a mandrel - it can be a piece of a suitable pipe. A purchased bushing usually has an internal diameter less than the recommended one - the interference reaches 0.5 mm or even more. It is not possible to seat it by heating it in oil. In this episode we proceed differently .
We replace the axle shaft with a bearing on a VAZ 2107 when it is deformed or there is significant wear on the bearing, which results in noticeable axial play of the suspended wheel. The axle shaft seal must be replaced when oil is detected in the brake mechanism of the reverse wheel, as well as in each episode when replacing the axle shaft. Removing the axle shaft rear bridge from a VAZ 2107 car 1. We install the VAZ 2107 car on an inspection hole or overpass (see “Preparation of a VAZ 2107 car for maintenance and repair”). Remove the brake drum (see “Reverse wheel brake pads - replacement”). Using a jack, we additionally lift the rear axle from the side of the axle shaft being replaced to prevent oil from leaking out of the beam. We rotate the axle shaft until the huge diameter holes in its flange coincide with the two nuts securing the brake flap. Using a 17 mm socket wrench with an extension, we unscrew the nuts and remove the spring washers. We similarly unscrew the remaining ones. two nuts. It is more convenient to remove the axle shaft from a VAZ 2107 car with a special puller, but if it is not available, you can use the removed wheel. We secure it with two bolts with the outer side to the axle shaft flange, while we do not tighten the bolts at all to ensure the influence of the inertia force of the wheel. We pull it out with a clear movement towards ourselves axle bearing from the rear axle beam flange.
There are events when it is impossible to pull the axle shaft out of the rear axle. The bearing in the mounting point has become stuck or rusted. And in order to knock it out, you can use the removed wheel (I already wrote about this method above), but then there remains the last and truest one, which cannot be cancel the axle puller if this option does not suit you! See the figure below:
1200 rub. for the photo report
We pay for photo reports on car repairs. Earnings from 10,000 rubles/month.
Write:
To replace the axle bearing on a VAZ Classic (2101-2107) you will need the following tools:
To begin replacing the rear axle bearing of a VAZ, you need to jack up the car, remove the wheel, remove the brake disc, and then the procedure for dismantling and replacing the bearing due to hum and knocking, wheel play and leakage.
Checking the rear suspension
To check the condition of the rear suspension of the VAZ “Seven”, the only tools you will need are a mounting blade, and the car itself will need to be installed in an inspection hole. Diagnostics consists of the following steps:
- We check the tightness of the fasteners of all elements of the rear suspension, and if loose connections are found, tighten them.
- We diagnose shock absorbers by alternately rocking the rear of the car by the wings or bumper on the left and right sides. After the applied effort, the body should return to its initial position, making just one upward movement. If one of the shock absorbers has lost its properties or traces of fluid leakage have been noticed on the element, both must be replaced. The shock absorber fastenings must be free of play, and the bushings must not show signs of cracking.
To check the rear shock absorbers, rock the car by the rear fenders or bumper. - We inspect the springs. If a sagging part is detected or cracks are detected, both springs must be replaced.
- We check the rear axle rods for damage (cracks, curvature, etc.). To check the condition of the silent blocks of the reaction rods, we insert a pry bar between the bracket and the eye of the rod, trying to move the rod itself. If this can be done, the rubber-metal hinges need to be replaced.
It is quite easy to check the condition of the reaction rods using a mounting spatula.
About the dangers of low clearance
Before you decide to make such drastic changes to your “Seven”, it is impossible not to mention the dangers that may await you on the road. Important information! Before you decide to lower your car's ride height, consider whether it's worth it
There are several points that we recommend paying attention to:
- the possibility of damage to important parts of the car when hitting potholes. At least you will visit the service station much more often;
- If the work is carried out by unqualified specialists, the car will very soon require additional cash injections.
Content
VAZ 2107 is a classic of the Soviet automotive industry. The car is really good in many ways. But, unfortunately, it also has a lot of disadvantages, especially for domestic roads. And the main one is the soft suspension. On the one hand, this is good, because it absorbs bumps and the car is comfortable to drive. Plus, you get less stress on your spine. On the other hand, a soft suspension worsens the car's handling during maneuvers. And it is not particularly reliable.
As for the Classic specifically, it has always been and continues to be used as a workhorse. And an additional disadvantage of the soft suspension on this car is that with heavy loads on one of the axles, the car begins to “sag”. It gets to the point where the wheels begin to cling to the arches. When it comes to options for improving the suspension, there are many. If finances allow, you can contact tuning specialists and they will make significant improvements. If your budget is limited, you will have to do everything yourself.
Preparatory work
Before removing the beam, it is necessary to remove the shock absorbers and suspension springs. For this operation, in addition to standard keys and heads, you will need a pry bar, a jack and spring ties.
The order of operation is as follows:
- Drive the car into the pit, put the handbrake on, and install wheel chocks under the rear wheels.
- Loosen the upper nuts of the front shock absorbers located in the engine compartment (to prevent the shock absorber rod from turning, it should be held with an open-end wrench).
- Unscrew the top nuts and remove them along with the washers and springs (the location of the elements must be remembered, this will be useful during assembly).
- Unscrew the nuts securing the shock absorbers to the lower arms.
- Pull out the shock absorbers.
- Loosen the front wheel mounting bolts.
- Raise the car on a jack, place the front part of the car on supports, remove the front wheels (special supports or ordinary bricks are located under the side members at the point where they connect to the body).
Further actions are performed sequentially for the right and left levers:
- Unscrew the nuts securing the lever two turns (otherwise it will be difficult to lift it with a jack).
- Raise the end of the lever with a jack and remove the stabilizer rubber bracket by unscrewing the fastening nuts.
- Partially unscrew the nuts securing the lower ball joint and knock it out of the knuckle with a hammer (it is better to use a special puller instead of a hammer).
- Move the stabilizer through the top pin using a pry bar.
- Lower the lever and remove the jack.
- Lift the upper arm and pull out the suspension spring, prying it up with a pry bar from below.
Reinstalling the parts is done in the reverse order. Before installing the springs, they should be compressed with ties.
Dismantling the unit
The front beam of a VAZ 2107 car is removed using metalwork tools and lifting devices. To perform this operation you will need:
- Wrenches and sockets in a set with a wrench and an extension.
- Automotive or hydraulic jack of appropriate size and load capacity.
- Manual hoist and design for its fastening.
- Portable lamp for illuminating the work area.
Instead of a lifting mechanism, a special device can be used to allow the engine to be suspended with support from body parts. It is most convenient to carry out the work in an equipped garage box on a lift or above an inspection pit. The wizard's sequence of actions is as follows:
- The front part of the car is hung out, the front wheels are removed from it, and the body is placed on strong supports.
- We dismantle the steel sheet of engine protection and mudguards.
- It is advisable to remove the hood to avoid accidental damage. The power unit hooks onto an eye fixed to the body and is lifted with a hoist or using a special device.
- If there are no lifting mechanisms, the support can be placed directly under the engine crankcase, be sure to place a piece of board under it. This will avoid deformation of the part.
- We disassemble the front suspension on both sides of the car. We dismantle the springs and lower arms along with the axles.
- Unscrew the bolts securing the rubber-to-metal engine mounts.
- We unscrew the nuts on the spar studs that hold the structure in place and free it.
Now you can directly remove the beam from the fasteners and move it to the side. A specialist is recommended to inspect the engine mounts; if they are significantly deformed, they should be replaced with new parts.
Thresholds
The main purpose of the thresholds is to protect the vulnerable sides of the car body. For this reason, thresholds are often susceptible to damage. In addition, when getting in or out of the car, passengers and the driver periodically come into contact with them, scratching the elements with their shoes. As a result, the paintwork comes off from them, which causes corrosion and rotting.
Hole in the threshold
On the “seven”, the classic replacement or repair of a threshold begins with adjusting the door hinges. If this is not done, then it will not be possible to replace the threshold correctly due to the gap.
After this, the following is done:
- The doors are removable;
- The threshold is cut off (first the outer part, then the amplifier);
Threshold amplifier
- The new amplifier is welded through the holes on it, as in the photo below;
Do-it-yourself threshold installation
- A new threshold is set.
The price for a set of thresholds for VAZ 2107 starts from 200 rubles. The thickness is usually 2-3 mm.
The remaining body parts of the VAZ 2107, such as doors and trunk lid, also have a significant place in the design of the body and its geometry.
Each of the body elements of the “seven” has its own ID number, casting pattern and thickness. So, for the roof - 0.9 mm, and for the rear wheel arches - 1 mm.
What to look for when choosing
When choosing a new consumable, you should pay attention to key characteristics. Knowing the basic parameters will allow you to find the optimal part that suits your specific needs.
Length
The ride height depends on the length. Typically, the manufacturer mentions the recommended clearance value in the technical documentation of the model. In rare cases, the spring lengths of the rear and front axles may differ. But it is advisable not to deviate from the technical parameters from the manufacturer. These parameters are determined by precise technical calculations.
You can deviate from the recommendations in two cases:
- “pumping” the car for the sake of visual customization
- modernization of the chassis for transporting heavy loads
Rigidity
The degree of rigidity determines the behavior of the car on the road and distributes the load across the remaining suspension elements. Soft springs are suitable for comfortable, smooth rides, while hard springs cope well with high loads. Therefore, the choice of rigidity largely depends on the purpose of using the machine.
Among owners of VAZ cars (including the Seven), there is a common problem with purchasing new consumables for their “swallow”. In a single set from one manufacturer, sometimes there are elements with different degrees of rigidity. Unfortunately, it is impossible to know about this in advance, and the body defect appears during use.
To resolve the issue, car owners resort to one of two methods. The first option involves purchasing another pair, usually foreign-made. The second method involves installing spacers.
A spacer is a rubber lining that is placed under the seating area of the “glass”. This method will significantly save the budget of the owner of the Lada.
The degree of spring stiffness depends on several indicators:
- The thickness of the rod section. A simple law applies here: the thicker the rod, the higher the level of rigidity. However, there are models with different ring diameters, and therefore the rule applies only to classic straight models.
- Total diameter of turns. Increasing the width of the rings leads to increased softness.
- Number of turns. The higher the number of revolutions of the rod, the lower the rigidity of the part.
Turning parameters
The main characteristics include two indicators: the number of turns and the thickness of the section. They determine the final degree of rigidity of the part.
It is not uncommon to find original springs with different ring diameters. Externally, they have an oval shape: wide in the middle with a gradual decrease towards the edges. The different diameters of the rings are also made of metal of different thicknesses. For massive turns, a thick rod is used, and the small rings on the sides are made of thin material. This design feature gives it versatility: it dampens small vibrations and large shocks equally well.
But the main “disease” of these models is hidden in the extreme turns. Due to the small thickness of the metal, the side parts of the part are very fragile, and therefore often break on uneven roads. This is the price of comfort: for a soft ride you have to pay for frequent repairs.
An alternative to factory springs is products from third-party manufacturers. A non-original product is made from a rod with a constant cross-section. This negatively affects ride comfort due to high rigidity. But non-original consumables are distinguished by their reliability and durability.
Types
The springs of the shock-absorbing system are conventionally divided into 5 categories, which can be presented in table form:
| Variety | Characteristic |
| Standard | They come as standard equipment for the car from the manufacturer. Designed for driving on city highways and rough terrain. |
| Reinforced | Capable of withstanding heavy loads. Used for transporting heavy loads. |
| Extended | Modification to increase the vehicle's ground clearance. |
| Shortened | They have the opposite effect - reducing the vehicle's ground clearance. At the same time, controllability indicators increase significantly. |
| Variable hardness | A universal option for traveling on various road surfaces. |
Finding the optimal solution depends on the intended use of the vehicle and the manufacturer's recommendations.
The standard kit for the VAZ 2107 is original parts from a “penny”. But to improve aerodynamic performance, car owners resort to tricks. Often, instead of standard elements, spare parts from the “four” are chosen, which have a positive effect on handling. True, to install them in the “seven” you need to remove the outermost turn.
The ideal option is springs from Niva
Therefore, one of our tasks is to increase the rigidity of the rear suspension. We recommend installing Niva springs there. Their rigidity is quite suitable for the VAZ 2107. On the road the car will feel confident, despite the fact that there is a maximum number of people in the cabin. Feel free to install these springs and don’t even hesitate. As for the front of the car, it is advisable to install shock absorbers in a circle, this will add elasticity to the suspension. If you have domestic tires, we recommend replacing them. Advertising is advertising, but whatever one may say, its quality is much inferior to that of foreign ones. Rubber has a huge impact on comfort. If you do everything correctly, then at 150-170 km/h the car will behave perfectly
Pay attention to the climate of the place where you live. If it is cold enough, then you should buy shock absorbers designed for weather conditions
In addition to the fact that the car will become more controllable, its aerodynamic qualities will also improve and passive safety will increase. It is almost impossible to find a complete set of sports suspension for the “seven”; you need to manually adjust the suspension to the parameters of the car.
Installation of spacers (extensions) for VAZ-CLASSICA rear shock absorbers.
Installation of spacers (extensions) for VAZ
-CLASSIC.
DISASSEMBLY OF THE UNIT
The front beam of a VAZ 2107 car is removed using metalwork tools and lifting devices. To perform this operation you will need:
- Wrenches and sockets in a set with a wrench and an extension.
- Automotive or hydraulic jack of appropriate size and load capacity.
- Manual hoist and design for its fastening.
- Portable lamp for illuminating the work area.
Instead of a lifting mechanism, a special device can be used to allow the engine to be suspended with support from body parts. It is most convenient to carry out the work in an equipped garage box on a lift or above an inspection pit.
The wizard's sequence of actions is as follows:
- The front part of the car is hung out, the front wheels are removed from it, and the body is placed on strong supports.
- We dismantle the steel sheet of engine protection and mudguards.
- It is advisable to remove the hood to avoid accidental damage. The power unit hooks onto an eye fixed to the body and is lifted with a hoist or using a special device.
- If there are no lifting mechanisms, the support can be placed directly under the engine crankcase, be sure to place a piece of board under it. This will avoid deformation of the part.
- We disassemble the front suspension on both sides of the car. We dismantle the springs and lower arms along with the axles.
- Unscrew the bolts securing the rubber-to-metal engine mounts.
- We unscrew the nuts on the spar studs that hold the structure in place and free it.
Now you can directly remove the beam from the fasteners and move it to the side. A specialist is recommended to inspect the engine mounts; if they are significantly deformed, they should be replaced with new parts.
What do we get as a result?
The road surface with the VAZ 2107 sports suspension feels much better, various bumps and holes are not so noticeable, and when picking up speed the car is pressed to the ground. All suspension installation operations take place in a special salon. There, special conditions are observed that improve stability and controllability. After installation, the ground clearance will decrease by approximately 3 cm; springs and shock absorbers are selected for this type of car. Remember that after installing a sports suspension, the car will become less comfortable, because a sports suspension is sports in order to improve the driving performance of the car, this occurs at the expense of losses in comfort. Don't worry, the losses will be minimal. There is an option in which the car will practically not lose any convenience. To do this, you need to abandon additional braces, stabilizers and rigid silent blocks.
Beam dismantling
The VAZ 2107 beam serves as the basis for attaching the lower suspension arms, so before removing it, the arms must be unscrewed. To dismantle the lever, simply unscrew the two nuts securing the lever axis to the beam.
The car engine is also attached to the beam. Before removing the beam, it is necessary to secure it to the hoist using the eye on the cylinder head located between the carburetor and the tee. Before hooking the engine onto the hoist, it is necessary to remove the air filter so as not to damage it. Once the engine is suspended, you can begin to remove the beam.
Unscrew the nuts securing the engine mounts to the beam.
Support the beam so that it remains in place after unscrewing from the side members. To do this, you can use a stack of boards, placing them under the part.
Unscrew the beam fastening bolts running in the horizontal plane, then the nuts of the bolts running vertically.
Raise the front of the car, controlling the beam so that it does not fall from the supports.