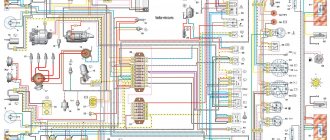
The graphical connection diagram for Starline A91 Dialogue will allow any car owner to install this device with his own hands, even if he has previously had experience installing a car alarm. It is present in the user manual, which the manufacturer supplies with each anti-theft system kit.
In total, in the diagram you can see 18 contacts of the main block, each of which has its own specific color. Based on this color, the required wire is selected, which is connected to one or another element of the car alarm. How to adjust the autostart temperature of Starline A91.
Starline alarm installation diagrams (by model):
Setting the sensitivity of the shock sensor
The security system includes a sensor that determines the force of the impact on the body. The sensor is used to activate the alarm mode, perceiving a blow as an attempt of unauthorized access to the vehicle interior. The device is mounted inside the vehicle; the operating instructions recommend placing the product open to adjust the sensitivity. There are control diodes on the body that turn on when a blow to the car body is detected.
Vibrations that occur during engine operation are perceived by the sensor as attempts at burglary, which triggers the siren. To adjust the sensitivity, 2 potentiometers are used (warning zone and alarm level), which are rotated with the tip of a screwdriver. The regulator has 10 positions; when shipped from the factory, position 4 or 5 is set. Before starting, you need to reduce the sensitivity of the device by turning the regulators to a minimum.
Then you should start setting the warning level. To adjust, you need to open the car door, activate the security mode, and then turn the adjuster screw clockwise. Sensitivity is determined by light palm strikes applied to the body. Then the user can set the alarm level on Starline (by analogy). After completing the adjustment, it is recommended to set the security system to autostart and check the sensitivity of the sensor when the engine is running and when there are impacts on the body (by tapping the roof panel with your palm).
Starline A91 programming scheme
To control the alarm, communicators are first prescribed. The procedure for registering the key fob:
- Find the Jack key;
- Deactivate the ignition;
- Press the button seven times;
- Restart the ignition;
- Wait for the seven-time signal;
- Simultaneously press keys 2 and 3, holding until the signal;
- Deactivate the ignition.
Gearbox selection loops
To select the type of gearbox when setting up Starline A91, you need to use a black cable loop. It is easy to distinguish it from the rest. If the car has a manual transmission, then the loop is broken, if the automatic transmission is not touched.
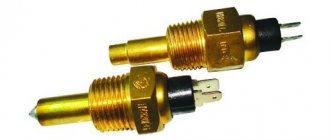
Engine temperature sensor connection diagram
An internal combustion engine temperature sensor will be needed for remote control. It is installed under the hood and connected with an orange-gray cable.
Trunk opening diagram
The luggage compartment is controlled via limit switches. To open or close the tailgate, an orange and white cable is connected to the switch.
Connection diagram Starline A91 to ignition wire
The engine and ignition can only be started automatically if the six-pin plug is connected.
List of actions:
- Connect the positive red and pink wires to the central locking;
- Connect the yellow cable;
- Cut the red cable and connect it to the starter cable.
Blue and green wires are not used because they do not relate to the normal operation of the equipment.
To connect to the ignition switch, the blue drive is connected to the white one, and the yellow one to the brown one.
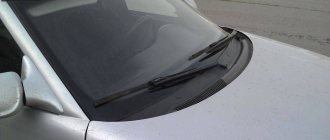
Antenna module
This is a device that is connected separately. It is fixed on the windshield not far from the mirror so that it does not create an obstacle to the signal. From the antenna, one module is attached to the control unit.
Not all autorun options work
The reasons why autostart based on engine temperature does not work are usually hidden in malfunctions associated with the temperature sensor. Usually, either the meter itself is faulty or its connection was made incorrectly.
If the motor does not start depending on the temperature, then you need to check that connector X6 is connected correctly. If this does not solve the problem, the temperature sensor must be replaced.
Autorun may not be set for the required time when working from an alarm clock. This is due to desynchronization of the internal clock of the car alarm and real time. It is not difficult to check this; just look at the time indicated on the key fob. To eliminate the malfunction, you must set the correct time in the security system.
Procedure for installing a car alarm
First, the ignition and power from the battery are deactivated. This is done to prevent short circuits.
Select a site for mounting the ECU. The best location is under the dashboard near the steering wheel. Further:
- Remove the side trims on the windshield pillar;
- Disassemble the steering wheel housing;
- Remove the dashboard.
The indicators are mounted on the left trim, and the antenna is mounted on the windshield.
Installation steps:
- Mounting the signaling unit;
- Wiring connection;
- Connecting the central locking cable to the control unit;
- Connecting indicator cables;
- Connecting cables to the ignition switch;
- Connecting wiring to door sensors;
- Siren fixation;
- Fixing the shockproof sensor;
- Embedding a service mode key.
How to disable the feature
The user can turn off automatic start using the buttons on the control panel. It is impossible to completely disable the function, since the motor operation algorithms are embedded in the software of the central unit. If problems occur with automatic start, it is recommended to force reset the alarm settings and then reprogram the parameters.
The Starline A91 alarm system is in deserved demand among consumers. It operates at an impressive distance, is able to ignore radio interference, and is simple and reliable to operate. Before using this handy anti-theft tool, you need to understand its basic features and functions.
Installation and connection algorithm
Let's consider the installation points of different alarm components.
Features of installing the control unit
- The location for attaching the block is chosen to be hidden and protected from moisture;
- It is better to disassemble the center console, installing the unit behind the dashboard;
- Secure the block with hardware or plastic clamps;
- Install the ECU with the connector facing down so that water does not penetrate into the chip.
Features of siren installation
- Installed under the hood so that the module is not exposed to moisture or exposed to high temperatures;
- Install so that an attacker cannot get to the module or wiring from the bottom of the car;
- The module is mounted with the horn facing down;
- The wires are laid inside the cabin.
Features of installing additional elements
- Shock and sensitivity sensors are mounted inside the passenger compartment in the middle of the body;
- Do not install gaskets between the shock sensor and the surface, because the device may not operate correctly;
- A device that controls the temperature of the cabin is mounted inside;
- The blocking relay is installed in the ignition switch;
- The Valyat key is safely hidden;
- The limit switches are fixed on the hood and doors.
Features of installing the antenna adapter
- The module is attached to the windshield as high as possible;
- There should be no metal elements or electrical appliances nearby, because they distort the signal;
- The surface is cleaned before fastening.
Laying wires
- The wires are connected according to the instructions;
- The wiring must be protected from the eyes of an intruder;
- The wires are laid so that moving body elements do not affect their operation in any way;
- The cables are insulated or equipped with heat-shrinkable tubing.
We are working on bugs
How to set up a starline a93 alarm
In theory, any car alarm has the properties listed here. The presence or absence of difficulties in setting is determined by the vehicle’s circuitry, and not by the presence of a malfunction in the security system. Starline, however, provided the user with instructions on how to solve the problems that arose. For example, the following effect may be observed: at low temperatures, startup is carried out “every other time,” but in the warm season there are no problems. This means that, most likely, “charge lamp” control is used, and the voltage at the generator output appears too early.
The generator should work like this
It would be pointless to change the sensitivity of the control circuit, and this option is not provided in the Star Line signaling. Use another method, such as tachometer monitoring.
There is advice that is not given either in the instructions or in the reviews. Having connected the “black-gray” wire to the charge lamp, try using both settings options – 2 or 3. If this does not help, connect to another contact of the lamp. But the best method, as Starline experts themselves say, is to read the engine tachometer signal.
ICE tachometer pulses
To implement this option, the control cord is connected to the high-voltage terminal of the tachometer. You can also use the injector control output if we are talking about an injection internal combustion engine. Then the sensitivity of the signal input is adjusted, and this operation is discussed in more detail in the following chapters.
The functions of more complex systems that do not belong to the Star Line Dialog family include monitoring the operation of the internal combustion engine using an oil pressure sensor. The method works ideally only with some engines, and at low temperatures it malfunctions. Use exactly the control method that is reliable when used under different conditions.
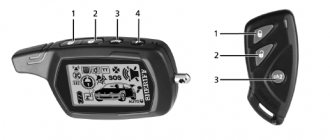
Description of the capabilities of the Starline A91 alarm key fob
Self-diagnosis and indication of operating modes:
- Automatic monitoring of security sensors with disabling faulty ones and reporting this
- Indication of alarm status by LED and on the key fob display
- Indication of the reasons for alarm activation in 9 security zones
- Indication of a faulty zone when the security mode is turned on
- Indication of the fact that the alarm has been triggered by sound signals
- LED indication of serviceability of limit switches
Alarm service functions:
- Silent security mode
- Security mode with engine running
- Silent activation/deactivation of security mode
- Turning on/off security mode without a key fob
- Bypassing the door area for the duration of the interior light extinguishing delay
- Automatic return to security mode in case of accidental shutdown
- Remote disabling of sensors by level in security mode
- Remote control central locking
- Central locking control from the ignition switch
- Two-step door unlocking
- Double-pulse door unlocking
- Possibility of implementing the “comfort” function
- 4 additional control channels
- Car interior lighting control
- Panic mode
- Car search mode
- Service mode
- Call mode from car
- Protection against accidental pressing of key fob buttons
- Sound and vibration modes of operation of the key fob with feedback
- Separate temperature display in the cabin and under the hood of the car
- Energy saving mode of key fob with liquid crystal display
- Remote programming of new and erasing lost key fobs
- Remote programming of alarm modes and functions
- Quick reset of programmable functions to factory settings
- Ability to work with GSM modules StarLine M20 and StarLine M30
- Current time display, alarm clock, timer
Possible problems
After installing the alarm and making all the settings, it happens that the turbo timer does not work. There may be several reasons for this.
- The alarm was not connected to the engine start circuit correctly;
- Factory and service settings do not allow activating the turbo timer mode;
- The parking brake of a car with a manual transmission is disabled or the Parking mode is not activated in cars with an automatic transmission;
- TURBO mode is not activated on the key fob screen.
Each of the options is a connecting link in the process of connecting the mode, so when wondering how to install a turbo timer on Starline, you need to take into account the manufacturer’s requirements and check the serviceability of the settings made. Only after this can you effectively use the turbo timer function, which ensures proper operation of the exhaust system components and protects the turbocharged engine from breakdowns.
2. Selecting the type of car engine
The next parameter that needs to be pre-programmed is the engine type, petrol or diesel. To make this selection, you must enter function programming mode No. 10 and select:
- Option 1 – petrol engine (factory setting). The starter activation delay time after turning on the ignition during the first attempt to start the engine is 2 seconds.
- Option 2 – diesel engine with a starter activation delay time of 4 seconds.
- Option 3 – diesel engine with a starter activation delay time of 6 seconds.
- Option 4 – diesel engine with a starter activation delay time of 10 seconds.