I was looking for the cause of the squeaking when turning, and discovered that the transverse link bracket was half torn off and was shaking.
I wonder what will happen if it falls off while driving? Is it possible to get to the landfill without this bracket? Is it possible to scrap it by arriving and leaving with the same car? Nobody needs four in St. Petersburg?
I traveled without it, then welded it for 1000 rubles in the village. The welder was too lazy to install a new one and strengthen it with pads. He promised that he would last 2 months.
The driving experience is wonderful: the car sways, wiggles, and even changes its trajectory at high speed. Now even something is missing - it’s a bit harsh.
Every year he came off for me on the pre. car. I'm talking about the left, not the right, "house".
> I wonder what will happen if it falls off while driving? ====The body will move left and right relative to the rear axle, hitting the flanges of the rear fenders against the rubber of the wheels, which can lead to their cutting.
> Is it possible to get to the landfill without this bracket? ====I drove tens of kilometers without it.
> Is it possible to scrap it by arriving and leaving with the same car? ====Why?! It is simply welded.
Since you are reading this article, it means that you have finally decided to strengthen the body on your VAZ 2101. It doesn’t matter what prompted you to undertake this responsible and time-consuming process: deformation from an impact, car tuning, or just your hands itching, one thing is for sure - the price of repairs will pleasantly surprise you if you do all the repairs yourself.
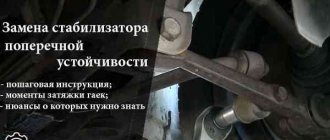
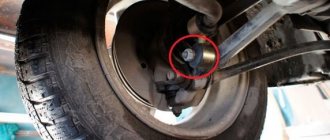
Transverse link bracket for VAZ 2107 replacement
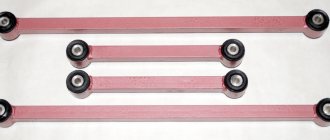
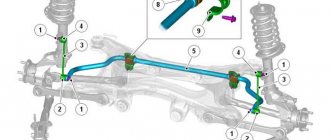
parts of the anti-roll bar for the VAZ 2107
1 - bushing holder (2101-2906048/49); 2 — nut M8 (16100811); 3 — spring washer (10516670); 4 — anti-roll bar (2101-2906010); 5 — bushing of the anti-roll bar (2101-2906040); 6 — outer bracket (2101-2906042); 7 — internal bracket (2101-2906043)
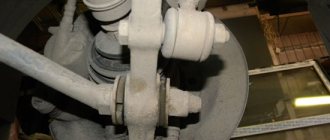
We remove the anti-roll bar from the VAZ 2107 car when the bar is deformed or when all the rubber bushings of its mounting brackets are replaced. We replace the rubber bushings of the clips that secure the stabilizer bar to the arms without removing the bar itself.
Removing bushings and anti-roll bar from a VAZ 2107 car
1. We install the VAZ 2107 car on an inspection hole or overpass and hang the front part of the car (see “Preparation of the VAZ 2107 car for maintenance and repair”).
2. Mark the position of the stabilizer bar bushings relative to the arms for correct installation during assembly.
Attention: The right and left mounting brackets for the anti-roll bar bushings are not interchangeable.
If we are replacing only the bushings, then mark their position relative to the anti-roll bar bar.
3. Using a 13 mm socket wrench, unscrew the two nuts securing the stabilizer bar bushing cage to the lower arm.
4. Using a mounting spatula, remove the bushing cage from the lever studs.
5. Remove the bushing from the anti-roll bar. Similarly, remove the bushing from the opposite side of the anti-roll bar.
To replace the anti-roll bar on a VAZ 2107 car or the bushings of its mounting brackets, remove the mudguard (see “Splash guard - removal and installation”).
Attention When removing the anti-roll bar, it is necessary that the load on the right and left springs of the front suspension of the VAZ 2107 is the same. Otherwise, when removed, the twisted rod may straighten out and cause injury.
6. Using a 13 mm socket wrench with an extension, unscrew the two nuts securing the anti-roll bar bracket to the side member of the VAZ 2107 car body.
7. Similarly, unscrew the nuts securing the second bracket and remove the anti-roll bar from the VAZ 2107. We clean the anti-roll bar from dirt.
8. To replace the stabilizer bar bracket bushing, clamp the bracket in a vice. If the anti-roll bar bar does not require replacement, then mark the position of the bracket bushing relative to the stabilizer bar to facilitate subsequent assembly. Lubricate the anti-roll bar bar with soapy water to facilitate removal of the bracket and bushing.
9. Turning the stabilizer bar in different directions, pull it out of the bracket bushing.
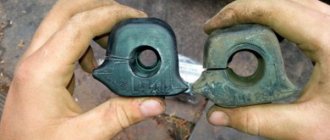
10. Use a slotted screwdriver to remove the rubber bushing from the bracket.
11. Similarly, remove the bushing of the second bracket.
Installation of bushings and anti-roll bar on a VAZ 2107 car
1. Installation of the anti-roll bar on a VAZ 2107 car is performed in the reverse order.
2. If the anti-roll bar bar has not been replaced, then we orient the stabilizer bushings according to the previously applied marks.
3. We tighten the nuts securing the stabilizer bar brackets.
4. First, install the cage on the lower pin of the lever and tighten the nut 2-3 turns. Using sliding pliers, tighten the cage and attach the second nut.
5. After making sure that the protrusion of the bushing is in the hole of the cage, we finally tighten the nuts. Similarly, we install the anti-roll bar clip on the other side of the VAZ 2107.
The deformed bracket or the remains of the bracket are cut down with a chisel or cut off with a grinding machine and the seats for the bracket are cleaned. Install the BS-08-300 device on the bottom of the body and a new bracket. The bracket is welded along the joint to the bottom of the body using electric welding in a carbon dioxide environment. Reinforcing pads are made, the dimensions of which are shown in the figure. The material for the overlays can be StZ with a thickness of 1.5-2 mm. The seats for the reinforcing linings are cleared of paint and welded by electric welding in a carbon dioxide environment. Clean the welding areas, degrease them with a rag soaked in white spirit, and apply zinc chromate primer GF-073. After 7-10 minutes, anti-noise mastic BPM-1 is applied to the repaired area.
Repair of the front suspension compression buffer bracket and mudguard strut. The deformation of the compression buffer bracket is checked as shown in Fig.
If dimension A is less than 32 mm, the bracket is replaced. To do this, remove the front wheel, clean the surface of the flange from mastic, drill out all the welding points with a drill with a diameter of 6 mm to the depth of the metal thickness of the bracket and disconnect the bracket from the rack. If there are small dents in the places where the bracket is welded, they are straightened with a drift through the middle hole in the mudguard on the side of the engine compartment. Clean the surface of the rack, weld a new bracket around the perimeter using electric arc welding with an intermittent seam. The center of the hole for the buffer in the bracket should be 97 mm above the axis of the upper arm of the front suspension, which corresponds to a distance of 9.5 mm from the edge of the bracket to the curved surface of the strut. If the side surfaces of the rack are deformed, remove the bracket and straighten the rack. They make local linings from sheet steel 1.5 mm thick (to strengthen the rack) and drill holes in it with a diameter of 6-8 mm, maintaining the dimensions shown in Fig.
Clean the surface of the rack, weld the overlay using electric arc welding around the perimeter and holes. Weld the buffer bracket and maintain the above dimensions.
Repair of body pillars. During the operation of the vehicle, cracks may appear on the body pillars, significantly reducing the rigidity of its power elements. The most likely places for cracks to form:
- in the upper amplifier of the central pillar;
- at the junction of the windshield pillar lining with the upper side panel lining;
- in the upper front corner of the front door opening;
- at the base of the wind window pillar in the front door opening on the outside and inside.
The places where cracks formed are restored by overlapping reinforcing linings made of sheet steel 0.9-1.0 mm thick, which should follow the contours of the contact zone. During repairs, reinforcing linings are welded with an intermittent seam along the longitudinal sides and in the holes using electric arc welding in a carbon dioxide environment. Welding seams are carefully cleaned, primed and painted in body color.
Top of page
The front suspension of a passenger car is one of the most loaded devices. It is she who takes all the blows, she “eats up” small unevenness in the road surface, and she also keeps the car from tipping over on sharp turns. One of the most critical elements of the suspension is the front beam, which, despite the massive structure, can also fail. Can I repair it myself? Yes. Let's figure out how this is done.
About welding and straightening a damaged beam
A beginner who decides to weld fatigue cracks in a garage does not have the proper equipment or skills to do this. The same applies to the process of straightening a deformed beam: by trying to straighten this part in the garage, as they say, “on the knee,” a novice car enthusiast can only deform the beam even more. And the service center has a special device for straightening beams, which allows you to restore the original shape of the beam literally down to the millimeter. We should not forget one more important point: after repairing the transverse beam, the driver will again have to adjust the camber and toe of the wheels. That is, you will have to go to the service center to the stand in any case.
Taking into account all of the above, the only rational repair option for a novice driver is to replace the cross beam. And the restoration of a damaged beam should only be carried out by specialists with the appropriate skills and equipment.
So, it is possible to replace the cross beam in a garage. The main thing is to carry out all the preparatory operations correctly and under no circumstances remove the beam without first hanging the engine. It is this mistake that novice drivers who are new to the design of the “seven” often make. Well, regarding the restoration and finishing of the beam, the driver will have to contact specialists.
Purpose of thrust rods on the VAZ 2107
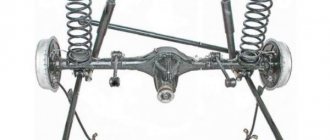
The purpose of the thrust rods on the VAZ 2107 is simple: to prevent the car from “walking” on the road and swaying strongly when entering sharp turns and when hitting various obstacles. This problem has been known since the days of early cars. They didn’t know about any jet thrust at that time, and the cars were equipped with ordinary springs. The result was natural: the car easily overturned, and it was incredibly difficult to drive. Over time, the car suspension was improved: a system of long rods began to be installed in it, which were supposed to take on part of the loads arising from road unevenness or due to an overly aggressive driving style. On the VAZ 2107 and other classic Zhiguli models, there are five jet rods: a pair of long ones, a pair of short ones, plus a large transverse rod, which serves as the basis of the entire traction system. All this is installed near the rear axle of the car.
This system can only be seen from the inspection hole, where all work on replacing broken rods is carried out.
Purpose of the beam
The main task of the transverse beam is to prevent the “seven” from tipping into a ditch when passing the next turn at high speed. When a car goes through a turn, a centrifugal force begins to act on it, tending to throw the car off the road.
The beam has an elastic torsion element, which, when a “seven” wheel occurs, thereby counteracts the centrifugal force. In addition, the transverse beam provides additional support for the VAZ 2107 engine. That is why, when dismantling it, the engine is always hung on a special block.
Weak points of car bodies VAZ 2101, 2103, 2106, 2105, 2107
The bodies of the “classics” - VAZ 2101, 2103, 2106, 2105, 2107 - have a number of problem areas, which gradually, as the mileage increases and some time passes, make themselves felt. These weak points are most susceptible to corrosion, the appearance of cracks, creases, and deformation of parts. Knowing them and knowing the reasons for their appearance, you can calculate what repairs your car needs or, when buying another car, detect them and reduce the price. Or don’t buy it at all if the car is really problematic.
List of weak points of VAZ 2101, 2103, 2106, 2105, 2107 car bodies
At the beginning of the list are weak points that directly affect the ability to operate the car and require immediate repair, then problems with which you can continue driving.
Front side members
The most common destruction of the front side members is in the area of the stabilizer bar mounts, since this area is most loaded due to the operation of the stabilizer. As a result, the stabilizer mounts simply fall off. Some car owners drill through the side members of the car and secure the stabilizer mounts with long bolts. But this measure is temporary; only digestion of the spars can help in such a situation.
The second most popular problem is the destruction of the front spar in the area where the steering gear is mounted. Also as a result of the constant load on the metal during the operation of the car’s steering. It can be fixed by welding a metal plate of a certain size and shape under the gearbox.
Rear axle longitudinal link bracket
Almost universally encountered malfunction of “classic” bodies. It requires immediate repair, since it is very difficult to drive with the rear axle “walking” from side to side.
Thresholds
Destruction of thresholds is a constant problem on all VAZ cars and “classics” are no exception. Periodic treatment of the hidden cavities of the sills and coating them on the outside with a protective composition somewhat postpones the need to replace them, but they cannot give a 100% guarantee against the occurrence and spread of corrosion, since these body elements are constantly exposed to dirt, water, and are sandblasted by sand and stones flying from under the wheels. . A “special” contribution to the rapid destruction of thresholds is made by plastic linings on them of various shapes.
Tuning and strengthening the body of the VAZ 2101
There is a large amount of body tuning that can be done on the VAZ 2101; the choice is based on only two factors: the further purpose of the car and the thickness of its owner’s wallet.
We will not delve into all the intricacies of the technological process, since when strengthening the body, a classic VAZ requires only imaginative thinking and hands growing from one place, we will discuss only some of the main, so to speak, basic options.
Front suspension strut
The universal front strut brace is designed to maintain the initial positions of the front suspension points during dynamic vehicle movement.
Strengthens the mudguard struts, which deform over time when the front suspension breaks down, thereby preventing and stopping the extrusion of the side members that has already begun, and increases the lateral rigidity of the body.
Installation of the spacer does not require any additional work; it is installed in the standard holes of the horizontal upper suspension mounts. At the same time, you additionally receive from 10 to 25% of the stiffness of the front glasses.
When tuning the body of a VAZ 2101, with the help of struts of this type (including in the rear), your car significantly reduces the risk of lateral skidding, which is very important when sliding sideways.
Purpose and design of the VAZ 2107 stabilizer
The design of the front suspension of cars of the VAZ 2101-07 family uses a front stabilizer, the task of which is to distribute the load as efficiently as possible. This is the load that the suspension of a domestic car experiences when turning and performing maneuvers on the road. Due to the presence of a stabilizer, the occurrence of a roll is eliminated, and the car is kept in a horizontal position. If you remove the front stabilizer, the driver will immediately feel how much the car will shift to one side during sharp turns or maneuvers. Moreover, the rolls are so large that the vehicle can tip over.
Structurally, the part of the suspension of the VAZ 2107 car under consideration consists of a long rod, which has the shape of the letter U. The rod is made of special steel, which has increased elasticity.
This is interesting! Springs for cars are made from similar steel, which have high strength, memory, and resistance to deformation.
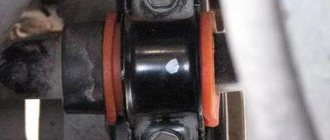
The part in question is fixed using a bracket with a rubber bushing. The ends of the bar are secured to the lower control arms, and the middle area is secured to the front of the body. During operation, depending on the mileage and driving habits of the car, wear occurs on the rubber bushings or stabilizer pads. When they wear out, they need to be replaced. However, first let’s look at the design of the unit in question:
- The rod is made of steel with increased elasticity. The diameter of the part is 18 mm. It has a U-shape.
- Brackets for securing the rod in the structure of the machine chassis. Their quantity is 6 pieces.
- Rubber bushings of the same sizes and diameters in the amount of 4 pieces.
Bushings made of rubber material are needed to soften the connection of steel parts. The stabilizer is attached in 4 places, but there are 6 brackets for fixation in its design.
The bar is activated only when the body shifts when turning or maneuvering. When driving in a straight line, the device is practically inactive. When maneuvering, one end of the device bends upward and the other downward, which leads to balancing stability. The harsher the driving style, the faster the rubber bushings of the front stabilizer on the VAZ 2107 will wear out.
Stub maintenance
The part in question rarely fails, however, as soon as the vehicle becomes unstable on the road, it is time to make repairs. When operating a classic, several types of malfunctions of the VAZ-2107 anti-roll bar bar occur. Some of these malfunctions include:
- The rubber bushings, which act as a damper between the rod and the car body, wear out.
- The pins that secure the device to the levers break off.
- The U-shaped fastening comes off. Four such brackets attach the middle part of the stub to the body of the seven.
Servicing the SPU is a simple process that includes replacing the rubber bushings. To change them, you will need to dismantle the part, remove the worn rubber bands, and replace them.
It is important! It is recommended to change all rubber seals of the stabilizer so that you do not have to replace it again after a short period of time.
Most often, rubber seals have to be replaced, and cases of stud breakage rarely occur. Usually the result of a breakage is extreme driving, so in order to prolong the life of the studs, it is advisable to drive moderately. Identifying a device malfunction is quite simple. If a roll occurs on sharp turns, accompanied by the formation of loud sounds, this means that the end of the rod has become free and is now in contact with the metal of the lever.
Changing classic stabilizer bushings
We recommend inspecting the bushings every 30–50 thousand km. However, parts can last 100 thousand or more if you drive moderately and do not overload the suspension. You can detect wear visually, but to do this you should look under the front end. The presence of cracks in the rubber bands, as well as visible gaps between them and the bar, indicate that the bushings need to be replaced. The more wear the rubber bands have, the higher the chance of hearing unpleasant knocks in the suspension and experiencing a deterioration in the car's handling. To restore the original controllability and control confidence, you will need to replace the VAZ 2107 stabilizer bushings.
To replace the rubber bands, you will need to completely remove the bar from the suspension. It is recommended to carry out work on replacing the device directly from the inspection hole or by placing the car on an overpass. The algorithm for replacing stabilizer bushings is as follows:
- dismantling begins with the need to jack up the front of the car, hanging both wheels. This will relieve the rod, which will simplify its removal;
- using a ratchet wrench with a 13 mm head, unscrew the nuts that secure the clamps of the device to the suspension;
- using a pry bar, you need to remove the brackets from the studs;
- dismantle the structure and mark the location of the old bushings;
- dismantling old rubber bands is very simple, since they already sit loosely on the stub and can simply be cut off or pulled together by hand;
- We recommend cleaning the inside of the device mounting clamps from rust. You can use a round file for this;
- treat the holes of the rubber seals with a soap solution, then put them on the rod to the place where the old ones are installed;
- install the stabilizer in place;
- When installing, the most important thing is not to mix up the ends of the stabilizer, otherwise the device will not function correctly. That is why before dismantling, appropriate marks should be made;
- screw the fastening clamps into place.
Question answer
In response to all of the above, I personally have a reasonable question: what exactly prevented the designers from initially achieving maximum values of torsional rigidity* of the VAZ 2101 body?
Firstly, this is the mass of the car. That is, here is the principle of the “golden mean”: either we reduce the weight of the car or increase its strength. Of course, we can suggest using more modern materials as the amplifier material, for example, carbon and titanium, but here another pitfall awaits us - the price.
Secondly, safety. There is such a thing as active and passive safety, and so, the engine compartment of a car plays an important role in passive safety. It should be as less rigid as possible so that its deformation has time to absorb the main force of the impact.
So designers have to look for compromises and come up with ideal balances for calculating torsional stiffness indicators.
Torsional stiffness* is the ratio of newton meters to degrees (Nm/deg.). The more force we apply (newton - meter), the greater the angle (degree) through which the car body is deformed. For the VAZ 2101 this value is 7300 Nm/deg, and after we strengthen the body of the VAZ with our own hands, this figure will increase by about 20-25%.
Signs of the need to replace stabilizer bushings
The main signs of wear on the stabilizer bushings are knocking and squeaking noises when the car is moving on an uneven road. In this case, it is necessary to immediately replace them with new ones.
To check the condition of the bushings in a garage, you need to strongly shake the stabilizer in the vertical direction. The wear of the bushings will certainly manifest itself as a creaking or knocking sound, and play will be felt in the connection of the stabilizer with the side members and levers. With serviceable bushings, the “stabilizer-spars-levers” combination creates the impression of a single whole.
Node maintenance
During the operation of classic Zhiguli models, several malfunctions associated with stabilizing traction occur:
- wear of stabilizer bushings on VAZ 2107;
- breakage of the upper or lower pin on which the ends of the rod are screwed to the lever;
- separation of the U-shaped fastening strip welded to the lever at the factory.
Broken studs are quite rare and are the result of metal fatigue. The malfunction is characterized by sharp rolls when turning, accompanied by loud metallic knocks. This unpleasant sound is produced by the released end of the rod clinging to the side of the lower arm. It’s quite easy to fix the damage, even while on the road in the middle of a field: a regular bolt and nut are put in place of the torn stud.
The fastening U-shaped strip of thick metal comes off very rarely. Which entails a labor-intensive process of replacing the lower arm, since welding it to the old one is useless, the part will very quickly break again. If any of these two troubles occur, it is possible to drive a car, but only very slowly, especially on turns.
The VAZ “classic” stabilizer bushings are replaced when they wear out approximately once every 20 thousand km. mileage Wear is clearly visible visually; you just have to look under the front of the car and make sure that the rubber bands are cracked and do not cover the traction properly. In advanced cases, bad bushings make themselves felt while driving, when the car sways and tilts dangerously.
To install new bushings, you will have to completely remove the VAZ stabilizer. It is most convenient to carry out work from the inspection hole, although if necessary, you can do without it. To disassemble and replace, you will need a pry bar, 2 13 mm wrenches and a powerful screwdriver. Replacement is carried out as follows:
- It is easiest to remove the rod when the springs are completely unloaded. Therefore, it is recommended to hang both front wheels of the car.
- Using a 13 mm wrench or socket, unscrew the nuts on all brackets.
- Using a pry bar, remove the brackets from the studs one by one.
- Remove the rod and use a sharp tool to mark the position of the old bushings, as well as the right and left sides.
- Old rubber bands can be cut off with a knife.
When finished, the rod must be thoroughly soaped (do not lubricate it with oil!) and new bushings must be tightened, and then the assembly must be assembled. When assembling, it is undesirable to confuse the right and left ends of the stabilizer, which is why marks were placed on them. In the end, you need to check the car while driving and go to a car service center to correct the wheel alignment of the front wheels.
Installation
If a grinder was used, it is important to remove all remnants of fasteners with a mounting spatula. How do you then replace the VAZ-2107 jet rods? After this, the new element is installed in the previous mounting locations. But installation may be difficult. Since the old rod could no longer cope with its task, the bridge could “move” a few degrees to the side.
To ensure that the new link is properly secured, rest the mounting blade against the bracket and unscrew the bridge until the holes line up. Next, tighten all the bolts and nuts. The same procedure is performed on the second side. For tightening, use the same wrench and a 19mm hex head.
vote
Article rating