March 15, 2019 Lada.Online 43 307 0
According to the maintenance regulations for Lada Granta, Lada Kalina and Lada Priora cars, the technical condition of the front suspension parts must be checked every 15,000 km. mileage You can determine the causes of knocks and squeaks in the suspension using self-diagnosis.
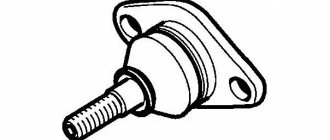
Replacing the ball joint of the suspension arm
Brake the vehicle with the parking brake and place wheel chocks under the rear wheels.
Loosen and tighten wheel bolts only with the vehicle on the ground. The tightening torque of the bolts is 65–95 Nm (6.5–9.5 kgf m).
1. Raise and place the front of the vehicle on supports.
Remove the wheel.
2. Unscrew the ball joint nut using a 19mm wrench.
3. Press the ball joint pin out of the lever using a puller.
Puller for ball joint of suspension arm.
4. If there is no puller, do not unscrew the nut completely.
Press the lever with a pry bar and use a hammer to press the hinge pin out of the lever using a hammer along the axis of the lever.
After this, finally unscrew the nut.
5. Unscrew the two bolts securing the ball joint to the steering knuckle using a 17mm wrench
6. Press the lever down with a mounting tool and remove the ball joint
7. Before installation, lubricate the hinge and the internal cavity of the cover with grease
8. Install the ball joint in the reverse order of removal.
After lowering the car to the ground, rock it vigorously several times.
Tighten with the appropriate torques: nut securing the ball joint to the lever - 80-96 Nm (8.0-9.6 kgf m), nut securing the ball joint to the steering knuckle - 50-63 Nm (5.0-6.3 kgf m).
After driving 100 km, tighten these threaded connections again to the required torque.
When installing, be careful not to damage the ball joint protective boot.
We replace the front suspension arm when the silent block is worn out or the arm itself is worn out and deformed.
We also remove the lever when repairing the front suspension.
To check the silent block of the front suspension arm, insert a mounting blade between the body bracket and the head of the arm and try to move the arm along its axis and along the axis of the bolt.
If the lever moves freely, without effort, it means that the silent block of the lever is badly worn or damaged, and it needs to be replaced.
Cracking or swelling of the rubber of the silent block is not acceptable.
To replace the lever, place the car on a lift or inspection ditch.
Remove the middle engine splash guard.
We disconnect the ball joint from the lever, as described at the beginning of the article.
Unscrew the nut securing the brace to the front suspension arm and remove the washer.
Unscrew the nut of the bolt securing the stabilizer bar to the arm and remove the bolt.
Using two 19mm wrenches, unscrew the nut of the bolt securing the lever to the body
Use a bronze or aluminum drift to knock out and remove the bolt, remove the lever from the bracket and remove it
Using a vice and suitable tool heads, press out the silent block
Using a chisel, we knock down the silent block of the guy wires on one side and the other.
New silent blocks are moistened with soapy water and pre-pressed in a vice
We finally press the silent blocks by striking a punch with a diameter of 8 mm through three windows in the rubber layer
Install the lever in reverse order.
We tighten the threaded connections of rubber-metal hinges when the car is on its wheels.
Tightening torques:
— nut of the bolt securing the front suspension arm to the body 79 – 96 Nm (7.9 – 9.6 kgf.m);
— nut of the bolt securing the stabilizer bar to the front suspension arm 43 -52 Nm;
— nut securing the brace to the front suspension arm 163 – 176 Nm (16.3 – 17.6 kgf.m);
After installing the lever, you need to check the angles of the front wheels.
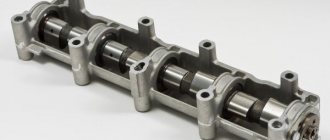
Front suspension components Lada Kalina, Granta
The front suspension of the Lada Kalina/Granta VAZ-2190 is independent, with telescopic swivel struts, wishbones, longitudinal bracing arms and a torsion-type anti-roll bar.
The front suspension strut consists of a housing in which a hydraulic telescopic coil spring shock absorber and an upper support are installed. A bracket for attaching the steering knuckle, a swing arm and a lower spring support cup are welded to the outside of the strut body.
Depending on the vehicle configuration, the strut may have a barrel-shaped or conical spring. The spring's lower coil rests against the lower support cup, and its upper coil rests against the upper support cup mounted on the shock absorber rod.
Also on the Lada Granta/Kalina shock absorber rod there is an upper strut support, consisting of a housing, a rubber cushion and a bearing. The support body is attached to the car body with three studs and nuts.
Options
As you can see, the quality and durability of a ball joint for any car is built on these important details. And for the VAZ-2110, the support should have the following parameters, if you can check them:
- finger angle - minimum 50°>;
- finger swing moment - 0.4-0.8 kGs/m >;
- moment of finger scrolling - 0.4-0.8 kGs/m >;
- the force of destruction of the top cover (pulling out a finger) is 2900 kgf .
Article number and cost of analogues of original ball joints
The lack of stable quality of original ball joints forces car owners to search for good analogues from third-party manufacturers. At the moment, the market is filled with a lot of alternative spare parts options. The price for non-original supports is comparable to the original. The best brands of balls are presented in the table below.
Table - Recommended alternatives to ball joint 11180-2904192-00.
| Manufacturer | vendor code | Approximate cost, ruble |
| BelMag | BM.0033 | 370-400 |
| Hofer | HF815503 | 300-350 |
| Pilenga | TS-P 3142 | 380-420 |
| Stellox | 52-00840A-SX | 400-430 |
How to replace a ball joint on a VAZ car?
Raise the car with a jack and remove the wheel.
Advertisement
Unscrew the ball joint using a 19 key.
Unscrew the two nuts a little higher, here you need a 14mm wrench.
Advertisement
Using a crowbar, you need to lift the upper arm of the front suspension and remove the ball from the mount.
We install the new ball joint and tighten all the bolts and nuts into place.
Additional recommendations for replacing the ball joint
There are special stock Lada Granta ball joints for sale for sporty driving. They have increased strength. Many car owners recommend installing them. According to reviews, the service life of tuned supports is 20-30% longer than original ones.
"Sports" ball joints for Lada Granta
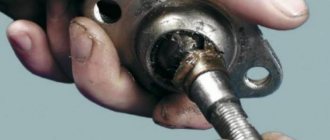
The service life of the ball joint is directly proportional to the quality and quantity of lubricant under the boot. Therefore, it is recommended to remove the cuff and check the contents before installation. For fear of tearing the boot, car owners apply additional lubricant using a syringe, bending the rubber band on one side.
Adding Additional Lubricant
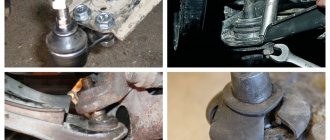
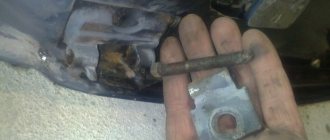
You can dismantle the ball joint without a puller. To do this, you will need to remove the lever with accompanying elements in the assembly.
Dismantled lever
Hammered out ball joint
If you do not have special tools, you can remove the support from the lever by knocking it out with a hammer. Strikes should be applied sharply and accurately. With this method of dismantling, the risk of damage to the lever and ball seat increases significantly. For this reason, experienced drivers still recommend purchasing a puller, the cost of which is from 500 to 1400 rubles.
Replacing Lada Granta struts and supports - several important features
If the rear suspension is more or less clear, then the front suspension always hides more mysteries. It is the front struts and supports that most often fail. Unless you constantly pull a trailer or tow careless friends. The load on the front of the car is always increased, so you often have to work with the front suspension parts. Changing the front struts on a Grant is not so easy:
- first you need to completely remove the rack and disassemble the lower parts of the chassis for subsequent installation on a new mechanism for damping road irregularities;
- if the rack is installed as a new assembly, then there will be much fewer problems, you just need to install a new one in place of the old mechanism and reassemble it in the reverse order;
- if only the liner is changed, it is worth completely disassembling the strut, removing the spring and taking out the shock absorber, checking the degree of wear of all parts and the need to replace them;
- Next, you should replace the strut liner, carry out technical checks right at the assembly site and reassemble the shock absorber to its original position;
- Next will be the installation of the rack in place, assembly and rough diagnostics of all the components that you repaired, this will give complete confidence in the quality of the work.
You need to acquire tools such as a set of wrenches and sockets, a spring puller, a pry bar, pliers, screwdrivers and other available tools. Otherwise, you will not be able to completely disassemble the part and carry out its normal restoration. Of course, there are certain difficulties in carrying out this process, so it is better to take your Lada Granta for service and complete all the work in just over an hour. We invite you to watch the video of the process of replacing the strut on front-wheel drive VAZ vehicles:
Required tools and materials for replacement
To independently replace the ball joint on a Lada Granta car, you need the tools from the list below.
Table - Tools and materials required to replace the ball joint.
| Name | Note |
| Socket head | Torx E12 |
| Vorotok | Under the end cap |
| Ball joint remover | Makes it easier to remove the ball joint from its seat |
| Balloon wrench | For dismantling and installing wheels |
| open-end wrench | "at 17", "at 19" |
| Hammer | Required if you do not have a ball joint remover |
| Jack | To lift the car |
| Wheel chock | For fixing the rear axle |
| Penetrating lubricant | To make it easier to unscrew stuck threaded connections |
| Grease | To fill the boots in case the manufacturer has supplied too little lubricant |
| Rags and wire brush | For cleaning fasteners and working surfaces |
Ball joint puller
Video review on replacing ball joints on Grant
For those who are too lazy to understand photo reports, everything can be shown clearly and easily using the example of a video review, which was taken from open sources.
This concludes this repair report.
Before starting work, you need to prepare: a set of keys, a universal puller, a jack, WD-40 fluid, as well as new spare parts.
1. Before starting work, apply a few drops of WD-40 to threaded connections that you think may have problems. They will be different for everyone, it all depends on the condition of the car, the roads on which it drives, and the attitude of the owner towards this car...
2. Unscrew the ball joints. There are two TORX bolts that are attached to the hub; for this we take an E12 head.
Let's sum it up
There are a number of features of operating the Lada Granta on Russian roads. For some reason, a domestic car is not very suitable for our roads; it crashes and fails instantly. Sometimes you come across a well-built car that doesn’t show any character after 100,000 kilometers. But in most cases, the Garnet justifies the title of the cheapest car in the Lada line. And when it comes to racks, the manufacturer saves a lot on these elements. The installation of low-quality suspension elements leads to the fact that more and more people, after purchasing Grants, repair it under warranty.
However, sometimes it is better to cancel the warranty and install normal racks, supports and other parts. In this case, you will ensure the normal service of your car’s suspension and will be able to establish normal operation of each unit. This will take a certain budget, but can provide you with comfortable movement without any particular difficulties or problems. Of course, even the best quality rack will eventually fail. But it can travel far beyond 100 thousand kilometers. What brands of spare parts do you choose to repair the suspension of your Lada Granta?
Which ball joints are better for the VAZ-2110: reviews, articles
As often happens, the most popular spare parts are produced by all and sundry, to the detriment of quality and in favor of price.
The service life of a VAZ-2110 ball joint rarely exceeds the hundred thousand mark, so there is always a demand for this part. And since there is demand, there is more than enough supply on the market.
In order not to throw money away and not experiment with your car and safety, let’s look at the issues of buying a ball for tens in more detail.
Features of ball joints on the VAZ-2110
Structurally, the support, as one of the main elements of the suspension, bears a huge load.
Not the same as in the classic double-wishbone suspension, but even in the MacPherson suspension it gets a lot of mileage.
The main purpose of the unit is to transfer force to the steering knuckle without losing the possibility of angular movements in all planes.
The simplest technological solution for this was a design based on a threaded ball pin, rolled into the body through plastic inserts.
Ball circuit.
As can be seen from the diagram, it is almost impossible to spoil anything in the simplest design. However, some manufacturers and artisanal cooperative enterprises manage to mess up here too.
Differences between a good ball and a low quality fake
Fortunately, we know how to distinguish a good support for a VAZ-2110 from a cheap fake, not only by brand (more on them later), but also visually:
- Let's look at the finger . The thread on it cannot under any circumstances be cut on a machine. It should only be forged or rolled. Pay attention to the color, it should be ashy with scale. This indicates the correct production technology and heat treatment of the finger.
- Frame . On dozens, the body is ball-welded, but we should see the welding points only on one of the halves. The halves fit neatly, distortions are excluded. The top cover should have a slot in the form of a neat hemisphere, but not an oval or other shape. It is important that the top cover must be made of hardened metal. This can be checked easily - two or three movements with a needle file, and a damp, low-quality lid will give itself away. The lower part of the body must be strictly cylindrical, and a cadmium-plated grease fitting is screwed into the lower part
- There is also a hemisphere on the finger, which should also be made of hardened metal.
- Support work . We take the ball in our hands, hold the body and rotate the finger, swaying it from side to side. It is strictly unacceptable for the finger to get jammed - it must turn with a uniform, slight force. If the effort is uneven, it turns with jamming, we immediately look for another option, it’s a fake. If the finger is stuck to the liners and does not give in, we also leave this support, we can do without broken lower arms.
- Boot and fasteners . The boot is made of elastic but durable rubber; it has a metal ring at the bottom for pressing onto the body. Correct supports are sold with fasteners - the nut should be cadmium plated, with a light plastic insert.
Reinforced ball joint BZAK.
Video
This video shows in detail the design of the ball, what it is used for, etc.
Here you can clearly see how a ball joint works in motion.
How to diagnose the suspension yourself.
Diagnostics of steering tips and balls.
This video shows how to check the suspension.
Checking and replacing the ball joint on a FORD FOCUS 2 / FORD FOCUS 2 car.
The suspension of any car consists of many different parts that have different functions. One of these parts is a ball joint, which is a connecting part that allows the front wheels to rotate in different directions. If a part malfunctions, serious consequences can arise, so we will figure out how to check the ball joint of a VAZ 2107, and what may be needed for this.
Reasons for failure
There are several reasons why a ball joint may fall out. Let's consider the main ones:
- Wear . The most common malfunction that occurs on cars.
- Insufficient lubrication in the boot leads to the fact that the finger begins to creak and may eventually simply break.
- The penetration of dirt and water into the ball contributes to the development of corrosion, which can affect the operation of the vehicle. At best, a wedge and the inability to turn the wheels; at worst, the car will fall onto the asphalt.
To avoid consequences, it is necessary to regularly diagnose and maintain ball joints.
Diagnostic operations
How can you diagnose the condition of ball joints on a Lada Kalina:
- The first thing you need to pay attention to is the condition of the boot. If it has cracks or is torn, then it must be removed and the ball should be inspected.
- We hang the wheel a little and swing it up and down with our hands. If there is play, then it’s time to replace the ball.
- The presence of a squeak, as well as heavy turning of the steering wheel, can also be signs that the ball joints are in critical condition.
- Instability in control, namely departure from the trajectory of movement to the left or right, with the steering wheel in a level position, indicates that the ball joint has failed.
The easiest way without a jack and lift
If the part is on top, you must do the following:
- Stop on a level surface and put the car on the handbrake.
- Ask a passenger for help to press the brake pedal. If there is no one to help you, then use improvised means (for example, a shovel). Lock the brake in the pressed position.
- Start to gradually swing the top of the wheel away from you, towards you.
In the event of a malfunction, these actions will lead to play. In addition, extraneous creaks will be clearly audible. However, using the presented testing technique, failure can only be determined if there is significant wear on the suspension element.
Diagnostics of the ball joint condition
The car owner can learn about the need for diagnostics by the following symptoms of a ball joint malfunction:
- driving over small humps and pits is accompanied by extraneous sounds emanating from the front suspension;
- There is a knocking sound in the wheel arches when entering a turn at speeds over 35 km/h;
- it becomes more difficult to turn the steering wheel and a creaking and grinding noise appears;
- decreased level of control over the car when cornering;
- partial loss of vehicle control while driving on uneven road surfaces.
To indirectly check the condition of the ball joint, you must use the method below.
- Hang the wheel on the side where the ball joint is expected to fail.
- Firmly grasp the tire with one hand from below and the other from above.
- Shake the wheel rim. If this is successful, then more accurate diagnostics of the suspension is required. Play can indicate not only a malfunction of the ball joint, but is also often a consequence of excessive wear of the stabilizer struts or steering tips.
Checking wheel play
You can more accurately identify a faulty ball joint if you gain access to the car from the bottom. To do this, you need to use an overpass, inspection hole or lift.
- Insert the mounting bracket between the lever and the ball.
- Shake the mount.
- The presence of noticeable play is unacceptable, as it is a sign of the need to replace the support.
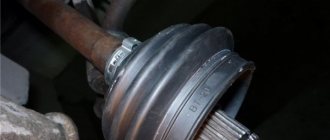
Having gained access from below the machine, you should visually inspect the boot. It should not show any mechanical damage, such as cracks or tears. Seeing grease is also a reason to pay attention to the ball joint.
Leaking grease on the ball joint boot
The most accurate diagnosis of the ball can be carried out by dismantling it. The support must be clamped in a vice and the axial and radial movement of the pin must be checked. It should not move due to hand effort. The presence of any play indicates that the ball joint must be replaced.
Checking the axial and radial movement of the pin in the support clamped in a vice
A torn boot, in most cases, signals the need to purchase a new support. Still, if you want to save money, you can conduct a more detailed diagnosis of the condition of the lubricant and, based on the test results, decide on the advisability of replacement. If it is noticeable that dirt is present inside the ball, then applying new grease on top does not make sense and you will need to buy a new spare part.
If you do not want to troubleshoot or have doubts about the failure of the ball, it is recommended to contact a service station.
Checking the car on special equipment, for example, a vibration stand, will show the true breakdown quickly and with high accuracy.
Which racks to choose for the Lada Granta - install normal spare parts
Selecting quality parts for car maintenance and repair is an important task for every motorist. In order for the car restoration to be high-quality and durable, it is better to use the most interesting options for parts with a sufficiently high quality. It is worth remembering that the reliability of spare parts determines their service life, as well as the quality of operation. Unfortunately, the cost of parts also greatly depends on this factor. Today we will talk about the racks that are best used on the Lada Grant. Considering the fact that factory suspension elements fail after a maximum of 50,000 kilometers, you have to look for something more interesting and non-standard. You can buy factory solutions again only under warranty, when you will receive a free replacement and will not charge money directly for the racks.
Today you can buy a shock absorber liner from any manufacturer, including some of the most amazing brands from around the world. In this case, it is not necessary to change the rack assembly; you can make a constructor by installing an insert of a specific selected type. This will completely change the behavior of the car. The stock shock absorbers on the Grant are simply amazing - they behave exactly as the Lada 2110 did back in 1998. There have been no significant changes in the suspension. At least regarding the struts and operating comfort of the car. There are different brands and specific recommendations for the types of racks. Let's take a closer look at each aspect of purchasing new suspension parts. This will help you better service your car and obtain the necessary features for operating a vehicle.
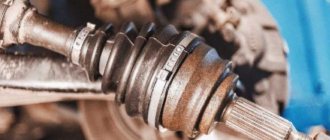
Removing the ball joint
The operation is performed when replacing a ball joint. We install the car on an inspection ditch or overpass. We hang up the front of the car and remove the wheel from the side of the ball joint being removed. We wet the screws securing the ball joint to the steering knuckle with penetrating liquid. If there is no puller, unscrew the nut securing the ball joint pin not completely.
We install an adjustable stop under the nut with a pin, tighten it and, striking the lever with a hammer, press the pin out of the lever. After pressing the pin out of the lever, unscrew the nut completely.
Using the E-14 head, unscrew the two screws securing the ball joint to the steering knuckle...
...and remove the ball joint. The ball joint can also be removed with a special puller. In this case, unscrew the pin fastening nut completely.
Using the tool shown in the photo, press the ball joint pin out of the lever. Unscrew the two screws securing the ball joint to the steering knuckle and remove the ball joint (see above). A working ball joint should have no play in its pin. We replace the faulty support with a new one and install it in the reverse order.
Other causes of ball failure
- Natural wear and tear. As mentioned above, each car part has its own lifespan. It all depends on many factors: the quality of the ball, the presence or absence of increased loads, car care, lubricant production, exposure to high and low temperatures, etc.
- Operation in extreme conditions. Breakneck speed, reckless driving on the roads, and constant off-road driving are a serious test even for the suspension that is designed for this. It is clear that the ball joint in such cases fails much earlier than in cars that are used exclusively in urban conditions.
- Lubrication production. Lubricants evaporate and dry out over time, and without them, the structure fails much faster. Moreover, even new parts should be lubricated additionally, since the manufacturer often leaves too little lubricant.
Ball failure usually makes itself known in advance. The main thing is not to turn a blind eye to these symptoms and go to the service station on time.
Symptoms of the malfunction Description of the breakdown When overcoming obstacles, knocking and other extraneous sounds are heard in the wheel area. A characteristic clanging and knocking sound is heard no matter how fast the car is moving. Extraneous sounds are best heard if the car is well loaded and the wheel hits a hole or any other pothole on the road. Even if the knock was heard only once (although this phenomenon usually repeats periodically), this is a reason to contact a specialist
Please note: knocking and clanging can also occur in winter (in sub-zero temperatures) if the lubricant in the CV joint freezes. The wheel alignment characteristics have changed. There are often cases when a problem cannot be detected with the naked eye. During a routine inspection at a service station, specialists will definitely warn you that the ball joint on one of the wheels has worn out and needs to be repaired.
The only visual sign that may indicate a malfunction is the “eating” of rubber on the edge of your car’s wheel. It has become more difficult to drive a car. When play occurs due to a broken ball joint. The wheel wobbles while driving, and this wobble is transmitted to the car: it is no longer able to drive smoothly. As the speed increases, handling only gets worse. Moreover, this symptom can be diagnosed at an early stage in cases where the car is driven exclusively on smooth city roads. If you constantly travel, go to the country or to the forest on dirt roads, the deterioration in handling will not always be noticeable. The wheels squeak when turning. Another sign of a bad ball joint is the squeaking noise that the front wheels make. If the sound comes from another place, the breakdown may be hidden by the steering rack or power steering. Tires wear unevenly. As a result of damage, the steering wheel ball occupies an uneven position and is at an angle to the road surface. In this case, along its inner edge (which is closer to the engine), the tread begins to wear out more than on the remaining surface of the tire. This malfunction can be detected both visually and by ear: the damaged wheel beats while driving. The trajectory of the car changes directly during braking. If you notice that the car goes sideways when braking, then most likely it has a damaged ball joint. Moreover, the car always tilts exactly in the direction on which the faulty spare part is located. One of the wheels will be tilted due to wear on the ball joint, and will begin to make characteristic clicks during braking.
In order to correctly diagnose damage, it is necessary to carefully check the entire suspension. A car is a complex piece of equipment that only works properly if all its elements are in order. And one breakdown can lead to another over time.
This is why it is so important to diagnose the problem at an early stage. This will help you avoid unnecessary expenses and save your nerves