This category was created specifically for the request of replacing the steering column of a VAZ 2107 injector - we invite you to visit us. All about renovation. Here we teach you how to repair a car yourself. How to repair a car yourself at home. We will help you with repairs and repair the car yourself. We know how to restore a car with minimal investment. I have attached video instructions.
Category: Auto repair article
Laughter in the topic: A young man was admitted to the hospital with a broken leg, a dislocated collarbone, and a broken jaw. Doctor: - Were you in an accident? - No, he sneezed in the closet.
Published by Admin: at the request of Yakub
Criticism of the car owner: 1. Reliable engine (with timely maintenance) -2. Economical consumption in winter: highway - 7.2 liters, city - 7.4 (sometimes more than 7.6) -3. high ground clearance of about 200 mm, and short overhangs - I can easily park against the curb until the wheel stops - important for women and inexperienced drivers.-
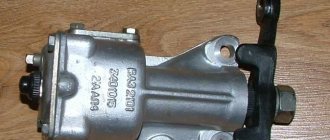
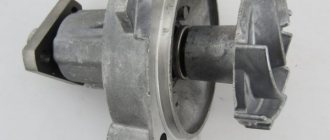
Standard check and repair of the steering mechanism VAZ 2104-2105-2107
Carefully inspect the working surfaces of the roller and worm for signs of wear, jamming, dents or scratches. Replace worn and damaged parts.
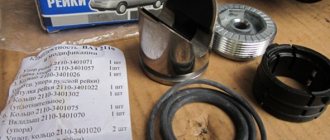
The size of the gap between the bushings and the bipod shaft, which should not exceed 0.10 mm. If the gap is larger than indicated, then change the bushings using mandrel A.74105.
On the inner surface of the VAZ 2105 bipod shaft bushings there are spiral grooves that extend only onto one side of the bushing. When pressing in the bushings, position them so that their ends, which have groove outlets, are inside the opening of the VAZ 2107 crankcase, and the groove outlets are placed opposite each other. The ends of the bushings should recess into the crankcase hole by 1.5 mm.
Before pressing, lubricate new bushings with transmission oil.
After pressing into the crankcase, completely machine the bushings with a reamer A.90336 to a size of 28.698–28.720 mm. The installation gap between the bipod shaft and the bushings should be within the range of 0.008–0.051 mm.
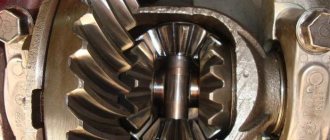
Check the ease of rotation of the bipod shaft roller on the ball bearing.
The ball bearings of the VAZ 2104 worm and the roller should rotate freely, without jamming, and there should be no wear or damage on the surface of the rings and balls.
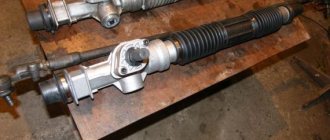
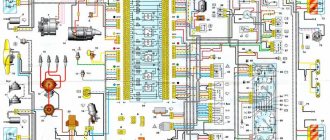
Replacing the steering column on a VAZ 2106
Steering wheel replacement
gearbox and shaft on my
VAZ
2104. It cannot be said that the old gearbox was already completely dead.
Replacing the steering gear and shaft on a Zhiguli VAZ 2104 “classic”. Part 1
The steering column has been
on
a VAZ 2107
, I also installed an additional amplifier for
the steering column
.
- Parts of the steering gear housing for Lada Classic
- 1 - crankcase
- 2 - bipod
- 3 - lower crankcase cover
- 4 - shims
- 5 - outer ring of the worm shaft bearing
- 6 - separator with balls
- 7 — bipod shaft
- 8 - adjusting screw
- 9 - adjusting plate
- 10 - lock washer
- 11 - worm shaft
- 12 - upper crankcase cover
- 13 - sealing gasket
- 14 — bipod shaft bushing
- 15 - worm shaft seal
- 16 — bipod shaft seal
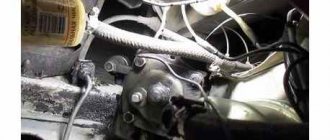
↑ Removing the steering mechanism from the car
- Disconnect the wires from the battery and remove the horn switch trim using a screwdriver.
- Remove the steering wheel.
- Remove both halves of the steering shaft cover.
NOTE! If it is necessary to remove only the steering gear housing, unscrew the bolt securing the lower end of the intermediate steering shaft to the worm shaft and the bolts securing the housing to the body side member.
- Remove the instrument panel and disconnect the plug blocks of the three-lever switch from the plug blocks of the wire harness.
- Disconnect the wires from the ignition switch terminals by unscrewing the fastening screws and pushing in the lock latch, remove the ignition switch.
- Loosen the clamp securing the housing of the turn signal switch, headlights and windshield wipers and remove it.
- Unscrew the bolt securing the lower end of the intermediate shaft to the steering gear worm shaft.
Steering wheel play
The appearance of steering play can be caused by two reasons. First, the nut securing the steering wheel to the shaft is loosened. If the nut is not tightened promptly, the splines on the handlebar and shaft will become damaged over time and one of these parts may need to be replaced. The second reason may be wear of the worm gear. To eliminate this malfunction, a special device is provided - an adjusting bolt with a lock nut.
In order to adjust the worm gear, the nut is released, the screw is turned using a screwdriver until the backlash is eliminated, after which the nut is tightened to prevent spontaneous unscrewing. If it is impossible to eliminate the backlash by adjustment, it means that the gearbox needs to be repaired and the worm pair replaced.
To prevent premature wear of gearbox parts, periodic monitoring of the oil level and its replacement is recommended. Level control is carried out as follows:
- Using a 8 key, unscrew the filler plug;
- Use a screwdriver or other object to check the oil level. It should be level with the bottom edge of the filler hole.
- If necessary, add oil using a special supercharger until it begins to flow out of the hole.
To change the oil, unscrew the screws securing the gearbox cover, having previously placed a container under it to collect used oil. Since complete removal of the cap is not required, it is moved to the side and the oil is drained. This operation is best performed on a hot engine. Warm oil has greater fluidity and drains faster. After all the oil has drained out, the cap is screwed into place and new oil is poured into the gearbox using the method described above.
↑ Steering gear parts
1 — steering gear housing; 2 - shaft seal; 3 - intermediate shaft; 4 - upper shaft; 5 — fixing plate of the front part of the bracket; 6 — bracket for fastening the steering shaft; 7 - upper part of the facing casing; 8 — bearing sleeve; 9 — bearing; 10 — steering wheel; 11 — lower part of the facing casing; 12—bracket fastening parts.
- Unscrew the bracket mounting bolts 6 and remove the steering shaft with the bracket.
- Unscrew the nuts securing the ball pins of the side and middle links to the bipod, and then use a puller A.47035 to press the ball pins out of the holes in the bipod.
- Remove the steering gear housing by first unscrewing the bolts securing it to the body side member.
- Unscrew the screws securing the steering shaft seal and remove it.
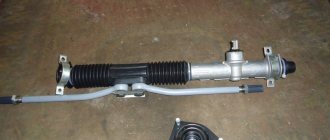
Steering column repair
The steering mechanism is subject to constant friction from the elements located inside, which eventually leads to their wear. As a result, repair work or complete replacement of the unit is required.
How to remove a column
Removing and repairing a gearbox is a difficult procedure, but it can be done on your own if you have at least a little experience in car repairs. To perform the operation you will need the following list of tools:
- wrenches 17 (socket and open-end);
- socket heads for 17;
- handle with ratchet;
- mount;
- hammer;
- steering rod puller;
- collar
↑ Installing a steering gear on a car
Having secured seal 2 to the front panel, install the steering gear housing onto the side member without fully tightening the nuts of the housing mounting bolts.
↑ Installation diagram of the steering mechanism on the VAZ-2107
1 — steering gear housing mounting bolts; 2 — coupling bolt of the lower end of the intermediate shaft; 3 — bracket mounting bolts; 4 — steering shaft bracket; 27.5 mm - the distance from the center of the bipod hole to the supporting surface of the steering gear housing with the bipod in the middle position.
Use a special device to orient the crankcase so that the angle “a” does not exceed 32°, and the gap between the shaft and the brake pedal is at least 5 mm. Then fully tighten the crankcase mounting bolt nuts.
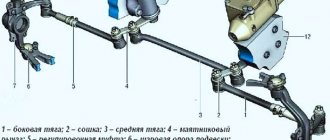
↑ Checking the ball joints of the steering rods
- First of all, check the movement of the rod tips along the axis of the fingers. To do this, using the lever and support, move the tip parallel to the axis of the finger.
- The axial movement of the tip relative to the finger should be 1–1.5 mm. This movement indicates that the pin insert is not jammed in the rod tip socket and moves along with the pin, compressing the spring. Replace the hinge with a jammed insert.
- While rocking the steering wheel in both directions, check by touch that there is no free play in the steering rod joints. If you feel free play in the ball joint, replace the tie rod end or tie rod assembly.
- Check the condition of the protective caps of the steering rod ball joints.
- If the protective caps are in good condition and ensure cleanliness inside the hinges, then the service life of the latter is practically unlimited. When moisture, dust, etc. gets into the hinge, premature wear of its parts occurs.
The cap must be replaced if it has cracks, ruptures, and also if lubricant penetrates out when squeezing it with your fingers.
↑ Section of the steering gear housing
1 — plate of the adjusting screw of the bipod shaft; 2 — bipod shaft adjusting screw; 3 — adjusting screw nut; 4 — oil filler plug; 5 — steering gear housing cover; 6 - worm; 7 — steering gear housing; 8 — bipod; 9 — nut securing the bipod to the shaft; 10 — spring washer; 11 — bipod shaft seal; 12 — bipod shaft sleeve; 13 — bipod shaft; 14 — bipod shaft roller; 15 - worm shaft; 16 — upper ball bearing; 17 — lower ball bearing; 18 — adjusting shims; 19 — lower worm bearing cover; 20 — roller axis; 21 — roller ball bearing; 22 — worm shaft seal; B, C - marks.
- Set the bipod of the steering mechanism to the middle position, for which align the marks on the crankcase and on the worm shaft (see figure).
- Temporarily install the wheel on the shaft so that the spokes are horizontal and in this position connect the universal joint fork of the intermediate steering shaft with the worm shaft, then attach the steering shaft bracket to the body.
- Remove the steering wheel and install the turn signal, headlight and windshield wiper switch onto the steering shaft.
- Place the steering wheel on the shaft in its original position and, pressing the steering wheel, as shown by the arrows in Fig. check that there is no radial movement of the shaft. If there is radial movement, replace the upper steering shaft or bearings.
- Check that the steering wheel rotates smoothly and easily in both directions, then tighten the steering wheel nut and tighten it at three points.
- Slide the housing of the turn signal, headlight and windshield wiper switch towards the steering wheel until it stops and tighten the switch mounting clamp.
- Connect the wires to the ignition switch terminals and secure the switch with screws to the steering shaft bracket.
- Connect the turn signal, headlight and windshield wiper switch connectors to the car wiring harness connectors.
- Place the two halves of the facing casing on the shaft and fasten them with screws. Install the horn switch on the steering wheel.
- Install the middle and side left link ball pins on the bipod and secure them with nuts.
- Adjust the toe-in of the front wheels and check the force on the steering wheel, which when turning the wheels on a smooth plate should not exceed 196 N (20 kgf) (when measured at the wheel rim).
NOTE! You can separately assemble the steering shaft with the turn signal switch, headlight switch and steering wheel, and install this unit on the car.
To secure the assembly, position the steering wheel spokes horizontally and connect the worm shaft to the lower end of the steering intermediate shaft.
Having not fully tightened the bracket mounting bolts, turn the steering wheel in both directions several times, then tighten the bracket mounting bolts.
Adjusting the VAZ 2107 steering gear
It can be determined that the unit in question needs adjustment by the spontaneous deviation of the machine from the intended trajectory when hitting holes, bumps and other obstacles.
To carry out adjustment work, you will need a flat-head screwdriver and a 19mm wrench. The operation is carried out as follows:
- We place the vehicle on a level surface and align the wheels, placing them in a position that corresponds to straight-line movement.
- We clean the mechanism cover from dirt.
- Remove the protective cap from the adjustment screw.
Video: how to reduce play in the classic steering gear
The steering gearbox of the VAZ “Seven” is a critical component, without which it would be impossible to control the front wheels and the car as a whole. Despite the imperfection of the mechanism and various problems that arise with it, the owner of this model is quite capable of repairing or replacing the mechanism. This does not require special tools or skills. It is enough to prepare a standard garage set of wrenches, a hammer with a screwdriver and pliers, and follow the step-by-step recommendations.
Removing the gearbox
The design of the gearbox does not allow it to be repaired without removing it from the vehicle. In order to remove it, you must:
- Disconnect the tie rod ends from the gearbox. First, they are uncoiled, then the nuts are unscrewed with a 22 wrench and the tips are pressed out using a special puller.
- Unscrew the clamp securing the steering shaft to the gearbox.
- Remove the three bolts that secure the gearbox to the car body.
The gearbox design should not cause any particular difficulties when repairing it. You just have to take into account that the worn elements, called the worm pair, are both replaced at the same time. After this, adjustments must be made.