- home
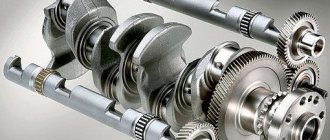
- Engine
- …
Any internal combustion engine has an intake and exhaust mechanism (through which a new fuel mixture is supplied to the engine cylinders, and exhaust gases are removed). The most important element is the valves (intake and exhaust); the performance of the entire power unit depends on their correct operation. After a certain mileage, the engine may become noisy, traction also disappears, fuel consumption increases, and you may hear from mechanics (and simply from knowledgeable drivers) that you need to “adjust the valves.” What is this process? Why is it done and why is it so necessary? Let's figure it out, as usual there will be a video version...
At the very beginning, I would like to say that today I will not talk about the timing system with hydraulic compensators ; nevertheless, this is a topic for a separate article. Let's consider a system with conventional pushers, which are now very popular on many cars; it is this system that needs adjustment at a certain interval
Misregulation and consequences
When the thermal clearance of the valve changes during long-term operation or when individual elements of the system break down, the efficiency of the engine and the service life of the parts are significantly reduced. This is also accompanied by increased fuel consumption and a characteristic knocking noise in the engine compartment. If, for example, the gap is larger than normal, the element cannot open completely, and this contributes to a drop in power characteristics. Burning of the valve and its seat is possible if the gap is very small. In any case, these faults have a bad effect on the engine's response when you press the accelerator pedal.
Gap function
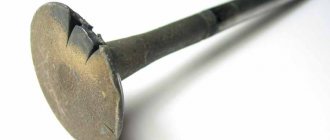
There are at least 2 valves in a car engine cylinder (maybe more depending on the car model). Through the inlet valve the combustible mixture enters the cylinder, and through the outlet valve the gases are removed. The part is driven by a gas distribution mechanism.
During operation, the motor heats up, resulting in expansion of all its elements. Therefore, when the motor is not running (in a cold state), there must be a gap between some parts sufficient for thermal expansion of the metal.
Adjustment of valves
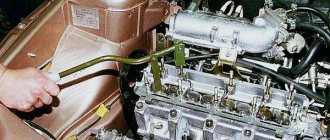
Proper adjustment of valve clearances is a process that requires skill, specific tools (feeler gauge, tweezers, etc.) and complete cooling of the engine. The clearance values of the intake and exhaust valves, the crankshaft rotation angle and other design features of the engine, as well as the sequence of its assembly/disassembly are determined in accordance with the manual for a specific car brand.
The adjusted gaps are checked twice, with permissible deviations not exceeding 0.05 mm.
Required Tools
What you need to adjust the valves
As mentioned earlier, a probe or a special device is required. If you choose the right one, you can work with the adjustment plates. A rack is often used to adjust valves, which provides greater accuracy compared to plates or a feeler gauge. However, the adjustment process itself is different; it does not correspond to the above method. You can use an indicator. It is a special device for adjusting valves with high precision.
What are gaps and why are they needed?
Modern modifications of engines provide for the presence of more than 2 valves in their cylinders, equipped with gaps with hydraulic compensators; this design does not require intervention. If there are no hydraulic valve compensators, their systematic adjustment is necessary (every maintenance!).
The fact is that completely closing the valve during gas expansion logically leads to the fact that the steel cylinder will not withstand the pressure and will rupture! The reason for the fatal destruction is not only in the mega Pascals acting on the cylinder wall, but also in its critical heating, reaching up to 900 degrees Celsius.
To prevent the valve from closing the cylinder silently, the pusher and the camshaft cam profile are separated by a small gap - a gap. Its size necessarily correlates with the increase in the length of the valve stem when heated and some other indicators.
What are "pushers"?
Let's start with something simple (many, I'm sure, don't know what it is). In order for the upper part of the valve and the camshaft cam to run longer, so-called pushers began to be put on them. This is a cylinder, on one side it has a bottom, there is one on the opposite side (to exaggerate, it looks like a metal “cup”).
The hollow part fits onto the valve system with a spring, but the bottom rests on the “cam” of the camshaft. Since the surface of the pusher is large, from 25 to 45 mm (different manufacturers have different values), it will wear out longer than, say, just the upper part of the “rod” (which has a diameter of only 5-7 mm).
Pushers are divided into two types:
- Solid - their adjustment occurs completely by replacing the housing
- Collapsible - when there is a groove on top of the lid into which a special adjusting washer is installed. You can replace it, thus choosing the size of the thermal gap
These elements do not last forever, and they (or the washers on top) also need to be replaced after a certain mileage.
How often are adjustments made?
If we talk about mileage, then it is 20-30 thousand km. Adjustment of the thermal clearances of the valves should be carried out even if you do not experience a loss of power, increased fuel consumption and black smoke from the muffler (you should not wait for the first symptoms to appear). It is best to carry out the procedure in a car service center, but if you have the appropriate tools, equipment and experience, this can also be done in your garage.
The engine is the most important part of the car, on which the operation of the car is completely based. That is why it is important to monitor the condition of the engine, carry out diagnostics, and also change consumables in a timely manner. The cause of many problems in a car (for example, knocking, loss of power) can be valves. Therefore, it is important to know how to properly adjust the valves.
conclusions
The valves on the VAZ-2114 should be adjusted no later than after 20,000 km. Failure to adapt in a timely manner can lead to unexpected and devastating consequences. Therefore, the driver must follow the manufacturer's recommendations.
Introduction Good morning everyone!!! The other day I went to the service center and asked to adjust the valves in my four-cylinder, a young guy with a confident look adjusted the valves, pre-cooled the engine as it should be 5-6 thousand km and did not like that the valves began to fray significantly. I decided to do another inspection, but at a different site, where the fat, skinny mechanic Kolya adjusted the valves for half an hour and discovered that the clearances were bad - some were hanging out, others were pressing... just as they were clicking before. But the worst thing began after driving a thousand kilometers - this was a knocking in the head area, and with mileage it increased - 200 km, the knocking was a little stronger, I drove another 200 km and got stronger... I didn’t know what to rush, so they replaced the generator bearings and changed everything is under the hood, we never thought about the valves, since they were recently adjusted. Finally, on the same site, all this fuss and trouble led back to the valve cover, I looked at the Kalyan clearance and on the exhaust valve the clearance was 0.8 instead of the supposed 0.35. They gave me a Kalyan washer and there I made a depression in it. Kalyan said the pad was wet (not hardened).
I went to a nearby store, took the same washer and put it there. Long story short, I was driving and thought something was wrong, I should check the clearance, but the knocking continued, the engine seemed to be pulling poorly... So I took the cover off and checked the clearance... the valves have the correct clearance - some are compressed, some are loose, and Kolyan replaced the washer, it was full of holes again. And I immediately realized that it turns out that adjusting the valve is an impossible task for today’s mechanics, and I abandoned this idea of adjusting the valve in the service department, because I realized that this was not a rewarding task and led to burnt out valves.
Because Kalyan, diligently adjusting my valves, made me loosen the two exhaust valves by 0.25 mm, knowing that I had gas and the clearance should be 0.35 + 0.
05 = 0.4 mm, and this is a hundred parts of the water valve burning out at 7000-10000 km. From now on, I also decided to adjust the valves myself and it turned out that there was nothing complicated about it.
METHODOLOGY FOR SETTING VALVES. First, I will say that I had not set it up before and therefore did not have a full set of washers and other accessories. Therefore, I decided to stop by an auto parts store (it’s next to the house, and there are some wet washers there; for a person, the owner doesn’t take full credit for the road) and pick up some limestone next to it.
I left the car for 2 hours (in the summer outside, the air temperature is 30 degrees Celsius), it arrived two hours later, the engine had cooled down properly (it should be 20-25 degrees). You can touch it with your hand; if the engine is not warmed up, you can start adjusting.
AND FOR BUSINESS.1 I bought a tool for squeezing the pusher (250 screws), took out from my accessories tweezers, a bayonet, a disposable syringe with a tube (for pumping oil), a thin flat screwdriver, a regular flat screwdriver and a 10 wrench with a ratcheting mechanism (three nuts from 10), I disconnected it from it and took it to the side. Then we removed the plastic cover from the timing belt, disconnected the gas hoses and removed the valve cover (by unscrewing 2 nuts by 10). He then set TDC (top dead center) by turning clockwise for the top crankshaft bolt clockwise (that is, the direction it normally turns counterclockwise should not rotate), and smoothed the mark on the sprocket and belt cover .
I screwed the tappet onto the valve cover studs and used a syringe to pump out the oil from the tappets.
4. Then I wrote on a piece of paper myself, the sequence of valve adjustment and the gap that should be the gap on the intake valve should be 0.2 mm - permissible error 0.05 mm -. The gap at the exhaust should be 0.35 mm - the permissible error is 0.05 mm (but it is better not to allow it) Adjustment order (the valves are counted from the gear, 1st is closest to the wheel, 8th is furthest away). 1 (output) and 3 (input), 5 (output) and 2 (input), 8 (output) and 6 (input), 4 (output) and 7 (input). 5. We determine what the clearance is now on the 1st and 3rd valves, then rotate the shaft 30 degrees or so (special accuracy is not needed here, the main thing for the camshaft cams was taken from a lathe, and since the large area is round then, when removing the cam, the bulge from the turner is visible to the naked eye) So we check the gap on the next pair, etc., rotate the shaft - check the gap.
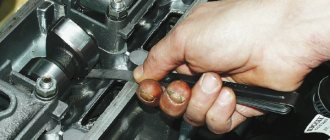
6. If the clearance is not the same, press the plunger with our tool and insert the retainer (from the valve adjustment kit) between the camshaft and the pushrod.
7. Using a small screwdriver and tweezers, remove the washer by inserting a small screwdriver into the pushrod slot and prying the washer off (if you can't get it out, you can use a larger screwdriver to help). 8.
How to Determine the Thickness of the Washer Required 1. The recommended aperture value should be subtracted from the resulting aperture measurement. 2.
Add the thickness of the old washer. Example: if the input gap is 0.27 mm (standard 0.
2 mm) and the thickness of the old washer is 3.75 mm, then subtract 0 from 0.27.
2 and we get 0.07.
Continue to 0.07 plus 3.75 and we have 3.
82. Therefore, the new shim should be 3.82 mm.
This is not available so we can use 3.8mm. ATTENTION!
Gaskets should only be installed with the number down and in no other way. Then no It has problems indicating the size of the washer in the next adjustment, from the fact that the number is erased on the shaft, pay special attention.
If the car is a gas car, it is recommended to make the gap on the exhaust valves 0.05 mm larger than the standard, or 0.35 normal + 0.
05 = 0.4 mm, at the input to leave 0.2 mm unchanged.
Most owners of a VAZ 2115 with an injection engine, even in the case of such a fairly simple operation as setting the terminal gap valves, decide to seek help from a car service center. Consequently, the main topic of the modern article will be regulating the VAZ 21115 injectors.
Most owners of VAZ 21115 cars for an injector engine, in the case of even such a fairly simple operation, as the need to set up thermal slots, choose help from a car service center. The pocket between the camshaft chamber and the end of the valve stem was created by designs to accommodate thermal expansion of the valve. If the fuel slot increases, the valve will not be able to open completely, and if the heat slot is too small, it will not be able to close completely.
Today we will try to show that the process of adjusting the valves on a VAZ 21115 car is a completely simple process, and it will take no more than thirty minutes. This article contains answers to the following fairly frequently asked questions:
- What is the process for adjusting the thermal slots in a VAZ 2115 with an injection engine?
- Why are there thermal slots on the VAZ 2115?
How to adjust
Most motorists turn to a car service for adjustments. But you can do the procedure yourself. Next we will look at how to adjust the gap using the example of a VAZ-2114.
Attention! Adjustment is necessary only on machines with an 8-valve motor.
- Adjustment kit. Can be purchased at a car store, cost about 300 rubles.
- The valve cover, air filter housing and front toothed belt cover are dismantled (key 10).
- The crankshaft is rotated clockwise until the marks on the pulley and the rear cover align (special wrench for the crankshaft).
When checking, the valves should be positioned like this (normal values are indicated in parentheses):
- 1, 3 (0.35 and 0.20);
- 5, 2 (0.35 and 0.20);
- 8, 6 (0.35 and 0.20);
- 4, 7 (0.35 and 0.20).
If the gap does not meet the standard, you need to dismantle the washer, calculate the thickness that is required, purchase a new part and install:
Attention! The crankshaft can only be turned clockwise.
When all valves are adjusted, install the valve cover with gasket. The renovation is complete.