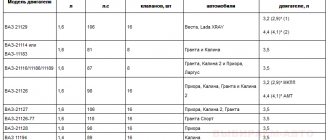
08 September 2015 Lada.Online 180 969 29
APS-6 is a standard anti-theft device for Lada Priora/Kalina/Granta/Niva cars. On Luxe trim levels the standard immobilizer is activated from the factory, but on simpler versions you have to do it yourself. The article provides instructions for learning the key and activating the immobilizer.
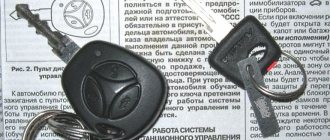
The delivery set includes 3 keys: 2 black “working” keys (hereinafter referred to as RK ) and a red “master key” (hereinafter referred to as MK ) for training the system. The indicator lamp (hereinafter referred to as CL ) signals the programming state. Its rapid flashing (5 times per second) indicates that the learning procedure is being performed correctly. Stopping fast flashing means:
- wrong action;
- exceeding the time provided for completing the training procedure;
- malfunction;
- This RK has already been trained by another immobilizer (does not fit the ECU).
Features of standard central locking
AvtoVAZ even installs a central locking system with a remote control from the factory even on the most budget versions of Kalina. However, such a system is clearly not enough to effectively protect a car from theft. The Lada Kalina central locking system is also controlled from the interior. On the driver's door next to the power window control unit there is a central locking button. The ignition key simultaneously functions as a remote control. On its plastic part there are three buttons, the purpose of which is as follows:
- Unlocking. One press – the actuator should click and the driver’s door will open, two presses – the rest.
- Closing. To close all doors at the same time, just press the button once.
- Opening the trunk. Not available on all trim levels, as a trunk lock actuator is required. You can also install the electric drive yourself.
Kalina also provides another important function - rear door locking, as it is also called - child protection. To activate it, you need to use the key to turn the red chip to the right near the lock from the outside. After this, opening the rear doors from the passenger compartment is not possible, so that children cannot accidentally fall out while driving.
The central locking system does not have anti-theft functions; there are no shock sensors. All that the central lock can do is signal an unauthorized opening.
Training procedure
Why is it necessary to carry out the procedure, how to train the key and what does it give? When you run the action, you can achieve the following results:
- activate the anti-theft function;
- Change password;
- erase all previous remote controls;
- enter new codes for Lada.
A system is used to achieve certain goals. Usually, in order to train the ignition key, it is necessary to carry out a number of manipulations. Before describing them, it is worth considering the basic results during training. So, the actions are carried out:
- to activate the anti-theft system;
- to remove outdated data, including passwords;
- for training remote control systems;
- to enter a new password.
In most cases, only new remote controls can be programmed. It is impossible to manipulate using a key from another car.
One important point needs to be noted. The ignition key for programming is not used in everyday life. After achieving the goal, it is advisable to put it in a safe place.
Before starting programming, it is recommended to fill the car with 10 liters. This will allow you to carry out all the actions correctly without getting confused by the signals emitted by the machine.
How to train a key and what is required for this? In fact, the procedure is simple. All manipulations are carried out according to a specific algorithm.
It is suitable for both Lada Priora and Kalina. In general, there are no significant differences between car brands. This kind of “influence” also lends itself well to Grant. A similar action plan will be presented below.
Basic central locking malfunctions and methods for eliminating them
There are times when, after pressing the door unlock button, you may encounter a lack of response to the command. The lock cannot be removed and the central lock does not respond to button presses on the remote control. Conclusion - Kalina's central locking does not work.
You can gain access to the interior using a key, but in this case the sound alarm is not deactivated, and everyone will know when the car is opened. If the system does not respond to commands from the remote control, there may not be many problems: either the batteries in the remote control are low and need to be replaced, or synchronization is lost. In this case, it is not repair that is required, but restoration of the system's functionality.
Frequent problems with alarms on Lada Kalina
The Lada Kalina manufacturer provides a standard alarm system that operates on a simplified principle and provides the following functions:
- door locking/unlocking;
- locking all doors when closing the driver's side;
- opening/closing the car by pressing a special button in the cabin;
- turning on the alarm when there is a break-in attempt.
Restoring synchronization
Synchronization may be lost if there is a short-term (from 6 seconds) lack of power to the microcircuit in the key fob. In this case, desynchronization may actually occur, i.e. the connection between the remote control and the control unit of the central locking Lada Kalina is lost. According to the operating manual, if such situations arise, it is necessary to register the key fob again, entering data about it into the memory of the central locking system. You should immediately take into account that the procedure is far from the simplest and most understandable, and you also need a special training key. You can try to restore synchronization as follows:
- Turn the ignition switch with the key that requires synchronization.
- Wait 6 seconds.
- After the immobilizer lamp stops flashing, the ignition can be turned off.
After 10 seconds, the same key is used to start the car again. If the immobilizer warning light does not blink, it means that synchronization has been restored.
At first glance, nothing complicated, but this method does not help in all cases. If there is a training key, but there is no previously registered key, then the ignition is first turned on, then turned off. After the immobilizer warning lamp stops flashing, within six seconds the key is moved to the second position of the ignition switch (starter).
Key programming instructions for Lada Kalina, Priora, Granta, etc.
- Close all doors. Turn on the ignition with the training key and wait in the on state for at least 6 seconds.
- Turn off the ignition. The indicator light in the warning lamp unit should flash quickly (at a frequency of 5 times per second) while the learning procedure is being carried out correctly. If the lamp stops flashing quickly, it indicates an incorrect operation, an out-of-time interval, or a malfunction. Remove the training key from the ignition switch.
- While the warning lamp is flashing (about 6 seconds), insert the remote control and turn on the ignition. The immobilizer buzzer should emit three beeps. If the buzzer does not sound and the indicator has stopped flashing, this means: - the time interval of 6 seconds has been exceeded and it is necessary to repeat the learning procedure, starting from step 1; -immobilizer is faulty
- Wait 6 seconds for the buzzer to emit two more beeps and turn off the ignition.
- If it is necessary to train the second remote control, then you should perform steps 3...4 again, using the second learning remote control to turn on the ignition. If not, continue from step 6.
- After turning off the ignition for no more than 6 seconds, while the indicator is flashing, remove the remote control, insert the learning key and turn on the ignition. The buzzer should beep three times. Wait 6 seconds until the buzzer beeps two more times.
- Turn off the ignition without removing the training key, wait 6 seconds until the buzzer sounds a single sound signal. The indicator should flash twice as fast. If the sound signal does not sound and the flashing indicator stops, you should return to step 1 and repeat the learning procedure. If a repeated failure occurs when performing step 7, this means that the ECM was previously trained with a different key, in which case the controller should be replaced.
- After the buzzer gives a single sound signal, no later than 3 seconds, turn on the ignition for 2...3 seconds and then turn it off (after turning on the ignition, the buzzer will sound three times and the indicator will stop flashing). The hazard warning lights should flash and the car horn should beep.
- Remove the learning key. Wait with the ignition off for at least 10 seconds. Insert the working key and turn on the ignition. Wait 6 seconds, if the indicator does not flash, test start the engine, the engine should start. If the indicator flashes, turn off the ignition and wait at least 10 seconds. Turn on the ignition. The warning light should not flash and the engine should start. If, after turning on the ignition, after 6 seconds the indicator lights up with a constant light, then the learning procedure must be repeated, starting from step 1.
Conversion into a single door unlocking impulse
The controller of the central locking control unit opens the doors in two stages: one press of the button unlocks the driver’s door, two presses – all others. But you can make it so that everything unlocks after one press. This is very easy to do:
- Turn on the ignition.
- Press the unlock and close buttons at the same time and hold for at least five seconds.
- After the beep, the key can be released.
When the buzzer sounds once, the system notifies you of the transition to a new mode. Returning everything to the way it was before is just as easy. To do this, repeat the above procedure and wait for the double buzzer to confirm the transition to the default settings.
Detailed programming instructions
How to train a key? To train the key in LADA Kalina you will need to follow eight steps.
- So, programming the key begins with closing the doors and activating the ignition. We carry out this manipulation only using a training key. Having started the engine, we perform a delay for 6 seconds.
- Now we turn off the LADA Kalina engine. At this moment, the tidy control indicator is switched to flashing mode. This action continues until the end of the learning process. When the indicator stops blinking for unknown reasons, this indicates the presence of an incorrectly performed manipulation at some stage. If this situation occurs, then repeat the ignition switch with a delay.
- The third stage of action is also characterized by the blinking of the indicated indicator. This happens for 6 seconds. At this time, you will need to re-insert the key into the lock and activate the ignition. When all manipulations are performed correctly, three sound signals will start coming from the buzzer.
- With the beginning of the 4th stage, you will need to do a little holding. Upon completion of repeated sound signals, insert the learning key and repeat the procedure. If we fail to complete this process, we conclude that an error was made during the manipulations. One might suspect that this chip key has previously been subjected to a similar procedure.
- The fifth stage involves turning off the ignition. The operation regarding the second element will need to be repeated about 3 times.
- In the next step, the control symbol starts flashing again. Here you will need to remove the trained key, after which we insert the training remote control. Correctly performed manipulations will be confirmed by a three-time buzzer.
- At the penultimate stage, we wait for a couple of signals to sound.
- We complete the action by turning off the ignition. Next, we wait for a single buzzer signal. Now you know how to train a key.
People's Councils
If you are confident that the key fob is working, but the central locking does not work or does not work correctly, then you can try the following:
- Replace the central locking fuse Kalina F22, which protects the controller's power circuit (located in the mounting block).
- The power supply circuit to the actuator of one of the doors may be broken. In this case, you need to open it 90° and find a broken contact or connector.
- It happens that the reason is that the key fob screw is too tight. You need to weaken it, and the functions will be restored.
In each specific case, atypical malfunctions may occur, so the above list is not exhaustive.
Installation and connection of central locking depending on the modification of Kalina
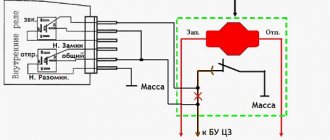
The central locking is controlled by an electronic unit, from which wires go to the door actuators. A wire also goes from the block to the driver's door microphone, which is located inside the actuator. When connecting, installing or repairing the central locking system after dismantling the left door trim, you need to find the cable from the drive to the 7-pin connector.
Depending on the configuration (“Norma”, “Standard”, “Lux”) under the casing you can see:
- Six wires suitable for the connector (drive and two microphones).
- Unconnected wires from the drive.
- Lack of wires that should be in the connector on pins 4/6.
If there is an alarm, then wires 2/7 must be connected to the central locking unit. If the package does not include connecting all the actuators, then you need to do this yourself by connecting the missing ones to the control unit. To do this, you can use a two-wire cable that runs from the door to the central locking control unit. The electrical circuit of one or another modification of Kalina will help with the work.
Central lock connection diagram
Connecting the central locking system for the “Lux” package
This method is also relevant for Lada Kalina Cross in the “Norma” configuration. “Lux” and configurations with additional options imply the presence of an armrest with installed central locking buttons and electric windows. From the button contacts you need to take the one that receives power after pressing, and stretch the wire to the alarm module. To connect, you can use the following diagram:
Connecting the central locking system for the “Lux” package
This connection option is suitable specifically for the “Lux” configuration, since it has a standard alarm system, and the central locking can be installed independently if for some reason it fails.
When connecting the central locking system, all work must be carried out with the vehicle's electrical equipment de-energized. Wires must be laid so that they do not touch metal. If this is not possible, then a tube is installed to protect the cable from breakage and other negative factors.
Connecting the central locking system in the “Norma” configuration
In inexpensive trim levels, there is no button to close the doors from the interior at all. In this case, the connection is made according to the following scheme:
Connecting the central locking system in the “Norma” configuration
Unlike the connection diagrams for the central locking system in the Kalina “Lux” configuration, there are no resistors and the “+” voltage is not used. But in this case, when you press the close button, all doors will be locked, and when you press the unlock button, only the driver's door will open. The options considered are among the simplest; more complex schemes require special skills, so it is better to entrust their implementation to professionals at a service station.
Pulse programming
When connecting a central lock, it is not enough to perform all the steps in the correct sequence; you also need to select the required pulse duration for the locks to operate. If it is too large, the actuators will overheat; if it is insufficient, it will not be enough to open and close. In the luxury configuration, all electronics usually “fall asleep” after 15 minutes of inactivity. To awaken it, an additional impulse is needed.
Central locking is a simple device, but it can secure your car from criminals much more effectively than a police cap on the passenger seat. The centralized door lock system is the most convenient way to quickly open and close them. If this security system is supplemented with a good car alarm, this will prevent you from ending up in a situation where your car is stolen or damaged.
Having tried to open the car using the key fob, one fine day you may find that the lock continues to operate and the car does not respond to key presses. In such a situation, it will be possible to unlock one door or even the central locking system by simply unlocking the driver's door lock. Only the security mode is not deactivated. The central locking, in turn, may not respond to commands for two reasons - the battery in the key fob is dead or synchronization is lost. How to solve these problems is discussed further.
Restoring synchronization
Let's say the keys on the key fob were pressed 1000 times outside the system's coverage area. Then synchronization between the following devices is lost: the key fob and the central locking control module. If the power to the chip installed in the key fob is turned off even for a short time, this will also cause a loss of synchronization. The maximum time interval, as we found out from the reviews, is 6 seconds.
VAZ key fob in two versions
The instruction manual attached to the cars of the Granta and Kalina-2 family says the following: in case of loss of synchronization, the key fob is re-registered, that is, data about it is entered into the system memory. The recording procedure is quite complex, and to complete it you need a “learning key”. If synchronization is indeed lost, try this:
- Turn on the ignition with the key you want to synchronize;
- Wait 6 seconds;
- The immobilizer lamp should start flashing, and then the ignition is turned off;
- After 10 seconds the ignition is turned on again. If the immobilizer lamp does not blink, it means that synchronization has been restored.
Everything looks simple, but the specified sequence will not necessarily be effective.
If there is a “training key”, but there is not a single registered key with buttons, you can start the engine like this: turn the ignition on and off, the lamp begins to flash, then within 6 seconds the key is moved to mark II (starter).
Resynchronization of remote control codes
In cases where the remote control buttons are pressed outside the range of the radio channel, the “floating” code counter in the remote control goes out of synchronization with the counter in the system control unit. If the number of button presses outside the signal reception area of the system exceeds 1000, the system stops responding to remote control commands. In this case, the remote control training procedure should be repeated.
Updated August 01, 2013
Due to the increasing number of cases of lost training (master) keys for car owners of Kalina, Priora, Grant, Niva-Chevrolet, we are introducing a new type of service: registration of working keys in these cars, without a master key!
Usually in such cases, it is necessary to change a set of blocks: ECU (electronic engine control unit), APS unit, glass control unit, ignition switch complete with door cylinders and new keys, etc.
Now in our company you can register a working key with buttons without a training key, and for an additional fee you can receive a new training (red) key for your car. For this procedure, you need to come by car and leave it while the work is being carried out. The work includes dismantling the necessary units (ECU, APS, etc.) from the car, programmatically changing data, installing units on the car and registering keys. We emphasize that a key registered in this way will cost more than registering a remote control yourself if you have a training key, but naturally cheaper than buying and replacing a set of blocks with new ones.
Update January 05, 2014
Attention! It is now possible to make a duplicate chip for autostart using a working key with remote control buttons! A master or training key is not required. The chip obtained in this way can be used both for installation in the immobilizer bypass unit to implement autostart, and for everyday use, starting the engine of Lada Kalina, Priora, Niva-Chevrolet cars. Such a duplicate is more expensive than a regular chip, which can be registered using a master key, but this is a real solution in cases where the master (training) key is lost. To create a duplicate, you need a car, a working key with remote control buttons (and it doesn’t even matter if it is partially faulty, for example, the buttons don’t work, etc., the main thing is that the ignition key starts the engine). The entire copying procedure takes 10-15 minutes. Contact us by phone in contacts.
As the Working key has already said, apparently after several drops the auto-chip (transponder) that was in the key stopped starting, after one time (and then 1 out of 10 times) it began to be read by the receiver installed in the ignition switch. For this reason, I drove for a whole year with the Training key (master key), which in turn was annoying by constantly entering the training mode, signaling this with an IMMO light, and about 1 time out of 15 the car did not start (training mode), I had to get it key and stick it in again. I didn’t want to disable IMMO. It is clear that if they want to steal it, they will steal it. And I didn’t want to bother with erasing the EPROM memory (deleting data on trained keys).
I don’t use the standard signaling system because... installed by a third party (by the previous owner) and needs to be purchased for 900 rubles. There is no remote control with buttons (working key). And he constantly rips his pockets. Attempts were made to arm/disarm the car from the alarm using the standard remote control, but either due to a faulty transponder - the car was armed but the IMMO lamp blinked for a long time, or because the faulty transponder was unsoldered/soldered in, or the battery was already dead - the remote control stopped responding to presses , and even without a working transponder soldered into the circuit, its operation is disrupted. So if you need a remote control with buttons and you have a standard “ciga”, then without purchasing a working key for 900 rubles. not enough.
I ordered the PCF7936A chip, 11/20/14. from Omsk: shop.chip-auto.net/index.…014-07-03-detail?Itemid=0 on track 12/02/14. has left the Chiba sorting. Today is 12/03/14. took the chip. Price 200 rub. + 100 rub. for Russian Post. An envelope arrived with a chip inside in bubble wrap. By the way, I found a program in the market: Russian Post inserted a track code into it to track the parcel, which was given to chip-auto and a notification was sent when the status was updated!
I took the miniature training key that was included with the car and pulled out the chip from it:
The purchased chip was inserted into the key with a red mark, and the chip (of the training key) that was pulled out was inserted into the case of the working key (having previously unsoldered the transponder from the microcircuit, so that there was no conflict) the mikrukha was also inserted into the case, because buttons may fly out and taught:
The car starts the first time, the IMMO lamp does not blink, as before, signaling entry into the learning mode - when the master key was used. After training, I left the key with the training chip (with a sticker) at home. I ride with a regular trained chip.
How fanaticism will reach a new level and extra rubles 300 rubles will appear. for the body and 150 rub. on the key recess, maybe I'll saddle the flip key: Video 1 Video 2 For the standard mikruzhka from the key, some not very cool cases are sold: www.drive2.ru/l/1412571/ Although here is a good option: www.drive2.ru/l /3976456/, but 1890 rub. issue price.
I made training instructions for myself based on the Training Procedure for APS-6 Immobilizer: www.drive2.ru/b/4062246863888395293/ Close all car doors. Turn the ignition on RED, wait 6 seconds and turn off the ignition and remove the training key from the ignition.
1st key: While the lamp is flashing (about 6 seconds), insert the BLACK key into the lock and Turn on the ignition, 3 beeps. Wait with the ignition on (about 6 seconds) until 2 beeps. Turn off the ignition.
2nd key: While the lamp is flashing (about 6 seconds), insert the BLACK key into the lock and Turn on the ignition, 3 beeps. Wait with the ignition on (about 6 seconds) until 2 beeps. Turn off the ignition.
While the light is flashing (about 6 seconds), insert the RED key into the lock and turn on the ignition, 3 beeps.
Wait with the ignition on (about 6 seconds) 2 beeps. Turn off the ignition. Do not remove the RED key, after 6 seconds there will be 1 beep. Within 6 seconds after the sound signal (while the lamp is flashing quickly), turn on the ignition with the RED key. after 2-3 seconds, turn off the ignition. No later than 5 seconds after turning off the ignition, there will be 3 beeps, and the light should stop blinking quickly. Do not turn on the ignition for at least another 10 seconds.
When working with some controllers, the light stops blinking and the buzzer emits 3 sound signals when the ignition is turned on. In this case, you should still turn off the ignition and wait at least 10 seconds.
At the end of the learning procedure, it may be necessary to resynchronize the immobilizer and controller codes. This means that after the learning procedure is completed, the controller will not allow the engine to start when the ignition is turned on for the first time.
To carry out resynchronization, you must turn on the ignition with any BLACK key. Wait 6 seconds. If the immobilizer light begins to show an error condition (flashes once per second), then turn off the ignition and wait at least 10 seconds. After this, turn on the ignition again. The light should not flash and the engine should start.
If the chip is placed far from the tip, then it will not be possible to train, because the chip will not fall within the coverage area of the IMMO antenna. I inserted a chip into the discharge valve and the IMMO did not see it, I had to attach it closer to the tip: ba.d-cd.net/186a062s-960.jpg and www.drive2.ru/l/6365716/
The remote control for a car is designed to remotely open and lock doors, turn on the alarm, block the trunk door, lower the windows and perform other actions. This key is also used as a coded electronic key for the immobilizer. The immobilizer can be disabled, then the car will be able to start from a “normal blank”. Such a system is attached to the metal part of the key itself and is intended for connection to the car system by:
- Radio channel.
- Transponder channel.
Regular remote control key Lada Kalina
To use the remote control key in a car, it must first be trained (activated). To do this you need to use a training key. Also, using such a key, you can remove restrictions on starting the engine. It is possible to use such a key with two remote controls.
Switching the central locking system to single unlocking pulse mode
The controller unlocks the doors in two steps: a single press on the “Open” button unlocks the driver’s door, and you can completely unlock the door with a second press. But according to AvtoVAZ instructions, it is possible to reconfigure the system, and then disabling the lock will be done in one step. The setup procedure looks elementary:
- The ignition is turned on with a key equipped with control keys;
- Press the “Open” and “Close” buttons on the key and hold them for 5 seconds;
- The buzzer should sound and then the keys will be released.
If a single signal sounds, it means that the system has entered the required mode. The question remains how to return it to its previous mode of operation. Perform the sequence discussed here a second time. At the end, a double signal will sound, which will confirm the transition to the previous settings.
The single pulse mode is characterized by the following. If the driver's door is opened with a key rather than using a key fob, the controller unlocks each door. However, the effect of pressing the “Open” button will look the same.
Replacing a dead battery
Let's say the LED located on the key fob body flashes quickly when you press any key. There will be no reactions from the central locker in this case. All of the above suggests that it is time to replace the battery. Details are discussed below.
If the LED flashes when you press the key, you can still start the car with that key. The immobilizer can easily read the code written into the key fob chip, and synchronization will not be lost either. But it is recommended to hurry up when replacing the battery.
So, to disassemble the key fob body, you will need a Phillips screwdriver. Having unscrewed one self-tapping screw, use a knife to separate the halves that make up the housing structure. The result looks like this:
Once the circuit board is removed, look at which battery is being used. The first characters of the designation are the letters “CR”. Then comes a set of numbers.
When making a replacement, try not to leave the contacts free for more than 6 seconds. Otherwise, there is a high probability of loss of synchronization.
It can be summarized that the replacement operation is performed in three steps:
- We disassemble the case, determine the type of battery;
- We purchase the same battery;
- We are making a replacement.
Care must be maintained at every step.
How to replace the ignition switch on a VAZ 1117-VAZ 1119?
Note! Before you start changing the lock, disconnect the negative terminal from the battery, you still have to work with electronics! (For information on how to remove the terminal, see the article: “Replacing the battery on a VAZ”, in paragraph 1)
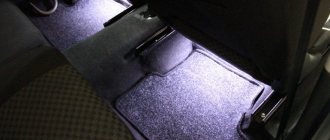
Removal: 1) At the beginning of the operation, you will need to remove the casing from the steering column, to do this, use a screwdriver and use it to remove the seven screws that secure the casing (see photo 1), after all the screws have been unscrewed, fully pull out the handle by which the steering wheel is adjusted (see photo 2, it is indicated by an arrow) and then remove the lower casing, and then lifting the upper one, also remove it from the steering column.
Note! When you remove the lower and upper casings, look at the side of them or look under the pedals for the rubber o-ring that is needed to seal the ignition switch from dust and dirt!
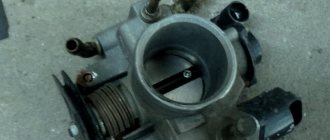
2) Then you will need to look at the lock itself and pay special attention to the wires that come from it, Kalina also has an immobilizer in addition, so there will be a lot of wires coming from the lock itself, and there will be only two wire connectors (One of the connectors will go to the starter is thus responsible for starting the car, and the second connector will go to the immobilizer and it is responsible for preventing the car from being stolen), so disconnect each connector from the pads (Each connector will be connected to the other two pads), to do this, grab your hand connector and simply disconnect it from the block using a little force (Do the same operation with the other connector).
Note! The photo above shows an example with an arrow where the wire connector coming from the ignition switch is connected to another block (This connector goes to the starter, the one that goes to the immobilizer looks a little smaller)!
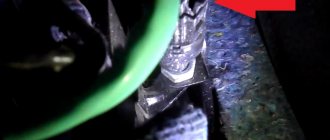
3) Next, as shown in the photo below, using a hammer and chisel, remove the four bolts (They have no edges and are indicated by arrows) that secure the lock to the steering column, how do you remove them, you ask? Let's explain! Take a chisel and a hammer in your hands and place the chisel on the edge of a bolt, then hit it and thereby try to move the bolt out of place, etc., until the bolts are completely turned out.
Note! If you don’t like this method, then you can also drill out these bolts, but only in this case, be careful not to damage anything!
4) When you have removed all four bolts, remove the bracket on one side of the steering shaft, which is indicated by the arrow, and on the other side, remove the ignition switch itself and put it aside if you no longer need it and you are going to put a new one in its place.
Note! In the event that you still suddenly need the old lock (For example, not all new locks are sold with a contact group, so you have to remove it from the old lock and install it on a new one), to remove the contact group from the lock, you must first be convinced that it’s not all about it, but about the lock and it needs to be replaced, for example, if you have problems with the electronics in the cabin, let’s say you turn the key and the devices don’t light up, then most likely it’s all in the contact group and the lock itself can’t be changed necessarily (But it’s not a fact that there may be a problem with the immobilizer, to do this, disassemble the contact group and check which contacts it has, oxidized or not), so here’s how to remove the contact group from the lock, for this:
Collection of “people's councils”
If the central locking is not working properly, but you know that the key fobs are fully functional, you can try the following steps:
- The power supply circuit of the central locking controller is protected by fuse F22. This element can be replaced or simply disabled and then installed back;
- Let's say no current flows to the actuator of one door. Then find the terminal block by opening the door 90 degrees. In order for the broken contact to be restored, sometimes it is enough to disconnect the mating connector and connect it again;
- Even if the key fob is working, check whether the self-tapping screw is screwed in all the way. It is recommended to loosen the fastening a little, and then everything works reliably.
To follow “tip number 1”, look for the fifth fuse from the top in the mounting block. The rating of this element is 15 Amperes.
Here is the correct fuse
So, I’ll start with the fact that about a year ago the first problems appeared with the standard alarm key fob on my Kalina. And this manifested itself in the following way: every now and then the buttons began to work, the doors did not open at the first press, and sometimes you just had to stand for five minutes at the car while you opened the central locking with the button.
In general, after disassembling the key fob, it turned out that some element inside it bounced off the microcircuit (I don’t know what to call it, I’m not involved in electronics). In general, this was precisely the reason for the key’s operation in such a country.
At first I ignored all this and continued to drive like this, and now instead of pressing the key fob button, I had to constantly insert the key into the door lock, which is not very convenient. This went on for more than six months, until the time of cold weather arrived. I think there’s no need to talk once again about the delights of the situation when the door lock, or rather its cylinder, freezes. And that is why it was decided to buy a new key fob for Kalina’s standard key and carry out the training procedure for it.
Purpose and features of the learning process
What preferences does key training provide to the owner of Lada Kalina? As a result of this procedure, the following options are achieved:
- the anti-theft function is activated;
- the password is changed;
- the previously existing list of remote controls is erased;
- updated codes are entered.
In most situations, remote controls of new modifications can be reprogrammed. It is not possible to perform a given manipulation using a non-native key.
An important point arises here. The ignition key, which has undergone all reprogramming steps, cannot be used permanently. It must be removed from sight and use.
Before directly performing the process, it is recommended to replenish the fuel tank in a volume of at least 10 liters. This allows you to perform all manipulations correctly and eliminate confusion in the signals sent by the car.
We perform actions according to a specific algorithm. It is relevant not only for the Lada Kalina, but will also suit the owner of a Priora or Granta. In general, the programming method for these models does not have any global differences.