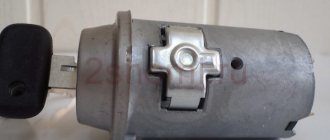
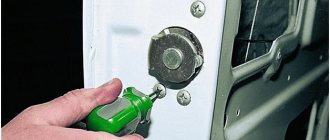
Lock and trunk cylinders of VAZ 2110
Today, VAZ cars are among the most popular in the vast countries of the post-Soviet Union. Cases of theft or attempted theft of a car are by no means uncommon these days. And very often such attempts end unsuccessfully due to certain circumstances. We can say that in this case, the car owner is extremely lucky. For the most part, in case of unsuccessful breakdowns, only the lock cylinder of the VAZ 2110 is damaged. This is the best outcome for a car lock, since to eliminate the malfunction you do not need to purchase a new one, because it is enough to replace only one functional element. The trunk lock cylinder of the VAZ 2110 can be easily replaced on your own.
Problem with the operation of the VAZ-2110 central locking control unit
Electronics, of course, are reliable things. Modern control modules for the central locking VAZ 2110 are assembled using a transistor control circuit. This eliminates their mechanical wear. The shelf life of key components is measured in tens of years. The control unit is located under the plastic dashboard cover on the right side of the driver's seat.
However, power transistors can easily fail when the activators are overloaded and the collector is short-circuited. It may even happen that the signal from the control unit will constantly be sent to the lock drive if the transistor is broken. Otherwise, it will simply not turn on.
Checking the control unit is extremely simple. The voltage from the negative terminal of the battery, or directly from the pink wire supplying the control unit, is supplied to the contacts of the gearmotor (activator) in series to the red and yellow conductors. All of the above contacts can be found directly on the eight-pin connector of the control unit.
Thanks for subscribing!
Also, the control unit may issue erroneous control commands due to incorrect operation of the limit sensor. Being a mechanical device, the main door switch can simply wear out. As a result, the control unit simply will not be able to function correctly, since it will not know in what position the car doors are currently located, whether the driver's door lock is closed or open.
Typical faults and solutions
Most often, VAZ 2110 owners encounter the following problems with the locking mechanism:
- It is impossible to close the door or a lot of force must be applied. Reasons: the latch is too moved inside the passenger compartment or the lock drives are incorrectly adjusted. Remedy: Move the lock outward slightly or adjust the drives.
- The door does not close completely and remains closed only in the first (emergency) position. Reason: The locking mechanism has failed. Remedy: repair or replace the locking mechanism.
- The door lock does not work. Causes: the locking mechanism has been adjusted incorrectly. Remedy: adjust the locking mechanism.
If the car has been converted to an electric lock, then it is necessary to diagnose the operation of the electrical signal from the key fob to the catchers, check the connection diagram and only then disassemble the door panel. The rear door lock is checked in the same way after diagnosing the central system.
Adjusting the lock
VAZ 2110 door lock adjustment
Note. In order to adjust the car lock, it is not necessary to remove the door itself. Moreover, there is no practical need for this.
Detailed regulation algorithm:
- first you need to outline the contours of the lock itself, and always on the body pillar of the vase;
- Next, you should proceed to checking the door and you need to determine how freely it closes;
VAZ 2110 adjustment of trunk door locks
- if the door closes extremely tightly, the first thing you need to do is loosen the fastening screws of the latch;
- field for loosening the screws, the lock itself will need to be slightly moved outward, and then all the nuts must be screwed back in;
- if the car door on the other hand closes too loosely, then the latch must be moved not outward, but rather inward.
Note. It is imperative to ensure that the car door itself is made in the form of a single monolith.
- sometimes it happens that when closing a car door, it lifts slightly up, in this case, the latch must be slightly lowered down;
- If the door, on the contrary, goes down slightly when closing, then the latch must be slightly lowered.
Note. The main thing is to objectively understand that the whole essence of door adjustment lies in the position of the latch, or more precisely in the vector of its spatial orientation.
Algorithm for adjusting the luggage compartment lock of a car:
- First, it is necessary to remove the casing in order to make it practically possible to loosen all three screw fastenings of the lock by relaxing the tension of the hood;
- after which you need to slightly move the lock in the desired vector;
- then you need to tighten the fastening rod screw tightly;
- It is good to check the effectiveness of the locking function of the lock;
- if the lock does not lock well or, on the contrary, locks too well, then it must be readjusted;
VAZ 2110 lock rod adjustment
- as soon as the final adjustment is made, it will be necessary to screw the lock’s fastening nut as tightly as possible;
- carefully make sure that the latch and the latch are well connected to each other; if this is not observed, you need to slightly reduce the degree of tension of the bolt fastening, and then move the latch itself in the required direction;
- after all of the listed technical manipulations have been successfully completed, it is imperative to check how easily the tailgate door can be locked and if the result is negative, the latch adjustment will need to be repeated again;
- Now you can safely tighten all the mounting bolts.
Note. Sometimes the trunk lock can jam during the cold season as a result of the keyhole freezing. In order to prevent this phenomenon, it is necessary to pour a few drops of Vaseline oil into the keyhole several times a week.
The instructions for adjusting the doors with your own hands are extremely practical and easy to understand, however, the use of additional photos and video materials is a prerequisite. Because this will help to significantly save money. The cost of adjusting the lock in car repair shops is insignificant, however, most likely, the workshop employees will simply replace it in order to increase their own degree of material benefit.
Troubleshooting
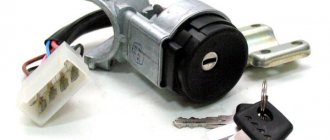
Replacing the ignition switch on a VAZ 2110 is not an easy task. And, first of all, you should figure out what caused the problem. Our guide below shows you how to do it correctly.
Note! Before reading the instructions, please read the image and symbols carefully. After all, to carry out work on repairing and replacing the ignition switch on a VAZ 2110, you must have at least minimal theoretical knowledge. And we decided to help you with this.
Explanation of the marks on the image: 1-reservoir; 2-negative backlight charge; 3-starting mechanism; 4 - positive charge following the ignition switch; 5-reservoir; 6- positive backlight charge; 7-constant positive charge; 8-constant positive charge.
Table 1. Replacing the ignition switch of a VAZ 2110 with your own hands: we study the structure and purpose of the main components in order to identify defects
| Item No. | Explanation (what it is used for, what it is responsible for) |
| 1, 5 | Used for anti-theft device. |
| 1-6 | Responsible for illuminating the lock. |
| INT | Light, washing device, wipers (permanent plus) |
| 50 | Starting mechanism (starter) |
| 30/1 | Permanent positive charge. |
| 15 | The positive charge created when the system starts up. |
Now take a close look at the photo below:
What do we observe on it and what are the elements designated by numbers responsible for?
1. Energy goes through this element, going to the electric switch of the key inserted sensor (+12 V);
2. Incoming weight when opening the doors on the driver's side;
3. So, staying in the starter and subsequently going to the ignition switch (+12 V);
4. A charge begins to flow from this element immediately after the key hits connection 5 in the rib device responsible for control (+12V);
5. Here the ignition switch socket is illuminated, powered by the potential that passes through the device (+12V);
6. This comes with +12V power from a reusable current source, which is a battery;
And now - step-by-step instructions for identifying defects and malfunctions in the ignition switch:
- Disconnect the battery;
- Remove the screws from the steering wheel, as well as the cover;
- Remove the ignition switch connector.
Next, arm yourself with a multimeter, which is necessary to check the voltage on the contact groups.
Note! When working with the device, the key must be located in the socket and switched in different positions.
When diagnosing, pay attention to the following:
- The unchanged state should be maintained only on pins 8 and 30, but only when the key is in zero position;
- Equipment responsible for servicing (turning on headlights, heated glass, operation of turn signals, etc.) must come into operation when the key is in state 1;
- The force coming from location II (see image above) must be directed to the propulsion devices;
- In position 3, the trigger mechanism must be activated. After this, the key must be returned to its original position.
If something clearly goes wrong and problems are noted, the ignition switch should be disassembled and tried to be repaired.
Automotive experts note several types of main failures during the operation of a component that turns the ignition on or off on a VAZ 2110 car:
- Mechanics. A malfunction of this type is directly related to the breakdown of the larva, which is one of the most common problems. The fact is that the elements of the lock, like the keys, are often made of relatively soft material, so many simply break off and/or become deformed.
- Electronics. Such a malfunction consists mainly of worn contacts.
Note! Regardless of the nature of the breakdown, dismantling the lock cannot be avoided.
Additional means to lubricate the lock
The lubricants described above relate to modern developments and results of the chemical industry. However, before their appearance, drivers for decades used various improvised means to lubricate locks and door hinges. For example, kerosene, acetic acid and even iodine. Let’s present for you a couple more, so to speak, “folk” remedies that you can use to lubricate car door locks for the winter. After all, it is during the cold season that locks create additional difficulties in order to get inside or close the door. And the question of which lubricant is better to lubricate becomes more relevant.
Processing of VAZ 2108-2109 locks
Yes, the good old WD-40 lubricant can also be used to inject into the lock cylinder, but in no case on all its rubbing mechanisms. The fact is that the main component of this product is white spirit (50% of the volume), whose freezing point is -60°C. Therefore, it washes away any remaining lubricant. The liquid is sold as an aerosol in a can with a tube, with which you can easily spray the product into hard-to-reach places.
WD-40 lubricant can be used to dehydrate the surface to which it is applied, removing corrosion from it and preventing its reappearance, forming a protective film on it. In general, the product is used very widely. And not only for processing car parts, but also in everyday life.
When treating a door lock with a “wedeshka” (both automobile and household), it is advisable to apply silicone grease to the same surfaces. You can use one of the lubricants listed above, or use any other.
Lock defrosters
In this case, we are talking about special products, the packaging of which says “Lock defroster” or something similar. They usually contain oil or white spirit, less often silicone. Such products are inexpensive and work well, at least in relatively mild frosts. The disadvantage of these products is their short duration of action, since their composition is similar to WD-40.
When purchasing such lubricants, carefully read the instructions. Manufacturers often attribute truly miraculous properties to their products. However, you need to understand that if the product is inexpensive (and most often it is), then you shouldn’t expect any miracles from it. Just regularly treat the lock cylinder and mechanism with “Lock Defrosters” in the winter and you won’t have any difficulties opening it. But only in the spring, after using it, it is recommended to treat the lock mechanism with a different composition. In particular, one that could protect against corrosion and friction.
Engine oil
If for some reason you don’t have any lubricant on hand (one of the above or others), then you can use regular motor oil to lubricate the car door lock both from freezing and for stable operation. Its viscosity, brand and consistency are not important in this case (well, unless it should be frankly black with soot and debris). Using a syringe or other similar devices, you should pour a few drops of oil into the cylinder and/or treat the lock mechanism. This will create a water-repellent film on the surface of its internal parts and prevent freezing.
However, the oil has the disadvantage mentioned above - its effect is short-lived and will also attract dust. Therefore, it can only be used if you do not have more professional means at your disposal. And at the first opportunity, buy any of the lubricants listed above.
Instead of a conclusion
Finally, let us remind you that you need to treat the hinges and locks of your car doors not only in advance (before the onset of cold weather), but also regularly. This will ensure their reliable operation even in the most difficult conditions. Today, for a reasonable price, you can buy professional lock treatment products with a long shelf life. The main thing is to buy lubricants in trusted stores so as not to run into fakes.
The ignition switch in a VAZ 2110 car, like on any other, is designed to switch electrical circuits and turn on the starter. Therefore, if it fails, then you will no longer be able to start the car.
It should be noted that the ignition switch is a tool for starting / stopping the engine, it can open or close certain groups of contacts, so when the lock is broken, the engine will not be powered. So if you have problems with it, then you will definitely need an electrical circuit diagram and a wiring diagram for the lock on the VAZ 2110 in order to check and repair it.
Regulation
If necessary (the door closes poorly, the door opens), adjustment is made using the latch.
To do this, use an impact screwdriver to loosen the fastening screws and move the lock. If it closes tightly - outwards, if it is loose - inwards, if there is a lifting of the door during closing - downwards.
Remember also that in order for the lock to operate silently, it should be lubricated every two to three months.
Didn't find the information you are looking for? on our forum.
We recommend reading:
How to remove the flywheel on a VAZ 2106
Checking the ignition coil of a VAZ 2112 16 valves with a multimeter
The best brake cylinders for the VAZ 2110
VAZ 2115 pros and cons
VAZ 2110 sauo pinout
GTS VAZ 2107 repair
VAZ 2110 brake system, operating principle, possible problems and their elimination
VAZ 2109 injector, tachometer jumps, reasons
How to open a VAZ 2114
If you have a VAZ 2114, how can you open it with the help of specialists?
You can call the nearest service station and find out if they have a locksmith who knows how to open locks. The service station has all the tools that will help solve your problem. All you have to do is thank the master by paying for his services.
How to open the door of a VAZ 2114
If the door of the VAZ 2109 does not open and conventional methods do not produce results, you can resort to rough ones.
For example, you can forcefully insert a screwdriver into a keyhole and then turn the lock. Even if you cannot remove the lock, there will be no problems opening the door. Consider the fact that it is almost impossible to insert a screwdriver without a hammer.
Installation details
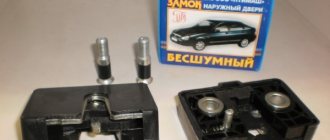
Very often, even the so-called silent locks (which are usually installed instead of old, noisy ones) are further modified.
There are several methods, but it is important to install a gasket between the body and the mechanism, since there remains a gap that affects the penetration of air, dust, and also the volume of sound.
If it suddenly turns out that after installation the door does not latch, you can solve the problem in several ways:
- Strengthening the lower springs (better suited for an old, noisy mechanism);
- Installing a cube of foam rubber in place of the bullet spring;
- By installing one large spring from below.
Checking for a spark
This method is most suitable for testing the module in “field” conditions. However, it requires having at least one new spark plug on hand in your car's inventory:
- One by one, remove the spark plug caps from the cylinder head cover, insert a new spark plug, which we ground to ground or to the body
- We rotate the starter, if there is no spark, then the problem does not lie in the spark plugs, and we should continue to study the ignition system
- Let's try to replace the armor wire on the cap on which there is a lack of spark.
- All wires are numbered on the module cover, so remove the wire from the non-working contact and put it on the working one (let's swap them)
- Thus, we will check the condition of the connecting contacts themselves and the integrity of the core
- If a spark appears after changing a non-working wire to a working one, then the problem was in the wire
- If the problem remains, it means that for the VAZ 2110, repair of the ignition module is inevitable, or replacement if repair is impossible
- If there is a complete absence of spark on all spark plugs, it means failure of the module or its high-voltage coil
- In cars with fuel injection, the electronic system that controls the ignition and fuel distribution may be damaged, signs of such a failure as if the ignition module breaks down
- To repair the module you will need a screwdriver, a soldering iron and spare parts, if you have nowhere to rush, then you can sit at home and calmly disassemble it and re-solder it, after watching a video on this issue
- It is often much faster to replace the ignition module or high-voltage armor wires with similar ones purchased or temporarily removed from a car of the same brand
- Replacement does not take long, the module can be removed easier than a distributor, the cylinder numbers are always marked on it
- This operation allows you to determine general faults of the entire system without unnecessary effort in some cases
That's all, we wish you success in self-repair and troubleshooting.
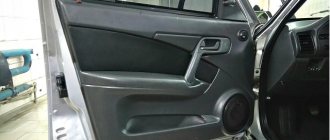
Door lock repair
In mechanical structures, repairs come down to replacing or restoring a faulty cylinder, cleaning and lubricating the internal lock mechanism, adjusting or replacing rods. It is not recommended to repair the internal locking mechanism itself, since it is assembled with rivets.
If the door lock does not work correctly, when the key does not turn or the door does not close, you need to do the following:
- Remove the car door trim.
- Remove the door lock cylinder.
- Carefully disassemble the cylinder, thoroughly clean, rinse, lubricate, carefully reassemble in the reverse order and install in its place.
- Remove the internal locking element. Rinse and lubricate. If there is a malfunction, replace it with a new one.
- Check the serviceability of the closing handle mechanism, the door button, all parts are connected to the internal locking mechanism.
- Adjust the locking latch.
If an electronic central unit is installed on a VAZ 2110, then the part is repaired at a service station. Almost none of the car owners have the necessary tools and equipment to check the signal quality and repair the ECU.
Principle of operation
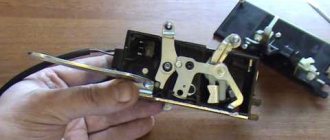
The door lock of the VAZ 2110 car consists of two parts - mechanical and electronic (not in all trim levels). The mechanical part includes three types of working schemes:
- constipation;
- lever;
- blocking.
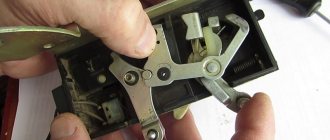
The main task of the locking mechanism circuit is to secure the door. The design uses a locking pawl and a turning latch. When the driver's door is closed, the turn signal latch moves behind the lock holder bracket. The pawl has two recesses - the main one and the additional one. With their help, the locking pawl holds the position of the rotary latch. When the door is completely closed, the pawl lever falls into the main recess. If the door is not closed completely, when the door is slammed, the rotary pawl falls into an additional recess and the door still remains closed, but a larger opening is visually visible. An additional recess is made for the safety of the driver and passengers.
The lever mechanism ensures the door opens. The force from the door handles is transmitted through the corresponding rods to the lever mechanism. It acts on the locking pawl. The rotary latch is released, rotated, and the mechanism opens. After the door is opened, the locking mechanism returns to its original position due to the action of the return spring of the lever mechanism.
The locking mechanism is designed to stop the opening mechanism. The cylinder is connected to the locking mechanism with a special rod and, using the ignition key, it locks the door.
Step-by-step instructions for changing the ignition switch
Before you start changing the ignition switch in a VAZ 2110 car, you need to fulfill the main condition, namely, turn off the power to the vehicle. It is necessary to disconnect the “-” terminal on the battery; only after such actions can you begin to remove the cover on the steering column. To facilitate the process of replacing the cylinder, it is recommended to dismantle the entire ignition switch. After replacing the element, the working lock is installed in its place. If we consider the financial side of the issue, it can be noted that changing the contact group will be much more profitable. As in the previous case, you cannot do without removing the casing and the lock itself. To avoid unpleasant moments, when disconnecting the contact group, it is advisable to mark all the dismantled wires. Such measures will prevent tangling and save valuable time.
Note! In rare cases, there may be a retaining ring in the contact group that can be removed with an awl. Upon completion of changing the contact group, you need to put the retaining ring in its original position.
Changing the ignition switch for a VAZ 2110
To change the ignition switch of the "tens" it is not necessary to have any superpowers. At the same time, ignorance of some of the nuances will make you suffer a little and tinker.
Like other repair work, it is recommended to change the ignition switch by following the instructions provided:
When replacing a part, you need to use special bolts with break-away heads. Most craftsmen advise replacing them with 20 mm M6 bolts. This can be explained by the fact that they are easier to remove when the next lock repair is necessary.
Note! Despite such advantages, there is a downside, namely a decrease in the safe level and anti-theft protection of the vehicle.
You will need a chisel to loosen the bolts.
They must be used with extreme caution. In the worst case, you can cut off the head of this bolt. Before changing the ignition switch in a VAZ 2110 car, you need to insert the key into it, turning it to the first position
These measures must be taken to enter the lock body of the latch-lock, which blocks the steering shaft mechanism.
- After these steps, switch
can be placed on the steering column, but it must be secured with a bracket and tightened with new bolts for fastening. - After removing the key from the lock hole, it is necessary to verify the functionality of the steering shaft locking mechanism. If for some reason the shaft lock does not work after turning the steering wheel, you need to adjust the location of the ignition switch on the steering column.
READ How to change brake discs on a VAZ 2110
Note! The actions continue until the latch falls into the corresponding groove.
If, after adjustment, the locking mechanism still does not work, you need to use a size 10 spanner to tighten the bolts. The bolts are carefully tightened until their heads come off.
Of course, you can repair your car at a car service center, but if it comes to minor repairs, for example, changing the ignition switch in a VAZ 2110, you can do it yourself using videos and photos. This is a simple procedure that requires a minimum of knowledge, skills and time. If you replace the part repeatedly, the instructions will no longer be needed. Since the cost of repairs at a service station is considerable, independent actions make it possible to save significantly, the main thing is to purchase high-quality spare components.
Download PDF
Such work as replacing the ignition switch on a VAZ 2110 and 2112 is not uncommon. The reason for frequent malfunctions is the constant operation of this structural element. Low quality parts also have a negative impact. Before replacing, make sure that the problem is in the lock. Sometimes, similar symptoms can occur with other breakdowns. To work, you will need a minimum of tools, but in some cases, it may be difficult to remove the spare part from the car. Do everything carefully and carefully. Then you won't have any problems with this. Please note that the ignition switch has a mechanical anti-theft device.
Dismantling
If previous activities have shown that intervention in the design of the ignition switch is required, work in any case will begin with dismantling the device.
We have special step-by-step instructions for this.
- To begin, disconnect the negative terminal from the battery of your VAZ 2110. This way you will ensure your safety and the safety of all wiring. You know what the consequences of a short circuit are.
- Next, remove the casing on the steering column. This is how you gain access to the castle.
- If you feel that the rotary switches will interfere with your work, it is better to remove them immediately. The work does not last for a couple of minutes, so all irritants should be put aside.
- Armed with a chisel and hammer, unscrew the mounting bolts with round heads. Don't get confused, they are the only ones there. Try to perform this operation as carefully as possible so as not to knock off the bolt head.
- Now take the pliers and remove the bolts.
- Insert the key into the ignition and turn it to position zero. This will disable the anti-theft system.
- Next in line is the bracket that held the previously removed bolts and the ignition switch itself.
- Mark the contact wires using different colored markers. Otherwise, you can easily mix them up during reassembly.
- Often it is not necessary to completely replace the lock, but only partial repairs. For example, change the backlight bulb, or fix a microswitch problem.
- Disconnect the connectors that used to operate the ignition switch.
- To replace the backlight bulb, disconnect the corresponding connectors, and then use pliers to remove the bulb.
- To replace the contacts, use a screwdriver to press out the special latches.
- Using a shaped screwdriver, unscrew three screws, after which you can remove the rod.
- Use a regular flathead screwdriver to pry out the clips and remove the microswitch.
- Next, new ones are inserted in place of the dismantled elements.
Checking status
Installation
Now that all preliminary repair work has been carried out, there are two options:
- Install a completely new ignition switch with wires and contacts, since the old one is unsuitable for further use;
- Return the old lock to its place, since the repairs have borne fruit.
Before installation, be sure to purchase special bolts equipped with break-away heads. They are designed to prevent your vehicle from being stolen.
Regardless of the option, the lock installation sequence is identical.
- Insert the key into the ignition, then turn it to position one.
- Secure the bracket to the steering column, and then replace the mounting bolts.
- Remove the key from the lock and check that the shaft lock works properly. If it's a new lock, there shouldn't be any problems. If we are talking about a refurbished old one, troubles may arise, since in reality it is better not to skimp and immediately replace the spare parts with a device of good quality.
- If everything works as it should, then you can complete the installation of the lock by tightening special bolts that are equipped with tear-off heads.
Buy only high-quality locks from trusted suppliers. Today there is an impressive number of fakes on the market, which use materials and components of dubious quality. Because of them, you can be seriously injured and even lose your car.
At the moment, the cost of a new ignition switch is about 20-25 dollars. These are small expenses, but sometimes simply necessary. Whether to do the repairs yourself or trust the car to a service station is a personal choice for everyone.
Loading …
Lada 2112 Emerald › Logbook › Trunk lock cylinder.
When I installed the Chinese central locking unit, I removed the lock cylinders on the front doors and installed plugs instead. A backup option for opening the car is a must. The battery can fail at any time. I decided that I would do it through the trunk. But the larva is so sour there that even the key cannot be inserted. I removed it from the cover; to do this, you need to dismantle the lining between the feet and the inner lining. And I started to soak it, I probably did this for a week, nothing helped. And yet I decided to take it apart. This is easy to do. It is necessary to sharpen with a file the riveted rod on which the lever and washer are placed.
We remove them, remove the spring and the larva should come out of the case without any problems, but not for me. I had to knock it out and this is what came out.
Full sizeThe body of the larva of VAZ 2111-2112 I started cleaning, soaking, even boiling in anti-scale. Nothing takes this crap. Then I started using the tool, and this is what ended up happening. Everything has soured tightly. Finally I realized that I was done with this lock and let’s call stores. Everywhere they sell only a set: trunk +2 doors. Price 800-900 rubles. Too expensive for such a small thing, especially since I don’t need it on the door. And in one small store the seller found a lock for a VAZ 2110 from his personal stock. I quickly drove to him and picked up the lock for 200 rubles. I will use it as a donor and make one out of two. The body of the larva is different from the ten, but the larvae themselves with pins are absolutely identical. It can also be disassembled, but you still need to drill out the metal cotter pin. The castle is not new and has also seen life. I took it apart and pulled out all the pins. I washed everything thoroughly with gasoline. I cleaned the pins with a utility knife blade. And lubricated it with transmission oil. Well, I put everything in the case from my larva. I installed it on the car. Finally, you can open the trunk with the key) Lubricate the locks, comrades, so that this does not happen. Good luck to everyone on the roads!
Basic ways to open cars without keys
Even a working mechanism can jam if the cause is weather, body deformation or human factor. To figure out how to open the door of a VAZ 2110 if you left the keys in the car, it’s worth studying the drivers’ recommendations. Options to solve the problem:
Contact the service station. Craftsmen have special devices that will open a locked door without damage. Call the special service. The workers have master keys and other tools. Break glass
To do this, it is important to wrap your hand with a thick cloth, and apply the main blow with the elbow. Drill through the lock if you have access to electricity. Unscrew the larva. Try lowering the window
Grasp the glass sheet tightly with your palms and press downwards.
Screwdriver
It is inserted into the locking mechanism and rotated with force
It is important that the tip of the tool is thin, so a Phillips screwdriver will not work. The metal forcefully penetrates inside the lock, breaks the cylinder and removes the lock.
After this, you will have to change the core of the mechanism.
Wire
If it is thin, it is folded in half and a hook is created at the end. Algorithm of actions:
- The end of the wire is pushed inside and picks up the seal framing the lock. It is necessary to be able to extend the edge of this element.
- The wire is passed between the glass and the seal, and the hook is bent.
- He suddenly pulls himself towards himself. The larva breaks and the door opens.
Warming up
Blocking of the body fragment occurs in severe frost. The lock freezes, so access to the cylinder is blocked. To open it you will need a hair dryer, a lighter or a defrosting substance. The latter is sold in any car store. If icy moisture is noticeable in the well, the steel is heated using a lighter. When the steel becomes hot, the ice will melt.
Ruler
A long iron ruler will allow you to open the vehicle and maintain the integrity of the lock. If the product is plastic or made from another fragile material, then it will not work as a master key. Instructions:
- Use your hand to lift the rubber seal on the door edge.
- The object is pushed under the glass.
- Presses on the locking mechanism.
When the window regulator device gives in and a gap appears, the ruler can be removed and further pressure is applied manually.
Rope
You can use a rope or cord to open the door, although it is more difficult. When using a cord, you need a hard tip. Instructions for use:
- A loop is tied on the cord.
- The rope stretches along the edge of the glass element.
- The edge of the lace is wound under the rubber border of the glass through the end of the door into the car interior.
- The loop is put on the lock button, tightened and pulled up.
The procedure for replacing and attaching wings on a VAZ 2110
There is always a risk that the lock will work, so it is better not to leave the keys there. To avoid this, craftsmen advise purchasing a special cord on which keys are hung. It is worn on the neck or wrist. Forgetful drivers have a spare set of keys.
What will be needed for repairs
If the outside lock stops opening, go straight to the store. You will need to purchase:
- several new plastic tips suitable for VAZ;
- set of screwdrivers - one flat, Phillips;
- a set of plastic rivets that secure the casing.
All parts are sold at an automotive supply store. It is better to buy spare parts with a reserve, several sets. The parts are inexpensive. They can also come in handy if the door stops opening not only from the inside, but also from the outside. Take the sheathing fasteners just in case, since the sheet may have to be removed.
Reasons for replacing the lock cylinder
Blocking of the internal or external mechanism occurs due to improper operation, burglary or severe frost. Prerequisites for the device to break soon: creaking, difficulty turning the key, the rod has difficulty entering/exiting the core. At such moments, the larva can be saved if you go through it: apply lubricant to individual elements and remove contaminants.
For VAZ 2110, replacing the driver's door lock cylinder will be required when:
- climatic changes;
- failure of the locking ring;
- pin falling out;
- violation of the integrity of the thrust cap;
- wear of columns or teeth.
If individual fragments malfunction, they begin to cling to each other, blocking the rotation function. In winter, moisture often gets into the core and freezes. Because of this, the key turns with difficulty, jams the unlocking mechanism, or becomes blocked. Repairs have to be carried out from the passenger compartment and entered into the car through the back door.
Let's make the alarm system and central locking together
Removing and installing the ignition switch. replacing the ignition lock cylinder
Any modern alarm unit is equipped with two relays connected to the central locking control unit. One relay is opening, the second is locking, and the circuit in the general case looks like this:
In our case, the green and white cords coming from the signaling unit will be required, as indicated in the diagram. However, they will not be the only ones needed. We will connect the relay contacts to breaks in the standard wiring. This means there will be not 2, but 4 cords.
Connection diagram for VAZ central locker
Take another look at the diagram published in the first chapter. We will connect the relay to the gap in the white and brown wires going from the microswitch to the central lock control unit. And it is obvious that it is easier to break these wires near the 8-pin connector. The same one shown at the beginning.
To avoid any questions, we will show you what should happen as a result:
Connection diagram, central lock VAZ
The common contacts are connected to the wires coming out of the microphone. The white cord continues with the brown wire coming from the door, and so on. Normally closed contacts are also used, along with normally open ones. These are the features of connecting to the VAZ central locking system.
An approximate sequence of actions performed by the installer:
- Make and lay a 4-core cable running from the signaling unit to the 8-pin connector;
- Connect the cable on the side of the alarm unit (see the last diagram);
- Near the 8-pin connector, disconnect the white and brown wires coming from the microswitch (pins 5 and 7). The main thing is not to confuse them with the wires going to the triangular connector “C”;
- Make connections to the broken wires, white and brown. That's all.
We have given this sequence to emphasize once again that the relays are switched on between the microphone and the central lock control unit. There is no need to connect any additional devices. As a result, the alarm system will be able to control the state of the locks.
All wires added to the car structure must be protected (use heat-resistant tubes or electrical tape). Twisting is not the worst method to connect two wires. But it's even better to use soldering.
It would seem that if a person has experience working with electrical equipment, he can do everything according to the instructions given. As a result, if no mistakes are made, you may encounter an interesting phenomenon. Instead of closing, there will be a short-term locking followed by opening. And vice versa. What to do in this case?
Take a look at what exactly may be present in some of the configurations:
The driver's door may not have an actuator. And then, it is useless to connect the signaling system to the control unit. There is no actuator, which means there is no one to close or open the door and move the microphone lever. Let's say the locks are closed, and then we remove ground from the brown wire and we get the following: the white wire is on ground, unlocking occurs.
We note the following: installation can only be carried out when you are sure that there is an actuator in the driver's door.
There were configurations where only a microswitch was installed. There is no need for arrogance here - adding an actuator will be difficult, since standard wiring must go to it. As you understand, it may not be available from the factory. And it’s unclear what to do then.
There remains one unanswered question - where exactly the central locking control unit is located. In these VAZ models, if there is a central locking system, then there is also a control unit. And it is located under the torpedo cover, next to the driver, on the right:
We remove the “beard” of the torpedo and look at what is on the upper right. On the same plane with the radio connector there are two boxes attached - the one we need, as well as the immobilizer (if there is one).
We would be lying if we did not say that in reality there is another option for installing the alarm. Standardly, only two power cables go to the actuators. Having a power outlet equipped with a fuse, these cables are connected directly to the alarm relay. This option, as you might guess, is not recommended. Imagine what would happen if the alarm system broke. The central lock must remain, but in this case this will not be done. Happy connection!
How to replace the handle and lock cylinder on a VAZ 2106
The external handle for opening doors in the VAZ 2106 is a very reliable and durable design. However, car owners often manage to break it. Also, these abilities cannot be taken away from particularly emotional passengers. Replacing the VAZ 2106 door cylinders will require the following arsenal of tools: * Phillips screwdriver; * head No. 8; * extension cord; * ratchet.
Replacing the door handle
The first step is to remove the inner door trim. Using the head and extension, unscrew the door handle, starting from its left side, as shown in the figure:
In order to unscrew the second nut, you will have to strain a little, because it has a more inaccessible location. You need to unscrew the three bolts securing the door lock:
The next step is to pull the lock structure towards us so that it becomes possible to place the head on the second nut that secures the handle:
At this stage, the handle will hang from the outside, although it will remain attached to the lock latch element:
To dismantle the handle, pull it with moderate force, gradually increasing it. Pull until the latch hook is released:
Having removed the handle, we come to the question of how to change the cylinder in the VAZ 2106 lock. Reinstallation is carried out in the reverse order, and the cost of a new part in auto parts stores ranges from 170 rubles.
Replacing the lock cylinder for VAZ 2106
A very common situation is when a lock cylinder fails separately. We will need a flathead screwdriver and a needle. Instead of a needle, you can use thin wire. First of all, we remove the spring that is responsible for throwing the key inside the shutter at the moment of opening. To remove it, you can easily pry it off with a screwdriver, after remembering its location for subsequent installation:
Then, using a needle (or thin wire), we squeeze out the rod holding the larva, as shown in the figure:
After this, the upper ring is removed, and the latch is dismantled from the opposite side
Having examined in detail how to replace the lock cylinder on a VAZ 2106, it is necessary to add an important detail: it is better to replace the lock elements of all doors (as well as the trunk) at the same time, so that there is one common key for everyone. A bunch of keys that are similar to each other will cause a lot of inconvenience. Such expenses will not hit your pocket hard; everything together will cost you about 300 rubles. Reinstallation is also carried out in reverse order. The whole procedure may seem more complicated than it actually is. To make it easier, the description is accompanied by photographs. If there are any nuances left regarding replacing the door lock cylinder of a VAZ 2106, video instructions that can be easily found on the Internet will help you figure it out.
Do we replace the entire lock, or just the contact group?
The issue is purely economic in nature. It is clear that replacing the complete lock will cost three times more, so before replacing the ignition switch completely, it is worth understanding the causes of the malfunction. It is possible that it will be enough to simply replace the contact group if everything is in order with the cylinder and the mechanical part of the lock.
Appearance of the contact group
Ideally, it is better to replace oxidized, and even more so burnt, contacts, however, they can simply be cleaned with very fine sandpaper. Diagnostics of the contact group is carried out using a multimeter in ohmmeter mode. Each pair of contacts on the terminal block is checked using the probes of a multimeter - we turn the key in the ignition switch and test each pair of contacts on the terminal block for a short circuit; if the multimeter shows zero resistance, everything is in order with the contacts.
We check each pair of contacts on the terminal block
There may be problems with the mechanical part of the lock, and in this case, experts do not recommend changing the cylinder yourself - firstly, it is quite difficult to find it on sale, and secondly, replacing the cylinder may be carried out incorrectly and, as a result, the entire lock will not work incorrect. In this case, it is more rational to buy a complete lock and replace it completely. It's more reliable and safer. Good luck to everyone and good travels!
Reasons for replacing the lock cylinder
Blocking of the internal or external mechanism occurs due to improper operation, burglary or severe frost. Prerequisites for the device to break soon: creaking, difficulty turning the key, the rod has difficulty entering/exiting the core. At such moments, the larva can be saved if you go through it: apply lubricant to individual elements and remove contaminants.
For VAZ 2110, replacing the driver's door lock cylinder will be required when:
- climatic changes;
- failure of the locking ring;
- pin falling out;
- violation of the integrity of the thrust cap;
- wear of columns or teeth.
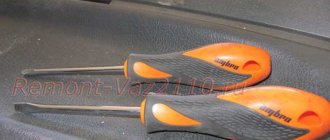
Tools
To get to the lock cylinder you will need:
- flat-head and Phillips-head screwdrivers;
- pliers or pliers;
- socket wrench for 8 and 10;
- the core of the closing device.
During repairs, it is not always necessary to change the cylinder, but you still need to lubricate the mechanical parts. Silicone grease is used for this.